Page is loading ...

1
KUZMA STOGI S 12 VTA TONEARM
Instruction manual Serial Number: …..
2013-4

2
KUZMA LTD
INSTRUCTION MANUAL FOR S 12 VTA tonearm
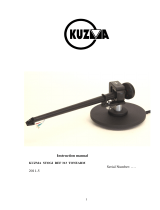
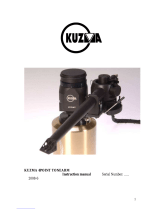
The Stogi S 12VTA tonearm is a very precisely engineered piece of equipment, however, the
construction is robust and requires minimal maintenance for optimal performance.
Fig.1
CONTENTS: Page
General description 3
Unpacking 4
Basic Setup 4-7
Adjustment of tracking force 5
Adjustment of azimuth 5
Adjustment of tangential geometry 5
Adjustment of bias 6
Adjustment of VTA 6
Adjustment of cueing device 7
Maintenance 7
Problems 7
Transport 8
VTA tower & knob
VTA lock

3
General description :
General Description: the tonearm is packed in one box with the serial number and type of
wiring marked on the outside
The tonearm is of a unipivot design with a unique, rigid headshell made from a solid
aluminium block and a base of solid brass which, together control all vibration as well as
facilitating the stability of the tonearm as a whole. All other parts are machined from
blocks of solid metal in order to provide damping and minimise resonances. The polished
pivot point is sited in a well of oil, which allows only minute friction and bearing vibration.
The height is at record level for optimum tracking, while silicone damping controls resonance
of the cartridge and arm combination and also gives stability in azimuth direction.
Three counterweights allow for easy adjustment of the tracking force and for general and
fine azimuth adjustment. Wires are in one continuous piece from the headshell to the RCA
plugs.
The whole construction is mounted on a rigid VTA tower which allows very precise VTA
adjustment while playing, without any loss of rigidity, yet with up to 0.01 mm of precision
and zero play.
Stogi S 12 VTA tonearm: Technical data :
Mass: 1530 g ( + armbase 220g)
Effective length : 304,8 mm
Mounting distance: 212 mm
Distance from centre to hor. bearing: 291 mm
Offset angle: 17,8 degrees
Effective mass: 13 g
Bearings: unipivot
VTA adjustment: yes ( scale 0.1mm)
Azimuth adjustment: yes
Bias adjustment: yes
Arm mount: Kuzma 212 mm
Optional: balanced wiring, armbase

4
1. Unpacking:
The tonearm with accessories is packed in one box. Before unpacking the individual parts of
the tonearm, make some space and check that your turntable has the right tonearm cutout.
Content:
Bearing base, tube base, headshell’s fingerlift PVC bottle with silicone oil, Allen keys: 1.5, 2,
and 3 mm, cartridge mounting hex screws M2.5 mm non magnetic, geometry protractor,
armbase, 9x hex screws )
Optional:
armbase.
Open the box carefully and remove the top covers.
For mounting on other turntables, armbase is required as optional spare part.
2. Basic set up:
For Stabi S turntables:
Tonearm pillar fits directly into brass part of a turntable.
Armbase:
Mount the armbase on the turntable. Be sure that you position the armbase so as to give
access to the Allen key for fixing arm into the armbase (towards the back of the turntable).
Also check, when mounting the arm on other turntables, that you allow enough clearance for
counterweights and correct position of the tube in relationship to the platter.
VTA arm tower:
Insert the VTA arm tower into the armbase. Ensure that the height is such, that the top of the
bearing shaft is at the same height as the record. Fix it with an Allen key. Also check that the
VTA adjustment is in the middle position, to allow fine VTA adjustment up and down 5 mm
each way.
With 1.5 mm Allen key, release the small ring which is on the fixing pillar below the VTA
arm tower. Now it will drop down and touch the armbase. Fix the ring again and release the
VTA arm tower. You now have the correct height but you can freely rotate the VTA arm
tower horizontally. Rotate it to such a position that the distance from the centre of the record
to the centre of the horizontal bearing is 291 mm. Now fix VTA arm tower.
Tube base:
Carefully lift the tube base with counterweights and cable which, (for transport only) is
fixed at the end of the tube. Position it gently onto the bearing shaft. The bearing pivot will
automatically fit into the bearing cup on top of the bearing shaft. With Allen key (1.5 mm),
release and then remove the metal holder and cable from the back of the tube and carefully
fix it on the outside of the bearing base. Rotate the cable in such a way that the wires rise

5
vertically. Then fix it with Allen key 1.5 mm. With fingers gently arrange the wires into a
loop. ( See Fig 1)
Due to the counterweight being at the end of the tonearm, the headshell end is raised. Using
the same Allen key ( 1.5 mm), release the top screws and slide both weights off.
Now you can check the position of the tube in the 'rest' position and rearrange the bearing
base if necessary. Return first the thicker and then thinner counterweight to the rod and fix
them gently so that the fixing screws are on top.
If Stogi S 12 VTA is mounted on other turntables, move the tube by hand towards the
spindle as if in an 'inner groove' position and ensure there is enough clearance for the rod
and counterweights. If not, consult your dealer.
Cartridge mounting:
Locate the hex screws for fixing the cartridge, or use screws supplied with the cartridge. Fix
the cartridge under the headshell in such a position that the tip of the diamond is at the
furthest point of the headshell.
With tweezers or other appropriate tool, (if using pliers be aware that strong force can break
the wires under the insulation material) connect pins according colours:
Red right +
Green right -
White left +
Blue left -
Tracking force:
Adjust the thicker counterweights so that the cartridge is balanced while keeping the
thinner counterweight as far away from the bearing as possible. If the cartridge is tilted
(azimuth) when viewed from the front, rotate the thicker counterweight. For some lighter
cartridges one counterweight will be adequate to obtain the correct tracking force.
To adjust tracking force use a gauge and move the counterweight closer to the bearing to
obtain the chosen force. Consult your dealer.
Cartridge set up:
Place the cartridge on the record and observe azimuth and height of the tonearm (VTA).
See appendix for cartridge, VTA and azimuth adjustment on our web site.
Azimuth:
Level the turntable horizontally. Any change will affect the azimuth. Observe the mirror
image of the cartridge on the record and adjust the tilt of the cartridge so that the mirror
image and the cartridge is vertical and straight. For this adjustment, rotate the thinner
counterweight. If you find that the tilt is excessive, then first rotate the thicker
counterweight and then make fine adjustments with the thinner counterweight. See Page 2.
Tangential geometry:
Adjust the geometry of the cartridge in the headshell so that zero point will be on the
protractor in both null points (66, 120.9 mm). Consult your dealer .
Oil for damping:
Carefully lift the tube base, bearing in mind the length of the wires and put it on top of the
platter. Cut the tip off the nozzle of the PVC bottle and squeeze to fill the reservoir

6
surrounding the bearing shaft till the fluid level reaches the groove line inside the reservoir.
In addition put 1-2 drops of fluid into the cup on top of the bearing shaft. The level of
damping is chosen to suit the best cartridges available but you should experiment, especially
with cheaper MM cartridges.
Bias adjustment:
Catch the string loop onto the hook which is at the back of the tube base. Be sure that the
string runs in the groove. Adjustments are made by moving the small counterweight after
releasing it with the Allen key (1.5mm). The maximum position is for 2.5 g tracking force
and the minimum is for 1 g. Finer adjustment should be done using a test record. Consult
your dealer.
Fine adjustments:
Re-check and readjust the tracking force, VTA and azimuth if necessary. For more precise
adjustments, play the cartridge for 5- 10 hours and then readjust. The cartridge will need
about 50 hours playing to settle down for the best sound.
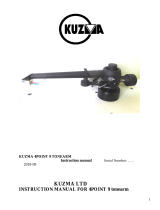
3. Adjustment of VTA:
It is extremely easy to set up VTA on this tonearm. Just unlock the lever at the back and
rotate the VTA knob. VTA knob rotation CW- VTA down (Fig.1)
VTA adjustment between any two lines is 0.1 mm (the whole rotation is then 0.8 mm) which
allows for very fine repeatable adjustment. The rigidity of the assembly is such that even in
the unlocked position you will not feel slack. Move the tonearm VTA to the desired height.
Simply lock the lever back with gentle force. Observe the 1 mm scale at the left hand side of
tonearm tower (Fig.5). If you run out of range (10 mm), then you must reposition the tonearm
height in the armbase. However take into account what is the optimal VTA by listening.
Once you find out the correct VTA, rotate the outer ring of the VTA main knob and position it
into null position. This is now your starting point for very fine tuning.
Fig. 2.VTA tower side-rough scale

7
4. Cueing device adjustment:
Should you find that in the ‘up’ position the cartridge is too high or too low above the record
then the cueing device can be raised or lowered. This can be done simply by using Allen key
1.5 mm:
Insert key into screw on side of arm rest.
Release screw, raise or lower device and retighten.
Rotation of cueing device can affect the drift of cartridge while traveling vertically down.
The cueing device may lift slightly as the screw is retightened. Do not over-tighten as this
may cause the cueing device to stick in the ‘up’ position. Should this occur, slightly release
the screw.
Tube rest:
The height of the tube rest can be adjusted with Allen key (1.5 mm).
5. Maintenance:
Bearing:
The bearing does not require any maintenance.
Cueing device:
Occasionally clean the black foam tube support to increase grip, using soft cloth soaked in
alcohol.
6. Problems:
Silicone oil spill:
If oil is spilled, firmly wipe with cloth or paper towel. Afterwards clean with a soft cloth
soaked in alcohol.
Tube running outwards:
Due to the silicone damping and descent rate of the tonearm, lower friction on the cueing
device in the 'play' position may cause the tube to travel towards the outer edge of the record.
Check that surfaces on the cueing device are clean and, with fingers, bend down the part of
the cueing device which lifts the tube at the inner groove. Check that bias is not too strong.
Also check that the wire loop is in a normal arc .
Mistracking:
Inadequate tracking force.
The cartridge may be too light. If so check the choice of counterweight and use only one
instead of two, or consult your dealer.
Cueing device too high in 'play' position and is touching the tube. See the air gap and lower
the cueing device.

8
7. Transport:
When moved, be sure to secure the tube against the armrest and be sure that you do not tilt
the turntable for more than 15 degrees, as this could cause a leakage of silicone oil.
If moving longer distances, re fix the cable to the back of the tube, lift up the tube base and
keep it above the bearing base for a short period of time until the silicone oil has dropped
back into the reservoir. Clean the brass damping base with a paper towel. If you cannot be
sure that the bearing base will be horizontal during shipment, remove silicone oil by pouring
it away and wipe surfaces with a paper tower. If necessary obtain a new bottle of silicone oil
from your dealer.
Kuzma Ltd
Hotemaze 17A
SI-4205 PREDDVOR
SLOVENIJA
P: +386 4 25 35 450
F: +386 4 25 35 454
E mail:kuzm[email protected]
www.kuzma.si
/