Page is loading ...

INSTALLATION GUIDE
Swash IS707 Advanced Bidet Toilet Seats
IS707-EW
IS707-RW

2
INSTALLATION PARTS
1. Mounting Bolt (2)
2. Rubber Cone Washer (2)
3. Flat Washer (2)
4. Nuts (2)
5. Mounting Plate
1
5
2
3
6
4
6. Top-Mount Brackets (2)
7. T-Valve Connector with
Rubber Washer
8. Bidet Hose
8
7
PRODUCT INSTALLATION

3
DO NOT PLUG THE PRODUCT IN WHILE THE UNIT IS UPSIDE DOWN
This may cause damage to the internal components.
WATCH OUR INSTALLATION VIDEO
Installation for all Swash products can be found online at brondell.com
CHECK BOLT SPREAD
This bidet can only be installed on toilets with a bolt hole spread of 5.5 inches (see Product
Dimensions on Page 7 for more information).
CHECK FOR TOP MOUNT INSTALLATION
If your fixture only has top-side access to the mounting bolts that hold the seat to the toilet,
include the Top-Mount Brackets included in the hardware pack (see Page 12).
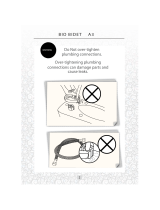
CHECK FOR A CONCEALED TOILET FILL VALVE
Many modern toilets have sleek designs intended to cover and camouflage plumbing
connections, which makes a standard Swash installation dicult or impossible. For this, we
recommend using our Alternate Swash Bidet Seat T-Valve, found on brondell.com.
CHECK WATER SUPPLY LINE
Check the line that connects the toilet tank to the water shut o valve. If it is a rigid pipe, you may
need to purchase a flexible hose to replace it before installing the Swash. The length of the hose
and the size of the connectors will vary.
RESIDUAL MOISTURE IS NORMAL
Every product is tested with pure water during production to ensure the highest quality and
performance. It is normal to find a small amount of residual moisture on the product and in the
reservoir and filter.
TOOLS
A Phillips head or standard screwdriver may be needed to remove the existing toilet seat and a
standard wrench may be needed for tight water supply connections. Teflon tape can be helpful in
creating a water-tight seat between plumbing connections.
BEFORE INSTALLATION
SWASH INSTALLATION
1. Existing Toilet Seat Removal
a. Lift hinge covers and use a screwdriver to remove the mounting bolts.
b. Remove the toilet seat. Keep for future use.
Please read these instructions carefully before installing the Swash. Failure to do so could result
in flooding, leaking or damage to the product.

4
NOTE: Steps may vary by type of seat and toilet
SWASH INSTALLATION (cont.)
3. Connect the top of the T-Valve to the incoming water
connection on the bottom of your toilet tank.
4. Connect the water supply line coming from the wall to the
bottom of the T-Valve
5. Install Mounting Plate for Standard Installation (see
Page 12, Step 6 for instructions on using the Top-Mount
Brackets)
a. Place adjustable mounting plate over mounting holes
on toilet, rubber side facing down, arrow pointing to the
toilet bowl.
b. Insert the mounting bolts through the mounting plate
and mounting holes of the toilet. Be sure that the
square mounting bolt head is even with the sides of the
mounting plate.
c. Slide rubber cone washer, flat washer, and then nut
onto mounting bolts under the toilet bowl and tighten to
keep mounting plate in place.
NOTES:
• The T-Valve connects to the fill valve directly under
your toilet tank - it does not connect at the wall.
• Only connect to the cold toilet water supply line.
• If your water supply line is rigid you may need to
replace it before continuing.
Steps 5b & 5c
Steps 3-4
toilet tank
t-valve
cold water
supply line
NOTES:
• You may wish to place a container under the tank to
catch any excess water.
• Do not continue without completing the above steps
• Failure to do so could result in flooding, leaking or
damage to the Swash.
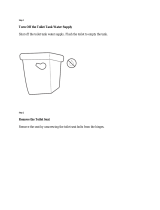
2. Turn O Water Supply Valve and Flush Toilet
a. Turn water valve o to stop the flow of water.
b. Flush toilet and hold down handle to completely
empty tank.
c. Disconnect water supply hose from toilet tank. Do not
disconnect from the water supply valve.
Step 2c
PRODUCT INSTALLATION (cont.)

5
SWASH INSTALLATION (cont.)
9. Connect the open end of the Bidet Hose to the T-Valve.
8. Attach the Swash to the Mounting Plate
a. Set the Swash flat on the toilet bowl in front of the
mounting plate, and slide seat onto plate until it is
secure.
b. If the seat appears too short or too long for the toilet,
adjust the mounting plate accordingly. To adjust the
mounting plate, loosen the nuts underneath the toilet
and slide seat forward or backwards as needed. Once
the seat is lined up properly, tighten the nuts to hold in
place.
7. Connect the Bidet Hose to the Seat
a. Connect the elbow side of the bidet hose to the water
inlet. Hand-tighten to secure. Take care not to twist the
bidet hose, excessively bend it, or strip the plastic screw
threads when screwing the hose onto the bidet seat.
11. Plug the Power Cord into an Electrical Outlet
a. If the Power Indicator is not illuminated press any
button on the control panel.
10. Turn On Water Supply
a. Open the main water supply valve slowly and check
for leaks.
b. Wait 5 minutes, check again and if there are no leaks
continue.
Step 8b
Step 7a
Step 9
6. Install Mounting Plate for top-mounted toilet seats (see
Page 11, Step 5 for instructions on Standard Installation).
This method will use a combination of the included Top-
Mount Brackets and the original toilet seat mounting bolts.
a. Place adjustable mounting plate over mounting holes
on toilet, rubber side facing down, arrow pointing to the
toilet bowl.
b. Place the provided Top-Mount Brackets flat side down
into the slots of the Mounting Bracket, over the bolt
holes.
c. Insert the original toilet seat mounting bolts through the
Top-Mount Brackets and into the threaded bolt holes of
the toilet, using a screwdriver to tighten.
Steps 6b & 6c

6
SWASH INSTALLATION (cont.)
NOTES:
• Make sure to only use a grounded GFCI (ground fault circuit interrupter) electrical outlet. In
the case of a short circuit, a grounded GFCI outlet may help prevent electric shock or injury.
• If it is necessary to use an extension cord, only use those rated for a minimum of 15 amps
with a three-wire extension cord with a three-blade grounding plug.
12. Press the “REAR WASH” button on the control arm to fill the water tank. The bidet will beep
continuously while it fills and then issue one long beep when the water tank is full. Wait 3-5
minutes for the water to heat, and then the Swash will be ready to use.
13. Follow instructions on Page 16 for using the Swash.
EXTERNAL BIDET FILTER INSTALLATION
1. Turn O Water Supply Valve and Flush Toilet.
a. Turn water valve o to stop the flow of water.
b. Flush toilet and hold down handle to completely empty tank.
2. Disconnect the Bidet Hose from the T-Valve
3. Connect the female end of the Swash Filter to the open T-Valve connection.
4. Connect the Bidet Hose to the male end of the Swash Filter.
5. Turn the toilet water supply valve back on.
Step 2
FLOW
Step 3
FLOW
Step 4
NOTE:
• Customers with hard water, well water, and softened water can extend the life of their bidet
seat by purchasing and installing an external inline water filter to be used with the Swash.
The bidet filter should be changed every six months, and can be purchased separately.
PRODUCT INSTALLATION (cont.)

7
Brondell products are backed by some of the most comprehensive warranties in the industry. Brondell
warrants that all products (excluding consumable items) shall be free from defects in material and
workmanship under normal use and service.
IS707 Residential One-Year Limited Warranty
• 100% Coverage of all parts and labor for the entire product (excluding consumable filters) for the first
year from original date of purchase
IS707 Commercial Warranty
Warranty period one year from original purchase date for all Brondell products. Warranties may not
apply to products that are used for heavy commercial, hospital, or other high use non-residential
applications.
Exclusions and Limitations
1. BRONDELL warrants its products to be free from manufacturing defects under normal use and service.
This warranty is extended only to the ORIGINAL PURCHASER.
2. BRONDELL’s obligations under this warranty are limited to repairs or replacement, at BRONDELL’s
option, of products or parts found to be defective, provided that such products were properly installed
and used in accordance with instructions. BRONDELL reserves the right to make such inspections as
may be necessary in order to determine the cause of the defect. BRONDELL will not charge for labor or
parts in connection with warranty repairs for the first three years from date of purchase on all products
except those that may be subject to commercial use limitations.
3. BRONDELL is not responsible for the cost of removal, return (shipping) and/or re-installation of
products. This warranty does NOT apply to:
• Damage or loss which occurs during shipment.
• Damage or loss sustained through any natural or man-made causes beyond the control of
BRONDELL, including but not limited to fire, earthquake, floods, etc.
• Damage or loss resulting from sediments or foreign matter contained in a water system.
• Damage or loss resulting from negligent or improper installation including installation of a unit in
a harsh or hazardous environment.
• Damage or loss resulting from removal, improper repair, modification of the product, or improper
maintenance including damage caused by chlorine or chlorine related products
• Damage or loss resulting from electrical surges, electrical outages, lightning strikes, or other acts
which are not the fault of Brondell or which the Product is not specified to tolerate.
4. This warranty gives you specific legal rights. You may have other rights which vary from state to state.
THIS WRITTEN WARRANTY IS THE ONLY WARRANTY MADE BY BRONDELL. REPAIR OR REPLACEMENT
AS PROVIDED UNDER THIS WARRANTY SHALL BE THE EXCLUSIVE REMEDY AVAILABLE TO THE
PURCHASER. BRONDELL SHALL NOT BE RESPONSIBLE FOR LOSS OF USE OF THE PRODUCT OR
FOR OTHER INCIDENTAL, SPECIAL, FOR CONSEQUENTIAL DAMAGES OR EXPENSES INCURRED
BY THE PURCHASER OR FOR LABOR OR OTHER COSTS DUE TO INSTALLATION OR REMOVAL OR
COSTS OF REPAIRS BY OTHERS, OR FOR ANY OTHER EXPENSE NOT SPECIFICALLY STATED ABOVE.
EXCEPT TO THE EXTENT PROHIBITED BY APPLICABLE LAW, ANY IMPLIED WARRANTIES, INCLUDING
THAT OF MERCHANTABILITY, ARE EXPRESSLY LIMITED TO THE DURATION OF THIS WARRANTY.
SOME STATES DO NOT ALLOW LIMITATIONS, SO THE ABOVE LIMITATION AND EXCLUSION MAY NOT
APPLY TO YOU.
How to Obtain Service
To obtain repair service under this warranty, you must contact an authorized BRONDELL Service Center
to obtain an RMA (Return Merchandise Authorization) number. Proof of purchase in the form of a copy
of the original receipt must accompany the returned unit for the warranty to be valid. Take or ship the
unit pre-paid to the closest Brondell authorized service center along with the RMA number and proof of
purchase.
To obtain the RMA number and locate the BRONDELL Service Center location nearest you, please call
1-888-542-3355, Mon–Fri, 9am–5pm PST.
WARRANTY

8
CONTACT:
Brondell, Inc.
PO Box 470085
San Francisco, CA 94147-0085
Phone: 1-888-542-3355
Email: [email protected]
Web: www.brondell.com
For questions, contact Brondell Customer Service:
1-888-542-3355, Monday – Friday, 9am – 5pm PST
MANUFACTURED BY:
Brondell, Inc.
PO Box 470085
San Francisco, CA 94147-0085
Please retain receipt records for any warranty claims.
Made in Korea

/