Page is loading ...

1
EN
Alarm ...................................................................... 11
View Alarm Settings ......................................... 11
Set Alarm .......................................................... 11
Activate Alarm .................................................. 11
Silence Alarm ................................................... 12
Weather Forecast .................................................. 12
Temperature .......................................................... 13
Select Temperature Unit ................................... 13
Minimum / Maximum Records .......................... 13
Moon Phase ........................................................... 13
Backlight ................................................................ 13
Reset System ........................................................ 14
Projection Unit ...................................................... 14
Safety and Care ..................................................... 14
Warnings ................................................................ 14
Troubleshooting .................................................... 15
Specifications ........................................................ 16
Main Unit Dimensions ...................................... 16
Remote Sensor Dimensions ............................. 16
Temperature ..................................................... 16
Remote Sensor (THN122N) ............................. 16
Clock / Projector ............................................... 16
Power ............................................................... 17
About Oregon Scientific ....................................... 17
FCC Statement ...................................................... 18
Declaration of Conformity ................................. 19
CONTENTS
Contents ................................................................ 1
Introduction ........................................................... 2
Product Overview ................................................. 2
Front View ......................................................... 2
Back View ......................................................... 3
LCD Display ...................................................... 4
Remote Sensor (THN122N) .............................. 5
Getting Started ...................................................... 6
Batteries ............................................................ 6
AC Adaptor ........................................................ 7
Adjust Settings .................................................. 7
Remote Sensor (THN122N) .................................. 8
Set Up Sensor ................................................... 8
Data Transmission ............................................ 9
Search for Sensor ............................................. 10
Clock ...................................................................... 10
Turn Atomic Clock Signal ON / OFF ................. 10
Set Time Zone / Clock / Calendar ..................... 11
Switch Clock Display ......................................... 11
Atomic Projection Clock with
Weather Forecast
Model: BAR623PA
USER MANUAL

2
EN
INTRODUCTION
Thank you for selecting the Oregon Scientific™ Atomic
Projection Clock with Weather Forecast (BAR623PA).
This device bundles precise time keeping with a
projection clock, weather forecast, and indoor and
outdoor temperature monitoring features into a single
tool you can use from the convenience of your home.
In this package, you will find:
• Main unit with projection clock
• Main unit 4.5V AC / DC adaptor
• Remote sensor (THN122N)
Keep this manual handy as you use your new product.
It contains practical step-by-step instructions, as well as
technical specifications and warnings you should know.
PRODUCT OVERVIEW
FRONT VIEW
1. SNOOZE / LIGHT button
2. and : Increase or decrease setting / activate or
deactivate atomic clock
3. MODE: Change display / settings
4. : View alarm status; set alarm
5. : Press to activate or deactivate alarm
6. Clock and outdoor temperature projector unit
7. LCD display
1
2
3
4
5
6
7

3
EN
BACK VIEW
1. Projector FOCUS knob
2. Projector IMAGE ROTATION knob
3. PROJECTION ON / OFF switch
4. AC / DC adaptor plug cover
5. Battery compartment (cover off)
6. SEARCH button to locate the remote sensor
7. MEM: View current, maximum, and minimum
temperature readings
8.
°C / °F switch
9. RESET hole
10. Battery compartment (cover on)
11. Fixed table stand
1
2
3
6
7
8
9
5
4
10
11

4
EN
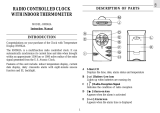
LCD DISPLAY
1. Weather display
2. Atomic clock signal icon
3. Alarm activated
4. Alarm setting
5. Time
6. Indoor temperature
7. Low battery icon for main unit
8. °C / °F (Outdoor temperature)
9. Sensor signal
10. Low battery icon for sensor
11. Outdoor temperature
12. Calendar
13. Moon Phase

5
EN
REMOTE SENSOR (THN122N)
1. Wall mount hole
2. RESET hole
3. CHANNEL number (1-3)
4. Battery compartment
(Battery compartment cover not shown)
1. LED status indicator

6
EN
UNIT
LOCATION
Main Indoor Temperature Area
Remote Outdoor Temperature Area
Installing the batteries:GETTING STARTED
BATTERIES
Main unit 3 x UM-3 (AA) 1.5V batteries
Remote unit 2 x UM-4 (AAA) 1.5V batteries
Insert batteries before first use, matching the polarity
(+ and -) as shown in the battery compartment. For best
results, install batteries in the remote sensor before the
main unit. Press RESET after each battery change.
NOTE Do not use rechargeable batteries.
shows when batteries are low.
NOTE It is recommended that you use alkaline batteries
with this product for longer performance.

7
EN
AC ADAPTOR
The main unit is supplied with a 4.5V AC / DC adaptor,
which provides continuous clock / temperature projection.
Inserting the adaptor:
ADJUST SETTINGS
To adjust the time, calendar and language settings:
1. Press and hold MODE for 2 seconds to enter setting
mode.
2. Press or to change settings. (To reach the
setting you want quickly, press and hold or .)
3. Press MODE to confirm.

8
EN
Installing the batteries:
Using the wall mount or stand:
REMOTE SENSOR (THN122N)
This product is shipped with a THN122N Thermometer
Sensor that collects Temperature data. The main unit
can be connected to only 1 remote sensor.
SET UP SENSOR
1. Open the remote sensor battery compartment with
a small Phillips screwdriver.
2. Insert the batteries, matching the polarity (+ and -)
as shown in the battery compartment.
3. Set the channel switch to any channel. The switch is
located in the battery compartment.
4. Place the sensor near the main unit. Press RESET
on the sensor. Then, press and hold SEARCH on
the main unit to initiate signal sending between the
sensor and the main unit. The reception icon on the
main unit will blink for approximately 3 minutes while
it is searching for the sensor. (Refer to the Data
Transmission section for more information.)
5. Close the remote sensor battery compartment.
6. Secure the sensor in the desired location using the
wall mount or table stand.

9
EN
For best results:
• Insert the batteries and before you mount the
sensor.
• Place the sensor out of direct sunlight and
moisture.
• Do not place the sensor more than 98 feet (30
meters) from the main (indoor) unit.
• Position the sensor so that it faces the main
(indoor) unit, minimizing obstructions such as
doors, walls, and furniture.
• Place the sensor in a location with a clear view
to the sky, away from metallic or electronic
objects.
• Position the sensor close to the main unit during
cold winter months as below-freezing
temperatures may affect battery performance and
signal transmission.
You may need to experiment with various locations to
get the best results.
Standard Alkaline batteries contain significant amounts
of water. Because of this they will freeze in low
temperatures of approximately 10°F. Disposable Lithium
batteries have a much lower threshold for temperature
with an estimated freezing range of below -40°F. The
Liquid Crystal Display in outdoor thermometers will
remain operational to -20°F with adequate power.
Wireless ranges can be impacted by a variety of factors
such as extremely cold temperatures. Extreme cold may
temporarily reduce the effective range between the
sensor and the base station. If the unit's performance
fails due to low temperature, the unit will resume proper
functioning as the temperature rises to within the normal
temperature range (i.e. no permanent damage will occur
to the unit due to low temperatures).
DATA TRANSMISSION
Data is sent from the sensor every 40 seconds. The
reception icon shown in the Temperature Area shows
the status.
ICON
The sensor cannot be
found. Search for the
sensor or check batteries
--- show in Outdoor
Temp Area
DESCRIPTION
Main unit is searching
for the sensor
A Channel has been
found

10
EN
To force a manual search for atomic clock signals, press
and hold for 2 seconds. If no signal is found, check
the batteries.
TURN ATOMIC CLOCK SIGNAL ON / OFF
Perform this step if you cannot receive atomic clock
signals. Press and hold for 2 seconds. Then, manually
set the clock following the “Set Clock” instructions.
The signal icon indicates that the clock feature is
ON. No icon means that it is OFF.
Once complete, the reception icon will stop blinking. The
icon is shown in the Clock Area.
STRONG SIGNAL WEAK SIGNAL NO SIGNAL
SEARCH FOR SENSOR
To search for the sensor, press and hold SEARCH (on
the main unit) for 2 seconds.
NOTE If the sensor is still not found, check the batteries,
obstructions, and remote unit location.
NOTE Signals from household devices such as
doorbells, electronic garage doors, and home security
systems may cause temporary reception failure. This is
normal and does not affect general product performance.
The reception will resume once the interference ends.
CLOCK
The clock automatically synchronizes the current time
and date when it is brought within range of the WWVB-
60 atomic clock signal generated from Fort Collins,
Colorado. For more information, please visit:
http://www.
boulder.nist.gov/timefreq/stations/radioclocks.htm
NOTE The signals are collected by the main unit when
it is within 932 miles (1500 km) of a signal.
Initial reception takes 2-10 minutes, and is initiated when
you first set up the unit, and whenever you press RESET.

11
EN
SET TIME ZONE / CLOCK / CALENDAR
You only need to do this if the unit is unable to
synchronize with the atomic clock broadcast, or if you
have disabled the atomic clock feature (see “Turn Atomic
Clock Signal ON / OFF” section).
To manually set the clock:
1. Press and hold MODE for 2 seconds. The Clock Area
will blink.
2. Select the US time zone, hour, minute, year, month,
day, and day-of-the-week language. Press or to
change the setting.
3. Press MODE to confirm.
NOTE The time zone options are (PA) Pacific, (CE)
Central, (MO) Mountain and (EA) Eastern.
NOTE The language options are (E) English, (F)
French, (D) German, (I) Italian, and (S) Spanish.
SWITCH CLOCK DISPLAY
Press MODE to toggle between Clock with Seconds and
Clock with Weekday display.
ALARM
This product is equipped with a 2-minute crescendo
alarm.
VIEW ALARM SETTINGS
Press . The alarm time and status will show in the
Clock Area.
SET ALARM
1. Press to switch to alarm display.
2. Press and hold again for 2 seconds. The alarm
settings will blink.
3. Select the hour and minute. Press or to change
settings. Press to confirm.
ACTIVATE ALARM
Press to activate or deactivate the alarm. shows in
the Clock / Alarm Area when the alarm is activated.

12
EN
SILENCE ALARM
When the alarm time is reached, the crescendo alarm
will sound for 2 minutes. To silence the alarm:
• Press SNOOZE to silence it for 8 minutes.
OR
• Press any key except SNOOZE to mute the alarm
and activate it again after 24 hours.
If no button is pressed, the alarm will automatically
silence after 2 minutes. It will then sound again after 8
minutes.
WEATHER FORECAST
This product forecasts the weather for the next 12 to 24
hours within a 19-31 mile (30-50 km) radius, with 70 to
75 percent accuracy. The weather forecast is displayed
as below.
SUNNY PARTLY CLOUDY RAINY
CLOUDY

13
EN
MOON PHASE
The Calendar must be set for this feature to work, see
“Set Clock” section.
• Press or to view the moon phase for the next
or previous day.
• Press and hold or to scan quickly through
the years (2001 to 2099).
TEMPERATURE
This product can display current, minimum, and
maximum temperature information collected by the
remote sensor and main (indoor) unit.
Outdoor data is collected and displayed every 40
seconds. Indoor data is collected and displayed every
10 seconds.
SELECT TEMPERATURE UNIT
Slide the
°C / °F switch into the desired location. The
switch is located in the main unit battery compartment.
The setting for the main unit overrides the remote sensor
setting.
MINIMUM / MAXIMUM RECORDS
The MEM button is located in the main unit battery
compartment. Press MEM to toggle between current,
maximum (MAX) and minimum (MIN) records. To clear
the records, press and hold MEM for 2 seconds. A beep
will sound to confirm that the memory has been cleared.
BACKLIGHT
Press SNOOZE / LIGHT to activate the backlight for 8
seconds.
New Moon
Waxing Crescent
First Quarter
Waxing Gibbous
Full Moon
Waning Gibbous
Last-quarter
Waning Crescent

14
EN
RESET SYSTEM
The RESET button is located in the main unit battery
compartment. Press RESET when you change the
batteries and whenever performance is not behaving as
expected (for example, you are unable to establish a
connection with the remote sensor or atomic clock
signal).
PROJECTION UNIT
The projection unit can display both time and outdoor
temperature. To use this feature:
• Press the SNOOZE / LIGHT button to project
the time and outdoor temperature for 8 seconds.
OR
• Slide the PROJECTION switch to ON to activate
continuous projection. However, this function will
not work unless the supplied AC / DC adaptor is
used.
You can also:
• Adjust the FOCUS knob to make the image
clearer.
• Adjust the IMAGE ROTATION knob to rotate the
image clockwise or anti-clockwise.
• Manually tilt the projection unit to position the
image vertically upwards or downwards.
SAFETY AND CARE
Clean the product with a slightly damp cloth and alcohol-
free, mild detergent. Avoid dropping the product or
placing it in a high-traffic location.
WARNINGS
This product is designed to give you years of service if
handled properly. Oregon Scientific will not be
responsible for any deviations in the usage of the device
from those specified in the user instructions or any
unapproved alterations or repairs of the product. Observe
the following guidelines:

15
EN
• Never immerse the product in water. This can
cause electrical shock and damage the product.
• Do not subject the main unit to extreme force,
shock, or fluctuations in temperature or humidity.
• Do not tamper with the internal components.
• Do not mix new and old batteries or batteries of
different types.
• Do not use rechargeable batteries with this
product.
• Remove the batteries if storing this product for a
long period of time.
• Do not scratch the LCD display.
NOTE The technical specification of this product and
contents of this user guide are subject to change without
notice. Images not drawn to scale.
TROUBLESHOOTING
REMEDY
Change
language
Disable clock
1. Adjust
batteries
2. Press RESET
3. Manually
activate clock
feature
Temperature is
out-of-range
Check batteries
Check location
Initiate a manual
sensor search
PROBLEM
Calendar
Clock
Temp
Remote sensor
SYMPTOM
Strange date /
month
Cannot adjust
clock
Cannot auto-
synchronize the
date and time
Shows “LLL” or
“HHH”
Cannot locate
remote sensor
Data does not
match main unit

16
EN
SPECIFICATIONS
MAIN UNIT DIMENSIONS
L x W x H 3.6 x 6.6 x 2.1 inches
(92 x 167 x 53 mm)
Weight 8.04 ounces (228 grams)
without battery
REMOTE SENSOR DIMENSIONS
L x W x H 3.6 x 2.4 x 0.9 inches
(92 x 60 x 23 mm)
Weight 1.6 ounces (46 grams)
without battery
TEMPERATURE
Unit °C / °F
Indoor range 23°F to 122°F
(-5°C to 50°C)
Outdoor range -22°F to 140°F
(-30°C to 60°C)
Resolution 0.2°F (0.1°C)
Display Rainy, cloudy, partly
cloudy, sunny
REMOTE SENSOR (THN122N)
RF frequency 433 MHz
Range 98 feet (30 meters)
with no obstructions
Transmission Every 40 seconds
Channel No. 1
CLOCK / PROJECTOR
Atomic Clock Auto or manual (disabled)
Clock display HH:MM:SS
Hour format 12hr AM / PM
(Model BAR623PA)

17
EN
Calendar MM / DD; weekday in
5 languages (E, D, F, I, S)
Alarm Single alarm with
2-minute crescendo and
8-minute Snooze
Projector Outdoor temperature
and time
POWER
Main unit batteries 3 x UM-3 (AA) 1.5V
Sensor batteries 2 x UM-4 (AAA) 1.5V
AC / DC adaptor 4.5V with jack
NOTE It is recommended that you use alkaline batteries
with this product for longer performance.
ABOUT OREGON SCIENTIFIC
Visit our website (www.oregonscientific.com) to learn
more about Oregon Scientific products such as digital
cameras; MP3 players; children's electronic learning
products and games; projection clocks; health and fitness
gear; weather stations; and digital and conference
phones. The website also includes contact information
for our customer care department in case you need to
reach us, as well as frequently asked questions and
customer downloads.
We hope you will find all the information you need on
our website, however if you're in the US and would like
to contact the Oregon Scientific Customer Care
department directly, please visit:
www2.oregonscientific.com/service/support
OR
Call 949-608-2848.
For international enquiries, please visit:
www2.oregonscientific.com/about/international/default.asp

18
EN
and on, the user is encouraged to try to correct the
interference by one or more of the following measures:
• Reorient or relocate the receiving antenna.
• Increase the separation between the equipment and
receiver.
• Connect the equipment into an outlet on a circuit
different from that to which the receiver is connected.
• Consult the dealer or an experienced radio / TV
technician for help.
FCC STATEMENT
This device complies with Part 15 of the FCC Rules.
Operation is subject to the following two conditions: (1)
This device may not cause harmful interference, and (2)
This device must accept any interference received,
including interference that may cause undesired
operation.
WARNING Changes or modifications to this unit not
expressly approved by the party responsible for
compliance could void the user's authority to operate
the equipment.
NOTE This equipment has been tested and found to
comply with the limits for a Class B digital device,
pursuant to Part 15 of the FCC Rules. These limits are
designed to provide reasonable protection against
harmful interference in a residential installation.
This equipment generates, uses and can radiate radio
frequency energy and, if not installed and used in
accordance with the instructions, may cause harmful
interference to radio communications. However, there
is no guarantee that interference will not occur in a
particular installation. If this equipment does cause
harmful interference to radio or television reception,
which can be determined by turning the equipment off

19
EN
DECLARATION OF CONFORMITY
The following information is not to be used as contact
for support or sales. Please call our customer service
number (listed on our website at
www.oregonscientific.
com, or on the warranty card for this product) for all
inquiries instead.
We
Name: Oregon Scientific, Inc.
Address: 19861 SW 95th Place,
Tualatin, Oregon 97062 USA
Telephone No.: 1-800-853-8883
Fax No.: 1-503-684-8883
declare that the product
Product No.: BAR623PA
Product Name: Weather Projection Clock
Manufacturer: IDT Technology Limited
Address: Block C, 9/F, Kaiser Estate,
Phase 1, 41 Man Yue St.,
Hung Hom, Kowloon,
Hong Kong
is in conformity with Part 15 of the FCC Rules. Operation
is subject to the following two conditions: 1) This device
may not cause harmful interference. 2) This device must
accept any interference received, including interference
that may cause undesired operation.

Atomic Projection Clock with
Weather Forecast
Model: BAR623PA
USER MANUAL
/