JBL ON TIME 200ID Owner's manual
- Category
- Loudspeakers
- Type
- Owner's manual
This manual is also suitable for

English............................... 2
Français .......................... 16
Deutsch........................... 30
Italiano ............................ 44
Español ........................... 58
Nederlands..................... 72
㘆#ສ
............................... 86
Dansk ............................ 100
Japanese ...................... 114
Ё᭛............................... 128
Русский
......................... 142
Svenska ........................ 156
Suomi ............................ 170
Norsk ............................. 184
JBL ON TIME
™
200ID
AM/FM RADIO AND SPEAKER DOCK FOR iPod
USER GUIDE
iPod not included/iPod non inclus
0024CSK - JBLOnTime200iD v13.indd 10024CSK - JBLOnTime200iD v13.indd 1 29/09/08 10:24:3629/09/08 10:24:36

22
JBL ON TIME 200ID USER GUIDE
Read these instructions, heed all warnings and keep for future reference.
•
Do not use this apparatus near water.
•
Clean only with a dry cloth.
•
Do not block any ventilation openings; a minimum distance of 10mm around the entire apparatus is required for suffi cient ventilation.
•
No naked fl ame sources, such as lighted candles, should be placed on or near the apparatus.
•
Attention should be drawn to the environmental aspects of battery disposal.
•
The apparatus is to be used in moderate climates only.
•
Do not install near any heat sources such as radiators, heat registers, stoves or other apparatuses (including amplifi ers) that produce heat.
•
Protect the power cord from being walked on or pinched, particularly at the plugs and convenience receptacles, and at the point where they exit from the
•
apparatus.
Only use attachments/accessories specifi ed by the manufacturer.
•
Unplug this apparatus during lightning storms or when unused for long periods of time.
•
Refer all servicing to qualifi ed service personnel. Servicing is required when the apparatus has been damaged in any way, such as the power supply
•
cord or plug is
damaged, liquid has been spilled or objects have fallen into the apparatus, or the apparatus has been exposed to rain or moisture, does not operate normally, or has
been dropped.
To be completely disconnected from the power input, the main plug of the AC/DC adapter shall be disconnected from the main.
•
The main plug of the AC/DC adapter should not be obstructed OR should be easily accessed during intended use.
•
The marking information is located at the bottom of the apparatus.
•
The battery shall not be exposed to excessive heat such as sunshine, fi re or the like.
•
The apparatus and AC/DC adapter shall not be exposed to dripping or splashing, and no objects fi lled with liquids, such as vases, shall be placed on the apparatus
•
and AC/DC adapter.
TO PREVENT THE RISK OF ELECTRIC SHOCK, DO NOT REMOVE THE COVER (OR BACK). THERE ARE NO USER-SERVICEABLE PARTS INSIDE THIS UNIT. PLEASE
•
REFER SERVICING TO QUALIFIED HARMAN CONSUMER GROUP, INC., SERVICE PERSONNEL.
Never remove grille covers in order to service the speaker system. The speaker system does not contain any user-serviceable parts.
•
IMPORTANT NOTE FOR ALL ELECTRONIC PRODUCTS:
Before inserting or unplugging audio cables from the source device’s headphones or line-level output jacks, it is good practice to turn off the device
fi rst. This will prolong the life of your unit, help protect your device from static electricity and prevent potential damage.
IMPORTANT SAFETY INSTRUCTIONS
PLEASE READ THE FOLLOWING PRECAUTIONS BEFORE USE:
0024CSK - JBLOnTime200iD v13.indd 20024CSK - JBLOnTime200iD v13.indd 2 29/09/08 10:24:3729/09/08 10:24:37

33
FCC STATEMENT AND WARNINGFCC STATEMENT AND WARNING
This device complies with Part 15 of the FCC Rules. Operation is subject to the following two conditions: 1) this device may not cause harmful interference, and This device complies with Part 15 of the FCC Rules. Operation is subject to the following two conditions: 1) this device may not cause harmful interference, and
2) this device must accept any interference received, including interference that may cause undesired operation.2) this device must accept any interference received, including interference that may cause undesired operation.
This equipment has been tested and found to comply with the limits for a Class B digital device, pursuant to Part 15 of the FCC Rules. These limits are designed to This equipment has been tested and found to comply with the limits for a Class B digital device, pursuant to Part 15 of the FCC Rules. These limits are designed to
provide reasonable protection against harmful interference in a residential installation. This equipment generates, uses and can radiate radio frequency energy provide reasonable protection against harmful interference in a residential installation. This equipment generates, uses and can radiate radio frequency energy
and, if not installed and used in accordance with the instructions, may cause harmful interference to radio communications. However, there is no and, if not installed and used in accordance with the instructions, may cause harmful interference to radio communications. However, there is no
guarantee that interference will not occur in a particular installation. If this equipment does cause harmful interference to radio or television reception, which guarantee that interference will not occur in a particular installation. If this equipment does cause harmful interference to radio or television reception, which
can be determined by turning the equipment off and on, the user is encouraged to try to correct the interference by one or more of the following measures:can be determined by turning the equipment off and on, the user is encouraged to try to correct the interference by one or more of the following measures:
Reorient the receiving antenna. Reorient the receiving antenna. • •
Increase the separation between the equipment and receiver. Increase the separation between the equipment and receiver. • •
Connect the equipment into an outlet on a circuit different from that to which the receiver is connected. Connect the equipment into an outlet on a circuit different from that to which the receiver is connected. • •
Consult the dealer or an experienced radio/TV technician for help. Consult the dealer or an experienced radio/TV technician for help. • •
Any special accessories needed for compliance must be specifi ed in the instruction manual.Any special accessories needed for compliance must be specifi ed in the instruction manual.
MODIFICATIONS NOT EXPRESSLY APPROVED BY THE MANUFACTURER COULD VOID THE USER’S AUTHORITY TO OPERATE THE EQUIPMENT UNDER FCC RULES. MODIFICATIONS NOT EXPRESSLY APPROVED BY THE MANUFACTURER COULD VOID THE USER’S AUTHORITY TO OPERATE THE EQUIPMENT UNDER FCC RULES.
The normal function of the product may be disturbed by strong electromagnetic interference. If so, simply reset the product to resume normal operation by The normal function of the product may be disturbed by strong electromagnetic interference. If so, simply reset the product to resume normal operation by
following the instruction manual. In case the function could not resume, please use the product in another location.following the instruction manual. In case the function could not resume, please use the product in another location.
WARNING: TO PREVENT FIRE OR
ELECTRICAL SHOCK HAZARD, DO NOT EXPOSE
THIS PRODUCT TO RAIN OR MOISTURE.
WARNING: THE APPARATUS SHOULD
NOT BE EXPOSED TO DRIPPING OR SPLASHING
AND NO OBJECTS FILLED WITH LIQUID, SUCH AS
VASES, SHOULD BE PLACED ON THE APPARATUS.
THE EXCLAMATION
POINT WITHIN
THE TRIANGLE IS
A WARNING SIGN
ALERTING YOU
TO IMPORTANT
INSTRUCTIONS
ACCOMPANYING
THE PRODUCT.
CAUTION: TO REDUCE
THE RISK OF SHOCK, DO
NOT REMOVE COVER. NO
USER-SERVICEABLE PARTS
INSIDE. REFER SERVICING
TO QUALIFIED SERVICE
PERSONNEL.
THE LIGHTNING
FLASH AND
ARROWHEAD
WITHIN THE
TRIANGLE IS A
WARNING SIGN
ALERTING YOU
TO DANGEROUS
VOLTAGE INSIDE
THE PRODUCT.
RISK OF ELECTRIC
SHOCK — DO NOT OPEN
IMPORTANT:
THE APPROPRIATE ADAPTER MUST BE INSTALLED BEFORE
INSERTING YOUR iPod INTO THE JBL
®
PRODUCT. MAKE SURE
THAT THE CONNECTOR FOR THE iPod IS PROPERLY ALIGNED
WITH THE JBL PRODUCT’S CONNECTOR WHEN INSTALLING
YOUR iPod. FAILURE TO DO SO MAY CAUSE PERMANENT
DAMAGE TO THE CONNECTOR FOR THE iPod, RENDERING
THE iPod INOPERABLE.
WWW.JBL.COM
CAUTION
English
0024CSK - JBLOnTime200iD v13.indd 30024CSK - JBLOnTime200iD v13.indd 3 29/09/08 10:24:3729/09/08 10:24:37

44
JBL ON TIME
™
200ID
The JBL On Time
™
200ID high-performance loudspeaker dock and clock radio for iPod will revolutionize the way you listen to your radio,
use your iPod, and wake from a good night’s sleep.
The JBL On Time 200ID system is a revolution in time travel. Imagine waking up to music on your favorite station or your iPod, with no
more buzzer or bad radio reception. The compact time machine and sound center, when connected to your iPod, MP3 player or other
music source, produces clean, powerful sound while providing time-keeping, alarm and radio features. The system is the world’s fi rst
time machine with an intuitive user interface that is easier than ever to navigate.
The JBL On Time 200ID loudspeaker dock has full ability to navigate your iPod via IR remote. Also, not only can you wake up to your
favorite radio station or song on your iPod, but with the multiple alarm setting option, you can set up to seven different alarms for “His”
and “Hers,” at whatever day or frequency needed.
ONEPOINT DESIGN
The OnePoint connectors provide the connection to your computer. Connect the standard cable for iPod to the rear of
the JBL On Time 200ID unit, and every time you dock your iPod, you’ll have a connection for synchronizing.
EVERCHARGE TOPOLOGY
The JBL On Time 200ID speaker dock charges your iPod, even when it’s not connected to the computer or the system is off. The system’s
memory is maintained by a backup battery. Even with the power out, it will provide the alarm function.
COE (COMPUTER-OPTIMIZED EQUALIZATION)
The JBL On Time 200ID system equalization is computer-optimized to provide a rich, complete soundstage.
OCT (OPTIMIZED COMPRESSION TOPOLOGY)
The JBL On Time 200ID radio and loudspeaker dock utilizes a proprietary compression technology to ensure clean, accurate sound at
high output levels.
DISPLAY
The large, backlit LCD enables easy viewing and menu navigation. Automatic dimming sets the correct brightness level in any
room environment.
JBL ON TIME 200ID USER GUIDE
0024CSK - JBLOnTime200iD v13.indd 40024CSK - JBLOnTime200iD v13.indd 4 29/09/08 10:24:3729/09/08 10:24:37

55
FM ANT
AM ANT
AUX-IN USB
DC 15V
AAA
AAA
AAA
FM ANT
AM ANT
AUX-IN USB
DC 15V
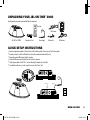
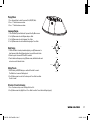
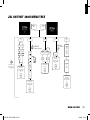
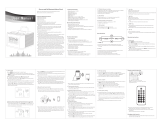
UNPACKING YOUR JBL ON TIME
™
200ID
Carefully unpack your speaker system and identify all its components:Carefully unpack your speaker system and identify all its components:
Adapters for iPod
IR remote
Audio cable
QUICK SETUP INSTRUCTIONS
•
Choose the appropriate adapter for iPod and place it into the docking station. Then place your iPod into the adapter.Choose the appropriate adapter for iPod and place it into the docking station. Then place your iPod into the adapter.
•
For backup memory, install three AAA batteries in the battery compartment underneath the unit. For backup memory, install three AAA batteries in the battery compartment underneath the unit.
•
Connect the external AM antenna for better reception. Connect the external AM antenna for better reception.
•
Unwind the FM antenna and straighten the wire for the best reception.Unwind the FM antenna and straighten the wire for the best reception.
•
Plug the power adapter into the “DC In” jack and then plug the adapter into a wall outlet. Plug the power adapter into the “DC In” jack and then plug the adapter into a wall outlet.
•
If an additional audio source is used, connect the source to the “Aux In” jack. If an additional audio source is used, connect the source to the “Aux In” jack.
JBL On Time
™
200ID Power supply AM antenna
Aux In DC In
FM antenna
WWW.JBL.COM
English
0024CSK - JBLOnTime200iD v13.indd 50024CSK - JBLOnTime200iD v13.indd 5 29/09/08 10:24:3729/09/08 10:24:37

66
Note: During clock-setting, if there is no user input for 2 seconds, display will return to the Now Playing screen. Press any one of the Enter, Up/Down arrows, or
Menu/Up Level to return to setting selection.
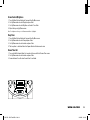
CONTROLS
Setting the ClockSetting the Clock
Press Menu/Up Level at any screen to display Top Menu (may require repeated presses, depending on which menu state the unit 1.
was previously in).
Use Up/Down arrows to highlight Clock. Press Enter to confi rm.2.
Use Up/Down arrows to highlight 12-hour or 24-hour format. Press Enter to confi rm. 3.
Use Up/Down arrows to set Hour. Press Enter to confi rm. Minute fi eld becomes highlighted. 4.
Use Up/Down arrows to set Minutes. Press Enter to confi rm. AM/PM fi eld becomes highlighted.5.
Use Up/Down arrows to set Day of Week. Press Enter to confi rm. The clock is set!6.
Base Unit Control
Power Select Up
Preset Select Down
Alarm Menu/Up LevelSource Enter
Navigation
Volume Down Volume Up
JBL ON TIME 200ID USER GUIDE
0024CSK - JBLOnTime200iD v13.indd 60024CSK - JBLOnTime200iD v13.indd 6 29/09/08 10:24:3829/09/08 10:24:38

77
Playing MusicPlaying Music
Press Source button to select the source (iPod, AM, FM, Aux).1.
Press “+” button to increase volume.2.
Press “–” button to decrease volume.3.
Radio TuningRadio Tuning
If AM or FM radio is already selected and playing, use Up/Down arrows to 1.
tune frequency; hold either button and release to scan for the next station.
Otherwise, press Source until FM or AM is selected.2.
Tune to the desired frequency using Up/Down arrows; hold either button and 3.
release to scan for the next station.
Setting PresetsSetting Presets
While listening to AM/FM radio, press and hold Preset for 2 seconds. 1.
The Radio Preset screen will be displayed.
Use Up/Down arrows to select slot to store preset. Press Enter to confi rm. 2.
Preset is stored!
To Select a Preset for Listening To Select a Preset for Listening
Press Preset once at any screen to display the Preset list. 1.
Use Up/Down arrows to highlight Preset. Press Enter to confi rm. Preset station will begin playing!2.
Power
Select Up
Preset
Select Down
Alarm
Menu/Up Level
Source
Enter
WWW.JBL.COM
English
Languages/RegionLanguages/Region
Press the Menu/Up Level button until you reach the Top Menu screen. 1.
Use Up/Down arrows to select Region and press Enter. 2.
Use Up/Down arrows to select language. Press Enter.3.
Use Up/Down arrows to select radio band region type. Press Enter. 4.
0024CSK - JBLOnTime200iD v13.indd 70024CSK - JBLOnTime200iD v13.indd 7 29/09/08 10:24:3929/09/08 10:24:39

88
Power
Select Up
Preset
Select Down
Alarm
Menu/Up Level
Source
Enter
CONTROLS (CONT.)
Alarm SettingAlarm Setting
††
Press Menu/Up Level at any screen to display Top Menu (may require repeated presses, 1.
depending on which menu state the unit was previously in).
Use Up/Down arrows to highlight Alarm. Press Enter to confi rm; or press Alarm to go directly to the Alarm menu.2.
Use Up/Down arrows to select an Alarm slot to edit. Press Enter to confi rm. Hour fi eld becomes highlighted. 3.
Use Up/Down arrows to set Hour. Press Enter to confi rm. Minute fi eld becomes highlighted. 4.
Use Up/Down arrows to set Minutes. Press Enter to confi rm. AM/PM fi eld becomes highlighted.5.
Use Up/Down arrows to set AM/PM. Press Enter to confi rm.6.
Use Up/Down arrows to set Day of Week, Weekdays, Weekends, Everyday or One-Time. Press Enter to confi rm.7.
Use Up/Down arrows to set Alarm source. Press Enter to confi rm. Alarm is set!8.
Note: During alarm-setting, if there is no user input for 2 seconds, display will return to the Now Playing screen. Press any one of the
Enter, Up/Down arrows, or Menu/Up Level to return to setting selection.
†
Use this same procedure to modify a previously set Alarm.
To Enable/Disable a Set Alarm To Enable/Disable a Set Alarm
Press Menu/Up Level at any screen to display the Top Menu (may require repeated presses, 1.
depending on which menu state the unit was previously in).
Use Up/Down arrows to highlight Alarm. Press Enter to confi rm; 2.
or press Alarm to go directly to the Alarm menu.
Use Up/Down arrows to highlight Alarm. Press Alarm to enable/disable the alarm. 3.
An icon will be displayed on the left when the alarm is enabled, and the alarm will sound at the set time.
Waking to the iPodWaking to the iPod
Use the steps under Alarm Setting and choose “iPod” as the source.1.
On your iPod, choose the song you would like to awaken to and press Play.2.
Set the volume level on the JBL On Time3.
™
200ID unit.
Put your iPod to sleep by holding down the Play/Pause button (older iPod models may vary).4.
The JBL On Time 200ID system can be put to sleep by pressing the Power button.5.
Note: If you choose the last song on your iPod, please place the iPod in repeat mode, which will ensure that the iPod will continue playing past the last song.
JBL ON TIME 200ID USER GUIDE
0024CSK - JBLOnTime200iD v13.indd 80024CSK - JBLOnTime200iD v13.indd 8 29/09/08 10:24:3929/09/08 10:24:39

99
Screen Contrast/BrightnessScreen Contrast/Brightness
Press the Menu/Up Level button until you reach the Top Menu screen.1.
Use Up/Down arrows to select Display and press Enter. 2.
Use Up/Down arrows to select Brightness or Contrast. Press Enter. 3.
Adjust settings using Up/Down arrows. 4.
Sleep TimerSleep Timer
Press the Menu/Up Level button until you reach the Top Menu screen. 1.
Use Up/Down arrows to select Sleep and press Enter.2.
Use Up/Down arrows to select minutes and press Enter. 3.
The sleep timer is started and the unit will power off when the timer reaches zero. 4.
Snooze Timer SetSnooze Timer Set
Press and hold the Snooze button for 3 seconds until you reach the Set Snooze Timer screen. 1.
Use Up/Down arrows to select minutes and press Enter. 2.
Snooze feature will use this value the next time it is activated.3.
Note: To set brightness to Auto, press the Down arrow until Auto is highlighted.
WWW.JBL.COM
English
0024CSK - JBLOnTime200iD v13.indd 90024CSK - JBLOnTime200iD v13.indd 9 29/09/08 10:24:3929/09/08 10:24:39

1010
JBL ON TIME 200ID USER GUIDE
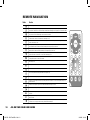
REMOTE NAVIGATION
Button Function
Turns main unit power on and off. Button is active in any menu state.
Preset the hot key. A single press brings up the preset screen from any menu. Repeated presses cycle through the preset list to the next
preset slot. Press and hold for 2 seconds when listening to the radio and the Now Playing screen is displayed, to store current radio station.
Volume Increase. Display changes to Volume screen. Increases volume level, turns Amps on if off, then increases volume. If in snooze
mode, cancels snooze mode and turns Amps on. Times out back to current menu.
Volume Decrease. If in snooze mode, no action. If not in snooze mode and Amps are on, displays changes to Volume screen and decreases
volume level. Times out back to current menu. Does not turn Amps on if off.
Enter or Selection Confi rmation button. Confi rms selection on any JBL On Time
™
200ID settings screen. If Now Playing screen is displayed,
returns to last-used menu screen.
Scroll Up/Tune Up. Moves highlighted box up on any JBL On Time 200ID menu setting screen. Increases digit value when setting Time
(hours and minutes) and Snooze Timer. In radio mode, manually increases tuning frequency; hold for Seek.
Scroll Down/Tune Down. Moves highlighted box down on any menu setting screen. Decreases digit value when setting Time (hours and
minutes) and Snooze Timer. In radio mode, manually decreases tuning frequency; hold for Seek.
Menu or Up Level button. If Now Playing screen is displayed, takes user to top-level menu screen. If in menu settings, steps up one level to
previous fi eld or menu screen. Hold for 2 seconds to return to Now Playing screen.
Alarm hot key. Takes user to Alarms settings of menu tree. Button is active in any menu state. If alarm is sounding, turns alarm off. When
viewing alarms list, enables or disables selected alarm.
Snooze button and Snooze Timer setting hot key. If alarm is sounding, enables snooze mode. Press and hold for 2 seconds to enter Snooze
Timer setting screen.
Directly switches the JBL On Time 200ID source to iPod.
Sends Scroll Down command to iPod navigation. Works in iPod navigation only.
Sends Scroll Up command to iPod navigation. Works in iPod navigation only.
Cycles to next source. AM FM iPod AUX.
A single press starts sleep time countdown, using currently set timer. Press and hold for 2 seconds to enter Sleep Timer setting screen
(similar to base unit).
Next Track in iPod navigation only. Does not affect JBL On Time 200ID menu navigation or function.
Previous Track in iPod navigation only. Does not affect JBL On Time 200ID menu navigation or function.
Enter/Select in iPod navigation only. Does not affect JBL On Time 200ID menu navigation or function. Similar function to the center button
of the iPod.
Menu/Up Level in iPod navigation only. Does not affect JBL On Time 200ID menu navigation or function. Similar function to the Menu
button of the iPod.
Play/Pause/Mute button. When iPod is the active source, a single press sends the Play/Pause command to the iPod. When AM, FM or AUX
is the active source, a single press mutes audio/amp on the JBL On Time 200ID system.
0024CSK - JBLOnTime200iD v13.indd 100024CSK - JBLOnTime200iD v13.indd 10 29/09/08 10:24:3929/09/08 10:24:39

1111
JBL ON TIME
™
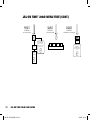
200ID MENU TREE
Clock Display Sleep
HOT KEY POINT
(on remote)
HOT KEY POINT
(on remote or base unit)
Press and hold for 2 sec at
any point in menu structure,
to return to now Playing
screen.
set sleep timer:
15-30-60
WWW.JBL.COM
English
A Selection command
displays setting
confi rmation and returns
state to Top Level Menu
screen.
A Selection command
returns state to display
menu screen.
A Selection command
displays setting
confi rmation and returns
state to Top Level Menu
screen.
A Selection command
displays setting
confi rmation and returns
state to Top Level Menu
screen.
Region
Set Language:
English
Spanish
French
German
Italian
Dutch
Set Radio Type:
U.S.
Europe
Japan
Now Playing
(ON)
Now Playing
(Off)
Alarm
AL1-AL7
Enable/
Disable
Select Alarm
Hr
Min
MO/TU/
WED/TH/FR/
SA/SU/WK/
ED/WE
AM
FM
iPod
Aux
Tone
A Selection command
displays setting
confi rmation and returns
state to Top Level Menu
screen.
set day
12H 24H
HR HR
Min Min
am/pm
Adjust Adjust
Brightness Contrast
0024CSK - JBLOnTime200iD v13.indd 110024CSK - JBLOnTime200iD v13.indd 11 29/09/08 10:24:4329/09/08 10:24:43

1212
JBL ON TIME
™
200ID MENU TREE (CONT.)
PRESET
HOT KEY POINT
(on remote or base unit)
SOURCE
HOT KEY POINT
(on remote or base unit)
SNOOZE
HOT KEY POINT
(hold button for 3 sec on base unit)
JBL ON TIME 200ID USER GUIDE
AM FM iPod Aux
Preset 1-10
Select and
begin playing
preset station
Press and hold Preset
button while listening to
radio to store current
station. Select slot 1-10 and
press enter to store.
set snooze
timer
SNOOZE
A Selection command
displays setting
confi rmation and returns
state to Top Level Menu
screen.
0024CSK - JBLOnTime200iD v13.indd 120024CSK - JBLOnTime200iD v13.indd 12 29/09/08 10:24:4429/09/08 10:24:44

1313
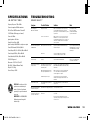
SPECIFICATIONS TROUBLESHOOTING
JBL ON TIME
™
200ID SOUND QUALITY
Symptom Possible Problem Solution Note
No sound from the
JBL On Time
™
200ID unit
No power to the unit
Make sure the wall power outlet or power strip
has power. Make sure all switches for outlet/
power strip are on and that all switches for speaker
system are on.
Is the display on? If not,
power is not getting to
your JBL On Time
200ID;
try the solutions shown.
Incorrect source selection Make sure the correct source is selected; choose
FM radio as a source. Turn up the volume. Check
the system with a known good source, such as your
iPod. Connect the Aux In cable to the headphone
jack on your iPod.
No sound or weak signal from
the AM/FM radio
Bad reception from current location
Interference
Reposition your JBL On Time 200ID unit until you
fi nd better reception.
Check surrounding area for any possible
interference; wrap up any excess cables.
If you are still getting a weak signal
from AM broadcasts, connect the
external AM antenna to the AM
antenna jack.
Sound comes from one
side/channel only
iPod or audio cable is not seated
properly
Make sure the iPod or Aux In cable is seated all the
way into the JBL On Time 200ID unit.
If you want to use a longer cable,
make sure it’s a 3.5mm mini-jack
stereo male-to-male cable.
Distortion (static, crackling or
hissing sounds)
Noise may be caused by interference
from a monitor, cell phone or other
transmitting device
JBL On Time 200ID unit is being over-
driven by an amplifi ed audio source
Volume level may be too high
Turn monitor off to see whether noise is eliminated.
Move JBL On Time 200ID unit’s cables farther away
from monitor.
Make sure the unit is connected to an appropriate
source device. Make sure all signal cables are
inserted snugly into receptacles.
Check volume of source device; some devices
will distort the output signal if the volume is set to
maximum.
Too much bass or treble Check the EQ setting on your iPod or
source device
We recommend that the source device EQ be set
to Flat or Off.
JBL On Time 200ID unit emits a
loud hum or buzzing noise
Input cables are not plugged in properly Check input cable connection.
Speaker system experiences
radio frequency interference
or picks up a radio station
Input cable may be picking up
interference
Wrap up excess input cable to make it as short
as possible.
Purchase a ferrite clamp and attach it over the
input cable; a clamp can be purchased at your local
electronics store.
Frequency Response: 70Hz – 20kHz
Power Consumption: 30 Watts maximum
JBL On Time
™
200ID Transducer: Phoenix SE
1-3/4" (45mm) x 2 (full range per channel)
Power:
2 x 6 Watts
Input Impedance: >5k Ohms
Signal-to-Noise Ratio: >80dB
Input Sensitivity: 350mV RMS for rated power output
Power (USA/Canada): 120 Volts, 60Hz AC
Power (Europe/UK): 220 – 230 Volts, 50Hz or 60Hz AC
Power (Japan): 100 Volts, 50Hz or 60Hz AC
Power (Australia): 240 Volts, 50Hz or 60Hz AC
UL/CUL/CE-Approved
Dimensions: 11-3/16
" x 5-3/4" x 2-3/4"
(W x D x H) (284mm x 146mm x 70mm)
Weight: 1.8 lb (0.8kg)
Remote Battery: CR2025
WWW.JBL.COM
DISPOSAL: Do not dispose of this
product as unsorted municipal
waste. Collection of such waste
separately for special treatment is
necessary.
IMPORTANT: Use UM4/AAA/LR03
alkaline-type nonrechargeable
batteries only.
English
0024CSK - JBLOnTime200iD v13.indd 130024CSK - JBLOnTime200iD v13.indd 13 29/09/08 10:24:4529/09/08 10:24:45

1414
JBL ON TIME 200ID USER GUIDE
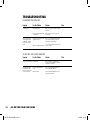
TROUBLESHOOTING
CHARGING AND SYNCING
Symptom Possible Problem Solution Note
iPod will not charge Wrong adapter is used Make sure correct adapter is used for your specifi c
iPod model.
The iPod is not making full contact with
the docking station
Make sure the iPod is seated securely into the
docking station.
iPod is not recognized by the
computer when docked into
the JBL On Time
™
200ID unit,
or there is an error in data
transfer
Third-party accessories may be confl ict-
ing with the USB signal
USB port is not supplying enough power
Make sure you do not have the JBL On Time 200ID
unit connected to a USB hub; connect the unit
directly into the computer’s USB port.
Try connecting the USB cable to another port on the
back of the computer.
Symptom Possible Problem Solution Note
Clock is not set to correct time Incomplete setup Be sure to follow the clock setting procedure
through, to the end. A confi rmation screen will be
displayed when set completely.
JBL On Time 200ID unit does
not retain memory settings
when there is a power outage,
or if the unit is unplugged
There are no batteries installed in
the unit
Batteries may be low
Make sure you install three AAA batteries in the
base of the JBL On Time 200ID unit.
If you have installed three AAA batteries, replace
them, as they may be defective.
CLOCK SET AND CLOCK MEMORY
0024CSK - JBLOnTime200iD v13.indd 140024CSK - JBLOnTime200iD v13.indd 14 29/09/08 10:24:4529/09/08 10:24:45

1515
WWW.JBL.COM
English
0024CSK - JBLOnTime200iD v13.indd 150024CSK - JBLOnTime200iD v13.indd 15 29/09/08 10:24:4529/09/08 10:24:45

JBL is a trademark of Harman International Industries, Incorporated, registered in the United States and/or other countries.
JBL On Time is a trademark of Harman International Industries, Incorporated.
iPod, Apple and iTunes are trademarks of Apple Inc., registered in the U.S. and other countries. “Made for iPod” means that an electronic accessory has been designed to
connect specifi cally to iPod and has been certifi ed by the developer to meet Apple performance standards. Apple is not responsible for the operation of this device or its
compliance with safety and regulatory standards.
JBL est une marque commerciale de Harman International Industries, Incorporated, déposée aux États-Unis et/ou dans d’autres pays.
JBL On Time est une marque commerciale de Harman International Industries, Incorporated.
iPod, Apple et iTunes sont des marques commerciales de Apple Inc., déposées aux États-Unis et dans d’autres pays. « Made for iPod » signifi e que le dispositif électronique a
été spécialement conçu pour se connecter à l’iPod et qu’il est certifi é par le développeur comme conforme aux normes de performance Apple. Apple n’est pas responsable du
fonctionnement de ce dispositif ou de sa conformité avec les normes de sécurité ou réglementaires.
Harman Consumer Group, Inc.
8500 Balboa Boulevard, Northridge, CA 91329 USA
516.255.4525 (USA only)
www.jbl.com
© 2008 Harman International Industries, Incorporated. All rights reserved. Tous droits réservés.
Document Number: 950-0232-001 REV. C
0024CSK - JBLOnTime200iD v13.indd 1980024CSK - JBLOnTime200iD v13.indd 198 29/09/08 10:26:2629/09/08 10:26:26
-
 1
1
-
 2
2
-
 3
3
-
 4
4
-
 5
5
-
 6
6
-
 7
7
-
 8
8
-
 9
9
-
 10
10
-
 11
11
-
 12
12
-
 13
13
-
 14
14
-
 15
15
-
 16
16


JBL ON TIME 200ID Owner's manual
- Category
- Loudspeakers
- Type
- Owner's manual
- This manual is also suitable for
Ask a question and I''ll find the answer in the document
Finding information in a document is now easier with AI
Related papers
Other documents
-
SCOTT CMX-108 User manual
-
EDIFIER If200plus User manual
-
Muse M-10CR Owner's manual
-
Logik LCRAN12 User manual
-
 Groove and Go Bluetooth Alarm Clock User manual
-
Currys Essentials CCRAN10 User manual
-
Bose Wave® radio IV Owner's manual
-
EKO KPR50 User manual
-
Magnavox AJ392017 User manual
-
SCOTT RXS 40 User manual
