Page is loading ...

Active Fabric Manager (AFM)
Installation Guide 2.0

Notes, Cautions, and Warnings
NOTE: A NOTE indicates important information that helps you make better use of your computer.
CAUTION: A CAUTION indicates either potential damage to hardware or loss of data and tells you how to avoid the
problem.
WARNING: A WARNING indicates a potential for property damage, personal injury, or death.
© 2013 Dell Inc. All Rights Reserved.
Trademarks used in this text:
Dell
™
, the Dell logo,
Dell Boomi
™
,
Dell Precision
™
,
OptiPlex
™
,
Latitude
™
,
PowerEdge
™
,
PowerVault
™
,
PowerConnect
™
,
OpenManage
™
,
EqualLogic
™
,
Compellent
™
,
KACE
™
,
FlexAddress
™
,
Force10
™
,
Venue
™
and
Vostro
™
are trademarks
of Dell Inc.
Intel
®
,
Pentium
®
,
Xeon
®
,
Core
®
and
Celeron
®
are registered trademarks of Intel Corporation in the U.S. and other countries.
AMD
®
is a registered trademark and
AMD Opteron
™
,
AMD Phenom
™
and
AMD Sempron
™
are trademarks of Advanced Micro
Devices, Inc.
Microsoft
®
,
Windows
®
,
Windows Server
®
,
Internet Explorer
®
,
MS-DOS
®
,
Windows Vista
®
and
Active Directory
®
are
either trademarks or registered trademarks of Microsoft Corporation in the United States and/or other countries.
Red Hat
®
and
Red Hat
®
Enterprise Linux
®
are registered trademarks of Red Hat, Inc. in the United States and/or other countries.
Novell
®
and
SUSE
®
are registered trademarks of Novell Inc. in the United States and other countries.
Oracle
®
is a registered trademark of Oracle
Corporation and/or its affiliates.
Citrix
®
,
Xen
®
,
XenServer
®
and
XenMotion
®
are either registered trademarks or trademarks of Citrix
Systems, Inc. in the United States and/or other countries.
VMware
®
,
vMotion
®
,
vCenter
®
,
vCenter SRM
™
and
vSphere
®
are registered
trademarks or trademarks of VMware, Inc. in the United States or other countries.
IBM
®
is a registered trademark of International
Business Machines Corporation.
2013 - 12
Rev. A0X

Contents
1 Configure Active Fabric Manager as a Virtual Appliance....................................................5
Prerequisites.............................................................................................................................................................5
Hardware Requirements...........................................................................................................................................6
Virtual Appliance Requirements...............................................................................................................................6
Deploy the OVF with HA and FT ............................................................................................................................... 6
Deploy the OVF without HA and FT ..........................................................................................................................6
Deploy the OVF with HA............................................................................................................................................6
AFM Client Browser Requirements ......................................................................................................................... 7
OMNM Requirements...............................................................................................................................................7
Port Usage................................................................................................................................................................ 7
Disabling VMotion on an ESX/ESXi Host.................................................................................................................. 8
2 Step 1: Deploy the OVF Template............................................................................................. 9
Deploy the OVF Template Using a VMware ESX Virtual Machine .......................................................................... 9
3 Step 2: Start the Virtual Machine........................................................................................... 11
4 Step 3: Manage the AFM Virtual Appliance......................................................................... 13
Configuring the System...........................................................................................................................................14
Changing the AFM Superuser Password............................................................................................................... 18
Update the AFM Server.......................................................................................................................................... 19
Setting the AFM Software to the Next Restart.......................................................................................................20
Restarting the AFM Application..............................................................................................................................20
Rebooting the AFM Server (VM).............................................................................................................................21
Transferring Files....................................................................................................................................................21
Editing AFM Files.................................................................................................................................................... 21
Uploading Switch Software Image.........................................................................................................................24
Restoring Database................................................................................................................................................ 25
Logging Out of the AFM Virtual Appliance............................................................................................................. 26
5 Step 4: Perform Initial Configuration......................................................................................27
6 RPM Installation........................................................................................................................ 31
Pre-requisites......................................................................................................................................................... 31
Step 1: Configuring CentOS.....................................................................................................................................31
Step 2: Install the AFM RPM Software on the Linux CentOS Machine ................................................................. 33
7 Upgrading the RPM ..................................................................................................................37

8 Technical Support.....................................................................................................................39
Accessing iSupport Services................................................................................................................................. 39
Contacting the Technical Assistance Center......................................................................................................... 39

1
Configure Active Fabric Manager as a Virtual
Appliance
You can deploy the Active Fabric Manager (AFM) as virtual appliance on a VMware® ESX® virtual machine. In this
guide, you learn how to configure the AFM as a virtual appliance. The instructions in this document assume you have
already installed and configured an ESX host where you plan to run AFM. For additional information about installing and
configuring the ESX virtual host machine, consult the VMware documentation.
NOTE: To deploy the AFM using the RPM installation instead of the OVF, see RPM Installation.
To configure AFM as a virtual appliance:
1. Review the Prerequisites
2. Deploy the OVF Template
3. Start the AFM VM
4. Manage the AFM Virtual Appliance
5. Perform Initial Configuration
Prerequisites
NOTE: If you are using the AFM VM as a syslog and a TFTP or FTP server, you do not need to gather the following
information.
Before you begin, gather the following information:
• Obtain your local or remote DHCP information.
• Define whether you want to use a Telnet or SSH session within the fabric
• Obtain the SNMP community string. By default, it is private for set and public for get.
• Syslog IP addresses — IP address of remote syslog server.
• TFTP or FTP server address — IP address of TFTP or FTP server for the Dell Networking Operating System FTOS
software images and configuration files during bare metal provisioning (BMP). If you are using an FTP server, obtain
the user name and password.
• If you are using the Active Link Settings option, gather the following OMNM server information:
– OMNM server IP address
– Communication protocol (HTTP or HTTPS)
– User name and password
See OMNM Requirements.
5

Hardware Requirements
Table 1. Hardware Requirements
Hardware Requirement
Processor Intel® Xeon® E5620 2.4Ghz, 12M Cache,Turbo, HT, 1066MHz Max Mem
System Type 64-bit operating system
Memory 32GB Memory (8x4GB), 1333MHz Dual Ranked LV RDIMMs for 2 Processors, Advanced ECC
Disk Space 1TB 7.2K RPM SATA 3.5 Hot Plug Hard Drive
Virtual Appliance Requirements
AFM runs as a virtual appliance. It requires the following software to host the solution:
• VMware® vSphere® Hypervisor (ESXi) 5.1 and higher (must meet virtual appliance, port access, and listening port
requirements)
NOTE: VMware® vCenter™ is required for HA and FT.
Deploy the OVF with HA and FT
The following are required to implement High Availability (HA) and Fault Tolerance (FT) using a VMware® ESX® Virtual
Machine:
• VMware® vCenter™ 5.0 Standard License
• ESXi® 5.0 Enterprise Plus License
• Dell M1000e chassis, if you are using MXL Blade switches.
• Shared storage for the OVF
NOTE: By default, the AFM VM CPU is set to 2. To use the HA feature, change the virtual CPU to 1.
Deploy the OVF without HA and FT
The following are required to deploy AFM without the HA/FT solution, using a VMware® ESX® Virtual Machine:
• VMware® ESXi® 5.0 Open Source License
• Servers (rack or blade switch). If you are using MXL blade switches, requires a M1000e blade chassis
• Shared storage for the OVF
NOTE: By default, the AFM VM CPU is set to 2.
Deploy the OVF with HA
When you deploy the AFM with HA only using a VMware® ESX® VM, the requirements are as follows:
• VMware® ESXi® 5.0 Open Source License
6

• Shared storage for the OVF
NOTE: By default, the AFM VM CPU is set to 2. To use the HA feature, change the virtual CPU to 1.
AFM Client Browser Requirements
• Internet Explorer® 9 and higher
• Firefox® 12 and higher
OMNM Requirements
The following is required to use the OMNM feature on the AFM:
• OMNM Server, Release 5.3 and higher
• The OMMN server is not installed on the same server as the AFM. To activate the performance statics, login directly
as write permission into Dell OMNM web service.
For information about how to install and configure OMNM, see the following URL: http://www.dell.com/support/
Manuals/us/en/555/Product/dell-openmanage-network-manager
http://www.dell.com/support/Manuals/us/en/555/Product/dell-openmanage-network-manager.
Important: By default, the web service is turn off in the OMNM server.
To use the OMNM web service:
1. On the OMNN server go to the server installation directory.
2. Navigate to the installed.properties file at C:\ProgramFiles\Dell\OpenManage\Network Manager\owareapps
\installprops\lib
3. Turn off Application Server and Synergy Network Management server.
4. Add the following three lines in the installed.properties file:
com.dorado.core.ws.disable=false
com.dorado.core.ws.legacy.soap.enabled=true
oware.webservices.authrequired=false
5. Turn on the Resource Monitoring option to enable performance monitoring.
6. Start the application server and synergy network management server.
Port Usage
The following table lists the default ports used by the various AFM services. To troubleshoot connectivity issues with the
AFM server, use the following table:
Table 2. Ports
Port Description
20 & 21 FTP
22 SSH and SCP (communication to switches and CLI access to AFM server)
23 Telnet (communication to switches)
67 & 68 DHCP
69 TFTP
7

80
AFM server port listening for client connection and requests
8080 OMNM client connection
8089 OMNM web service port
8443 OMNM client HTTPS connection
123 NTP
161 For the SNMP get and set protocol between AFM server and switch.
162 For the SNMP trap listener between AFM server and switch.
443 For the HTTPS communication protocol where the AFM takes requests from the client browser.
5432 Database server
8080 TCP/UDP
61616 ActiveMQ
Disabling VMotion on an ESX/ESXi Host
For information on how to disable VMotion® on an VMware® ESX/ESXi® host, see the VMware documentation at http://
kb.vmware.com/selfservice/microsites/search.do?language=en_US&cmd=displayKC&externalId=1010376 or perform a
search in the VMware knowledge using the key words “Disabling VMotion® on an ESX/ESXi host”.
8

2
Step 1: Deploy the OVF Template
You can deploy the Open Virtualization Format (OVF) template with the VMware ESX virtual machines.
Deploy the OVF Template Using a VMware ESX Virtual Machine
Before you can configure and use AFM, deploy the provided OVF template on a VM on your ESX/ESXi server.
Important: By default, the AFM VM CPU is set to 2. To use the HA, FT, or both, change the virtual CPU to 1.
To deploy the AFM OVF with the vSphere client:
1. Start the VMware® vSphere 5.1 client on your ESX® server or vCenter™.
2. Copy the AFM OVF template files from the directory where you have stored the AFM package to the location that
the vSphere client can access it.
NOTE: If you are using HA or HA with FT, make sure that the OVF uses shared storage. To enable FT, select
the virtual host and then right click to select the Fault Tolerance > Turn On Fault Tolerance option.
3. In the vSphere client, select File > Deploy OVF Template.
4. Choose the Deploy from file option and browse to where you copied the AFM OVF file.
5. Select the AFM.ovf file and then click the Next button.
Important: At the Disk Format screen, make sure you select the Thick Provision Lazy Zero option to ensure
that the AFM has the required disk space for all storage to be immediately allocated.
6. Start the VM. See Step 2: Start the VM.
9

10

3
Step 2: Start the Virtual Machine
After you have completed the OVF wizard and finished deploying the template, you can start the AFM VM console.
NOTE: Before you start the VM console, modify the VM settings as needed using the Edit Settings option.
1. Start the VM by clicking on its name and choosing Power > Power On.
2. Open the VM Console by right clicking on its name and choosing Open Console.
3. Open the Console, and log in with the default credentials. The first time you log in from the console or SSH using
superuser, if there is an IP assigned to the VM, the AFM prompt you to change the password for superuser. This
password is used for both the web URL login and console login.
Important: The AFM user name is superuser and password is Superuser1.
When the software requires an ESXi Shell CLI command, the ESXi Shell CLI user name is superuser and the
password is Superuser1.
4. Once the VM is powered on, an IP address is automatically assigned to the VM when the DHCP is available. If no IP
is assigned to the VM (which means that the DHCP is not enabled), AFM prompts you with following message:
“There is no IP address assigned. Press the <Enter> to start doing network configuration. ”. If this message is
displayed, press the
Enter key and do the following:
a) Select the Configure System option and press the Enter button.
b) When the network configuration warning message appears, Enter ‘Y’ to continue.
The Select Action screen displays.
c) Select the Device configuration option. To navigate between elements, use the Tab and down arrow keys.
The Network Configuration screen displays.
d) In the Static IP field, specify the static IP Address of the AFM server. To verify connectivity, ping the IP address
assigned to the AFM. If the destination host is unreachable assign the same IP address.
e) Select OK to save your changes.
f) Select Quit to exit this screen.
5. Manage the AFM virtual appliance. See Step 3: Manage the AFM Virtual Appliance
11

12

4
Step 3: Manage the AFM Virtual Appliance
After you have deployed the AFM OVF and performed the initial configuration, you can use the AFM Virtual Appliance to
perform the following tasks:
• Configure the System
• Change the AFM superuser password
• Update the AFM Server
• Set AFM Software to the Next Reboot
• Restart AFM Application
• Restart the AFM Server (VM)
• Transfer Files
• Edit Files
• Upload Switch Software Image
• Restore Database
• Log out
NOTE: To access the AFM virtual appliance, go to the AFM VM, click the Console button and then login as
superuser. The first time you log in from the console or SSH using "superuser", if there is an IP assigned to the VM,
the AFM prompt you to change the password for "superuser". This password is used for both the web URL login
and console login. If no IP is assigned to the VM (which means that the DHCP is not enabled), AFM prompts you to
do the network configuration. The VM then reboots.
The AFM virtual appliance options are shown in the following screen shot.
13
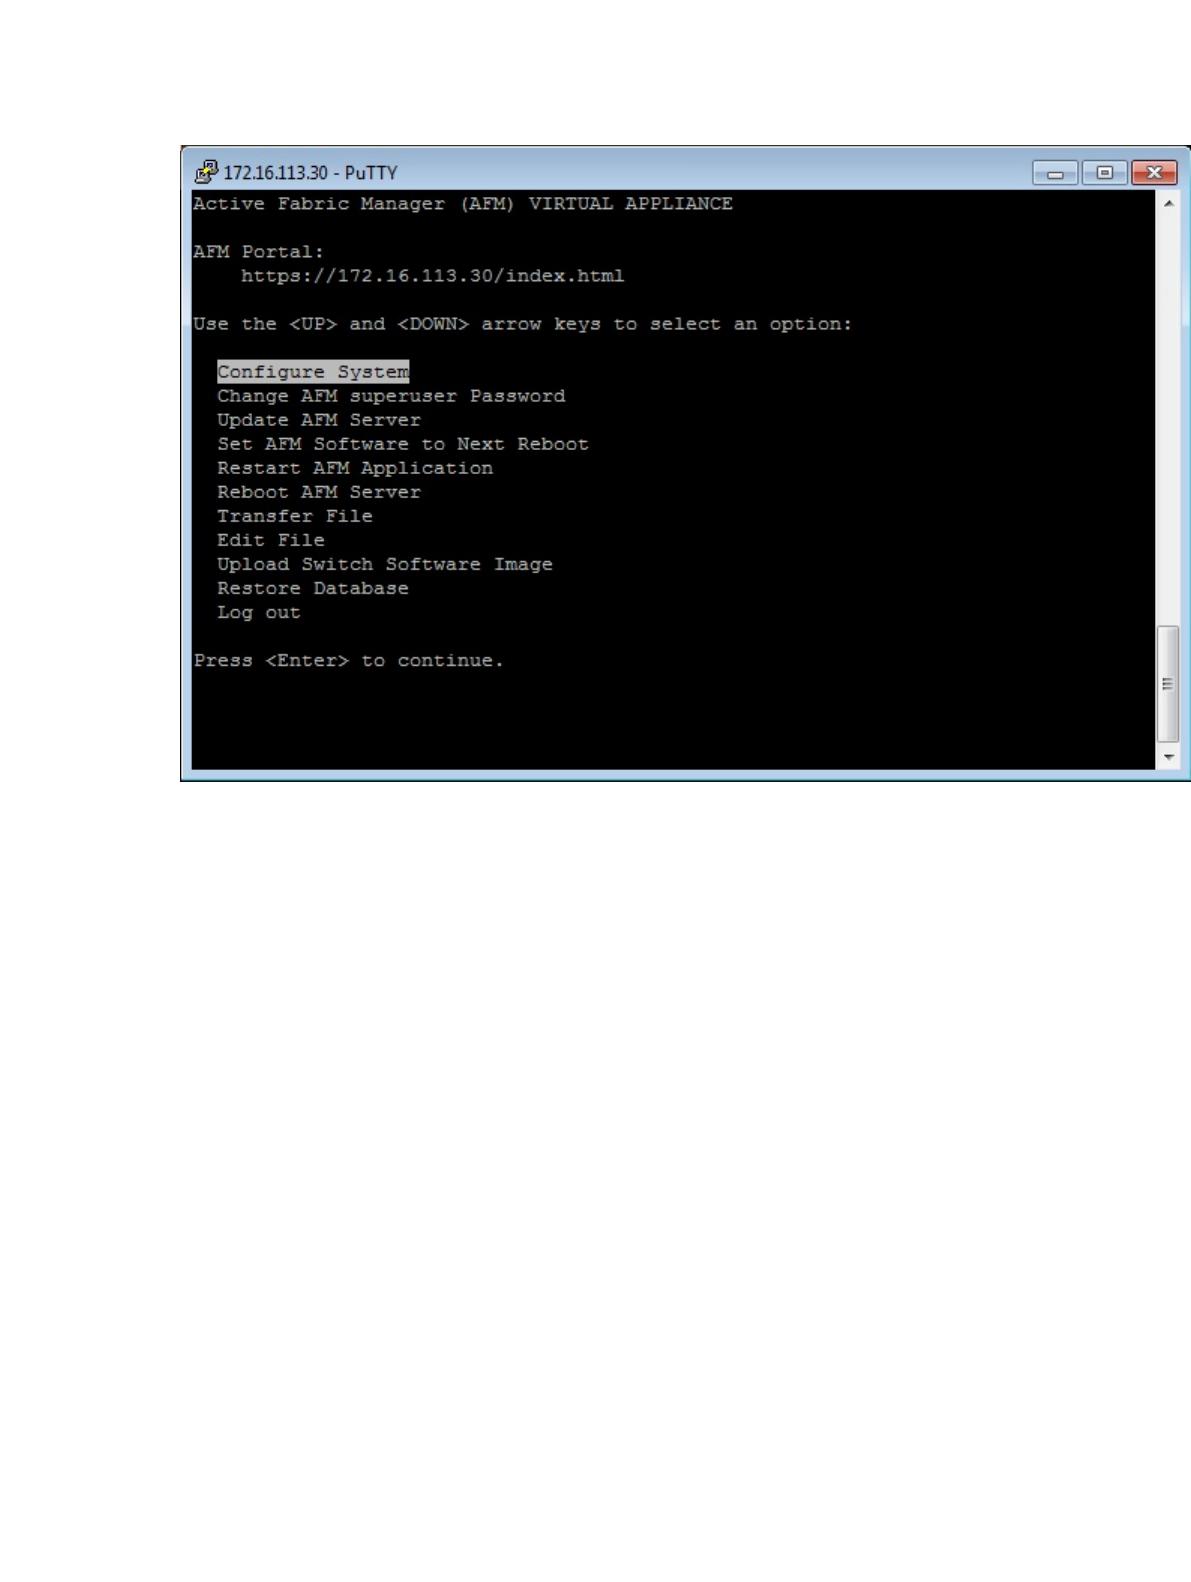
Figure 1. AFM Virtual Appliance Options
Configuring the System
To configure the device settings, use the Configure System option.
• Device configuration (Network Configuration) — Use this option to use a static IP to the AFM Ethernet controller,
change another device eth0 attribute, or add a new device such as a new interface.
• DNS configuration — Use this option to configure the AFM DNS settings.
To configure device settings:
1. Select the Configure System option and press the Enter button.
14

Figure 2. Configure System
The following network configuration warning message displays.
15
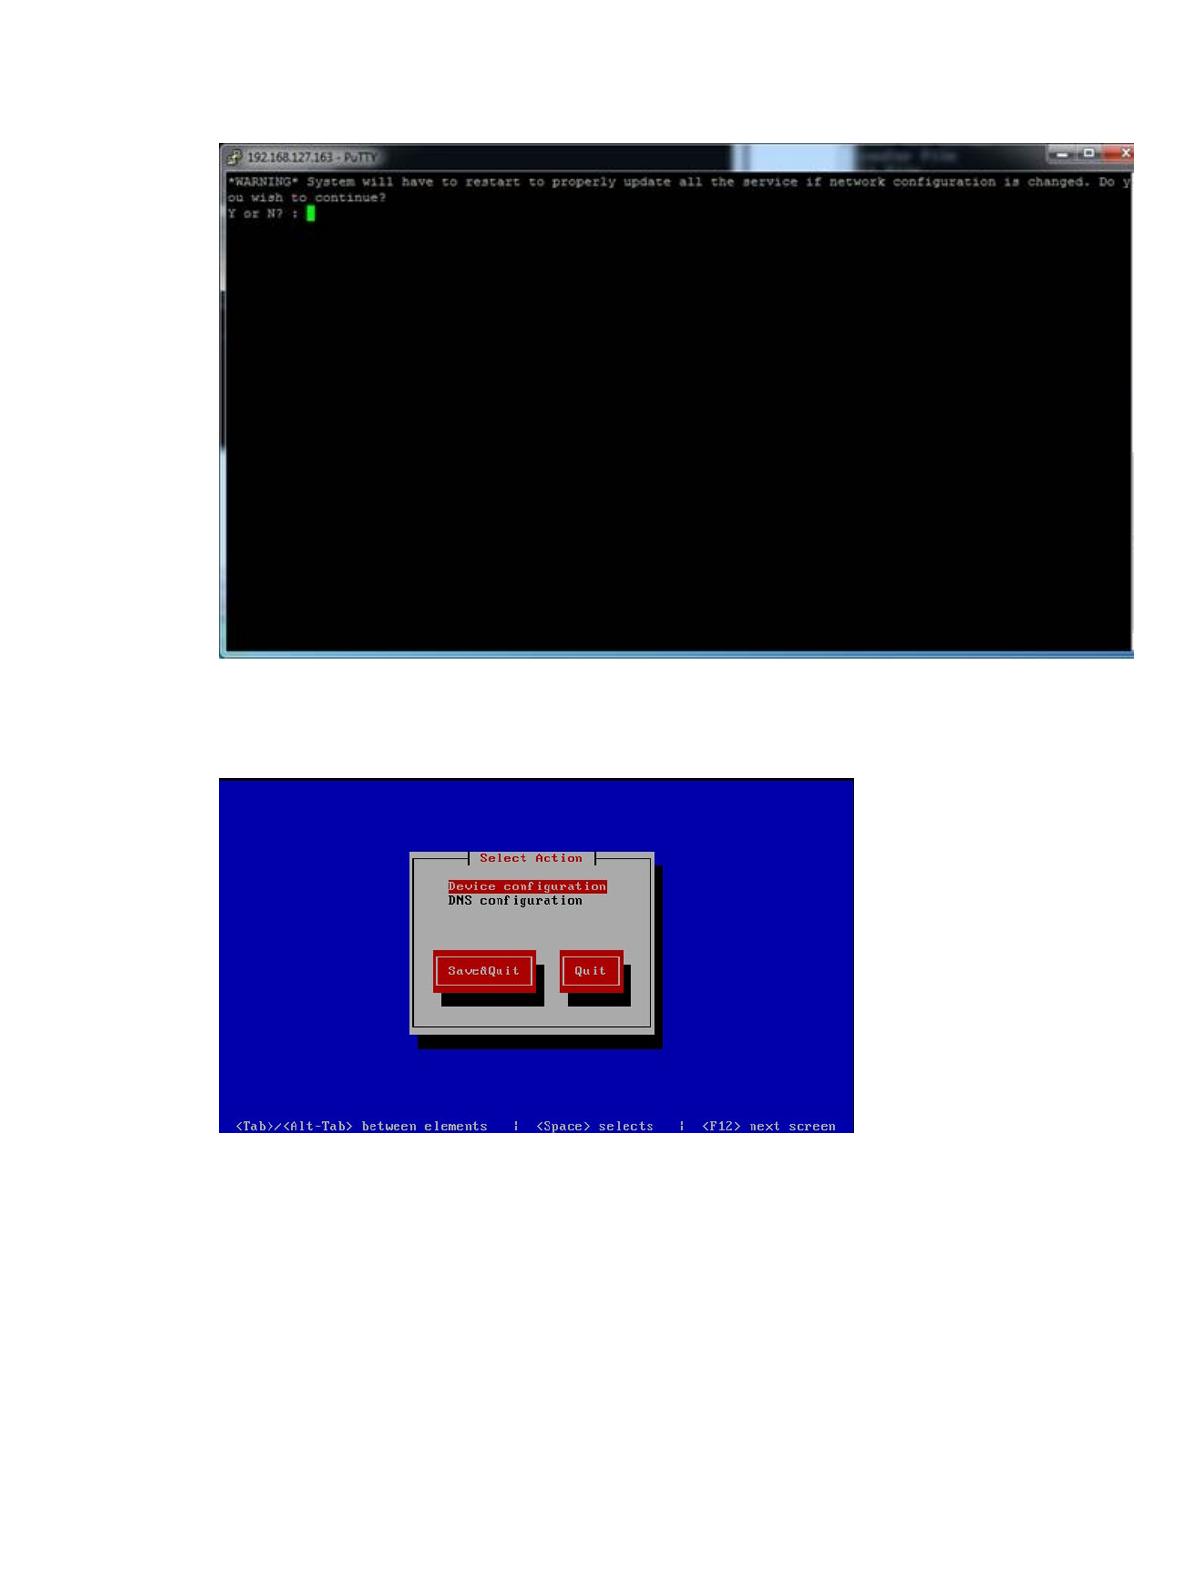
Figure 3. Network Configuration System Warning Message
2. Enter ‘Y’ to continue.
The Select Action screen displays.
Figure 4. Select Action Screen
3. Select the Device configuration option. To navigate between elements, use the Tab and down arrow keys.
The Network Configuration screen displays.
16

Figure 5. Network Configuration Settings
4. Modify the following settings as needed:
– Name — Assign the name of AFM Server
– Device — Assign or select the NIC Card to be used.
– Use DHCP — Select to enable DHCP to assign an IP address to the VM
– Static IP — Specify the static IP Address of the AFM server.
NOTE: To verify connectivity, ping the IP address assigned to the AFM. If the destination host is
unreachable assign the same IP address.
– Netmask — Specify the subnet mask of the static IP address for the AFM Server.
– Default gateway IP — Specify the gateway IP Address of the AFM server.
– Primary DNS Server — Specify the primary DNS server address. To enable the DNS server on AFM Server,
use this option.
– Secondary DNS Server — Specify the secondary DNS server address.
5. Select OK to save your changes.
6. Select Quit to exit this screen.
To configure AFM DNS settings:
1. Select the Configure System option.
2. Select the DNS configuration option.
To navigate between elements, use the Tab and down arrow.
3. Modify the following settings as needed:
17
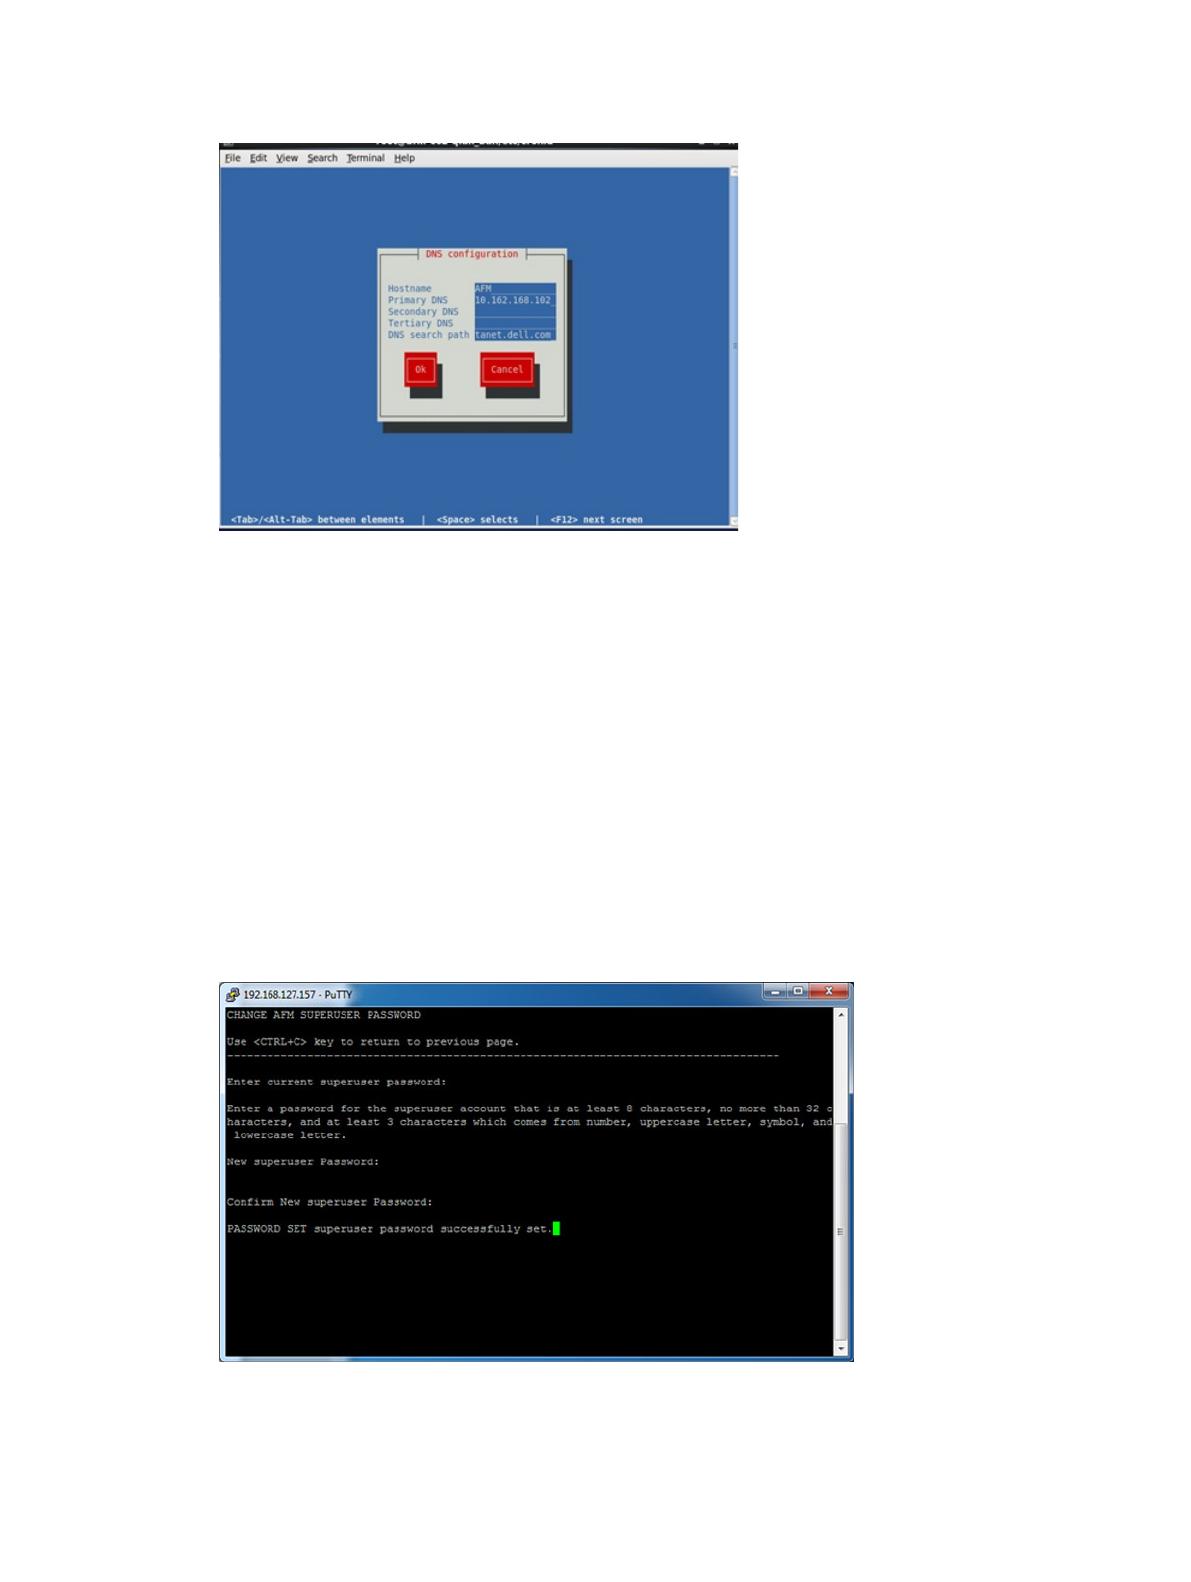
Figure 6. DNS Settings
– Hostname — Configure the hostname for the AFM server.
– Primary DNS — Configure the primary DNS.
– Secondary DNS — (Optional) Configure the secondary DNS.
– Tertiary DNS — (Optional) Configure Third DNS.
– DNS search path—Configure the DNS search path.
4. Select the OK option to save your changes.
5. Select Quit to exit this screen.
Changing the AFM Superuser Password
To change the AFM superuser password:
1. Select the Change AFM Superuser Password option.
2. Press the Enter button.
The CHANGE AFM SUPERUSER PASSWORD screen displays.
18
3. In the Enter current superuser password field, enter the superuser password. For example, Superuser1.
NOTE:
The password must have 8 to 32 characters and include at least 3 categories from the following:
a. lowercase alphabetic character
b. uppercase alphabetic character
c. digit number (0-9)
d. special character
4. Press the Enter button.
5. In the Confirm New Superuser Password field, enter the new superuser password one more time to confirm the
superuser password.
6. Press the Enter button to return to the main menu.
Update the AFM Server
To upgrade the AFM server:
1. Update the AFM Server
2. Set AFM Software to Next Reboot
3. Restart AFM Application or 4. Reboot the AFM server.
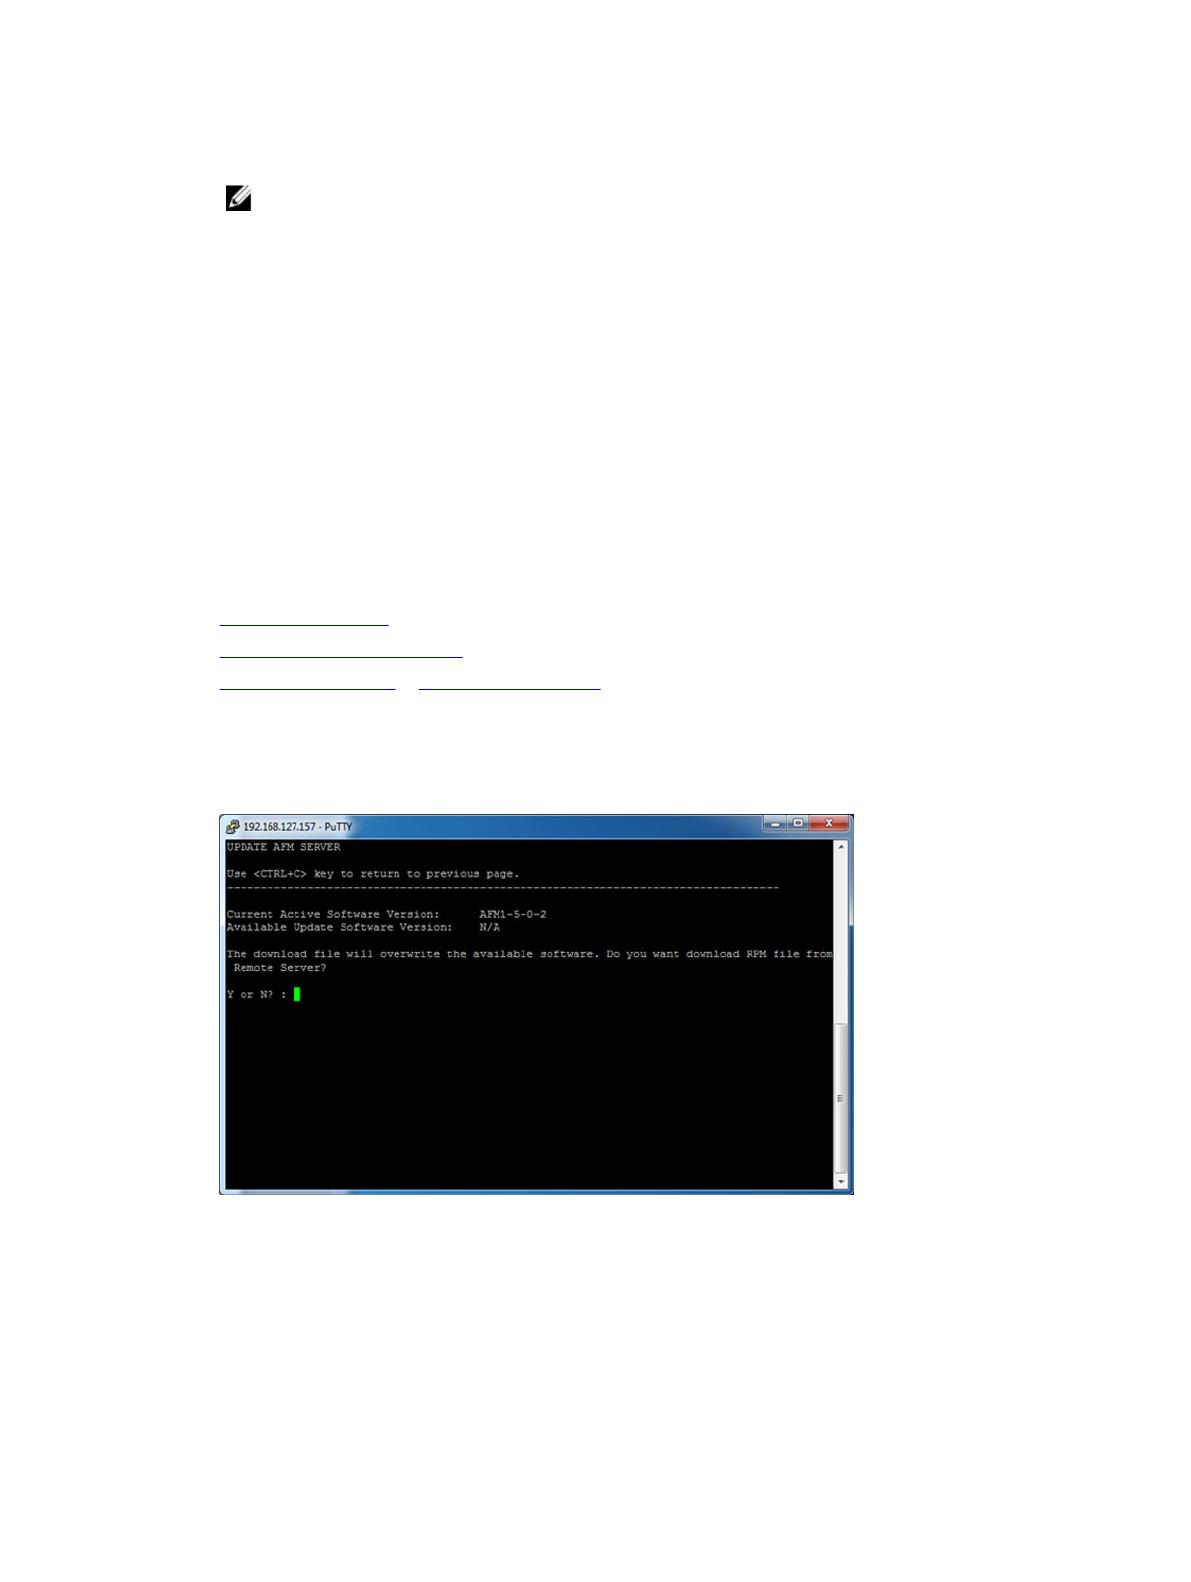
To update the AFM server:
1. Select the Update AFM Server option and press the Enter button.
The UPDATE AFM Server screen displays.
2. Enter 'y' to download the latest AFM software package (RPM format) file from remote URL to available partition or
enter 'n' to download the (AFM software package RPM format) file from the local workstation (where the AFM
console is launched) to the AFM server.
3. If the location is a remote server, enter the URL location of the RPM file on the remote server and then click the
Enter button using the following formats:
19
– https://
ipaddress
/
path_to_rpm.file
– ftp://
ipaddress
/
path_to_rpm.file
– sftp://
ipaddress
/
path_to_rpm.file
4. If the location is local, enter the absolute path of the RPM file and then click the Enter button.
5. If required, enter you username and password.
6. Press the Enter button to return to the main menu.
NOTE:
To use the new RPM on the active partition, Set the AFM Software to Next Reboot and then Restart the AFM
Application.
Setting the AFM Software to the Next Restart
There are two versions of the AFM software package: one in the current partition and the other in the available partition.
To select the AFM software and partition for the next reboot:
1. Select the Set AFM Software to Next Restart option and press the Enter button.
2. Enter ‘y’ and then the Enter button to apply the available update on the next reboot.
3. Press the Enter button to return to the main menu.
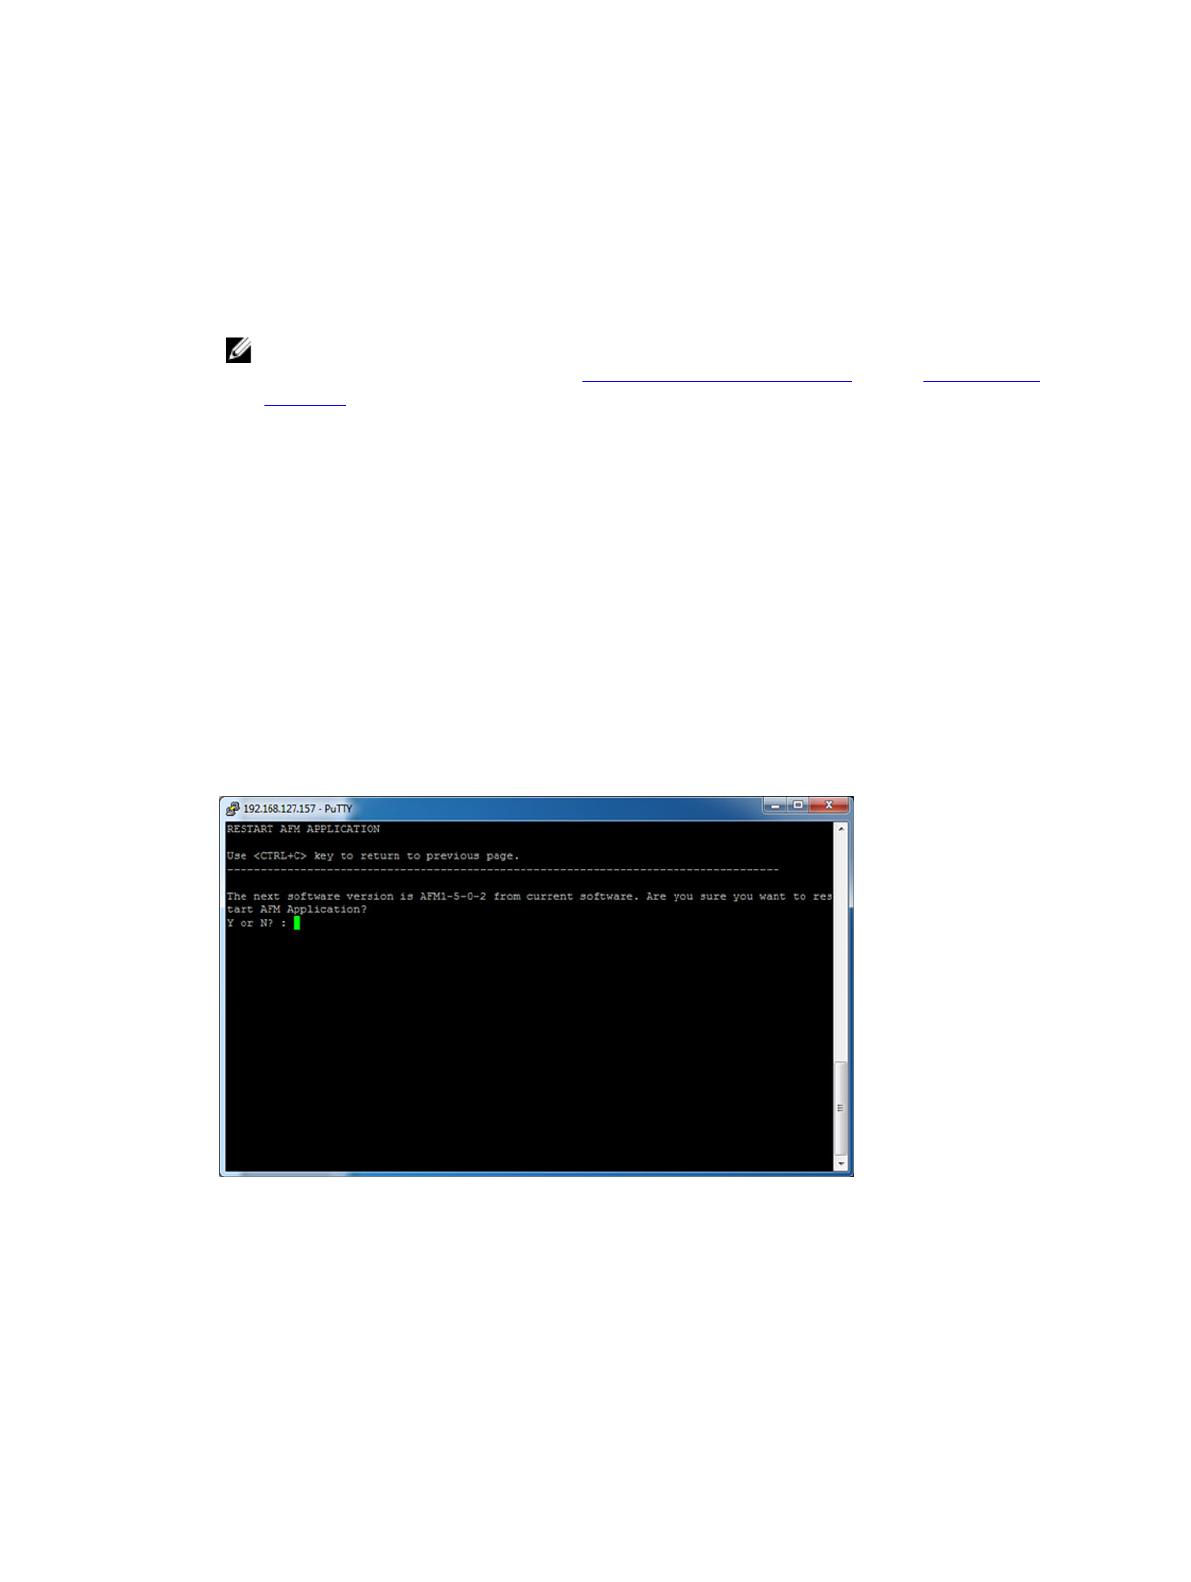
Restarting the AFM Application
To restart the AFM application:
1. Select the Restart AFM Application option and press the Enter button.
Figure 7. Restarting the AFM Application
2. Enter y to restart the application.
3. Press the Enter button to return to the main menu.
20
/

