Page is loading ...

3
4
5
6
7
安裝說明
安装说明
專為 ASUS ROG STRIX-GTX1080/1070-O8G-GAMING 顯示卡設計
Designed for ASUS ROG STRIX-GTX1080/1070-O8G-GAMING VGA Card.
1
BP-WBV1080ARS_RGB 1組
SCM4IM2H3 6 PCS
Spare Screws- SCM4IM2H3 6 PCS
備品螺絲-
1
2
1 MM導熱墊片 4片
3
4
52.5 MM導熱墊片 5片
6
7
7
7
Bitspower背板 1片
M2.5x8 MM螺絲 11支
RGB控制器 1個 (詳見說明書)
BP-WBV1080ARS_RGB 1組
1
2
1 毫米导热垫片 4片
3
4
52 .5 毫米导热垫片 5片
6Bitspower背板 1片
M2.5x8 MM螺丝 11支
RGB控制器 1个(详见说明书)
BP-WBV1080ARS_RGB 1 Set
1
2
1 MM THERMAL PAD 4 PCS
3
4
52.5 MM THERMAL PAD 5 PCS
6Bitspower Backplane 1 PCS
M2.5x8 MM Screw 11 PCS
RGB Controller 1 PCS (Refer Instruction)
2
专为ASUS ROG STRIX-GTX1080/1070-O8G-GAMING 显卡设计
搭配BP背板,使用標準配備。
方案一.
搭配原廠背板, 處螺絲請拆除
處螺絲更換成BP SCM4IM2H3螺絲後使用原廠螺絲。
方案二.
背板方案說明
Use the BP back plate with the BP standard screws,
which comes with the BP block.
Use the original back plate and screws , Remove
the screws at location and replace the screws
at location with BP spare screw SCM4IM2H3.
I- Install BP Back Plate with BP standard Screws
II-Install Original Back Plate with original screws
Back Plane Installation Guide
搭配BP背板,使用标准配备。
方案一.
搭配原厂背板, 处螺丝请拆除
处螺丝更换成BP SCM4IM2H3螺丝后使用原厂螺丝。
方案二.
背板方案说明
SCM4IM2H3 6 PCS
备品螺丝-
X 1
X 6
GRB
+G R B
Correct
正確安裝
墊高螺絲 4支
垫高螺丝 4支
Booster screw 4 PCS

V5/第五版
注意,跑水前,請先確認所有零件已安裝在正確的位置上,在不開主機,單開水泵的情况下,
進行24小時的跑水測試, 確保無漏水情况後再開主機,避免發生漏水而導致電腦零件的損壞。
注意,跑水前,请先确认所有零件已安装在正确的位置上,在不开主机,单开水泵的情况下,
进行24小时的跑水测试, 确保无漏水情况后再开主机,避免发生漏水而导致电脑零件的损坏。
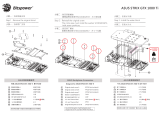
导热垫片和导热膏的正确应用位置
适量使用导热膏
1 毫米导热垫片
2.5 毫米导热垫片
導熱墊片和導熱膏的正確應用位置
適量使用導熱膏
1 MM導熱墊片
2.5 MM導熱墊片
Applying The Thermal PAD And Thermal Paste On Correct Positions.
Using Appropriate Amount Of Thermal Paste.
1 MM THERMAL PAD
2.5 MM THERMAL PAD
Before fill in water,please make sure all the component be installed correctly,
avoidingleaking happen and destroy the PC component.
/