Page is loading ...

Copyright © 2015 Omix-Ada®, Inc.
460 HORIZON DR. SUITE 100 | SUWANEE, GA 30024 | PHONE: 770-614-6101 | FAX: 770-614-6069 | [email protected]
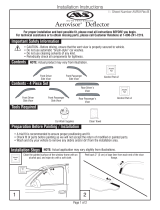
General Installation for Exterior Tape Mount Accessories
Page 1/1
2. Test t item to the vehicle before removing plastic
liner from mounting tape. This will aid in aligning the
item before adhesion.
3. Remove only enough plastic liner to be easily
gripped when item is installed.
The plastic liner of the shorter tape
sections may need to be fully removed
before installing.
4. Install item in proper mounting position while
keeping partially removed liner ends accessible.
This step must be done for adhesive tape
to properly mount. Failure to clean could
result in poor attachment of item.
1. Clean surface with isopropyl alcohol (rubbing
alcohol). Avoid cleaning areas that tape will not
contact.
5. Firmly hold item in proper mounting position while
pulling the exposed plastic liner to completely
remove. Maintain pressure on installed item for 30
seconds to ensure proper contact. Full adhesion
occurs within 24 hours of application.
Read all instructions thouroughly before installation
For proper installation, mounting surface of item should be between 4-38° C (40-100° F) prior to application
/