Ingenico PAYZONE iCT250 Home Working Manual

Type
Home Working Manual

This manual is also suitable for

The following guide is to assist anyone planning on using their Ingenico terminal from home for short or
long term. The guide covers:
How to set up respective machines to their communications sources.
How to take a Cardholder Not Present payment.
How to manually download an update on the machine.
How to manually settle the machine.
The installation of your terminal will depend on how it communicates with the banks, you can tell what
model of terminal you have by looking at the home screen of your terminal (i.e. when it says “Yorkshire
Payments”) and at the top of the screen (pictured) you will see some symbols. The symbols indicate the
type of terminal you have (symbols may vary between models):
Please now proceed to the section based on your communications type:
ICT-250 Fixed Terminal
IWL-250 Bluetooth Terminal
IWL-250 WIFI Terminal
IWL-250 Mobile Terminal
Please note, if you have a non-contactless Ingenico (ICT/IWL-220 range) or one of the new Ingenico
Move range (Move3500) then please contact the office for special instructions.
The Ingenico Fixed Terminal (hereafter just referred to as “the terminal”) can communicate via the internet
or a telephone line, although the latter is more designed as a back-up rather than a main comms means,
this guide will cover how to install both comms means.
Internet Connection:
Take one end of the ethernet cable and plug into a spare
socket on your internet router (usually labelled 1 – 4) and
the other end plugs into the terminal’s ethernet (ETH)
socket, this is found on the little “box” at the end of the long
coiled cable, it’s the socket opposite from the power supply
socket. Make sure the two ends are all the way home and
have locked / clicked into place.
Telephone Connection
Plug the standard telephone cable end into your phone line master socket (the BT Connector end) and the
cube-like end into the telephone “IN” socket, this is found on the little “box” at the end of the long coiled
cable, it’s the socket opposite from the coiled cable leading to the terminal. Make sure the two ends are all
the way home and have locked / clicked into place.
Note that you can use both connection types on a fixed model but the terminal will prioritise the
internet as the communication means by default.
Basic Connection Diagram for Fixed Ingenico Terminals
ETH
IN
Ingenico "Magic Box", found at the end of the coiled cable.
The Ingenico WIFI Terminal (hereafter just referred to as “the terminal”) can communicate via the internet
using your own WIFI, provided your WIFI has a network password.
To connect your terminal to the WIFI please follow the below steps (note you will need your WIFI Network
Name and Password:
1. Press the down arrow (see picture)
2. Select “Telium Manager” (either by scrolling with the
arrow keys and pressing the green enter button, or
by pressing the corresponding number next to it)
3. Select “Initialisation” (either by scrolling with the
arrow keys and pressing the green enter button, or
by pressing the corresponding number next to it)
4. Select “Hardware” (either by scrolling with the arrow keys and pressing the green enter button, or
by pressing the corresponding number next to it)
5. Select “Wi-fi Settings” (either by scrolling with the arrow keys and pressing the green enter button,
or by pressing the corresponding number next to it)
6. Select “Profiles” (either by scrolling with the arrow keys and pressing the green enter button, or by
pressing the corresponding number next to it)
7. Select “New Profile” (either by scrolling with the arrow keys and pressing the green enter button, or
by pressing the corresponding number next to it)
8. Select “Automatic Scan” by scrolling to it and pressing the green menu button.
9. Look for your WI-FI network on the list that will be generated and select either by scrolling with the
arrow keys and pressing the green enter button, or by pressing the corresponding number next to
it.
10. Select “Home Security” by scrolling to it and pressing the green menu button.
11. Select “WPA/WPA2” by scrolling to it and pressing the green menu button.
12. Enter your WIFI Password by using the numeric keypad, similar to texting on an old mobile phone.
If you keep pressing the button you will scroll through numbers, upper and lower case letters. So
for example if you press “5” once you will get the number “5”, twice will give you “J”, then “K”, then
“L”, then “j”, then “k” and finally “l”. Once input, please double check before proceeding, just in case
of typos. If you are happy to proceed, press the green enter button.
Your Ingenico WIFI Terminal communicates directly with your router so long as it has a secure connection.
13. Leave the Priority as it is and press the green button.
14. Now select “Active Profiles”, this will list what networks the terminal is setup for, if your WIFI
network is listed then your terminal should be ready to use, however if you do not see your network
listed then please head to the “Troubleshooting” section at the foot of this page.
15. If all is well, keep pressing the red cancel button until you get back to the Yorkshire Payments logo.
After about 10 seconds (depending on WIFI speed) your terminal will display a green network
symbol ( ) and then display a signal strength. If this does not appear after a reasonable
amount of time please check troubleshooting below, otherwise you have successfully connected
your terminal to your WIFI.
Troubleshooting
My WIFI network is not listed on the “Active Profile” list and / or there are just two squares on the list (∏∏)
This is a known glitch with the Ingenico software but it more inconvenient than troublesome, the terminal
was not successful in connecting, you will need to remove the profile by selecting “Delete Profile” from the
“Profiles Menu” (Press the red cancel button once to go back to the Profiles menu from “Active Profiles”),
then following the above steps from 7 onwards again. Please note you may have to do this a few times
before it connects to your network properly but once it has you do not need to worry again.
My WIFI was on active profiles but when I go back to the home screen there is no WIFI signal or name
You have entered the WIFI password incorrectly, please repeat the above steps but when you get to step
7 select “Modify Profile” instead of “New Profile” then select your WIFI Network to amend the password.
Make doubly sure that it matches to what your WIFI password is before proceeding. This should solve that
issue.
Any other troubleshooting matters, please call the office for assistance.
The Ingenico GPRS, or mobile, terminal (hereafter just referred to as “the terminal”) connect to the acquirer
banks via a mobile phone signal. This terminal should not require any special setting up, so long as you are
in a place where you get a mobile phone signal the machine should work.
However please bear in mind that things such as steel girders, metal corrugated roofs or old thick-walled
buildings can cause interference with mobile phone signals so please bear this in mind when choosing
where to set up the machine.
If you are having difficulty getting a signal and/or need to change the network you are connected to,
please call the office for assistance.
Once you are happy everything is connected correctly, we recommend that you test the terminal to make
sure that it is working correctly. Firstly on an Ingenico terminal if you have no connection the terminal will
not display a signal. You need to make sure that your terminal at least has one of the following showing:
If those symbols are showing you can run a test on the machine by doing one of the following:
1. Process £0.01 on a debit card you have in the household.
2. Run a settlement/reconciliation. If you are not sure how; press the Menu button twice, press F1 for
“Reports” > PIN (Enter) and select F2 Banking and the terminal should connect to the bank and
settle itself.
If either or both of those approaches don’t work or you have a separate issue then please get in touch and
we will troubleshoot with you.
Running a Cardhold Not Present transaction is pretty simple on an
Ingenico terminal; simply press the F4 button (top right button on
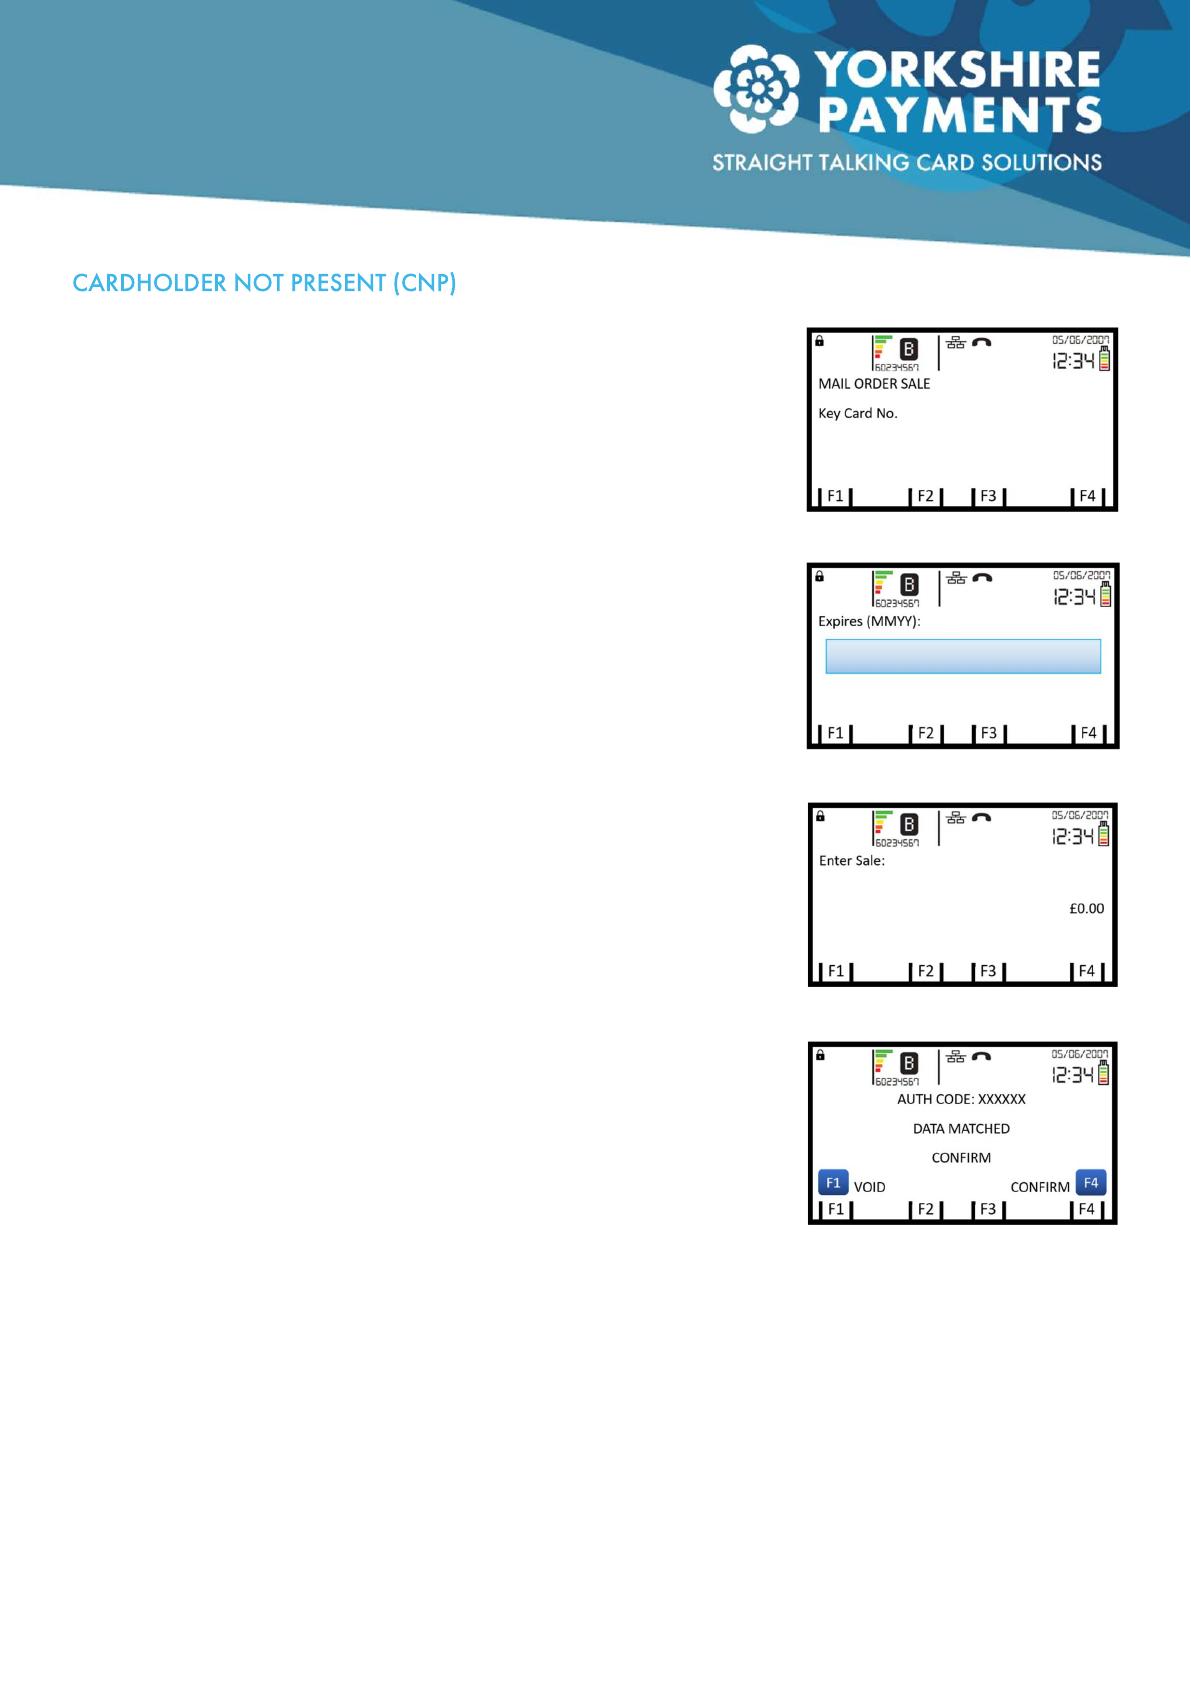
keypad, above “3”). Once you see the “MAIL ORDER SALE” screen
(pictured) start inputting the long card number from the front of the
credit / debit card and when you have finished press the green enter
button. You will then be prompted the following in order:
1. Input the expiry in the MMYY (pictured), press green when input.
2. Input the CVV2 Secutiy Code from the back of the card, press
green when input.
3. Input the numerics of the post code of the card’s registered
address, e.g. the postcode “HD1 2AB” would be input as “12”,
note that there are no letters or spaces. Press green when input.
4. Input the numerics of the address of the card’s registered
address, i.e. the door number. You only need the numerics so “18
Smith Road” would just be “18”, “18a Smith Road” would also
just be “18”. If the address contains a house name rather than
number, e.g. “Old House, Smith Road”, you input “0”. Press green
when input.
Please note you can skip the address and post code inputs but
we recommend that you don’t skip these steps as it is an
additional security check.
5. Input the sale amount (pictured) and press green to confirm.
6. The transaction will process and you will get a screen prompt
showing you the result of the security checks, if everything
matches and you are happy to proceed select F4 – Confirm to
confirm the transaction (pictured). If it says “Not Matched” we
would recommend you select “F1 – Void” and advise the
customer they have failed the security check.
That’s it, you have successfully taken a CNP transaction, your merchant copy will print first and the
customer copy second which will need to be given to the customer at a later date. If you need to process a
refund over the phone you just follow the same steps above with one difference; instead of starting the
transaction by press F4, press the Menu button and select “F1 – Mail Order”, you will then be asked to
select “Sale” or “Refund”, press “F1” for refund. You will be asked to input your supervisor pin (by default
this should be 96757 but you may have changed it) and pressing the green enter button to confirm. From
here it is pretty much as above except the first screen says “MAIL ORDER REFUND”.
Mail Order initialisation screen.
Card expiry screen
Enter sale amount screen
Sale confirmation screen
Ingenico terminals periodically complete their own software updates and downloads however you may be
prompted to complete a software update by the machine, or a
download by a member of Yorkshire Payments staff. To do so just
follow the below steps:
1. Make sure the terminal is on the “Yorkshire Payments” screen.
2. Press the Menu button twice to access the second main menu
page (pictured).
3. Press the F3 button for “Supervisor”.
4. Input your PIN (default 96757) and press the green enter button,
this will bring up the “Supervisor” menu.
5. Press the Menu button once more to scroll to the next page.
6. Press the F4 button for “Call TMS”.
That’s it, the terminal will look for an update and if one is available, download it and install it, then restart
itself once finished. You should get a reciept print out saying it has completed a software update if
everything was successful.
Ingenico terminals could be set to automatically settle themselves every day, however, if not, you may be
prompted to complete a reconciliation (Banking) by the machine or by a member of Yorkshire Payments
staff. To do so just follow the below steps:
1. Make sure the terminal is on the “Yorkshire Payments” screen.
2. Press the Menu button twice to access the second main menu page (pictured).
3. Press the F1 button for “Reports”.
4. Input your PIN (default 96757) and press the green enter button, this will bring up the “Reports”
menu.
5. Press the F2 button for “Banking”.
That’s it, the terminal will connect with the bank and settle itself, then print off a reciept showing takings
and what has been processed. Please note that takings on the terminal may not correlate with what is
banked as most acquirer banks will settle machine takings manually after 3 – 5 working days.
If you struggle with any of the above or any issues not covered in this guide then please get in touch with
the tech support team by calling the office on 01422 323785. Support is available Monday – Saturday 8am
– 11pm and Sunday / Bank Holidays 10am – 4pm.
The second page of the main menu.
  • Page 1 1
  • Page 2 2
  • Page 3 3
  • Page 4 4
  • Page 5 5
  • Page 6 6
  • Page 7 7

Ingenico PAYZONE iCT250 Home Working Manual

Type
Home Working Manual
This manual is also suitable for

Ask a question and I''ll find the answer in the document

Finding information in a document is now easier with AI