Page is loading ...


Guide
Installation
SKYFi2
™
Home and Vehicle Kits
Contents:
SKYFi2 Vehicle Adaptor Kit Setup · · · · · · · · · · · · 2
SKYFi2 Installation · · · · · · · · · · · · · · · · · · · · · · · · · 6
XM Antenna Setup · · · · · · · · · · · · · · · · · · · · · · · · 11
SKYFi2 Home Adaptor Kit Setup · · · · · · · · · · · · 15
Warranty · · · · · · · · · · · · · · · · · · · · · · · · · · · · · · · · · 18
Warning: This manual and the SKYFi2
Satellite Radio Receiver User Guide contain
important safety and operating information.
Please read and follow the instructions in
these manuals. Failure to do so could result
in personal injury, death, and/or damage to
your SKYFi2 Receiver, accessories, and/or to
your vehicle or other property.

This device complies with Part 15 of the
FCC rules. Operation is subject to the fol-
lowing two conditions:
1. This device may not cause
harmful interference, and
2. This device must accept any interfer-
ence received, including interference
that may cause undesired operation.
The Delphi XM
®
SKYFi2
™
Satellite Radio
Receiver incorporates an FM transmitter
and is therefore classified as an intentional
transmitter. Changes or modifications to
the unit not expressly approved by Delphi
can void your authority to operate this
equipment.
Important: The FCC and FAA have not
certified the Delphi XM SKYFi2 Satellite
Radio Receiver for use in any aircraft
(neither portable nor permanent instal-
lation). Therefore, Delphi cannot support
this type of application or installation.
2
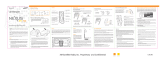
Cassette audio
adaptor
Vehicle swivel mount
SKYFi2 Cradle
Vent mount
12V power adaptor
XM Vehicle Antenna
Figure 1. SKYFi2 Vehicle Adaptor Kit components.
Your kit also includes:
• Extra adhesive pad
• Surface preparation
cleaning kit
• Alcohol prep pad
• Cable wrap
• Adhesive-backed
Velcro
®
pads
SKYFi2 Vehicle Adaptor Kit (SA10102) Setup
Your Delphi XM SKYFi2 Vehicle Adaptor Kit contains the following components:
Nokia
®
-style button
mount converter

3
Hooking up Your SKYFi2 Receiver Cradle
Figure 2. Connect accessories to your SKYFi2 Cradle as shown.
Caution: Connect only appropriate input devices
to the SKYFi2 Vehicle Adaptor Kit. Connecting any
incorrect input devices may damage the system and/
or the external electronic device. It is recommended
that you use only the 12V to 6V conversion power
adaptor that came with your SKYFi2 Vehicle Adaptor Kit.

Cassette Adaptor:
Direct Connect:
FM Modulator:
Audio Quality
Good Better Best
4
The SKYFi2 Vehicle Adaptor Kit
offers you many ways of connecting
your SKYFi2 to your vehicle’s radio.
All options provide excellent sound
quality and stereo separation.
Review and consider your own
unique situation when choosing
from the three options.

Cassette Adaptor
For vehicles with a built-in cassette
player. Due to its superior audio quality,
this configuration is recommended
over the wired or wireless FM
modulator configurations if a
cassette slot is available in the vehicle.
Direct Connect
The Delphi FM Direct Adaptor
(SA10112) (sold separately) can provide
audio input through the vehicle’s
antenna lead. (Some vehicles may
require special antenna lead adaptors.)
Wireless FM Modulator
For the ultimate ease of installation,
SKYFi2 has a built-in wireless FM
modulator that allows you to hear XM
programming on any nearby FM
radio. This FM modulator is turned on
whenever the cassette adaptor or any
other audio cable is unplugged from
the SKYFi2 Cradle. See the SKYFi2
Satellite Radio Receiver User Guide
for more details.
5

6
Note: If using the wireless FM modulator or
the Delphi FM Direct Adaptor, set the SKYFi2
Receiver and the FM radio to the same
frequency. See the SKYFi2 User Guide section
on “Listening to XM Using Any FM Radio.”
SKYFi2 Installation
Because every vehicle is different,
these instructions are provided as a
general guideline only. If you need
help, consult a professional installer.
1. Decide which method (cassette
adaptor, wireless FM modulator, or
direct connect) is most appropriate
for your vehicle and where you live.
2. Verify the system is working by
completing a test. Before installing
the system, connect the XM Antenna,
12V power adaptor, and audio
connector or cassette adaptor (if
used) to the SKYFi2 Vehicle Adaptor
cradle with the SKYFi2 Receiver
inserted. Plug the 12V power adap-
tor into the cigarette lighter and
place the XM Antenna on the roof
of your vehicle. Make sure you are
outdoors and not surrounded by
tall buildings or trees. Turn on
both your vehicle’s radio and
SKYFi2 Receiver. Tune the SKYFi2
Receiver to XM channel 1. You
should be able to hear the XM
Preview channel. If not, check all
connections.
Warning: Do not install the mount where it
or SKYFi2 could block your vision or usage of
controls, or interfere with any safety devices
such as airbags. Failure to correctly place
SKYFi2 could result in injury to you or others if
the unit becomes detached during an accident
and/or obstructs the deployment of an airbag.

7
3. Turn off the radio and SKYFi2
Receiver. Disconnect all cables.
4. Find a place where you can mount
your SKYFi2 Vehicle Adaptor
where it is most convenient for
you to use. It should be mounted
to a hard, flat surface if possible or
to a horizontal in-dash air vent. Be
certain the air vent is rigid enough
to hold the weight of both the
SKYFi2 Receiver and the SKYFi2
Vehicle Adaptor Kit.
b. Vent mount: Assemble the
mount (if not assembled) by
inserting the two clips into the
main piece. Clip the assembly
onto the vent, and then posi-
tion the pivoting kickstand at
the bottom. The orientation of
the clips must match each
other and may need to be
rotated in one of two possible
orientations depending on the
design of the air vent being
used. Be careful when
installing and removing the
vent mount clips to prevent
damaging the vent fins.
5. The SKYFi2 Vehicle Adaptor Kit
has three mounting options: flat
mount, vent mount, or swivel
mount.
a. Flat mount: Use the included
Velcro pads or extra adhesive
pad, attaching them to the back
of the SKYFi2 vehicle cradle
and then to a flat surface in
your vehicle. Do not install the
mount on a leather surface.

8
c. Swivel mount: This mount allows
you to adjust the angle of your
SKYFi2 Vehicle Adaptor after it
is installed. This mount uses a
strong adhesive that is not eas-
ily repositioned when installed,
so use care when choosing the
location of and placing the
mount. Do not install this mount
on a leather surface. Install the
mount only if the temperature
is at least 60°F.
– Clean the mounting surface
with the enclosed surface
preparation cleaning kit.
Wipe the towelette in one
direction only. Do not wipe
the surface in a circular
adhesive pad and adhere to
the vehicle’s surface. Make
sure you accurately place the
pad on the first try since in
many cases it will bond
almost immediately. For best
results, do not touch or apply
pressure to the vehicle mount
for 72 hours.
motion or back and forth. Dry
the area with a clean, dry
cloth. Repeat the cleaning
process. Allow to air dry
thoroughly.
– Clean the same surface with
the enclosed alcohol prep
pad. Wipe in one direction
only. Dry the area with a
clean, dry cloth. Allow to air
dry thoroughly.
– Warm the vehicle mount
adhesive pad by using a hair
dryer or by placing the vehicle
mount on top of the vehicle’s
defrost outlet for several
minutes with the heater on.
Remove the liner from the

9
6. Clip the SKYFi2 vehicle cradle
onto the vent or swivel mount
(figures 3 and 4).
7. Reassemble the system as in step 2.
8. Attach the antenna as explained on
page 11 and route the antenna
cable as described on page 13.
Figure 3. Vent mount.
To vehicle
dashboard
Figure 4. Attach vehicle mount to back of
SKYFi2 as shown.

10
Removing swivel mount
from your dashboard
You can remove the swivel mount
from your dashboard by following
these steps:
1. Lift one edge of the adhesive pad
gently with fingers or the rounded
edge of a spoon. Once enough of
the edge is loosened to grip with
your fingers, pull the pad gently
from the mounting surface at a
90-degree angle. Do not use
sharp tools that could damage
the vehicle’s interior.
2. If the pad fails to loosen, warm it
with a hair dryer for 2 to 3 minutes
to soften the adhesive. Be careful
not to apply too much heat, which
could damage the mounting
surface. Repeat step 1.
3. If any adhesive remains on the
dashboard surface, the adhesive
can easily be removed by rubbing
your thumb or finger across it.
4. As necessary, use a mild household
cleaner to clean the dashboard
surface.
Caution: Never use a commercial heat gun or
a paint-stripping gun. This can damage the
unit or your vehicle.

11
Middle
Front
Rear
Important: Do not install antenna inside the
vehicle passenger compartment. An antenna
mounted on the dashboard or on the rear window
deck area of the vehicle will likely experience signal
interruption issues and must be avoided. Mounting
the antenna on a nonmetallic surface will also
result in severe degradation in reception.
XM Antenna Setup
For best reception, follow these
recommendations:
• Mount the XM Antenna on the metal
surface of the vehicle roof in the center
of an area with at least 12" x 12" of
surface area and a minimum of 6"
from a window or sunroof. Figure
5 shows three typical mounting
locations. Due to the small size of
this antenna, there are many possible
locations for installation depending
on the vehicle. Improper positioning
of the antenna could cause brief
interruptions in the signal reception.
Figure 5. The design flexibility of your XM Antenna
allows mounting on many types of vehicles. Trunk
mounting of the antenna is an alternative only for
hard- or soft-top convertibles with nonmetallic roof-
tops. All other vehicles should have roof mounting.
Warning: Failure to properly install the
antenna may result in injury to you or others if it
becomes detached during an accident.

12
If an appropriate antenna mounting
location cannot be identified, contact
your local retailer installation depart-
ment for additional guidance.
• If you use the wireless FM modulator,
place the antenna as close to the
vehicle’s FM antenna as possible.
Note that the FM antenna may be
embedded in the windshield or rear
window.
A suitable compromise between
installation location and reception
quality must be assumed by the user.
• If the vehicle has roof racks or skid
ribs, you may mount the antenna
off-center.
• If the vehicle is a hard- or soft-top
convertible, then the antenna can
be mounted on the metal trunk lid
at least 4" from the rear window.
Ensure that the antenna does not
interfere with the opening or closing
of the convertible top and that the
cable is free to move and not prone
to wear. Where exposed to wind, it
is best to route the cable parallel to
the airflow.
/