iRobot Roomba Owner's manual

Category
Robotic vacuum cleaners
Type
Owner's manual
P.S. Don’t miss out on your exclusive benefits! Register your
Roomba online right now at www.irobot.com/register.
Dear iRobot Roomba Owner,
Thank you for purchasing an iRobot Roomba vacuum cleaning
robot. You’ve joined the millions of people who clean with robots -
the smarter way to get it done.
Please take a few moments to read this manual and get acquainted
with your Roomba, to get the best performance from your robot.
If you have any questions, visit our website at www.irobot.com for
more information.
Register your robot to instantly activate your warranty and enjoy
these exclusive benefits:
• Take advantage of iRobot’s award-winning customer service
Get support tailored to your specific robot, including answers
to questions, maintenance tips, video demos, live chat and
more.
• Get product updates and other valuable information
Be among the first to find out about new robots, exclusive
discounts and special promotions.
When you register, you can also tell us about your experience
with your Roomba; iRobot listens to our customers and makes
enhancements to our robots based on your valued feedback. We’d
love to hear from you!
Register your robot right now at www.irobot.com/register.
On behalf of the entire team, thank you for choosing iRobot; we
appreciate your business, feedback and loyalty.
Here’s to robots that make a difference!
Yours for less chores and more life,
Colin Angle
Chairman, CEO and Co-Founder
iRobot Corporation
P.S. Don’t miss out on your exclusive benefits! Register your
Roomba online right now at www.irobot.com/register.
4 iRobot Roomba 600 Series
Important Tips
Roomba contains electronic parts. DO NOT submerge Roomba or spray it
with water. Clean with a dry cloth only.
Before using Roomba the first
time, you need to activate Roomba
by removing the battery pull tab.
Charge Roomba overnight before
first time use.
Remove battery pull tab
For Best Performance
• Remove and clean Roomba’s brushes after every use.
• Empty Roomba’s bin and clean its lter after every use.
Use a Virtual Wall
®
(optional accessory) to keep Roomba cleaning where
you want it.
• Use your Roomba frequently.
Battery Life
To extend Roomba’s battery life and keep Roomba cleaning at peak
performance:
Always keep Roomba plugged in when not in use.
Recharge Roomba as soon as possible. Waiting several days to
recharge Roomba can damage the battery.
For storage off the power supply, remove the battery from Roomba and
store in a cool, dry place.
Blue or black batteries should be stored after Roomba has been
used.
Yellow batteries should be stored after being fully charged.
Turning Roomba on and off
To turn Roomba ON, press CLEAN once. You will hear a
beep and the CLEAN button will light.
To start a cleaning cycle, press CLEAN again. Roomba will
start a cleaning cycle.
• To pause Roomba, press CLEAN while Roomba is cleaning.
To turn Roomba OFF, press and hold the CLEAN button
until Roomba’s lights turn OFF.
• To resume the cleaning cycle, press CLEAN again.
For more detailed information, visit: www.irobot.com 5
Table of Contents
iRobot Roomba Anatomy .............................................6
Cleaning Pattern ...........................................................7
Cleaning Modes ............................................................8
Cleaning System ...........................................................9
Battery Storage and Charging ............................. 10-11
Optional Accessories .................................................12
Virtual Wall
®
............................................................12
Virtual Wall
®
Halo ....................................................13
Home Base
®
............................................................14
Remote Control ......................................................15
Scheduling Roomba (selected models) .................. 16-17
Regular Maintenance ........................................... 18-20
Language Selection Mode .........................................21
Troubleshooting .................................................... 22-23
Replaceable Modules ........................................... 24-28
Frequently Asked Questions ......................................29
Important Safety Instructions ....................................30
Declaration of Conformity ..........................................31
iRobot Customer Care ...............................................32
6 iRobot Roomba 600 Series
iRobot Roomba Anatomy
Infrared Sensor
Bin Release Button
Power Supply Socket
Flexible
Brush
Cliff Sensor
Openings
Edge-Cleaning
Side Brush
Dirt Detect
Sensor
Left Wheel
Module
Right Wheel
Module
Contact Points
for Home Base
(selected
models)
Brush Guard Release Tabs
Brush
Bearings
Brush
Guard
Removable
Caster Wheel
Buttons and Lights
Bottom View
(Models 650 and 660)
Scheduling
Interface
Main
Brush
Faceplate
Bin
DOCK Button
SPOT Button
CLEAN/Power
Button
Dirt Detect
Troubleshooting
Light
SPOT Button
CLEAN/Power
Button
DOCK Button
Dirt Detect
Troubleshooting
Light
(Models 620 and 630)
For more detailed information, visit: www.irobot.com 7
Cleaning Pattern
Roomba is a robot that cleans floors differently than the way most people
clean their floors. Roomba uses its robot intelligence to efficiently clean
the whole floor, under and around furniture and along walls.
Roomba calculates the optimal cleaning path as it cleans and determines
when to use its various cleaning behaviors:
Spiraling: Roomba uses
a spiral motion to clean a
concentrated area.
Wall Following: Roomba
uses this technique to
clean the full perimeter
of the room and navigate
around furniture and
obstacles.
Room Crossing: Roomba
crisscrosses the room
to ensure full cleaning
coverage.
Dirt Detection: When
Roomba senses dirt, the
blue Dirt Detect™ light is lit
and Roomba cleans more
intensely in that area.
TIP: For most efcient cleaning, clear your oor of clutter and use a Virtual
Wall to confine Roomba to one room.
8 iRobot Roomba 600 Series
Cleaning Modes
Roomba will clean based on the cleaning mode you select. Roomba has
three cleaning modes.
Clean Mode (all models)
Roomba automatically calculates the room size and adjusts its cleaning
time appropriately.
Spot Mode (all models)
Roomba will spiral approximately three feet in diameter and then spiral
back to where it started, intensely cleaning a localized area.
Scheduled Cleaning Mode (Models 650 and above)
When a future cleaning time is programmed, Roomba enters Scheduled
Cleaning Mode. When scheduled to clean, Roomba will occasionally flash
its next cleaning time to remind you of its schedule. At the specified time,
Roomba leaves its Home Base, cleans, and then returns to the Home
Base to recharge when it’s done.
For more detailed information, visit: www.irobot.com 9
Cleaning System
Roomba features a patented three-stage cleaning system.
Floor Surfaces
Roomba works on wood, carpet, tile, vinyl, and linoleum, and adjusts
automatically to different floor types.
Roomba automatically senses stairs and other cliffs. Roomba might
stall when confronting rounded edges and might slide over particularly
slippery surfaces. Extremely dark-colored floors may contribute to
Roomba’s cliff sensors working less effectively.
Anti-Tangle system
Roomba won’t get stuck on cords, carpet fringe or tassels. When Roomba
senses it has picked up a cord or tassel, it will automatically stop its main
brushes or side brush and try to escape. Roomba may make a clicking
noise when anti-tangle is activated.
1
Side brush
sweeps along
edge of walls and
into corners.
2
Two counter-
rotating brushes
scoop up dirt,
hair, and debris
into the bin.
3
Powerful vacuum picks up the
remaining fine particles, dirt, and
hair. The filter traps dust and
small particles.
Filter
10 iRobot Roomba 600 Series
Battery Storage and Charging
TIP: For best performance, charge Roomba’s battery overnight before using
Roomba for the first time.
Roomba is powered by a rechargeable battery. Roomba’s battery can last
for hundreds of cleaning cycles if cared for properly.
Battery Life
To extend the battery life, iRobot recommends always storing Roomba
plugged in. For more details on how to maintain Roomba’s battery life,
visit www.irobot.com/support.
TIP: Recharge Roomba as soon as possible. Waiting several days to recharge
Roomba can damage the battery.
TIP: For storage off the power supply, remove the battery from Roomba and
store in a cool, dry place.
Cleaning Time
You should fully charge Roomba’s battery before each cleaning cycle.
When fully charged, Roomba’s battery will last for at least one full clean
cycle.
16-Hour Refresh Charge
If Roomba has been left off the power supply or Home Base for an
extended period, Roomba will initiate a special 16-hour charge cycle. This
extensive charge refreshes Roomba’s battery and extends the battery
life. While charging, Roomba’s “Clean” button will pulse quickly. Note: For
best results, do not interrupt this Refresh Charge.
For more detailed information, visit: www.irobot.com 11
CLEAN button light Battery status
Solid red Battery empty
Amber pulse Charging
Solid green Fully charged
Quick amber pulse 16-hour refresh charge
TIP: When Roomba is on the Home Base, always make sure that the Home
Base power light is on.
Or
Charging Roomba
Charge Roomba in one of two ways:
Charging Lights
Roomba uses the CLEAN button light to indicate that it is charging. Use
this chart to determine the status of the battery.
CLEAN/Power
Button
Using the Home Base Using the Power Supply Only
12 iRobot Roomba 600 Series
Virtual Wall
®
(optional accessory for all models)
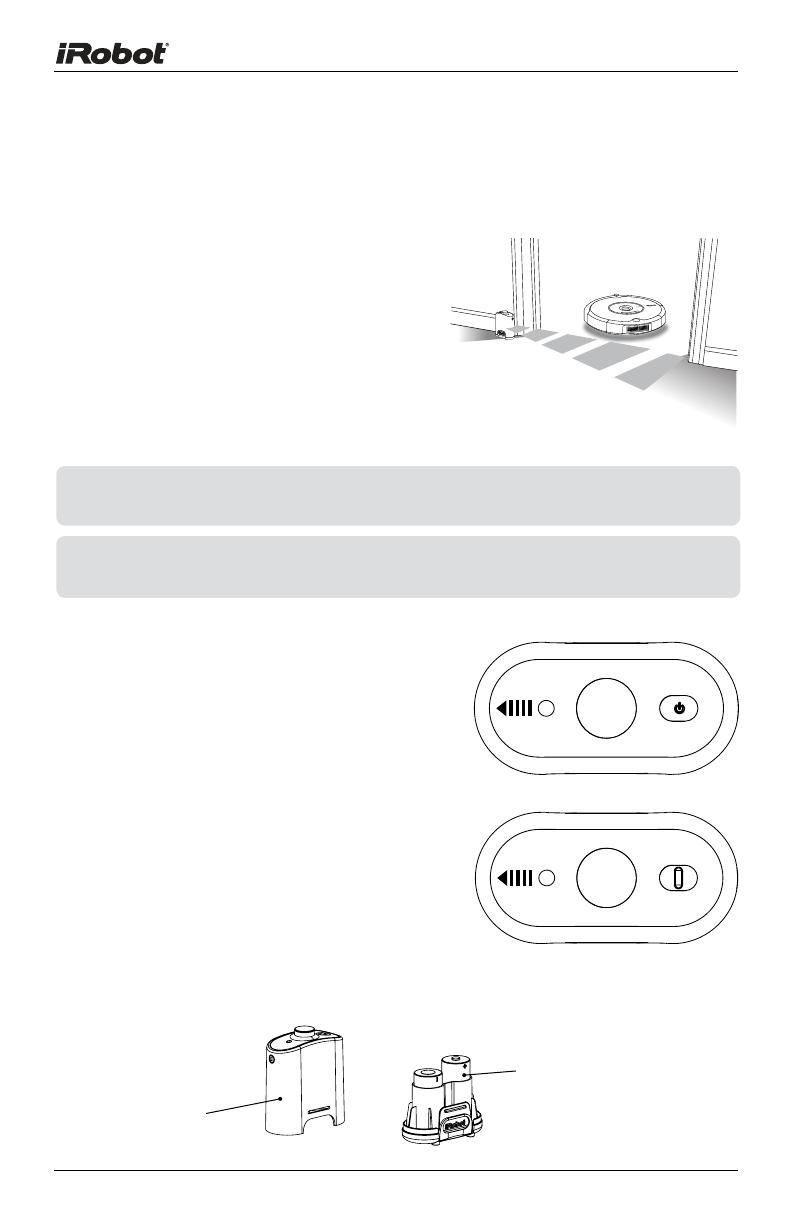
Virtual Walls create an invisible barrier that Roomba will not cross. This invisible barrier
can be used to confine Roomba to a particular
room or area, and prevent it from getting too
close to electrical or computer cords, delicate
objects on the floor, etc.
The Virtual Walls can be set to block an opening
up to seven feet long. Note that the width of the
Virtual Wall’s beam also increases as its length increases,
creating a cone-shaped area which Roomba cannot pass.
The Virtual Wall also creates a halo of protection around itself,
preventing Roomba from getting too close.
Manual Virtual Wall
A Manual Virtual Wall must be turned on by
hand at the beginning of the cleaning cycle to
activate the barrier. A Manual Virtual Wall (and
its power light) will shut off after 135 minutes.
When battery levels are low, the Virtual Wall
power light will blink slowly to indicate that it
needs new batteries.
Auto Virtual Wall
When an Auto Virtual Wall is set to “Auto”
mode, the power light blinks repeatedly to
indicate it is on. When battery levels are low, the
Virtual Wall blinks repeatedly twice to indicate
that it needs new batteries. To save battery
power, switch the Auto Virtual Wall to “Off”.
When in “Auto” mode, the batteries should last
approximately six months.
TIP: Point the arrows on top of the Virtual Wall towards the opening you would
like to block.
TIP: For best performance, place the Virtual Wall on the outside of the
doorway you wish to block.
OFF
AUTO
Battery
Compartment
Battery Installation
Two “C” Alkaline Batteries
(not included)
For more detailed information, visit: www.irobot.com 13
Virtual Wall
®
Halo
(optional accessory for all models)
The Virtual Wall Halo is perfect for homes with pets. It sets up a protective
zone, gently guiding Roomba around your pet’s food and water bowls to
keep the contents intact.
To set up the Halo, take the Virtual Wall out of the sleeve. Install batteries
as shown on the previous page. Set the Virtual Wall to “Auto” mode and
fully insert it into the sleeve. Make sure the Virtual Wall is inserted all the
way into the sleeve. The circular lens should be completely visible at the
top. Place the Virtual Wall Halo on the oor, level with Roomba, and in
close proximity to the bowls as shown below. If you have one bowl, put
it beside the Halo, almost touching the wall. For two bowls, place one on
either side.
TIP: As Halo’s battery levels get low, the field may not be strong enough to
protect your bowls. If that happens, change the batteries in the Virtual
Wall Halo.
TIP: Virtual Wall Halo works on non-metal bowls less than 10 inches (25 cm) in
diameter and up to 3.5 inches (9 cm) tall.
x
protective zone
bowlbowl
bowl bowl
Halo
Halo
protective zone
bowl
bowl
Halo
protective zone
Protective zone
approximately 20
inches (50 cm) in
diameter
14 iRobot Roomba 600 Series
Home Base
®
Roomba returns to the Home Base at the end of a cleaning cycle or when
its battery is running low. Roomba needs to find the infrared signal of the
Home Base in order to return.
Always keep the Home Base plugged in. When the Home Base is plugged
in, the power light will blink to indicate that the Home Base is connected
to the power source. When Roomba connects to the Home Base, the
power light will be solid to indicate that Roomba has successfully
connected to the Home Base. When Roomba is charging, Roomba’s
“Clean” button will pulse amber as described in the “Battery Storage and
Charging” section of this manual. The “Clean” button will be a solid green
when Roomba is completely charged.
Home Base Location
You should position the Home Base on a hard level surface and in an
area where Roomba has a clear path to return at the end of a cleaning
cycle. Locate the Home Base against a wall or other immovable object to
prevent it from sliding during docking. If Roomba is unable to dock on its
first attempt, it will try again until it docks successfully.
TIP: Do not place the Home Base within 4 feet of a stairwell.
Chair
Table
Home
Base
Stairs
Area Rug
For more detailed information, visit: www.irobot.com 15
TIP: Check that there is a direct line of sight from the Remote Control to
Roomba and that the remote is pointed at Roomba.
The Remote Control, Virtual Walls and Home Base operate using an invisible
infrared beam. If they are all used in the same area, Roomba may see
multiple infrared signals and will not operate. The Remote WILL NOT work
when Roomba is near Virtual Walls.
Before using your remote for the first time, install 2 AA batteries (not
included).
SPOT
Roomba spirals approximately three
feet in diameter and then spirals back
to where it started, intensely cleaning a
local area.
CLEAN
Roomba automatically calculates the
room size and adjusts its cleaning time
appropriately.
. . .
Roomba attempts to dock on the Home
Base, if present.
. . .
Remote Control
(optional accessory for all models)
The Remote Control lets you conveniently control Roomba’s functions.
You can use it to turn Roomba on and off and steer it around your
room without bending down. It also gives you remote access to these
commands:
SPOT
Button
CLEAN/Power
Button
. . .
Button
Directional
Buttons
16 iRobot Roomba 600 Series
Scheduling Roomba
(Models 650 and above)
Setting the Time
You must set the time before scheduling Roomba to clean.
1
Press and hold CLOCK.
2
While holding CLOCK, use the DAY, HOUR,
and MINUTE buttons to set the correct time.
3
Release CLOCK. Roomba will beep to
indicate that the time has been set.
Setting a Schedule
You can schedule Roomba to clean once per day, up to seven times
per week. You must set the time before setting a schedule.
To set a schedule:
1
Press and hold SCHEDULE.
2
While holding SCHEDULE, use the DAY,
HOUR, and MINUTE buttons to set the
schedule.
3
Release SCHEDULE. Roomba will beep to
indicate that the schedule has been set.
Viewing and Deleting Schedules
To view Roomba’s scheduled cleaning times:
1
Press and hold SCHEDULE.
2
While holding SCHEDULE, press the DAY
button to cycle through Roomba’s scheduled
cleaning times.
3
Release SCHEDULE.
For more detailed information, visit: www.irobot.com 17
To Delete a Schedule
1
Press and hold SCHEDULE.
2
While holding SCHEDULE, press the DAY
button to cycle through Roomba’s scheduled
cleaning times.
3
When Roomba is displaying the scheduled
cleaning time you’d like to delete, press and
hold DAY to delete the scheduled cleaning
time.
4
Release SCHEDULE.
To Change a Schedule
1
Press and hold SCHEDULE.
2
While holding SCHEDULE, press the DAY
button to cycle through Roomba’s scheduled
cleaning times.
3
When Roomba is displaying the scheduled
cleaning time you’d like to change, press the
HOUR and MINUTE buttons to change the
scheduled cleaning time.
4
Release SCHEDULE. Roomba will beep to
confirm that the schedule has been changed.
TIP: Roomba’s clock can be viewed in either the 12-hour (AM/PM) format or
the 24-hour format. To toggle between the two views, press and hold the
DAY and MINUTE buttons simultaneously for 3 seconds until Roomba
beeps and the clock briefly illuminates, indicating the clock format has
been switched. Roomba’s clock will switch back to the default 12-hour
(AM/PM) format when Roomba’s battery is disconnected or significantly
discharged.
18 iRobot Roomba 600 Series
Regular Maintenance
To keep Roomba running at peak performance, it is recommended that
you perform the following maintenance regularly:
TIP: Bin emptying and brush cleaning should be done after every cleaning cycle.
Regularly pull out and clean Roomba’s front wheel.
TIP: If you notice Roomba picking up less debris from your floor, empty the bin
and clean the brushes.
Empty bin
A. Push down and remove to clean filter*
Visit www.irobot.com/support for information on keeping Roomba running at peak
performance.
*Replace filter every 2 months
1
Remove and empty Roomba’s bin after each use
2
Clean Roomba’s filter
Press button and
pull to remove bin.
For more detailed information, visit: www.irobot.com 19
TIP: When maintaining Roomba, look for the yellow parts. These parts are
designed to be removed and cleaned every time you empty Roomba’s bin.
3
Clean Roomba’s brushes
B.
Remove and clean Roomba’s
brushes.
A. Remove brush guard by lifting both
yellow tabs.
D. Use the included cleaning tool to
easily remove hair from Roomba’s
bristle brush by pulling it over the
brush.
C. Remove and clean hair and dirt from
Roomba’s yellow brush bearings.
Do not attempt to run Roomba without the bearings. If you
misplace Roomba’s brush bearings, contact iRobot Customer Care
for replacement bearings.
Excessive build-up of hair can permanently damage Roomba.
Remove brushes and inspect brush bearings regularly.
Bearings
Brush
Bearings
20 iRobot Roomba 600 Series
Clean Roomba’s front wheel
1
Pull firmly on Roomba’s front
wheel to remove it from the
robot.
2
Remove debris from inside the
front wheel cavity.
3
Remove the front wheel from
its housing and clear any hair
wrapped around the axle. Push
firmly on the wheel axle to
remove it completely from the
wheel.
4
Wipe the wheel clean.
5
Re-install the wheel into the housing, and the module into the robot.
Clean Roomba’s cliff sensors
1
Wipe all four cliff sensors with a clean, dry cloth.
Cliff Sensor
Openings
Wheel
Axle
Housing
Front wheels clogged with hair and debris could result in floor
damage.
  • Page 1 1
  • Page 2 2
  • Page 3 3
  • Page 4 4
  • Page 5 5
  • Page 6 6
  • Page 7 7
  • Page 8 8
  • Page 9 9
  • Page 10 10
  • Page 11 11
  • Page 12 12
  • Page 13 13
  • Page 14 14
  • Page 15 15
  • Page 16 16
  • Page 17 17
  • Page 18 18
  • Page 19 19
  • Page 20 20
  • Page 21 21
  • Page 22 22
  • Page 23 23
  • Page 24 24
  • Page 25 25
  • Page 26 26
  • Page 27 27
  • Page 28 28
  • Page 29 29
  • Page 30 30
  • Page 31 31
  • Page 32 32

iRobot Roomba Owner's manual

Category
Robotic vacuum cleaners
Type
Owner's manual

Ask a question and I''ll find the answer in the document

Finding information in a document is now easier with AI