Page is loading ...

Thank you for your purchase of the ProMaster PL400 advanced LCD control studio monolight. The
PL400 is designed for the photographic enthusiast who is looking for a portable, reliable, powerful studio
lighting solution with advanced features. Standard features include color-temperature corrected circular
flash tube (5600k), Bowens compatible reflector mount allowing for a wide range of accessories,
continuous power level adjustment, multiple anti red-eye sync options, remote optical slave sensor,
audible flash ready signal, built-in umbrella holder, and adjustable locking flash mount.
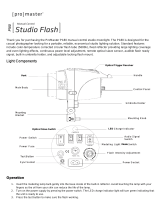
Light Controls and Operation
A. FLASH CHARGE INDICATOR – Shows status of flash charging.
B. MODELING LAMP CONTROL - The MODELING LAMP CONTROL is used to select the modeling lamp
mode. Pressing the MODE button (M) until the indicators for the MODELING LAMP CONTROL are flashing.
Press the ENTER BUTTON (G) until the mode you wish to choose is flashing. After a couple of moments, the
selected mode will stop flashing and will display the mode you have selected. If you select Free, the modeling
lamp output is adjusted independent of the flash output If you select Prop(optional), the modeling light output
will adjust in synch with the flash output. To adjust the modeling light output in this mode, press the ENTER
switch until the MODELING LAMP POWER INDICATOR (K) is flashing and then rotate the MODE button (M)
until you have selected the desired modeling lamp power. Pressing the ENTER button again will return the
MODE control to the FLASH POWER INDICATOR (L). If the control is set to OFF, the modeling light is off.

C. AUDIO SIGNAL SWITCH - If you would like to have an audio signal to indicate that the flash is fully charged
and ready to fire, select Buzz/ON. If you prefer to not have the audio signal, select Buzz/OFF.
D. OPTICAL SLAVE MODE - The flash offers 3 synchronization modes for the built-in optical slave trigger. These
modes allow the flash to properly synchronize with another flash which is triggering the PL400. Selecting Cell
without one of the numerical choices deactivates the optical slave.
Modes:
1. Standard Sync Mode - When this mode is selected, the PL400 will flash instantly when another flash fires.
2. Trigger On Second Flash – In this mode, the PL400 will ignore the first triggering flash and trigger instantly
with the second flash from the triggering flash.
3. Trigger On Third Flash - In this mode, the PL400 will ignore the first and second triggering flash and
trigger instantly with the third flash from the triggering flash.
Different cameras use a variety of flash schemes to reduce red-eye from a single pre-flash to a burst of flashes.
Choosing the mode which best matches the pre-flash mode on your camera will help you to get the best results.
E. COUNTER – Counts the number of times which the flash has been fired. This cannot be reset by the user.
F. TEST BUTTON - Press the TEST BUTTON to manually fire the flash and check its operation.
G. ENTER BUTTON – Used to toggle between mode selections.
H. POWER BUTTON – Turns the flash on and off. The red indicator light will blink when the flash is plugged in
and not turned on. It will glow solid when the power is on and fan is operating.
I. SYNCH PORT – Plug a synch cord or radio trigger into this port to trigger the flash.
J. POWER INPUT
K. MODELING LIGHT POWER INDICATOR – Indicates the power level of the modeling light from 2.0 to 6.0
in increments of .1.
L. FLASH POWER INDICATOR – Indicates the power level of the modeling light from 2.0 to 6.0 in increments
of .1.
M. MODE BUTTON – Press this button to toggle though menu choices. Rotate the button to change the flash
power level or the modeling light power level.
N. HANDLE – Use the flash handle to conveniently adjust the position of the flash head.
Safety Precautions
1. Before using the flash, make sure that your lighting equipment is plugged into a 110 volt AC power source.
2. Do not expose your lighting equipment to sunlight, moisture, dust, dirt, rain or water.
3. Any exposure to chemical solutions, gasoline, grease, oil, paint, or detergents can result in permanent damage
to your equipment.
4. Do not insert any metal objects into your lighting equipment.
5. Do not touch or handle equipment with wet hands or allow your equipment to be in contact with water.
6. Be sure to disconnect from the power supply when the light is not in use.
7. Do not attempt to repair your lighting equipment yourself.
8. Avoid rapid continuous firing of your flash. Continued rapid firing may cause excessive heat build up and
potential damage to your unit.

OVER TEMPERATURE PROTECTION
The PL400 flash features an OVER TEMPERATURE PROTECTION CIRCUIT. It is normal for the flash to become
warm during operation. If the temperature exceeds the working limit due to excessive rapid firing, the OVER
TEMPERATURE PROTECTION circuit will power off the flash to avoid damage. The red light above the power button
will be off. Allow the PL400 to cool. It can be powered on again by pressing the power button.
Specifications
Power: 400 watt second (joule) at full power
Color Temperature: 5600k ± 100k
Guide Number: 223’ /68m @ 100 ISO
Modeling Lamp: 150 watt / 120 volt – FJDD E27 Lamp
Modeling Lamp Control: 2.0-6.0 stepless adjustment/auto adjustment/ independent
adjustment/off/auto off during charging
Power Control: Continuous 2.0 – 6.0, 1/32 stepless adjustment
Optical Slave: Built-in, effective up to 35’ / 10m depending on conditions; 3 synch delay options
Recycling Time: .2 to 2.2 seconds
Over Temperature Protection: Yes with built-in cooling fan
Power Input: AC110 - 130 volt, 60Hz
Fuse: 6.3 Amp – F6.3L 250V
Weight: 4 lb. 3 oz. approx.
Size: 9 ½” L x 5 ¼” Ø x 7 ½” H (aprox. With bracket collapsed)
ONE YEAR UNCONDITIONAL GUARANTEE
If for any reason, this ProMaster product fails within ONE YEAR of the date of purchase, return this product to your
ProMaster dealer and it will be exchanged for you at no charge. ProMaster products are guaranteed for ONE FULL
YEAR against defects in workmanship and materials. If at any time after one year, your ProMaster product fails under
normal use, we invite you to return it to ProMaster for evaluation.
Code 9469
Made in China
www.promaster.com
Fairfield, CT 06825
/