Page is loading ...

INSTALLATION INSTRUCTIONS
66-1153-03
R7140G,L,M
Burner Control Modules
APPLICATION
The Honeywell R7140G,L,M Burner Control Modules are
microprocessor-based integrated burner controls for
automatically fired gas, oil or combination fuel single burner
applications. The Burner Control Module system consists of a
Relay Module, Q520A Subbase, Amplifier and Purge Card.
Options include S7800 Keyboard Display Modules (KDM).
The R7140 Burner Control Modules directly replace many
BC7000 PM720G,L,M, and many R4150G,L,M and
R4140G,L,M units using the existing Q520A 20-terminal
Wiring Subbase.
The R7140 can be demonstrated or tested on the FSP5004
tester. Note that the R7849 UV Amplifier or the R7851 Optical
Flame Amplifier cannot be tested.
The R7140G,L,M is programmed to provide a level of safety,
functional capability and features beyond the capacity of
conventional controls.
Functions provided by the R7140G,L,M include automatic
burner sequencing, flame supervision, system status
indication, system or self-diagnostics and troubleshooting.
FEATURES
• Device status available to ModBus™ through S7810M
card or S7800A1001 Series 5 Keyboard Display.
• Safety features:
— Interlock check.
— Closed loop logic test.
— Dynamic AMPLI-CHECK™.
— Dynamic input check.
— Dynamic safety relay test.
— Dynamic self-check logic.
— Expanded safe-start check.
— High Fire Purge Switch test (R7140L only).
— Internal hardware status monitoring.
— Low Fire Start Switch test.
— Tamper resistant timing and logic.
• Application flexibility.
• 0.8 or 3.0 second Flame Failure Response Time (FFRT),
depending on amplifier selected.
• Dependable, long-term operation provided by
microcomputer technology.
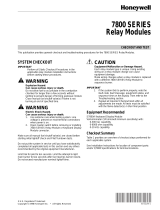
• Five LEDs for sequence information. See Fig. 1.
• Five function Run/Test Switch.
• Interchangeable plug-in flame amplifiers.
• Nonvolatile memory; history files and sequencing
status are retained after loss of power and can be
viewed using the Keyboard Display Module
S7800A1001 (sold separately).
• Report generation (optional) through modbus™.
NOTE: Check Service Notes on page 7 and Static Check-
out on page 26 prior to installation of R7140.
• Burner controller data (optional):
— Lockout/alarm status.
— Total cycles of operation.
— Total hours of operation.
• Status of configuration jumpers.
• Status of Run/Test Switch.

R7140G,L,M BURNER CONTROL MODULES
66-1153—03 2
Fig. 1. Burner Control Module and sequence status LEDs.
SPECIFICATIONS
Electrical Ratings (See Table 1):
Voltage and Frequency: 120 Vac (+10%/-15%), 50 or 60 Hz
(±10%).
Power Dissipation in the Run Mode: 10W maximum.
Maximum Total Connected Load: 2000VA.
Fusing—Total Connected Load: 15A fast blow, type SC or
equivalent.
Environmental Ratings:
Ambient Temperature:
Operating: -40°F to +140°F (-40°C to +60°C).
Storage: -40°F to +150°F (-40°C to +66°C).
Humidity: 85% relative humidity, continuous, noncondensing.
Vibration: 0.5G environment.
Weight:
With Dust Cover and Q520A Subbase: 4 lb., 5 oz. (1.96 kg).
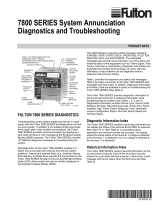
Dimensions:
See Fig. 2.
Approvals:
Underwriters Laboratories Inc. UL, cULus Component
Recognized.
Federal Communications Commission: Part 15,
Class A—Emissions.
Mounting:
Q520A 20-terminal Subbase for panel mounting.
Required Components:
Plug-in Flame Signal Amplifier. See Table 1.
Plug-in Purge Timer Cards. See Table 2.
SEQUENCE
STATUS
LEDs
RESET
PUSHBUTTON
FLAME
SIMULATOR INPUT
FLAME CURRENT
TEST JACKS
RUN/TEST SWITCH
PLUG-IN
PURGE
CARD
DUST
COVER
RELAY
MODULE
FLAME
AMPLIFIER
M7552B

R7140G,L,M BURNER CONTROL MODULES
3 66-1153—03
Table 1. Flame Detection Systems.
a
Flame Failure Response Time (FFRT) depends on selection of amplifier and 7800 SERIES and R7140 Relay Module.
b
R7824C is used only with the 24 Vdc RM7824 Relay Module and C7024E,F Flame Detectors.
c
Circuitry tests all electronic components in flame detection system (amplifier and detector) 12 times a minute during burner
operation and shuts down burner if detection system fails.
d
Circuitry tests flame signal amplifier 12 times a minute during burner operation and shuts down burner if amplifier fails.
e
200/220/240 Vac applications require a 120 Vac, 10 VA minimum stepdown transformer (not provided) to drive the shutter.
Applies to R7886A series 2 or greater; R7861 series 1 or greater. Fig. 2 shows flame detector wiring.
f
Use C7027, C7035 and C7044 Flame Detectors only on burners that cycle on-off at least once every twenty-four hours. Use
C7061A Ultraviolet Detector with R7861A Amplifier or C7076A Flame Detector with R7886A Amplifier as ultraviolet flame detec-
tion system for appliances with burners that remain on continuously for twenty-four hours or longer.
g
R7847A,B Amplifiers with 0.8/1 second FFRT should NOT be used with C7012A,C Solid State Ultraviolet Detectors.
h
R7824C Series 2 and greater and R7847C Series 4 or greater, check flame detector system when flame reaches 1.5 Vdc or at
4.5 seconds, whichever occurs first.
NOTE: R7824C Series 2 or greater and R7847C Series 4 or greater, pulse the shutter when signal of 1.5 Vdc is sensed. Display
readings of 0.7 to 2.4 Vdc are common.
i
Order flame rod separately; see flame detector Instructions for holder.
Plug-in Flame Signal Amplifiers Applicable Flame Detectors
Type Color Self-Checking Model
Flame
Failure
Response
Time (sec)
a
Fuel Type Models
Rectification Green Dymanic Self-
Check
R7824C
b,c,h
3 Gas, oil,
coal
Ultraviolet (Purple
Peeper®)
C7024E,F
No
R7847A
g
0.8/1 or 2/3 Gas Rectifying Flame Rod
Holders
i
C7004, C7007, C7011
Complete Assemblies:
C7008, C7009, Q179
No
R7847A
g
2/3 Gas, oil,
coal
Ultraviolet (Purple
Peeper®)
C7012A,C.
Dynamic Ampli-
Check®
R7847B
d,g
0.8/1 or
2/3
Gas Rectifying Flame Rod
Holders
i
C7004, C7007, C7011
Complete Assemblies:
C7008, C7009, Q179
Dynamic Ampli-
Check®
R7847B
d,g
2/3 Gas, oil,
coal
Ultraviolet (Purple
Peeper®)
C7012A,C
Dynamic Self
Check
R7847C
c,h
3 Gas, oil,
coal
Ultraviolet (Purple
Peeper®)
C7012E,F
Infrared Red No R7848A 2/3 Gas, oil,
coal
Infrared (Lead Sulfide) C7015
Dynamic Ampli-
Check®
R7848B
d
2/3 Gas, oil,
coal
Infrared (Lead Sulfide) C7015
Red/
White
No R7852A 2/3 Gas, oil,
coal
Infrared (Lead Sulfide) C7915
Dynamic Ampli-
Check®
R7852B
b
2/3 Gas, oil,
coal
Infrared (Lead Sulfide) C7915
Ultraviolet Purple No R7849A 0.8/1 or
2/3
Gas, oil Ultraviolet
(Minipeeper)
C7027, C7035, C7044
f
Dynamic Ampli-
Check®
R7849B
d
0.8/1 or
2/3
Gas, oil Ultraviolet
(Minipeeper)
C7027, C7035, C7044
f
Dynamic Self-
Check
R7861A
c,e
0.8/1 or
2/3
Gas, oil,
coal
Ultraviolet C7061
Blue Dynamic Self-
Check
R7886A
c,e
2/3 Gas, oil,
coal
Ultraviolet (Adjustable
Sensitivity)
C7076
Optical White Dymanic Ampli-
Check®
R7851B 0.8/1 or 2/3 Gas, oil,
coal
Optical (UV, Visible
Light)
C7927, C7962
Dynamic Self-
Check
R7851C
c
2/3 Gas, oil,
coal
Optical (UV only) C7961

R7140G,L,M BURNER CONTROL MODULES
66-1153—03 4
Above times cover the Purge timings of the R4140/50 Pro-
grammers and PM720.
Other timings exist—consult the Tradeline catalog for com-
plete list of ST7800 Purge timers.
Accessories:
The following accessories enhance the R7140 Burner Control
Module and are available through local 7800 SERIES
distributors.
Keyboard Display Modules (KDM):
S7800A1001 English language.
S7800A1035 French language.
S7800A1043 German language.
S7800A1050 Italian language.
S7800A1068 Spanish language.
S7800A1118 Katakana (Japanese) language.
S7800A1126 Portuguese language.
S7800A1142 English language.
Communications:
S7810A1009 Data ControlBus Module™ (if no KDM is
used).
S7810M1003 ModBus™ Module.
Miscellaneous:
S7820A1007 Remote Reset Module.
S7830A1005 Expanded Annunciator, 120 Vac, 50/60 Hz.
203541 Data ControlBus Connector, 5-wire.
203765 Remote Display Mounting Bracket.
221729 Dust cover, Relay Module.
50023821-001 Keyboard Display Module Cover, NEMA 4,
clear.
50023821-002 Keyboard Display Module Cover, NEMA 4,
clear with reset button.
205321 Flush Display mounting kit.
221818A Extension Cable, display, 5 ft. (1524 mm).
221818C Extension Cable, display, 10 ft. (3048 mm).
FSP5004 Tester.
123514A Rectification Flame Simulator.
203659 Ultraviolet Flame Simulator.
Fig. 2. Mounting dimensions of R7140G,L,M Burner Control Module with Q520A Subbase, in in. (mm).
Table 2. Plug-in Purge Timer Cards.
Pre-Purge Timing Product Number
7 ST7800A1013
30 ST7800A1039
40 ST7800A1047
60 ST7800A1054
90 ST7800A1062
5-3/4 (146)
1-1/4
(32)
RESET
POWER
PILOT
FLAME
MAIN
ALARM
S
_
+
5
(127)
5
(127)
7
(177)
6-5/32
(156)
BURNER CONTROL
M22604

R7140G,L,M BURNER CONTROL MODULES
5 66-1153—03
a
The R7140 must have an earth ground providing a connection between the subbase and the control panel or the equipment. The earth
ground wire must be capable of conducting the current to blow the 15A fast blow fuse (or breaker) in the event of an internal short
circuit. The R7140 needs a low impedance ground connection to the equipment frame, which, in turn, needs a low impedance
connection to earth ground.
Table 3. Terminal Ratings.
Terminal No. Description Ratings
G
Flame Sensor Earth Ground
a
—
Earth G
Earth Ground
a
—
L2(N) Line Voltage Common —
L1 Line Voltage Supply (L1) 120 Vac (+10/-15%), 50 or 60 Hz (±10%).
3 Lockout/Running Interlock 120 Vac, 8A run, 43A inrush.
4 Pre-Ignition Interlock Input 120 Vac, 1 mA.
5 Pilot Valve/Ignition 120 Vac. See Table 4.
6 Interrupted/Intermittent Pilot Valve/First Stage Oil Valve 120 Vac. See Table 4.
7 Main Fuel Valve 120 Vac. See Table 4.
8 Burner Motor 120 Vac, 9.8 AFL, 58.8 ALR (inrush).
9 Alarm 120 Vac, 1A pilot duty.
10 Firing Rate High Fire 120 Vac, 75 VA pilot duty.
11 Firing Rate Common 120 Vac, 75 VA pilot duty.
12 Firing Rate Modulate 120 Vac, 75 VA pilot duty.
13 Low Fire Switch Input 120 Vac, 1 mA.
14 Firing Rate Low Fire 120 Vac, 75 VA pilot duty.
15 High Fire Switch Input 120 Vac, 1 mA.
16 Burner Controller and Limits 120 Vac, 1 mA.
17 Shutter 120 Vac, 0.5A.
18 Ignition
120 Vac,
4.5A ignition.
F Flame Sensor 60 to 220 Vac, current limited.
Table 4. Terminal Ratings.
Terminal Typical Load Maximum Rating at 120 Vac, 60 Hz
5 or 6 Ignition
Transformer/Pilot
Valve/First Stage Fuel Valve
4.5A ignition and 50 VA pilot duty, or
2.5A ignition and 75 VA pilot duty.
7 Main Fuel Valve(s) (solenoid/
motorized/diaphragm) and
Vent Valve, if required
250 VA pilot duty or 65 VA pilot duty in parallel with motorized valve(s) using a total of
1150 VA locked rotor (inrush), 460 VA to open, and 250 VA to hold or motorized valve(s)
using a total of 1500 VA locked rotor (inrush), 600 VA to open, and 250 VA to hold.

R7140G,L,M BURNER CONTROL MODULES
66-1153—03 6
a
30 seconds with JR2 clipped and jumper from terminal 8 to terminal 15.
* STANDBY and RUN can be an infinite time period.
** PURGE will be determined by which ST7800A purge card is selected; 15 timings are available from 2 seconds to 30 minutes.
NOTE: Allowable inrush can be up to ten times the pilot
duty rating.
EXAMPLE: Pilot duty rating = 50 VA.
At 120 V, running current is:
50/120 = 0.42A.
Maximum allowable inrush is ten times 0.42A = 4.2A.
INSTALLATION
When Installing this Product...
1. Read these instructions carefully. Failure to follow
them could damage the product or cause a hazardous
condition.
2. Check the ratings given in the instructions and marked
on the product to make sure the product is suitable for
the application.
3. Installer must be a trained, experienced, flame
safeguard service technician.
4. After installation is complete, check out the product
operation as provided in these instructions.
WARNING
Fire or Explosion Hazard.
Can cause property damage, severe injury,
or death.
To prevent possible hazardous burner operation, verify
safety requirements each time a control is installed on
a burner.
WARNING
Electrical Shock Hazard.
Can cause serious injury or death.
Disconnect the power supply before beginning
installation. More than one power supply disconnect
may be required.
IMPORTANT
1. Wiring connections for the relay modules are unique;
therefore, refer to Fig. 4–11 or the correct
Specifications for proper subbase wiring, and
sequence charts.
2. Wiring must comply with all applicable codes,
ordinances and regulations.
3. Wiring must comply with NEC Class 1 (Line Voltage)
wiring.
4. Loads connected to the R7140 must not exceed
those listed in the Specifications; see Table 3 and 4.
5. Limits and interlocks must be rated to simultaneously
carry and break current to the ignition transformer,
pilot valve, and main fuel valve(s).
6. All external timers must be listed or component
recognized by authorities who have jurisdiction for
the specific purpose for which they are used.
7. For on-off gas-fired systems, some authorities who
have jurisdiction prohibit the wiring of any limit or
operating contacts in series between the flame
safeguard control and the main fuel valve(s).
8. Two Flame Detectors can be connected in parallel
with the exception of flame detectors C7927, C7915,
C7961, and C7962.
9. This equipment generates, uses and can radiate
radio frequency energy and, if not installed and used
in accordance with the instructions, may cause
interference to radio communications. It has been
tested and found to comply with the limits for a
Class A computing device of Part 15 of FCC rules
which are designed to provide reasonable protection
against such interference when operated in a
commercial environment. Operation of this
equipment in a residential area may cause
interference; in which case, the users at their own
expense may be required to take whatever measures
are required to correct this interference.
10.This digital apparatus does not exceed the Class A
limits for radio noise for digital apparatus set out in
the Radio Interference Regulations of the Canadian
Department of Communications.
Table 5. Sequence Timing for Normal Operation.
Device Initiate Standby Purge
Flame
Establishing
Period
Run
Post
Purge
Timing Interlock Circuits
Firing
Rate
Circuit
Energy
Saving
Pre-Purge
Approval
Code
BodiesPilot Main
R7140G 10 sec. * ** 4 or 10
sec.
10, 15
sec.
a
or
intermittent.
* 15 sec. Pre-Ignition,
Running, Low Fire
4-wire
modulating
No UL/CSA
Modulating
R7140L 10 or 15
sec.
a
Pre-Ignition,
Lockout High and
Low Fire
FM/IRI
Modulating
R7140M 10 sec. or
intermittent
Pre-Ignition,
Running, isolated
Low Fire.
2-wire
isolated
On-Off-On
contacts
UL/CSA
On-Off.

R7140G,L,M BURNER CONTROL MODULES
7 66-1153—03
Location
Humidity
Install the relay module where the relative humidity never
reaches the saturation point. The relay module is designed to
operate in a maximum 85 percent relative humidity
continuous, noncondensing moisture environment.
Condensing moisture may cause a safety shutdown.
Vibration
Do not install the relay module where it could be subjected to
vibration in excess of 0.5G continuous maximum vibration.
Weather
The relay module is not designed to be weathertight.
When installed outdoors, protect the relay module using an
approved weathertight enclosure.
Final Wiring Check
1. Check the power supply circuit. The voltage and
frequency tolerance must match those of the R7140. A
separate power supply circuit may be required for the
R7140. Add the required disconnect means and
overload protection.
2. Check all wiring circuits and complete the Static
Checkout, Table 8, before installing the R7140 on the
subbase.
3. Install all electrical connectors.
4. Restore power to the panel.
Service Notes:
Per industry standards, a conduit seal or a cable type that is
sealed is required to be installed in a device that can result in
flammable gas or flammable liquid flow through a conduit or
cable to an electrical ignition source in the event of a seal
leakage or diaphragm failure. This could be on the gas valves,
or gas or oil pressure regulators.
Check the Q520 Wiring Subbase terminals against the typical
wiring drawings, Figures 7, 8, 12, 13, 17, or 18.
If wires are attached to terminals that are unused in the
figures, DO NOT INSTALL THE R7140 until you have
identified the connections’ functions. Most likely the old
subbase terminals were used as tie points, so removing the
wires, capping with a wire nut, and tucking the wire down into
the subbase is all that needs to be done.
Make sure the wiring subbase of the old device is a
20-terminal Q520 (four rows of 5 terminals).
Make sure the system Controller is connected to the correct
terminal on the Q520 wiring subbase. It may be in a wire nut
tucked into the subbase. It needs to be connected to a
terminal (like terminal 4 or 16).
Make sure there is an electrical service ground wire
connection to the G terminal in the wiring subbase.
R4140G or BC7000 with PM720G replacement.
— If the application was a dual burner ignition, check the
Q520 subbase for a jumper between terminals 6 to 7,
discard the jumper and move the main valve connec-
tion (terminal 7) to terminal 6.
Replacing GP201 or GP301 devices:
— High Fire (or Purge Rate) Switch may be connected to
terminal D.
— Identify, remove, and connect to terminal M.
Replacing GP101 devices:
— Check wiring subbase. If D is jumpered to 8, remove
the jumper.
Replacing R4140 programmers on Carlin 1050 and 1150
burners:
— Remove jumper from 6 to 7.
— Remove jumper from L2 to 12 and wire nut the wires
together. Note: There will be no wire on terminal 12.
R4140M replacements:
Check terminal 13 of the Q520 wiring subbase.
— If nothing is on 13, install the new R7140M1007.
— If 13 is jumpered to 8, remove the jumper and install
R7140M1007.
— If 13 goes somewhere (assume a low fire switch
because the system has a damper motor), remove J1
and J2 from the back of the R7140M1007.
NOTE: J1 and J2 provide an input for the R7140M when
the system does not have a spring return damper
with a low fire switch.
Leaving J1 and J2 in place with either 13 jump-
ered to 8 or with the low fire switch will cause the
blower motor to come on after the R7140M is
installed and power is supplied to the system.
Generally, the following table will apply to select
the R7140M1007 model and the status of jumpers
J1 and J2.

R7140G,L,M BURNER CONTROL MODULES
66-1153—03 8
* Check terminal 8 and 15.
If jumpered, ST7800A1031 (7 second purge).
If not jumpered, ST7800A1039 (30 second purge).
Mounting R7140 Relay Module
Installing the Programmer (Fig. 3)
WARNING
Electrical Shock Hazard.
Can cause severe injury, death or property
damage.
Disconnect power before installation to prevent
electrical shock. More than one disconnect may be
involved.
1. Open the master switch.
2. Make sure no subbase wiring is projecting out beyond
the terminal blocks. Tuck in wiring against the back of
the subbase so it does not interfere with the contacts.
3. Grasp the programmer chassis and engage the chassis
hinge brackets with the pivot pins at the bottom of the
subbase.
4. Swing the chassis inward until the spring connectors
engage the knifeblade contacts. Push in until the
contacts are fully engaged.
5. Tighten the chassis retaining screw securely.
6. Close the master switch to restore power.
Removing the Programmer
1. Open the master switch.
2. Loosen the chassis retaining screw.
3. Pull outward on the top of the chassis.
4. Disengage the chassis hinge brackets from the subbase
pivot pins.
Fig. 3. Mounting the programmer on the subbase.
Table 6. J1/J2 Jumper Configuration for R4140M/PM720M.
Model Purge Timer Leave J1 & J2 Remove J1 and J2
R4140M1004/M1012 A1039 X
R4140M1020/M1038 A1047 X
R4140M1046/M1053 A1062 X
R4140M1079 (GP101) A1062 X
R4140M1103/M1111 A1039 X
R4140M1145/M1152 A1047 X
R4140M1160/M1178 A1062 X
R4140M1186 A1047 X
R4140M1194 ST7800A1062
BC7000L1000 w/PM720M2002 ST7800A1062 X
BC7000L1000 w/PM720M2036 * X
CHASSIS
RETAINING
SCREW
SPRING
CONNECTORS
KNIFE-BLADE
CONTACTS (20)
WIRING
SUBBASE
PIVOT PIN (2)
HINGE
BRACKET (2)
PROGRAMMER
CHASSIS
M22605

R7140G,L,M BURNER CONTROL MODULES
9 66-1153—03
Fig. 4. Operating sequence, R7140G1000/R7140G2008.
R7140G
POWER
OPERATING
CONTROLS
AND
INTERLOCKS
BURNER
FLAME
SIGNAL
FIRING
RATE
MOTOR
INITIATE
(INITIAL
POWERUP
ONLY)
POWER
STANDBY
PREPURGE
HOLD
DRIVE TO
LOW FIRE
POWER
PILOT
FLAME
MAIN
POWER
PFEP
10 SEC.
(4 SEC. IF
JR1
CLIPPED
PILOT
FLAME
MAIN
POWER
MFEP
PILOT
FLAME
MAIN
RUN
POWER
POSTPURGE
POWER
STANDBY
00 00 10 25 00 1520
MOTOR ACTION
BURNER/BLOWER MOTOR
IGN.
15 SEC. INTERRUPTED PILOT VALVE
LIMITS AND BURNER CONTROLLER CLOSED
RUNNING INTERLOCKS CLOSED
PII CLOSED
LOW FIRE SW.
SAFE START CHECK
FLAME PROVING
10 SEC. IGN./PILOT
5
18
8
5 SEC.
6
TO
3TO
16
TO
8
13
TO
10 11
TO
10 11
TO
M23319
INTERLOCK. CHECK
14 11
TO
14 11
TO
4
16
L1
MAIN VALVE
7
TIMED
PREPURGE
POWER
FLAME
MAIN
PILOT
ALARM
POWER
FLAME
MAIN
PILOT
ALARMALARMALARMALARM
00
IC
SSC
LED
DISPLAY
R7140G SWITCHING
1
TERMINAL 6 HAS THE FOLLOWING OPTIONS:
AS RECEIVED - INTERMITTENT PILOT
JR2 CLIPPED - 15 SECOND MAIN FLAME ESTABLISHING PERIOD (INTERRUPTED PILOT)
JR2 CLIPPED PLUS TERMINALS 8 - 15 JUMPERED - 30 SECOND MAIN FLAME ESTABLISHING PERIOD (INTERRUPTED PILOT)
1
16
2
2
PII MEANS PRE-IGNITION INTERLOCK.
3
FOR R7140G1000:
L1 TO 4
4 TO 3
3
3

R7140G,L,M BURNER CONTROL MODULES
66-1153—03 10
Fig. 5. Internal block diagram of the R7140G1000. (See Fig. 8 for detailed wiring.)
CONFIGURATION
JUMPERS
MICROCOMPUTER
RESET
PUSHBUTTON
RUN/TEST
SWITCH
STATUS LEDs
PLUG-IN PURGE
TIMER CARD
SAFETY RELAY
CIRCUIT
POWER SUPPLY
KEYBOARD
DISPLAY MODULE
HIGH FIRE
COMMON
MODULATE
LOW FIRE
PLUG-IN
FLAME
AMPLIFIER
RELAY
DRIVE
CIRCUIT
CONTROL
POWER
TEST
JACK
REMOTE
RESET
DDL
DDL
COMMUNICATIONS
INDICATES FEEDBACK SENSING
OF RELAY CONTACT STATUS
AND LINE VOLT INPUTS
IGNITION
PILOT
PILOT/V2
MAIN VALVE
1K
9K
RELAY
STATUS
FEEDBACK
AND LINE
VOLTAGE
INPUTS
LIMITS
CONTROLLER
RUNNING/
LOCKOUT
INTERLOCK
PRE-IGNITION
INTERLOCK
1K1 2K1 5K1
8K1
8K2
9K1
9K2
120 Vac,
50/60 Hz
FLAME SIGNAL
TEST
LOW FIRE SWITCH
PROVIDE DISCONNECT MEANS AND OVERLOAD PROTECTION AS REQUIRED.
RS485
1
2
3
L1
(HOT) L2
L1
16
3
4K1
7K1
2K2
18
5
6
7
13
8K
7K
6K
5K
4K
3K
2K
F
G
17
1
BLOWER
6K1
8
ALARM
3K1
9
10
11
12
14
M23320
1
L2
FIELD WIRING
INTERNAL WIRING
R1
4
R1

R7140G,L,M BURNER CONTROL MODULES
11 66-1153—03
Fig. 6. Internal block diagram of the R7140G2008. (See Fig. 7 for detailed wiring.)
CONFIGURATION
JUMPERS
MICROCOMPUTER
RUN/TEST
SWITCH
PLUG-IN PURGE
TIMER CARD
POWER SUPPLY
HIGH FIRE
COMMON
MODULATE
LOW FIRE
PLUG-IN
FLAME
AMPLIFIER
CONTROL
POWER
TEST
JACK
INDICATES FEEDBACK SENSING
OF RELAY CONTACT STATUS
AND LINE VOLT INPUTS
FIELD WIRING
INTERNAL WIRING
IGNITION
PILOT
PILOT/V2
MAIN VALVE
LIMITS
CONTROLLER
RUNNING/
LOCKOUT
INTERLOCK
PRE-IGNITION
INTERLOCK
1K1 2K1 5K1
8K1
8K2
9K1
9K2
120 Vac,
50/60 Hz
FLAME SIGNAL
TEST
LOW FIRE SWITCH
PROVIDE DISCONNECT MEANS AND OVERLOAD PROTECTION AS REQUIRED.
L1
(HOT)
L2
L1
16
4
3
4K1
7K1
2K2
18
5
6
7
13
F
G
17
1
BLOWER
6K1
8
ALARM
3K1
9
L2
12
13
15
14
M23321
1

R7140G,L,M BURNER CONTROL MODULES
66-1153—03 12
Fig. 7. Wiring diagram for R7140G2008 for application replacing R4140G with start Interlock or BC7000L1000 with
PM720G.
RECTIFYING FLAME
ROD, OR
INFRARED
(LEAD SULFIDE)
FLAME DETECTOR
C7027A, C7035A, OR
C7044A ULTRAVIOLET
FLAME DETECTOR
C7012A, C, C7061, OR
C7076A ULTRAVIOLET
FLAME DETECTOR
LOW FIRE
START SWITCH
BURNER MOTOR
(BLOWER)
MAIN FUEL
VALVE(S)
10 SECOND
INTERRUPTED
PILOT/IGNITION
PILOT/IGNITION
RUNNING
INTERLOCKS
(INCLUDING
AIRFLOW SWITCH)
PREIGNITION
INTERLOCK(S)
BURNER
CONTROLLER
120V ALARM
MASTER
SWITCH
120V, 60 HZ
POWER
SUPPLY
L1 (HOT)
L2
5
6
7
8
G
L1
L2
12
13
F
3
4
9
10
11
W
R
B
W
R
B
LIMITS
PROVIDE DISCONNECT MEANS AND OVERLOAD PROTECTION
AS REQUIRED.
USE ALL NEC CLASS 1 WIRING.
START INTERLOCKS IF USED BECOME PREIGNITION INTERLOCKS - (MUST REMAIN CLOSED UNTIL IGNITION TRIALS BEGIN.)
TERMINAL 6 HAS THE FOLLOWING OPTIONS:
AS RECEIVED - INTERMITTENT PILOT
JR2 CLIPPED - 15 SECOND MAIN FLAME ESTABLISHING PERIOD
JR2 CLIPPED AND JUMPER FROM 8-15 - 30 SECOND MAIN FLAME ESTABLISHING PERIOD.
C7012E.F NEEDS TO BE UPDATED TO C7061.
1
1
2
3
L2
18
17
16
15
14
BLUE
BLUE
WHITE
WHITE
WHITE
YELLOW
OR
OR
M22607B
HIGH FIRE
COMMON
MODULATE
LOW FIRE
SERIES 90
CONTROLLER
SERIES 90
FIRING RATE
MOTOR
IGNITION
TRANSFORMER
1ST STAGE
FUEL VALVE
2ND STAGE
FUEL VALVE
(OPTIONAL)
TO
L2
5
6
7
FOR DIRECT SPARK IGNITION (OIL OR GAS)
3
WIRING
SUBBASE
TERMINAL
STRIP (4)
2
4
4
5
5
4
5 SECOND IGNITION
(EARLY SPARK
TERMINATION)

R7140G,L,M BURNER CONTROL MODULES
13 66-1153—03
Fig. 8. Field wiring for R7140G1000 used for replacing R4140G Programmers with pre-ignition interlocks.
RECTIFYING FLAME
ROD, OR
INFRARED
(LEAD SULFIDE)
FLAME DETECTOR
C7027A, C7035A, C7927 OR
C7044A ULTRAVIOLET
FLAME DETECTOR
C7067A,D OR
C7061 ULTRAVIOLET
FLAME
DETECTOR
LOW FIRE
SWITCH
BURNER
MOTOR
MAIN FUEL
VALVE(S)
10 SECOND
INTERRUPTED
PILOT/IGNITION
PILOT/IGNITION
RUNNING
INTERLOCKS
(INCLUDING
AIRFLOW SWITCH)
PREIGNITION
INTERLOCK(S)
BURNER
CONTROLLER
120V ALARM
MASTER
SWITCH
120V, 60 HZ
POWER
SUPPLY
L1 (HOT)
L2
5
6
7
8
G
L1
L2
12
13
F
3
4
9
10
11
W
R
B
W
R
B
WIRING
SUBBASE
TERMINAL
STRIP (4)
LIMITS
PROVIDE DISCONNECT MEANS AND OVERLOAD PROTECTION
AS REQUIRED.
USE ALL NEC CLASS 1 WIRING.
FOR DIRECT SPARK IGNITION OF OIL, CONNECT IGNITION TO
TERMINAL 5 AND MAIN OIL VALVE SOLENOID TO TERMINAL 7; JUMPER
TERMINAL 7 T0 TERMINAL 6. SEE INSET.
SOLENOID MUST NOT EXCEED THE ELECTRICAL RATINGS OF TERMINAL 7.
1
1
2
2
3
4
4
5
L2
FOR THE C7015A INFRARED (LEAD SULFIDE) FLAME DETECTOR, EITHER
LEADWIRE CAN BE CONNECTED TO THE F TERMINAL. RUN THE C7015A
LEADWIRES ALONE IN CONDUIT ALL THE WAY TO THE WIRING SUBBASE
AND GROUND THE CONDUIT AT THE SUBBASE. (REFER TO PUBLICATION
60-2306 FOR DETAILED INSTRUCTIONS.)
C7012 MUST BE UPDATED TO C7061.
18
17
16
15
14
5
5
3
BLUE
BLUE
WHITE
WHITE
WHITE
YELLOW
OR
OR
M22608B
IGNITION
JUMPER
MAIN OIL VALVE
SOLENOID
TO
L2
5
6
7
FOR DIRECT SPARK IGNITION (OIL OR GAS)
HIGH FIRE
COMMON
MODULATE
LOW FIRE
SERIES 90
CONTROLLER
SERIES 90
FIRING RATE
MOTOR
4
6
6
TERMINAL 6 HAS THE FOLLOWING OPTIONS:
AS RECEIVED—INTERMITTENT PILOT.
JR2 CLIPPED—15 SECOND INTERRUPTED PILOT.
JR2 CLIPPED, TERMINALS 8-15 JUMPERED— 30 SECOND
INTERRUPTED PILOT.
6

R7140G,L,M BURNER CONTROL MODULES
66-1153—03 14
Fig. 9. Operating sequence, R7140L1009 and R7140L2007.
R7140L
POWER
00
OPERATING
CONTROLS
AND
INTERLOCKS
BURNER
FLAME
SIGNAL
FIRING
RATE
MOTOR
INITIATE
(INITIAL
POWERUP
ONLY)
POWER
STANDBY
POWER
PREPURGE
HOLD
DRIVE TO
HIGH FIRE
PREPURGE
HOLD
DRIVE TO
LOW FIRE
POWER
PILOT
FLAME
MAIN
POWER
PFEP
10 SEC.
(4 SEC. IF
JR1
CLIPPED
PILOT
FLAME
MAIN
POWER
MFEP
PILOT
FLAME
MAIN
RUN
POWER
POSTPURGE
POWER
STANDBY
00 00 10 25 00 1520
SWITCHING
MOTOR ACTION
BURNER/BLOWER MOTOR
IGN.
LIMITS AND BURNER CONTROLLER CLOSED
LOCKOUT INTERLOCKS CLOSED
PII CLOSED
LOW FIRE SW.
SAFE START CHECK
FLAME PROVING
10 SEC. IGN./PILOT
5
18
8
5 SEC.
16
TO
16 TO
16TO
8
13
TO
10 11
TO
10 11
TO
M23322
HIGH FIRE SW.
15TO
10 14
TO
10 14
TO
8
4
3
L1
MAIN VALVE
7
TIMED
PREPURGE
POWER
FLAME
MAIN
PILOT
ALARM
POWER
FLAME
MAIN
PILOT
ALARMALARMALARMALARM
00
SSC
LED
DISPLAY
15 SEC. PILOT 6
1
2
1
FOR R7140L1009:
L1 TO 4.
4 TO 3.
2
PII MEANS PRE-IGNITION INTERLOCK.
1

R7140G,L,M BURNER CONTROL MODULES
15 66-1153—03
Fig. 10. Internal block diagram of the R7140L1009. (See Fig. 12 for detailed wiring.)
CONFIGURATION
JUMPERS
MICROCOMPUTER
RESET
PUSHBUTTON
RUN/TEST
SWITCH
STATUS LEDs
PLUG-IN PURGE
TIMER CARD
SAFETY RELAY
CIRCUIT
POWER SUPPLY
KEYBOARD
DISPLAY MODULE
HIGH FIRE
COMMON
MODULATE
LOW FIRE
HIGH FIRE SWITCH
PLUG-IN
FLAME
AMPLIFIER
RELAY
DRIVE
CIRCUIT
CONTROL
POWER
TEST
JACK
REMOTE
RESET
DDL
DDL
COMMUNICATIONS
INDICATES FEEDBACK SENSING
OF RELAY CONTACT STATUS
AND LINE VOLT INPUTS
FIELD WIRING
INTERNAL WIRING
IGNITION
PILOT
PILOT/V2
MAIN VALVE
1K
9K
RELAY
STATUS
FEEDBACK
AND LINE
VOLTAGE
INPUTS
1K1 2K1 5K1
8K1
8K2
9K1
9K2
120 Vac,
50/60 Hz
FLAME SIGNAL
TEST
LOW FIRE SWITCH
PROVIDE DISCONNECT MEANS AND OVERLOAD PROTECTION AS REQUIRED.
RS485
1
2
3
L1
(HOT) L2
L1
4K1
7K1
2K2
18
5
6
7
13
(D)
15
(8)
8K
7K
6K
5K
4K
3K
2K
F
G
17
1
BLOWER
6K1
8
(M)
ALARM
3K1
10
(X)
11
(10)
14(
12)
M23323
1
L2
9
(A)
R1
12
(11)
LIMITS CONTROLLER
RUNNING/
LOCKOUT
INTERLOCK
PII
16
(3)
4
R1
NOTE: ( ) NUMBERS ON GP201, GP301 SUBBASE.

R7140G,L,M BURNER CONTROL MODULES
66-1153—03 16
Fig. 11. Internal block diagram of the R7140L2007. (See Fig. 13 for detailed wiring.)
CONFIGURATION
JUMPERS
MICROCOMPUTER
RESET
PUSHBUTTON
RUN/TEST
SWITCH
STATUS LEDs
PLUG-IN PURGE
TIMER CARD
SAFETY RELAY
CIRCUIT
POWER SUPPLY
KEYBOARD
DISPLAY MODULE
HIGH FIRE
COMMON
MODULATE
LOW FIRE
HIGH FIRE SWITCH
PLUG-IN
FLAME
AMPLIFIER
RELAY
DRIVE
CIRCUIT
CONTROL
POWER
TEST
JACK
REMOTE
RESET
DDL
DDL
COMMUNICATIONS
INDICATES FEEDBACK SENSING
OF RELAY CONTACT STATUS
AND LINE VOLT INPUTS
FIELD WIRING
INTERNAL WIRING
IGNITION
PILOT
PILOT/V2
MAIN VALVE
1K
9K
RELAY
STATUS
FEEDBACK
AND LINE
VOLTAGE
INPUTS
LIMITS CONTROLLER
RUNNING/
LOCKOUT
INTERLOCK
PRE-IGNITION
INTERLOCK
1K1 2K1 5K1
8K1
8K2
9K1
9K2
120 Vac,
50/60 Hz
FLAME SIGNAL
TEST
LOW FIRE SWITCH
PROVIDE DISCONNECT MEANS AND OVERLOAD PROTECTION AS REQUIRED.
RS485
1
2
3
L1
(HOT) L2
L1
16
4
3
4K1
7K1
2K2
18
5
6
7
13
15
8K
7K
6K
5K
4K
3K
2K
F
G
17
1
BLOWER
6K1
8
ALARM
3K1
9
L2
10
11
12
14
M23329
1

R7140G,L,M BURNER CONTROL MODULES
17 66-1153—03
Fig. 12. Sample block diagram of field wiring for the R7140L1009, used for
replacing R4140L Programmers with pre-ignition interlocks.
RECTIFYING FLAME
ROD,OR
INFRARED
(LEAD SULFIDE)
FLAME DETECTOR
C7027A, C7035A, OR
C7044A ULTRAVIOLET
FLAME DETECTOR
C7061, C7927 OR
C7076A, D
ULTRAVIOLET
FLAME DETECTOR
HIGH FIRE
SWITCH
LOW FIRE
SWITCH
BURNER MOTOR
(BLOWER)
MAIN FUEL
VALVE(S)
10 SECOND
INTERRUPTED
PILOT/IGNITION
15 SECOND
INTERRUPTED
PILOT/IGNITION
IGNITION
TRANSFORMER
LOCKOUT
INTERLOCKS
(INCLUDING
AIRFLOW SWITCH)
PREIGNITION
INTERLOCKS
BURNER
CONTROLLER
120V ALARM
MASTER
SWITCH
120V, 60 HZ
POWER
SUPPLY
L1 (HOT)
L2
TO
MAIN FUEL VALVE
L2
5
6
7
FOR DIRECT SPARK IGNITION (OIL OR GAS)
5
6
7
8
G
L1
L2
12
13
F
3
4
9
10
11
W
R
B
W
R
B
5 SECOND IGNITION
(EARLY SPARK
TERMINATION)
WIRING
SUBBASE
TERMINAL
STRIP (4)
LIMITS
POWER SUPPLY. PROVIDE DISCONNECT MEANS AND OVERLOAD
PROTECTION AS REQUIRED.
USE ALL NEC CLASS 1 WIRING.
FOR DIRECT SPARK IGNITION (OIL OR GAS) CONNECT THE IGNITION
TRANSFORMER AND MAIN FUEL VALVE(S) AS SHOWN IN INSET.
FOR THE C7015A INFRARED (LEAD SULFIDE) FLAME DETECTOR, EITHER
LEADWIRE CAN BE CONNECTED TO THE F TERMINAL. RUN THE C7015A
LEADWIRES ALONE IN CONDUIT ALL THE WAY TO THE WIRING SUBBASE
AND GROUND THE CONDUIT AT THE SUBBASE. (REFER TO PUBLICATION
60-2306 FOR DETAILED INSTRUCTIONS.)
1
1
2
2
3
4
5
6
7
L2
C7061 OR C7076 MUST BE RATED FOR 120 V, 60Hz. TWO DETECTORS
WITH THE SAME MODEL NUMBER CAN BE WIRED IN PARALLEL TO
THE SAME TERMINALS. C7076A, D DOES NOT HAVE LEADWIRES. (FOR
INSTRUCTIONS, SEE FORM NUMBERS: 60-2046 FOR C7012A, C MODELS
WITH ELECTRON TUBES; 60-2044 FOR C7012A,C,E,F SOLID STATE
MODELS; 95-8269 FOR THE C7076A.)
WHITE SHUTTER LEADWIRES ARE ONLY ON THE C7061A, E
ULTRAVIOLET FLAME DETECTORS; C7076A, D ADJUSTABLE SENSITIVITY
ULTRAVIOLET FLAME DETECTORS DO NOT HAVE LEADWIRES.
TERMINAL 17 IS USED ONLY FOR THE SHUTTER ON SELF-CHECKING
C7061A, E, F OR C7076A, D FLAME DETECTORS.
18
17
16
15
14
7
4
5
4
6
BLUE
BLUE
WHITE
WHITE
WHITE
YELLOW
OR
OR
M22610
HIGH FIRE
COMMON
MODULATE
LOW FIRE
SERIES 90
CONTROLLER
SERIES 90
FIRING RATE
MOTOR
JUMPER

R7140G,L,M BURNER CONTROL MODULES
66-1153—03 18
Fig. 13. Block diagram of field wiring for the R7140L2007, used for replacing
BC7000L1000 with PM720L.
RECTIFYING FLAME
ROD, RECTIFYING
PHOTOCELL, OR
INFRARED
(LEAD SULFIDE)
FLAME DETECTOR
C7027A, C7035A, OR
C7044A ULTRAVIOLET
FLAME DETECTOR
C7012A, C, C7076A, OR
C7061
ULTRAVIOLET
FLAME DETECTOR
HIGH FIRE
PURGE SWITCH
LOW FIRE START
SWITCH
BURNER MOTOR
(BLOWER)
MAIN FUEL
VALVE(S)
10 SECOND
INTERRUPTED
PILOT/IGNITION
15 SECOND
INTERRUPTED
PILOT
IGNITION
TRANSFORMER
LOCKOUT
INTERLOCKS
(INCLUDING
AIRFLOW SWITCH)
PREIGNITION
INTERLOCKS
BURNER
CONTROLLER
120V ALARM
MASTER
SWITCH
120V, 60 HZ
POWER
SUPPLY
L1 (HOT)
L2
TO
MAIN FUEL VALVE (S)
L2
5
6
7
FOR DIRECT SPARK IGNITION (OIL OR GAS)
5
6
7
8
G
L1
L2
12
13
F
3
4
9
10
11
W
R
B
W
R
B
5 SECOND IGNITION
(EARLY SPARK
TERMINATION)
LIMITS
PROVIDE DISCONNECT MEANS AND OVERLOAD
PROTECTION AS REQUIRED.
USE ALL NEC CLASS 1 WIRING.
IN SOME INSTALLATIONS THE LOW FIRE INTERLOCK IS BETWEEN
TERMINALS L1 AND 13.
C7076 COMES WITHOUT LEADWIRES; C7061 DOES NOT HAVE BLACK LEADWIRES.
1
1
2
3
L1
L2
L2
18
17
16
15
14
BLUE
BLUE
BLACK
BLACK
WHITE
WHITE
WHITE
YELLOW
OR
OR
M22611B
HIGH FIRE
COMMON
MODULATE
LOW FIRE
SERIES 90
CONTROLLER
SERIES 90
FIRING RATE
MOTOR
JUMPER
3
2
WIRING
SUBBASE
TERMINAL
STRIP (4)
4
4

R7140G,L,M BURNER CONTROL MODULES
19 66-1153—03
Fig. 14. Operating sequence, R7140M.
R7140M
POWER
OPERATING
CONTROLS
AND
INTERLOCKS
BURNER
FLAME
SIGNAL
DAMPER
MOTOR
INITIATE
(INITIAL
POWERUP
ONLY)
POWER
STANDBY
PREPURGE
HOLD
DRIVE TO
LOW FIRE
POWER
PILOT
FLAME
MAIN
POWER
PFEP
10 SEC.
(4 SEC. IF
JR1
CLIPPED
PILOT
FLAME
MAIN
POWER
MFEP
PILOT
FLAME
MAIN
RUN
POWER
POSTPURGE
POWER
STANDBY
00 00 10 25 00 1520
MOTOR ACTION
BURNER/BLOWER MOTOR
IGN.
INTERMITTENT PILOT VALVE
LIMITS AND BURNER CONTROLLER CLOSED
RUNNING INTERLOCKS CLOSED
PII CLOSED
LOW FIRE SW.
SAFE START CHECK FLAME PROVING
10 SEC. IGN./PILOT
5
18
8
5 SEC.
6
4
TO
3TO
16TO
8
13
TO
11 12
TO
10 12
TO
M23331B
4
16
L1
MAIN VALVE
7
TIMED
PREPURGE
POWER
FLAME
MAIN
PILOT
ALARM
POWER
FLAME
MAIN
PILOT
ALARMALARMALARMALARM
00
SSC
LED
DISPLAY
R7140M SWITCHING
1
1
WHEN USING A SPRING RETURN ACTUATOR MOTOR, REMOVE J1 AND J2 JUMPERS LOCATED ON R7140M SUBBASE.
2
2
PII MEANS PRE-IGNITION INTERLOCK.
R7140M WHEN USED AS BC7000 REPLACEMENT ON R4140 WITH START INTERLOCKS L1 TO 16.
3
3
3
11 14
TO
11 14
TO

R7140G,L,M BURNER CONTROL MODULES
66-1153—03 20
Fig. 15. Internal block diagram of the R7140M1007 with start interlocks. (See Fig. 17 for detailed wiring.)
Fig. 16. Internal block diagram of the R7140M1007 with pre-ignition interlocks. (See Fig. 18 for detailed wiring.)
INTERNAL
ELECTRONICS
M23335
CONFIGURATION
JUMPERS
PURGE
TIMER
FLAME
AMPLIFIER
ALARM
BLOWER
IGN XFMR
INTERMITTENT
PILOT
1R1
3K1
6K1
9
8
6
MAIN VALVE
7
LF
13
F
G
17
L1
L1
L2
L2
15 SECOND
INTERMITTENT
PILOT VALVE
18
5
5K1
4K1
2K1
7K1
2K2
1K1
3
AIRFLOW
4
16
LIMITS
CONTROLLER
1R1
10
11
START
INTERLOCKS
12
J1
8K2
9K1
14
J2
9K2
INTERNAL
ELECTRONICS
M23336
CONFIGURATION
JUMPERS
PURGE
TIMER
FLAME
AMPLIFIER
ALARM
BLOWER
IGN XFMR
INTERMITTENT
PILOT
1R1
3K1
6K1
9
8
6
MAIN VALVE
7
LF
13
F
G
17
L1
L1
L2
L2
15 SECOND
INTERMITTENT
PILOT VALVE
18
5
5K1
4K1
2K1
7K1
2K2
1K1
3
AIRFLOW
16
4
LIMITS
CONTROLLER
1R1
10
11
PRE-
IGNITION
12
J1
8K2
9K1
14
J2
9K2
/