Page is loading ...

Installation Instructions
INSTALLATION TIME SKILL LEVEL
2 Hours 2 - Moderately Easy
TOOLS
YJ Bow Assembly
Vehicle Application:
www.Bestop.com - We’re here to help! Visit our web site and click on “Ask a Question”. Click here for more Jeep® Accessories by Bestop.
• Jeep Wrangler YJ
1988 – 1995
Part Number: 55004
1/8" Bit 10' #2
#50, #45, #50
Tamper Proof

Rev. B 1010 55004 pg. 2
Bow Installation Instructions
Parts List and Hardware Identifi cation
Corner Belt Rail, Right, Qty - 1,
Part Number 288.33
Corner Belt Rail, Left, Qty - 1,
Part Number 288.34
#8 x 1/2" Pan Head Washer
Screw - Black, Qty - 21, Part
Number 200.48
5/16-18 x 1" Phillips Head Bolt,
Qty - 12, Part Number 236.20
5/16-18 Tapping Plate, Qty - 12,
Part Number 200.50
Snap Head Screw, Qty - 2,
Part Number 200.49
Bow Assembly - Left, Qty - 1,
Part Number 475.41
Bow Assembly - Right, Qty - 1,
Part Number 475.40
Windshield Retainer - Right,
Qty - 1, Part Number 225.42
Windshield Retainer - Left, Qty - 1,
Part Number 225.43
Windshield Flange- Right, Qty - 1,
Part Number 269.10
Windshield Flange- Left, Qty - 1,
Part Number 269.09
Tailgate Retainer - Right,
Qty - 1, Part Number 288.75
Side Belt Rail - Right, Qty - 1,
Part Number 188.31
Side Belt Rail - Left, Qty - 1,
Part Number 188.32
5/16" Flat Washer, Qty - 12,
Part Number 233.04

Bow Installation Instructions
Rev. B 1010 55004 pg. 3
Wrangler Windshield Measurement
Wrangler/YJ Windshield
Adjustment: If necessary,
loosen the #50 Tamper
Proof Torx Bolt on top of the
side sport bar. Adjust the
windshield and tighten the
Torx Bolt.
75 1/8"
Before installing the top, check the windshield
measurement. The distance from the top lip of the
windshield to the top outer edge of the body must be
75 1/8" on both sides of the vehicle. Measure 4"-6"
inside the doors.
Front Measurement
Detail
Top lip of
windshield Tape
Measure
Rear point of
measurement
on body
Improper windshield
adjustment will result
in poor fi tting top and doors, causing looseness or
undue strain on the top.
After adjusting the
windshield angle, make
sure that the bolts on top of the sport tube and the
windshield have been tightened.
A loose Windshield
Retainer may allow the
top to disengage from
the windshield, causing damage to the top and pos-
sible injury to the occupants of the vehicle.
Make certain that the Windshield Retainer is se-
curely fastened to the windshield during installation
and at all other times by checking the tightness of
the mounting screws every three months.
Do not use any drill size other than 1/8". Failure
to use the correct size may cause the Windshield
Retainer to loosen.
Install Windshield Retainer
Position the two piece Windshield Retainer on
top of windshield frame. Use retainer pieces as
templates to mark, center punch and drill eleven
1/8" holes. Install with eleven #8 x 1/2" Pan Head
Screws.
Windshield
Windshield Retainer
(2 pieces)
Use retainer pieces
as guide to drill holes.
Install retainer pieces
with #8 x 1/2" Phillips
Head Screws
Drill 1 hole
between the
two retainer
pieces
Windshield
Retainer Detail
Cross Section
Windshield
Frame
Front
Windshield
Retainer
#8 x 1/2"
Pan Head
Screw
Windshield
Retainer Detail
Cross Section
#50 Tamper Proof
Torx Bolt under
sport bar pad

Rev. B 1010 55004 pg. 4
Bow Installation Instructions
Install the Left and Right Windshield
Flanges on each side of the
windshield frame. Mark, center
punch and drill four 1/8" diameter
holes. Install the door seals with
four #8 x 1/2" Phillips Head
Screws. Windshield
Mark, center punch and
drill four 1/8" diameter
holes. Install #8 x 1/2"
Phillips Head Screws
Front of
Vehicle
Install Windshield Flanges
Install the Left and Right
Side Belt Rails on each
side of the vehicle. Use
the existing holes, four
5/16" Phillips Head Bolts
and four Tapping Plates
on each side. Side Belt
Rail
Front Sport Bar
Sport Bar
5/16" Phillips
Head Bolt
Tapping
Plate
Side Belt
Rail
Inside of Vehicle
Body
Panel
Install Side Belt Rails 5/16" Phillips
Head Bolts
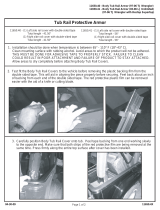
Install Rear Corner Belt Rails
When drilling in the top
edge of the vehicle body,
check underneath for
wiring for the rear lights. Pull the wiring out of the
way before drilling.
Tapping Plate
Detail
Tapping
Plate
Corner
Belt Rail
5/16" Phillips
Head Bolt
Vehicle
Body
5/16" Washer
There may be a small gap of
+/- 1/4" between the Corner Belt
Rails and the Side Belt Rails.
Install the Left and Right Rear Corner Belt Rails on
each side of the vehicle. Notice that the Corner
Belt Rails do not butt-up against the Side Belt Rails
installed in Step 3, this is normal. Use the Corner
Belt Rails as templates to mark, center punch and
drill two 3/8" holes in the top edge of the vehicle
body. Some vehicles may already have some of
these holes. Install the Corner Belt Rails with two
5/16" Phillips Head Bolts, two 5/16" Washers and
two 5/16" Tapping Plates. At the location of the
remaining hole in the Corner Belt Rail, next to the
tailgate, mark, center punch and drill a 1/8" hole.
Install a #8 x 1/2" Pan Head Screw.
Rear Corner
Belt Rail
Tapping
Plate Inside of
Vehicle
Body
Panel
Rear Corner Belt Rail
Detail Cross Section
Rear Corner
Belt Rail
Sport
Bar
5/16" Phillips
Head Bolts
5/16" Phillips
Head Bolt and
5/16" Washer
Screw

Bow Installation Instructions
Rev. B 1010 55004 pg. 5
Slide halves together
to form Support Bow
Assembly
Foam
Slide Bow
Halves Together
Push
buttons in
It may be helpful to use a fl at screwdriver
to push buttons down while sliding bow
halves together.
Assemble the two halves of the Support Bow.
Orient the two pieces to each other and lay them on
the fl oor. Slide the pieces together, pushing down
on the buttons. Once the two halves are together
install a Snap Head Screw in the hole formed in the
center, front of each bow.
Assemble Support Bow
Slide the ends of the front and rear bows into the
tracks in the Side Belt Rails on each side of the
vehicle. Start from the rear of the vehicle and slide
the bow assembly toward the front.
It may be helpful to have two people to slide
both sides of the bow assembly forward at
the same time.
Install Bow Assembly
in Belt Rails
Slide Bow Ends
into Track
Front Bow
Rear
Bow
Inside of Vehicle
Side Belt
Rail

Rev. B 1010 55004 pg. 6
Bow Installation Instructions
Drip Rail (Front of
Bow Assembly)
Slip Drip Rail over
pin on Windshield
Flange
Windshield
Flange
Attach the drip rail at the front of the Bow Assembly
to the pin on the Windshield Flange and lock it into
place om both sides of the vehicle.
Slide lock to secure
drip rail in place
Secure Bow Assembly to
Windshield Flanges

Bow Installation Instructions
Rev. B 1010 55004 pg. 7
LIMITED WARRANTY
We warrant our product to be free from defects in material and workmanship, for the terms specifi ed below, provided there has been normal
use and proper maintenance. This warranty applies to the original purchaser only. All remedies under this warranty are limited to the repair or
replacement of any item or items found by the factory to be defective within the time period specifi ed. If you have a warranty claim, fi rst you must
call our factory at the number below for instructions. You must retain proof of purchase and submit a copy with any items returned for warranty
work. Upon completion of warranty work, if any, we will return the repaired or replaced item or items to you freight prepaid. Damage to our
products caused by accidents, fi re, vandalism, negligence, misinstallation, misuse, Acts of God, or by defective parts not manufactured by us, is
not covered under this warranty.
THE WARRANTY TIME PERIOD IS AS FOLLOWS FOR REPLACE-A-TOP™, SAILCLOTH REPLACE-A-TOP™, SUPERTOP®, SUPERTOP®
REPLACEMENT SKINS, SUNRIDER®, AND TIGERTOP®: TWO YEARS FROM DATE OF PURCHASE.
THE WARRANTY TIME PERIOD IS AS FOLLOWS FOR ALL OTHER “SOFT GOODS” MANUFACTURED BY OUR COMPANY (USING
PRIMARILY VINYLS, PLASTICS, AND/OR FOAM): ONE YEAR FROM DATE OF PURCHASE.
THE WARRANTY TIME PERIOD IS AS FOLLOWS FOR ALL OTHER “HARD GOODS” MANUFACTURED BY OUR COMPANY (USING
PRIMARILY METALS, PLASTICS, AND/OR FIBERGLASS): ONE YEAR FROM DATE OF PURCHASE.
ANY IMPLIED WARRANTIES OF MERCHANTABILITY AND/OR FITNESS FOR A PARTICULAR PURPOSE CREATED HEREBY ARE LIMITED
IN DURATION TO THE SAME DURATION AND SCOPE AS THE EXPRESS WRITTEN WARRANTY. OUR COMPANY SHALL NOT BE LIABLE
FOR ANY INCIDENTAL OR CONSEQUENTIAL DAMAGE.
Some states do not allow limitations on how long an implied warranty lasts, or the exclusion or limitation of incidental or consequential damages,
so the above limitations or exclusions may not apply to you. This warranty gives you specifi c legal rights, and you may also have other rights
which vary from state to state.
For further information or request for warranty work, please contact:
Bestop Inc. Customer Service
Toll-Free: (800)845-3567
Main: (303)465-1755
E-mail: [email protected]
Website: www.Bestop.com
/