Page is loading ...


Attaching Your Engage System
1. Locate cardboard template and peel
command adhesive from top and
bottom of template.
2. Holding template vertically and by
the edges, determine placement. If
you are installing the system on a
whiteboard, make sure to leave 2
inches (5.08 cm) between the Engage
System and the board frame.
3. Place the template so that it is
centered vertically on the board and
parallel to the frame.
4. Press the metal brackets rmly
against the board for best adhesion.
Do this on the top and bottom of the
system.
5. To remove the template, pull down
and lift it out from beneath the
Engage System.
6. After the template is removed,
conrm that the top and bottom
brackets are rmly attached to the
board, if necessary press down on
them again. *Note: 3M recommends
waiting at least one hour for
maximum adhesion.
7. Align the brackets with the four holes
on the back of the Engage System.
8. Gently push downward on the
Engage System to lock it in place.
Listen for the “click!”
9. Engage installation is complete.
Prepare Your Engage System For Use
10. Connect your projector to your
computer.
11. Turn on your projector and align/
focus the image on the board.
12. Connect the power cord to your
Engage System.
13. Connect the Engage USB cable to
your computer.
14. Connect the USB cable to your
Engage System.
15. Connect the power cord to a power
outlet and remove the backing on the
3M adhesive. Attach box to wall.
16. Insert the provided USB dongle and
install software.
17. Launch the eBeam software.
Once installed, locate calibrate button
on the Engage system and calibrate
your work area.
18. Software installation is complete,
enjoy your system!
1
3
2
6
4
5
8
9
7
x2
click!
1
10
11
13
16
17
18
12
14
15

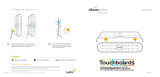
Removing the Engage system
19. Place provided key in the top edge of
the Engage System.
20. Lift the Engage system upward to
release from brackets and pull away
from surface to remove.
Removing the Engage Brackets
and 3M Command Adhesive Strips
21. Pull the 3M strips slowly in a
downward motion to remove and
release bracket.
www.luidia.com
19
click!
20
21
/