Page is loading ...

eBeam Education Suite
Version 2.2
© Luidia Incorporated, 2011

p2
© 2011 Luidia, Incorporated
Table of Contents
eBeam Education Suite
4
Contents
5
About...
6
Minimum System Requirements
7
Setup
8
System Setup
9
eBeam Classic
10
eBeam Edge(TM)
12
The Interactive Stylus
15
Bluetooth Wireless Configuration
17
Your Receiver is Not Detected
19
Calibration
20
eBeam Education Menu on the Mac Menu Bar
21
Preferences
22
eBeam Education Palette
23
Hardware Settings
24
Software Update
25
eBeam Tool Palette
26
Desktop Tools Palette
26
Screen Annotation
27
Keyboard Viewer
28
Scrapbook
29
Snapshot
29
Screen Annotation Tools Palette
30
Pen Tool
31
Shapes Tool
32
Redo Tool
33
Eraser Tool
34
Mouse Tool
35
Save Tool
36
Undo Tool
37
Highlighter Tool
38
Scrapbook Tools Palette
39
Standard Annotation Toolbar
40
Pen Tool
41
Shape Tool
42
Slide Forward Tool
43
Eraser Tool
44
Select Tool
45
Undo Tool
46
Slide Back Tool
47
Highlighter Tool
48
Slideshow Tools Palette
49
Pen Tool
49
Shapes Tool
50
Slide Forward
51
Eraser Tool
52
Mouse Tool
53
Exit Slideshow Presentation Tool
54
Slide Back
55

p3
© 2011 Luidia, Incorporated
Highlighter Tool
56
eBeam Home
57
eBeam Home Shortcuts
58
Scrapbook
60
What is a Scrapbook Meeting?
61
Scrapbook Menus
62
Scrapbook Menu
63
File Menu
64
Edit Menu
66
View Menu
68
Page Menu
70
Insert Menu
72
Sharing Menu
73
Window Menu
74
Help Menu
75
Scrapbook Toolbar
76
Playback
79
Scrapbook Elements
81
Background Settings
83
eBeam Inscribe Wireless Tablet
84
Gallery
86
Navigating the Gallery
87
Adding Images to Scrapbook Pages
90
Adding and Removing Links to Folders
91
Favorites
92
eBeam Focus Document Camera
94
Flickr
97
Encyclopædia Britannica
99
Scrapbook Preferences
101
Automatic File Saving
102
Supported File Types
103
Shared Meetings
104
What is a Shared Meeting?
105
Hosting/Sharing a Meeting
106
Joining a Meeting
108
Sending an Invitation
109
Accepting an Email Invitation
110
Proxy Server Setup
111
View Participants
112
Adding a Meeting Server
113
PowerPoint/Keynote Presentations
114
Starting/Ending a PowerPoint Slide Show
115
Starting/Ending a Keynote Slideshow
116


p6
© 2011 Luidia, Incorporated
About...
Help Main Page
About eBeam Education Suite
Version 2.2
eBeam Education Suite is made up of eBeam Scrapbook, the eBeam Tool Palette and
eBeam Home. eBeam Education Suite makes it easy to develop, organize and communicate
classroom information. It includes software applications that allow you to annotate lessons
on-the-fly, create and save multi-page brainstorm sessions and mark up content from
outside applications. eBeam Education Suite is easy to set up and intuitive to use, creating a
fun learning environment for students and teachers, and enhancing the impact of every
lesson plan.
eBeam Scrapbook is a powerful resource that can be used to create lessons, store
annotations and enliven curriculum material.
The eBeam Tool Palette provides quick access to important tools that can be used as a part
of Scrapbook, in conjunction with your every day applications or to annotate over your entire
desktop. The tools in the eBeam Tool Palette change depending on the environment that you
are working in.
eBeam Home works on top of Scrapbook. It creates a centralized shortcut to the most
commonly used resources, making the eBeam Education Suite an even more integral part of
everyday teaching resources.
Copyright
2011 Luidia, Inc.
All rights reserved.
The publications included with the interactive product are protected by copyright, and all rights are reserved. No part
of it may be reproduced or transmitted in any form or by any means for any purpose without express prior written
consent from Luidia, except as expressly permitted herein. Information in this document is subject to change without
notice and does not represent a commitment on the part of Luidia.
The software described in this publication is furnished under license and may only be used or copied in accordance
with the terms of such license.
Portions of the Scrapbook Gallery ©2011 Luidia, Inc. All Rights Reserved.
Portions of the Scrapbook Gallery ©2005 Mythic Wave Productions, Inc. All Rights Reserved.
2.2

p7
© 2011 Luidia, Incorporated
Minimum System Requirements
Help Main Page
Minimum System Requirements
Mac OS X 10.5 or higher.
1.42 GHz G4 PowerPC
1 GB RAM
120 MB available hard drive space
CD-ROM drive or Internet connection (for software installation)
Internet connection (for participating in shared meetings)
One available USB port or Bluetooth connection
Digital projector attached to computer


p10
© 2011 Luidia, Incorporated
eBeam Classic
Help Main Page
eBeam Classic Setup
The following describes a typical setup for the eBeam USB or Bluetooth Wireless receivers
and related hardware.
Connect your projector to your computer.
Turn on your projector and align/focus the image on the board.
Connect the eBeam USB cable to your eBeam receiver.
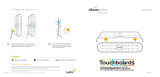
Attach the eBeam receiver mounting bracket to the board.
The eBeam package contains the following receiver mounting options.
Suction cups
Command adhesive
Magnetic mounting brackets
The eBeam receiver is pre-attached to the suction cup mounting
bracket. To detach any of the mounting brackets from the eBeam
receiver, position thumbs at bottom corners of the bracket and push
up; the bracket should easily snap off.
To secure brackets to the receiver, position the desired bracket over
the back of the receiver and snap it into place. To permanently fasten
the receiver, use the clear mounting bracket -- the one without suction
cups. Fasten the receiver to the mounting surface through the holes in
the clear mounting bracket.

p11
© 2011 Luidia, Incorporated
Install the AA battery in your eBeam Stylus.
Connect the eBeam USB cable to your computer USB port.
Insert the eBeam software CD and install.
For additional information on seting up Bluetooth on your computer,
see Bluetooth Wireless Configuration.
Launch the eBeam software and calibrate the system.
Finished!

p12
© 2011 Luidia, Incorporated
eBeam Edge(TM)
Help Main Page
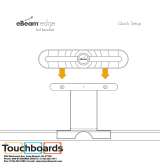
eBeam Edge(TM) Setup
This section demonstrates the quick setup instructions for the eBeam Edge(TM) receiver. The
most updated eBeam Edge information can be found under the Products tab at http://www.
e-beam.com.
Connect your projector to your computer.
Turn on your projector and align/focus the image on the board.
Connect the eBeam USB cable to your eBeam receiver.
Peel the Command Adhesive backing from the receiver.
Hold the receiver and prepare to place it carefully in the indicated
location.

p13
© 2011 Luidia, Incorporated
Place the receiver so that it is centered vertically on the board and
parallel to the frame.
Press the receiver firmly against the board for best adhesion.
Install the AAA battery in your eBeam Stylus.
Connect the eBeam USB cable to your computer USB port.
Insert the eBeam software CD and install.
Launch the eBeam software and calibrate the system.

p14
© 2011 Luidia, Incorporated
Finished!

p15
© 2011 Luidia, Incorporated
The Interactive Stylus
Help Main Page
The Interactive Stylus
The Interactive Stylus was created specifically for use with the projection system. The
Interactive Stylus behaves exactly like a mouse attached to your computer.
Model 303
Model 305
The following table shows the different components of the Interactive Stylus and what those
components do.
Model 303
Model 305
Men
u
Butt
on
The Menu Button is the equivalent of the
Control-click action of your mouse.
Sho
w/Hi
de
Inter
activ
e
Tool
s
Butt
on
The Show/Hide Interactive Tools
Button shows/hides the current Tool
Palette.
Pen
Tip
The Pen Tip performs the same action as a
click button on your mouse.
Batt
ery
Cap
The battery cap unscrews counter-
clockwise to allow you to insert or replace
the AA battery (Model 303) or AAA battery
(Model 305).

p16
© 2011 Luidia, Incorporated

p17
© 2011 Luidia, Incorporated
Bluetooth Wireless Configuration
Help Main Page
Bluetooth Wireless Configuration
When you are using a Bluetooth interactive receiver, the first thing you need to do is to
establish a connection between the receiver and your computer. To establish a connection,
your computer must have built-in Bluetooth or you need to be using a Bluetooth adaptor.
Refer to the Apple Support website for more information. The Bluetooth-enabled eBeam
Edge is supported only on Mac OS X 10.5 or higher at this time.
See System Setup to confirm which eBeam receiver you are working with.
eBeam Classic Configuration
eBeam Edge Configuration
eBeam Classic Configuration
The following will help you set up your Bluetooth enabled eBeam System 3 on your Mac.
1.
Make sure your Bluetooth hardware is connected to your computer, and your eBeam
Classic has power. If you are using your computer's built-in Bluetooth, confirm that
it is turned by going to Bluetooth: On from the Bluetooth Icon in the Mac Menu
Bar.
2.
Select Set Up Bluetooth Device from the Bluetooth Icon in the Mac Menu Bar and
the Bluetooth Setup Assistant dialog box will open.
3.
From the Bluetooth Setup Assistant dialog box, select your interactive receiver (the
default name is generally eBeam [xxxxxx]). The type will be detected as Peripheral.
Click the Continue button.
4.
Select the Passcode Options button and a new floating window will appear.
5.
Choose Use a Specific Passcode, enter 1234 and select OK.
6.
You will be directed to the original Bluetooth Setup Assistant dialog box. Click
Continue.
7.
At the final screen select the Quit button.
Your interactive software has now established a connection with your Bluetooth receiver.
eBeam Edge Configuration
The following will help you set up your Bluetooth enabled eBeam Edge on your Mac.
1)
Plug your eBeam receiver into the power adapter, and plug the adapter into a power
outlet. Confirm that the light on your receiver is glowing blue.
2)
Select System Preferences from the Apple Menu in the Mac Menu Bar and click

p18
© 2011 Luidia, Incorporated
Bluetooth.
3)
Verify that On and Discoverable are checked.
4)
If your device is not displayed, select “Set Up New Device” / “+”.
5)
Highlight your Bluetooth-enabled eBeam device and click Continue. (Your device will
be called eBeam-“XXXX”).
6)
Quit the Bluetooth setup and verify that the glowing light on your eBeam receiver
flashes four times. Your setup is complete.

p19
© 2011 Luidia, Incorporated
Your Receiver is Not Detected
Help Main Page
Your Receiver is Not Detected
Each time you launch the software, it will attempt to connect to your interactive receiver.
When the software does not detect a receiver, it opens a detection dialog box. If your
interactive receiver is not detected:
Make sure that the hardware is properly set up, powered up and connected to your
computer. See System Setup and Bluetooth Wireless Configuration.
Is the correct connection established? You can specify the type of connection in eBeam
Education Preferences > Hardware Settings. If Autodetect is selected, change the
settings to match the type of connection you are using, click Detect and try the
connection again.
If you're attempting to connect your receiver through Bluetooth, plug the USB cable
directly into the computer instead and then click Search Again from the Welcome
dialog box.
The detection dialog box allows you to do the following:
Button
Description
Bluetooth
Setup
Opens the Bluetooth Wireless Configuration. This gives you instructions
on how to set up your Bluetooth enabled receiver.
Search Again
Searches all available ports for an interactive receiver.
Cancel
Use this button if you do not have an interactive receiver but wish to join
a meeting.
Note: Many advanced features of the interactive software are available only when an
interactive receiver is detected by the software.

p20
© 2011 Luidia, Incorporated
Calibration
Help Main Page
Calibration
When you start eBeam Education Suite, you will be prompted to calibrate if you have not
calibrated previously. Always perform the calibration step unless you are certain the
projector and the interactive receiver have not been moved since the last use.
To calibrate:
1.
Set up your system as shown in System Setup.
2.
When prompted to calibrate, select Yes.
You can also select Calibrate Interactive Area from the eBeam Education menu.
/