Page is loading ...

PERGO
®
IS MANUFACTURED AND DISTRIBUTED BY UNILIN NORTH AMERICA, LLC
CUSTOMER SERVICE | 1-800-33-PERGO | NA.PERGO.COM/CONTACT-US 05/2021 | PAGE 1 OF 7
Locking Engineered Hardwood - Floor Installation Instructions
Job Site Site Requirements
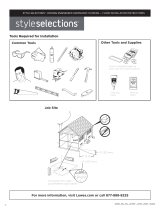
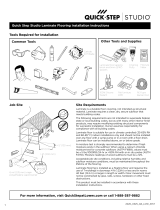
Tools Required for Installation
10' (3 m)
)mm 031( "5 >
nigriv )mm 51.0( lim 6
polyethelene vapor barrier
ground
)mm 002( "8 >
Locking engineered hardwood is a durable floor covering,
not intended as structural material. Locking engineered
hardwood requires a clean, dry, secure subfloor that meets
building codes. Locking engineered hardwood flooring can
be installed above, on or below grade.
The following requirements are not intended to supersede
federal, state or local building codes, but as with many
other interior finish products, may require modifying
existing structural components for successful installation.
Owner assumes responsibility for compliance with all
building codes.
All work involving water or moisture (plumbing, masonry,
painting, plastering) must be completed prior to flooring
installation. Building envelope must be complete and
exterior doors and windows installed. Exterior grading and
gutter downspouts should be completed and permanent
HVAC systems in operation.
Precautions should be taken to protect floors from other
trade work. Do not cover floors with plastic, red rosin, felt
or wax paper or previously used cardboard. Instead, use
a breathable material such as clean, dry, plain uncoated
cardboard or craft paper; inks from printed cardboard could
damage the hardwood floor. The floor should be thoroughly
cleaned before covering to remove grit and debris that
would damage the finish.
Common Tools
Wood
Glue
Carbide
40T Blade
Other Tools and Supplies
M
A
D
E
I
N
T
H
E
U
S
A
1
F
L
O
Z
(
3
3
.
5
m
l
)
P
REMIUM
SYSTEM
CO
MPONEN
T
S
P
E
C
I
A
L
L
Y
D
E
V
E
L
O
P
E
D
F
O
R
L
A
M
I
N
A
T
E
F
L
O
O
R
I
N
G
Finishing
Putty
PREMIU
M
SYSTEM
COMPONENT
Finishing
Putty
SILICONE
CAULK
ENOCILIS
KLUAC
ENOCILIS
KLUAC
100% Silicone
Sealant
Felt furniture
pads
Moisture
Meter
ON
Non Destructive Moisture
dlfwej dtra
djflsv
dlfwe vtra
alskdjf
vmwjc
Concrete
Encounter
Plus
0
1
2
3
4
5
6
0
50
100
15
0
200
250
Moisture
Meter
S
p
a
c
e
r
s
5
m
m
S
p
a
c
e
r
s
5
m
m
Floor tapping block
and 5mm (
3
/16")
spacers
PE Foam
Backer Rod

PERGO
®
IS MANUFACTURED AND DISTRIBUTED BY UNILIN NORTH AMERICA, LLC
CUSTOMER SERVICE | 1-800-33-PERGO | NA.PERGO.COM/CONTACT-US 05/2021 | PAGE 2 OF 7
Locking Engineered Hardwood - Floor Installation Instructions
The floor must be completely covered to eliminate uneven ambering from exposure to UV light.
Locking engineered hardwood flooring is suitable for use in climate controlled indoor installations only and should not be installed
over any floor with a sump pump or in a room with a floor drain. Room temperature should be 60-80°F, with relative humidity
between35-55%. These environmental conditions are specified as pre-installation requirements and must be maintained for the
life of the product. Additionally, any HVAC system must be in operation for a minimum of 14 days prior to performing moisture
tests or installation.
Building interiors are affected by two distinct humidity seasons–Heating and Non-Heating. Care should be taken to maintain
humidity levels between 35-55% year-round. As with all wood flooring, expansion and contraction will be minimized if the interior
relative humidity is consistently maintained year-round. Humidification and/or dehumidification systems may be necessary to
maintain your home environment to prescribed relative humidity conditions.
All heating methods create dry, low humidity conditions. Humidifiers are recommended to prevent excessive shrinkage or
gapping in wood floors due to seasonal periods of low humidity.
During the non-heating season proper humidity levels should be maintained by using an air conditioner or dehumidifier.
RADIANT FLOOR HEATING – This product can be used in combination with many types of in-floor heating. The heating system
can be cast in a concrete floor or in a thin layer of filler on the surface of a concrete subfloor. It can also be installed under a
wood subfloor or installed on the surface of the subfloor as an electrical matting if it meets the floor flatness requirements.
a. Follow the instructions from the supplier of the floor heating system.
b. Concrete subfloors must be installed and cured with no heat transfer for a minimum of 60 days.
c. The heating system must be in operation for at least two weeks before installation. The system may be turned off or
set to a suitable installation temperature (65 to 72°F).
d. The flooring surface temperature, which is the surface of the subfloor or the heat radiating from electric heating mats,
should not exceed 84°F (29°C).
CAUTION – Excessive floor heating will damage flooring planks. Radiant heating systems create dry heat that lowers interior
humidity levels. It may be necessary to add supplemental humidity in order to maintain recommended RH levels (35-55%) and
prevent damage to the wood floor.
A moisture test is strongly recommended to determine if high moisture exists in the subfloor. When using a calcium chloride
moisture test for concrete subfloors (ASTM F1869), values must be ≤ 5 lbs/1000ft
2
/24-hr or <80% RH with an in situ probe
(ASTM F2170). Moisture readings of wood subfloors must be ≤ 12%.
Acceptable job site conditions, including relative humidity and subfloor moisture conditions, must be maintained throughout the
lifetime of the flooring.
This product is installed as a floating floor only and requires the use of T-moldings in doorways 4 ft (1.22m) or less and in rooms
40 feet (12.2 m) or larger in length or width. Floor movement must not be constrained by glue, nails, screws, hardware or other
fixed obstructions.
This product must be installed in accordance with these installation instructions.

PERGO
®
IS MANUFACTURED AND DISTRIBUTED BY UNILIN NORTH AMERICA, LLC
CUSTOMER SERVICE | 1-800-33-PERGO | NA.PERGO.COM/CONTACT-US 05/2021 | PAGE 3 OF 7
Locking Engineered Hardwood - Floor Installation Instructions
A
Door
Frame
Cutting Line
Wallbase
Casing
1 inch
(2,5 cm)
B
%
48 hours
60° – 85° F
15° – 29° C
35% – 65% RH
C
subfloor
6 mil (0.15 mm) virgin
polyethelene vapor barrier
> 8" (200 mm)
D
E
F
G
Site and Material Preparation
a. Remove carpet and padding. Also remove any wood flooring installed on concrete. Do not remove products unless
they are asbestos-free.
b. Undercut door frame and wallbase. Slide the flooring at least 1/4" underneath the door frame and wallbase. Also leave
a concealed 3/8" minimum expansion space under each.
c. Remove bumps or peaks in subfloor and fill depressions with floor leveling compound to ensure no more than 3/16"
unevenness per 10-foot span.
d. Acclimate unopened product before installation for a minimum of 48 hours.
e. Clean debris from subfloor before installation.
f. For concrete subfloors, install vapor barrier with overlapped seams of 8" or more.
g. For planks without attached underlayment, install over single layer of underlayment appropriate for locking
engineered wood floors. For planks with attached underlayment, it is acceptable to install Pergo Gold
®
underlayment
(Lowes Part # 670312) prior to flooring installation if desired.
h. Some cartons may include a starter/cut plank with a white label on the face. These planks are a conservation
measure to help reduce the waste of trees that contain natural imperfections. We recommend to cut the plank on
each side of the label to create two planks for starting and finishing a row during your installation. If the label is near
the end of the plank, you will only be able to cut on one side of the label. DO NOT install cut pieces less than 8” in
length. For more information call 1-800-33-PERGO or visit na.pergo.com/contact-us.
H

PERGO
®
IS MANUFACTURED AND DISTRIBUTED BY UNILIN NORTH AMERICA, LLC
CUSTOMER SERVICE | 1-800-33-PERGO | NA.PERGO.COM/CONTACT-US 05/2021 | PAGE 4 OF 7
Locking Engineered Hardwood - Floor Installation Instructions
Flooring Installation
Make sure to follow the Pergo Gold
®
installation instructions, taking special care to seal all foam edges with sealing tape and
repair all tips and perforations in the underlayment vapor barrier prior to flooring installations. A separate vapor barrier should
not be used in conjunction with Pergo Gold underlayment.
14
15 16
WOOD
GLUE
17
10
11
13
12
7
8
9
1
2
3
4
4
5
1 3 5 5
2
4
6
5
6
6
> 12 in
> 30 cm
6
2
3
1
Left
Right
Undercut door frame and wallbase. Slide the ooring at least 1/4"
underneath the door frame and wallbase. Also leave a concealed
Remove bumps or peaks in suboor and ll depressions with oor
leveling compound to ensure no more than 3/16" unevenness per
Acclimate unopened product before installation for a minimum of
layer of underlayment appropriate for locking engineered wood
oors.For planks with attached underlayment, it is acceptable
to install Pergo Gold™ underlayment (Lowes
Part # 670312) prior
to ooring installation if desired. Make sure to follow the Pergo
Gold installation instructions, taking special care to seal all foam
edges with sealing tape and repair all rips and perforations in
the underlayment vapor barrier prior to ooring installation. A
separate vapor barrier should not be used in conjunction with
Pergo Gold underlayment.
5
14 15
1312
4
Left
Right
8
9
1
2
3
4
PE foam backer rod
Molding
Silicone sealant
19
Silicone sealant
PE foam backer rod
Molding
Silicone sealant
subfloor
Undercut door frame and wallbase. Slide the ooring at least 1/4"
underneath the door frame and wallbase. Also leave a concealed
Remove bumps or peaks in suboor and ll depressions with oor
leveling compound to ensure no more than 3/16" unevenness per
Acclimate unopened product before installation for a minimum of
layer of underlayment appropriate for locking engineered wood
oors.For planks with attached underlayment, it is acceptable
to install Pergo Gold™ under
layment (Lowes Part # 670312) prior
to ooring installation if desired. Make sure to follow the Pergo
Gold installation instructions, taking special care to seal all foam
edges with sealing tape and repair all rips and perforations in
the underlayment vapor barrier prior to ooring installation. A
separate vapor barrier should not be used in conjunction with
Pergo Gold underlayment.
5
14 15
1312
4
Left
Right
8
9
1
2
3
4
18
PE foam
backer rod
Molding
Silicone sealant
subfloor
18
19
PE foam
backer rod
Molding
Silicone
sealant
Silicone sealant

PERGO
®
IS MANUFACTURED AND DISTRIBUTED BY UNILIN NORTH AMERICA, LLC
CUSTOMER SERVICE | 1-800-33-PERGO | NA.PERGO.COM/CONTACT-US 05/2021 | PAGE 5 OF 7
Locking Engineered Hardwood - Floor Installation Instructions
1. Inspect each plank. Floor should be installed blending planks from several cartons at the same time to ensure good color and
shade mixture throughout the installation.
2. For the first row along straight walls, remove the tongue on all long side joints and on the short side of the 1st plank only.
3. For uneven walls, trace contour on tongue-side of plank and cut.
4. Assemble the first row tongue side toward wall. Insert the end tongue into the end groove and rotate downward to assemble.
Keep the planks aligned and the joints closed.
5. Two spacers thick side to thick side = 3/8".
6. Provide a 3/8" space for expansion on all sides. First piece must be at least 8" long. Start new rows with pieces trimmed from
previous row or use a starter/cut plank from step H of site and material preparation. Ensure at least a 12" end joint offset.
7. At a slight angle, insert the tongue of plank 2 into the groove of plank 1 until the plank edges meet, and then rotate down until
the joints lock.
8. Join the short end of the plank first. There will be a gap on the long side joints when the plank is rotated down.
9. Raise the outside edge of the plank upward approximately 1". Maintain this angle as you push the plank in until the plank
edges meet. Rotate the plank downward until the joint locks. Repeat these steps to complete the installation. Installation Tip:
Place a carton of planks across the end of the row being installed to keep installed planks in place during installation.
10. Alternate Tap Method: Align the tongues into the grooves of the long and short sides of the planks. Install the long side first
by placing a tapping block no closer than 8" from either end and tap lightly along the long side until the joint is closed tightly.
Then tap the end using the tapping block into a locked position. Note: Uneven tapping or use of excessive force may damage
the joint.
11. Ensure there will be a 3/8" gap (after the joint is closed) to the wall for expansion.
12. For the last row, align the plank to be used on top of the 2nd to last row. Using a full width plank as a spacer, trace wall
contour and cut plank.
13. For the last row, install the long side tongue into the groove with the end joint aligned. Using a pull bar and hammer, work
evenly along the length of the plank and lightly tap the joint closed.
14. After tapping the long side joint closed, tap the short side closed, using a tapping block or a pull bar.
Installation Under Doorway Frames
15. Slide plank under pre-cut door frame.
16. Tap the long side joint closed first. Then tap the end joint closed.
Installation Around Fixed Objects (such as Pipes)
17. Allow 3/8" expansion space around pipes or other fixed objects.
18. Remove all spacers.
19. The entire perimeter of the installation must be sealed with Simple Solutions waterproof quarter round
(Lowe’s item # 3674489) or 100% silicone sealant in accordance with the installation instructions. For sections where
Simple Solutions waterproof quarter round cannot be used, seal the perimeter with 100% silicone sealant, as follows.
DO NOT use acrylic sealant.
• First fill all expansion spaces with 3/8" compressible PE foam backer rod and cover with silicone sealant.
• Prior to installing the moldings, apply silicone sealant to the portion of the molding or transition that will contact directly
with flooring surface.
• Install moldings and immediately wipe away any excess silicone sealant.
• Apply silicone at connections to doorframes or any other fixed objects.
Finishing the Installation
Flooring Installation

PERGO
®
IS MANUFACTURED AND DISTRIBUTED BY UNILIN NORTH AMERICA, LLC
CUSTOMER SERVICE | 1-800-33-PERGO | NA.PERGO.COM/CONTACT-US 05/2021 | PAGE 6 OF 7
Locking Engineered Hardwood - Floor Installation Instructions
Place felt floor protectors under legs of moveable furniture. Chair casters should be rubber — not plastic or metal. Place walk-off
mats at entrances. Dust mop as primary cleaning method. Occasionally wet mop with water only, using a well wrung-out mop;
DO NOT pour liquid directly on floor or use an excessively wet mop that will puddle or leave moisture standing on the floor. If
needed, use a solution of 1 cup of vinegar per gallon of water OR 1/3 cup ammonia per gallon of water. DO NOT use detergents,
abrasive cleaners, soaps, waxes or polishes. A residential steam mop may be used provided the steam is applied to a microfiber
pad and not applied directly to the floor. Make sure to set the temperature of the steam mop to the appropriate setting for
hardwood floors, or to the lowest setting. Steam mop in the length direction of the planks only. Use correct hard surface vacuum
tools. DO NOT use rotating beater bars, floor scrubbers, jet mops or similar products. Wipe up spills immediately. DO NOT allow
topical moisture to remain on the floor longer than the time specified in the product warranty.
Engineered hardwood reacts to sunlight. Hardwood contains certain types of acids in its cellular structure. With exposure to
sunlight these acids begin to amber. The color change is referred to as patina. The hardwood will reach its own natural warmth
and patina level and stop ambering. The amount of patina is directly related to the species, amount of acids and the level of
sunlight. The entire floor will reach the same patina level over time. This is often noticed after a rug is removed and the floor is
noticeably different in color underneath. If you remove the rug and expose the entire floor to the same amount of light, it will
even out over time and become uniform in color.
Care and Cleaning
• Cutting, sanding or machining wood products produces wood dust. While wood products are not hazardous under the OSHA
Hazard Communication Standard (29 CFR 1910.1200), the International Agency for Research on Cancer (IARC) and the state
of California have classified wood dust as a human carcinogen.
• Airborne wood dust can cause respiratory, skin and eye irritation. Power tools should be equipped with a dust collector. Use an
appropriate NIOSH-designated dust mask. Avoid dust contact with skin and eyes.
• In case of irritation flush eyes with water. If needed seek medical attention. If dermatitis occurs, seek medical attention.
• PROPOSITION 65 WARNING: This product contains chemicals known to the state of California to cause cancer.
• The products in this carton DO NOT contain asbestos or crystalline silica.
• DO NOT MECHANICALLY CHIP OR PULVERIZE EXISTING RESILIENT FLOORING, BACKING, LINING FELT, ASPHALTIC
“CUTBACK” ADHESIVES OR OTHER ADHESIVES.
• DO NOT sand existing resilient tile, sheet flooring, backing or felt linings. These products may contain asbestos fibers that are
not readily identifiable. Inhalation of asbestos dust can cause asbestosis or other serious bodily harm. Check with local, state
and federal laws for handling hazardous material before attempting the removal of these floors.
WARNING: Wood Dust
THESE BUILDING MATERIALS EMIT FORMALDEHYDE. EYE, NOSE, AND THROAT IRRITATION, HEADACHE, NAUSEA
AND A VARIETY OF ASTHMA-LIKE SYMPTOMS, INCLUDING SHORTNESS OF BREATH, HAVE BEEN REPORTED AS A
RESULT OF FORMALDEHYDE EXPOSURE. ELDERLY PERSONS AND YOUNG CHILDREN, AS WELL AS ANYONE WITH
A HISTORY OF ASTHMA, ALLERGIES, OR LUNG PROBLEMS, MAY BE AT GREATER RISK. RESEARCH IS CONTINUING
ON THE POSSIBLE LONG-TERM EFFECTS OF EXPOSURE TO FORMALDEHYDE. REDUCED VENTILATION MAY ALLOW
FORMALDEHYDE AND OTHER CONTAMINANTS TO ACCUMULATE IN THE INDOOR AIR. HIGH INDOOR TEMPERATURES
AND HUMIDITY RAISE FORMALDEHYDE LEVELS. WHEN A HOME IS TO BE LOCATED IN AREAS SUBJECT TO EXTREME
SUMMER TEMPERATURES, AN AIR-CONDITIONING SYSTEM CAN BE USED TO CONTROL INDOOR TEMPERATURE LEVELS.
OTHER MEANS OF CONTROLLED MECHANICAL VENTILATION CAN BE USED TO REDUCE LEVELS OF FORMALDEHYDE
AND OTHER INDOOR AIR CONTAMINANTS. IF YOU HAVE ANY QUESTIONS REGARDING THE HEALTH EFFECTS OF
FORMALDEHYDE, CONSULT YOUR DOCTOR OR CALL LOCAL HEALTH DEPARTMENT.
IMPORTANT HEALTH NOTICE FOR MINNESOTA RESIDENTS ONLY:

PERGO
®
IS MANUFACTURED AND DISTRIBUTED BY UNILIN NORTH AMERICA, LLC
CUSTOMER SERVICE | 1-800-33-PERGO | NA.PERGO.COM/CONTACT-US 05/2021 | PAGE 7 OF 7
Locking Engineered Hardwood - Floor Installation Instructions
The owner/installer assumes all responsibility for final inspection of product quality. Examine flooring for color, finish and
style prior to installation. If material is unacceptable, contact the seller immediately. Wood is a natural product and contains
characteristics such as variations in color, tone and graining. Flooring is manufactured in accordance with industry standards,
which allows manufacturing and natural deficiency tolerances up to 5% of the total installation. Installer should work from
minimum of 3 cartons at the same time to ensure good color and shade blend. The installer must use reasonable selectivity and
hold out or cut off piece with deficiencies. DO NOT install undesirable pieces. Flooring warranties DO NOT cover materials with
visible defects once they are installed. Installation is acceptance of product quality.
It is the responsibility of the installer and owner to ensure that jobsite, environmental, subfloor and subsurface conditions
involved meet or exceed all requirements as outlined in installation instructions prior to installation. Manufacturer declines
all responsibility for product performance or installation failure due to subfloor, substrate or environmental deficiencies or
jobsite conditions.
For service under the warranty please contact your local Lowe’s store. Describe the problem and in many cases, they can
provide you with a solution.
For installation, maintenance and technical questions please call 1-800-33-PERGO.
Pergo locking engineered hardwood flooring is manufactured by
Unilin Flooring North America LLC
550 Cloniger Drive
Thomasville, NC 27360
Warranty Conditions
/