Page is loading ...

Volume 1:
The A318/A319/A320/A321 Professional in P3D
RECORD OF REVISIONS
revision n°
Issue date
Release
Description
001
15 June, 2018
1.0.0
Completion shared on forum.
002
11 July, 2018
1.0.0
Spellcheck (thanks Kendall)
003
6 March, 2019
1.2.3
Added chapters on printer and Connected Flight Deck
004
16 April, 2019
1.2.4
Added chapter on GSX2

A318/A319/A320/A321
Professional
The A318/A319/A320/A321 In P3D
Vol
1
01-03-10
16 April 2019
CONTENTS
INTRODUCTION .............................................................................................................................................12
THE MANUALS ...............................................................................................................................................12
COPYRIGHTS ..................................................................................................................................................13
CREDITS..........................................................................................................................................................13
SYSTEM REQUIREMENTS ...............................................................................................................................14
INSTALLATION AND REMOVAL ......................................................................................................................14
DRM OR LIMITATIONS? ............................................................................................................................ 14
WHERE THE FILES ARE INSTALLED ............................................................................................................ 15
THE AEROSOFT GENERAL FOLDER ........................................................................................................ 15
THE AIRCRAFT PRODUCT FOLDER ......................................................................................................... 15
DISABLING THE AIRCRAFT ..............................................................................................................................15
AFTER LOADING THE AIRCRAFT .....................................................................................................................15
NAVIGATION DATABASE ................................................................................................................................16
SUPPORT, FORUMS, RELEASES AND UPDATES ..............................................................................................16
CONTACT SUPPORT .................................................................................................................................. 16
VERSION NUMBERS .................................................................................................................................. 16
UPDATING ................................................................................................................................................. 17
MAKING VIDEOS ............................................................................................................................................17
WEATHER RADAR ..........................................................................................................................................17
TERRAIN DISPLAY ...........................................................................................................................................18
CONNECTED FLIGHT DECK .............................................................................................................................18
STARTING SESSION AS CAPTAIN ............................................................................................................... 19
PREPARATION ....................................................................................................................................... 19
INITIALIZATION (ALL INSIDE THE SIM) .................................................................................................. 19
JOINING SESSION AS FIRST OFFICER OR OBSERVER ................................................................................. 21
PREPARATION ....................................................................................................................................... 21
INITIALIZATION (ALL INSIDE THE SIM) .................................................................................................. 21
SAVING AND LOADING MODES .....................................................................................................................23
NON-STANDARD SHADERS AND COLOR SETTINGS .......................................................................................23
VOICE SETS .....................................................................................................................................................24
TOOLS ............................................................................................................................................................24
CONFIGURATOR ........................................................................................................................................ 24
FUEL PLANNER .......................................................................................................................................... 25
LIVERY MANAGER ..................................................................................................................................... 26
COMPANY ROUTE EDITOR ........................................................................................................................ 27
MCDU INTERFACES ........................................................................................................................................27
MCDU WEB INTERFACE ............................................................................................................................ 27
MCDU COMPANY ROUTES .............................................................................................................................27
THE MULTIPURPOSE COCKPIT PRINTER ........................................................................................................29
AUTOMATICALLY GENERATED PRINTS ..................................................................................................... 30
AIDS GENERATED PRINTS ......................................................................................................................... 31
ATSU/AOC GENERATED PRINTS ................................................................................................................ 32
SETTINGS MCDU ............................................................................................................................................34
ACFT STATE (AIRCRAFT STATE) ................................................................................................................. 34
ACFT DOORS (AIRCRAFT DOORS) .............................................................................................................. 34
GND SERVICES (GROUND SERVICES) ........................................................................................................ 34
OPTIONS ................................................................................................................................................... 35
SOUND .................................................................................................................................................. 35
VIEWS ................................................................................................................................................... 35
CHECKLIST ............................................................................................................................................. 35
FLIGHT ................................................................................................................................................... 36
AICRAFT ................................................................................................................................................ 36
LOAD/FUEL ........................................................................................................................................... 36

A318/A319/A320/A321
Professional
The A318/A319/A320/A321 In P3D
Vol
1
01-03-11
16 April 2019
GSX2 SETTINGS ......................................................................................................................................... 37
VIEW SYSTEM ................................................................................................................................................38
ST. ELMO’S FIRE .............................................................................................................................................38
ANIMATIONS .................................................................................................................................................39
MAKING THE TILLER FUNCTIONAL .................................................................................................................41
P3D SETTINGS ................................................................................................................................................42
OPTIONS | GENERAL | REALISM ............................................................................................................... 42
OPTIONS | GRAPHICS | DISPLAY .............................................................................................................. 42
AIRCRAFT | GRAPHICS | LIGHTING ........................................................................................................... 43
APPENDIX A: THE MAKING OF .......................................................................................................................44

A318/A319/A320/A321
Professional
The A318/A319/A320/A321 In P3D
Vol
1
01-03-12
16 April 2019
INTRODUCTION
The Aerosoft A318/A319/A320/A321 Professional is a follow up project to the previous Bus projects. In
that project, we created an airliner aimed at an audience, that outgrew the simpler default aircraft and
wanted a more complex simulation. Almost all code has been rewritten to give you the best experience
possible.
In relation to that, we kept a strong focus on the left seat, the captains’ seat, as the whole project is
designed to be flown from that location. We figured that if you buy a project like this you want to be the
captain and not the co-pilot!
Please note that the ‘Professional’ in the title reflects that it is part of our line of products aimed at P3D
V4 and does not indicate this is in any way a serious training tool.
THE MANUALS
There are 9 separate documents that make up the manual.
• Readme.txt: Contains the change log, version number information and last-minute information.
• Vol1_InP3D.pdf: You are reading it now. Contains information on using the aircraft in P3D and
more general information.
• Vol2_Normal_Procedures.pdf: Contains all the procedures.
• Vol3_Procedure_Guide.pdf: Contains the information in the Normal_Procedures.pdf in a more
condensed (checklist like) format.
• Vol4_Systems.pdf: Contains an in-detail description of all systems.
• Vol5_Checklist.pdf: Full checklist for use in the cockpit.
• Vol6_Step_by_Step.pdf: A flight described in detail for you to follow.
• Vol7_Thrust Lever Setup.pdf: Only to be read when you have problems with the Thrust levers in
P3D.
• Vol8_Weird and Wonderful Logic.pdf: A document that describes some of logic of A320 systems.
Recommended reading if you come from non-FBW aircraft or have never flown an A320.
• Vol9_Connected Flight Deck Flows (some work still needs to be done on this one)
Also, note that the readme.txt always contains the information on the latest updates. Before contacting
support do make sure you have installed the latest version!

A318/A319/A320/A321
Professional
The A318/A319/A320/A321 In P3D
Vol
1
01-03-13
16 April 2019
COPYRIGHTS
The manual, documentation, video images, software, and all the related materials are copyrighted and
cannot be copied, photocopied, translated or reduced to any electronic medium or machine legible form,
neither completely nor in part, without the previous written consent of AEROSOFT. THE SOFTWARE IS
FURNISHED «AS IS» AND IT DOES NOT COME FURNISHED WITH ANY GUARANTEE IMPLICIT OR EXPRESS.
THE AUTHOR DECLINES EVERY RESPONSIBILITY FOR CONTINGENT MALFUNCTIONS, DECELERATION, AND
ANY DRAWBACK THAT SHOULD ARISE, USING THIS SOFTWARE.
Copyright © 2018 AEROSOFT. All rights reserved. All trademarks and brand names are trademarks or
registered trademarks of the respective owners. Copyrights are serious stuff. If you find any pirated copies
of this software, please notify us at support@aerosoft.com. We will make sure reports of copyrights
violation are rewarded.
Aerosoft GmbH
Lindberghring 12
D-33142 Büren
Germany
www.aerosoft.com
CREDITS
Concept: Aerosoft
Modeling/Texturing/Animation: Stefan Hoffmann (Aerosoft), Holger Sobl
Project Management: Mathijs Kok (Aerosoft)
Aircraft System Coding: Frank Wiesmann (PAD-Labs),
Manual, documentation: Mathijs Kok (Aerosoft), Rolf Fritze, Emanuel Hagen (Aerosoft)
MCDU programming/Connect Pro: Baylan Cannol (Aerosoft)
Immersion/Cockpit printer: Baylan Cannol (Aerosoft)
XML coding: Frank Wiesmann (PAD-Labs), Finn Jacobsen, Joshua Che
PFD coding: Scott Printz
ND coding, weather radar: Frank Wiesmann (PAD-Labs)
Flight modeling: John Cagle
FMS, AP coding: Robert Miroszewski (Aerosoft), Joshua Che
Settings MCDU: Rolf Fritze, Frank Wiesmann (PAD-Labs)
Sounds: Turbine Sound Studios, Aerosoft
Installer: Andreas Mügge (Aerosoft)
Fuel/Load Planner: Ross Carlson
Additional liveries: Holger Sobl
Digital Flight Data Recorder add-in: Thomas Molitor
Configurator: Robert Miroszewski (Aerosoft)
RAAS add-in: FS2CREW (see below)
Project Advisor: Frank Docter
Voices actors: Frank Docter, Adam
Pushback gauge code: Arjan Scheffel
Livery Manager: Hauke Fehr (Fehrware.de)
WebServer tweaks: Robert Steffens
Coding Assistance: Hans Hartmann
The beta testers of this product deserve special mentioning. In this development we experimented extensively with involving them
directly in the production, they often tested code minutes after it was written, gave feedback and got new code almost immediately.
Without them the product would not be where it is now.

A318/A319/A320/A321
Professional
The A318/A319/A320/A321 In P3D
Vol
1
01-03-14
16 April 2019
A special mentioning to the Kindergarten. They did their best to delay this product with random chatter, but we prevailed.
The RUNWAY AWARENESS AND ADVISORY SYSTEM (RAAS) was developed by FS2Crew (www.fs2crew.com) with additional technical
support from Tebin Ulrich and Manuel Ambulo. To purchase an unrestricted version of RAAS Professional that works with every FS9,
P3D and Prepar3D aircraft (not just the Aerosoft Busses), please click here: http://www.fs2crew.com/cart/products/FS2Crew%3A-
RAAS-Professional.html
SYSTEM REQUIREMENTS
• Intel Core i5 Quad Core (i7 recommended)
AMD Ryzen 5 (Ryzen 7 recommended)
• 8 GB RAM (16 GB recommended)
• Direct X11 compatible Graphics Card with minimal 3 Gb (6 Gb recommended)
GTX 1050 class minimal, GTX 1070 class recommended
• Lockheed Martin Prepa3D v4.3 minimal (please note not compatible with older versions)
• Windows 10 64-bit fully updated (it might work with other Windows versions, but we have not
fully tested that)
• Control hardware with rudder and throttle channels
• 1024×768 minimum screen resolution for primary display
• Adobe Acrobat® Reader 8 minimal to read and print the manual
(1)
(1)
Available for free, download at: http://www.adobe.com/prodindex/acrobat/readstep.html
INSTALLATION AND REMOVAL
To install just start the SETUP.EXE and follow the on-screen suggestions.
At the end of the installation you are asked if RAASPro should be installed. RAASPro is a fully functional
version of the product with the same name released by FS2Crew (but it is locked to this product).
Removal should never be done manually but only using the software removal applet you will find in the
Windows Control panel.
DRM OR LIMITATIONS?
No. If you paid for this product you can download it as many times as you like, install it as many times as
you like and on as many machines as you want (if they are yours). Of course, it is not allowed to share
your files and do note they are personalized the moment you start the installer.
The installer does not collect any information, does not connect to ay server, it just installs files. Nothing
more. We promise.

A318/A319/A320/A321
Professional
The A318/A319/A320/A321 In P3D
Vol
1
01-03-15
16 April 2019
WHERE THE FILES ARE INSTALLED
The complete product is installed in two folder, both OUTSIDE the simulator. It uses the P3D method of
installing so the simulator can be fully replaced without having to re-install all add-ons.
THE AEROSOFT GENERAL FOLDER
\Documents\Aerosoft\General: In this folder all the files that are shared between Aerosoft products are
installed. It absolutely must stay in this location and can’t be moved.
THE AIRCRAFT PRODUCT FOLDER
\Aerosoft A318-A319 Professional: This folder can be placed where you want if P3D is instructed where
to find it. Of course, the installer will handle this. If you run this add-on on multiple computers you can
install it on a shared drive, a server or a NAS.
DISABLING THE AIRCRAFT
Should you want to disable the aircraft for some reason but not de-install it you can use the P3D OPTIONS
| Add-ons dialog to disable it.
AFTER LOADING THE AIRCRAFT
When you load the aircraft (or select another mode) it needs to configure systems and load files. This will
take around 20 to 30 seconds. Just wait, don’t do anything, don’t click, and don’t press any keys until all is
stabilized. If this is your first start, make sure you have the Step-By-Step guide open in addition!

A318/A319/A320/A321
Professional
The A318/A319/A320/A321 In P3D
Vol
1
01-03-16
16 April 2019
NAVIGATION DATABASE
This product contains a complete copy of the NavDataPro navigation database, which provides the LIDO
data and is the worlds most used navigation database in aviation. The database is fully updatable, look on
the Aerosoft websites for NavDataPro.
The Aerosoft A318/A319/A320/A321 is also
fully compatible with the well-known
Navigraph database. You can use the
configurator to select which database to use.
Although these databases come from a
different source and have some differences in
structure, they are basically the same and you
should not see any change between the two.
The database is in the \Documents\Aerosoft\General folder\A3XX NavData folder.
SUPPORT, FORUMS, RELEASES AND UPDATES
No product is bug free and we don’t claim this one be. What is important is how bugs are handled and we
feel it is important that we explain how we intend to handle that.
CONTACT SUPPORT
Support for this product is done by Aerosoft. We prefer to do support on the support forum for one
simple reason: It is fast and efficient, because customers help customers when we are sleeping. It’s also
the difference between one support person reading the question, and 500 people, of which some know
a LOT about the aircraft for various reasons.
• Bus Professional forums: http://forum.aerosoft.com/index.php?/forum/863-aerosoft-bus-
professional/
There are FAQ in every section, please check those first
• If you prefer support by email: https://aerosoft.zendesk.com/anonymous_requests/new
Please note that email support can be slow when things are busy (shortly after a major release
form example). We try to get back to you in 24 hours, but if you want an answer fast, go to the
forums.
We feel strongly about support. Buying one of our products gives you the right to waste our time with
questions you feel might be silly. They are not.
VERSION NUMBERS
• The release version number will be 1.00.
• A service pack will show in the tens, 1.10 (first service pack) -> new full build
• A hotfix will show in in the hundreds 1.11 (first hotfix to be put on service pack 1)
If there are many hotfixes we will also be releasing full new builds. If you are ever in doubt which version
you have, check the product.cfg which you can find in your Aerosoft A318-A319 Professional folder.

A318/A319/A320/A321
Professional
The A318/A319/A320/A321 In P3D
Vol
1
01-03-17
16 April 2019
UPDATING
To update your product, start the Aerosoft Updater Tool (look for that in your Windows Start Menu). You
will see the supported products. Click on the product and select [Update selected product]. Under
[Configuration] you can select to include experimental (and not supported!) updates.
MAKING VIDEOS
If you make video’s you might see the FBW system show the flight control
surfaces animate where they should not in replay mode (or when using a tool like
FSRecorder. To avoid this, you can disable the FBW system for replay using a
hidden option. In the right MCDU, under Options, press the LSKR1 button to
activate. The aircraft will hardly be flyable with this de-activated though!
WEATHER RADAR
As the weather radar is a totally new development and unlike from any previous products, it is good to
discuss its virtues and limitations.
The weather radar in the Aerosoft A318/A319/A320/A321 products works with any weather add-on or
even without. It reads the weather conditions directly from P3D and does not need to link to any weather
add-on. However, because it does just that it also shows some of the limitations of weather in P3D. For
example, it is always builds up in square blocks. We choose to leave this effect visible because we believe
a weather radar should show where the weather is, not how it should look in an ideal simulator. Because
we simulate the actual working of the weather radar it also means a lot of calculations need to be done,
this can influence your frame rate. Because wind shear and turbulence cannot correctly be placed in P3D
detection of that is currently not possible.
As stated, the weather radar works with any weather add-on we have tried. But only the weather they
inserted in P3D is detected. If they have weather that is shown on their own display but that has not yet
been send to P3D it cannot be shown. As this weather is not in P3D it is of course not part of the
simulation at that moment. In other words, if you can’t see the
weather the weather radar can’t see it. Compatibility with
weather tools that do not adhere to SDK standards has been
considered but not guaranteed.
The display of the weather (and terrain) on the Navigation
Display is controlled by the larger part of the ND control knob.
On a few systems the Weather Radar has shown to cause severe drop in frame rates combined with some
advanced settings in weather tools. It is now possible to edit some functions via the AB_ND_GDI.ini (to be
found in the product folder. The possible options are explained with the comments in that file.

A318/A319/A320/A321
Professional
The A318/A319/A320/A321 In P3D
Vol
1
01-03-18
16 April 2019
TERRAIN DISPLAY
Just like the Weather Radar the Terrain Display is an overlay on the Navigation Display. The terrain is
shown in colors depending on the height of the terrain in relation to the altitude of the aircraft.
A/C Altitude +2000
50% Red
A/C Altitude + 1000
50% Yellow
A/C Altitude -250 <> +500
25% Yellow
A/C Altitude -1000
50% green
A/C Altitude -2000
16% Green
A/C Altitude >2000
Black
Note that the terrain and weather cannot be displayed at the same time and that the same control it used
as the weather display to set the transparency of the overlay.
CONNECTED FLIGHT DECK
This is another special feature almost no other add-on has. Connected Flight Deck (CFD from now on)
allows you to connect your computer running the Aerosoft bus to another computer running the same
aircraft. Using CFD is not complex (not as complex as flying an A318/A319/A320/A321 anyway) and
following these steps should help you in getting connected. On our forum you will find a specific support
forum for CFD.
You will need a voice connection of course if you are not in the same room. You can use Skype or any
other VOIP service. But for gaming we prefer TeamSpeak (http://www.teamspeak.com/) or Discord
(https://discordapp.com/).
A few things to keep in mind when using CFD:
• Use the same weather engine if possible (otherwise make sure the weather is as similar as
possible) as our weather radar will send the WX overlay from the master to the slave computer.
• Stability is more important than bandwidth in the connection, but still a broadband connection is
needed.
• You do not need to be connected to any online flying service like IVAO or VATSIM, but it most
certainly is possible. One of the pilots needs to be active, the second needs be online as
observer.
• You do not need any of P3D standard ways of connection, as this is a fully stand-alone
connection.
• Vol 9 of the manuals contains a complete procedural flow of what is done by each pilot. Unless
you are very experienced it is a good idea to have this on hand.
• Hifisim’s ActiveSky is the only weather tool we know that guarantees the same exact weather is
both systems have the same settings.
• Do not forget to say ‘I have control’ when you take over flying the aircraft.
• When both pilots try to fly the aircraft you will hear the computer complain (“Dual Input”) and
after it has decided who won it will say either “Priority Right” or “Priority Left”.

A318/A319/A320/A321
Professional
The A318/A319/A320/A321 In P3D
Vol
1
01-03-19
16 April 2019
STARTING SESSION AS CAPTAIN
PREPARATION
(none of these things are really needed but they make life a lot easier)
1. Make sure both pilots are at the same location
2. Make sure both pilots are in the same aircraft
3. Make sure both pilots are using the same weather
4. Make sure both pilots have Crash Detection off. Not only does this prevents some problems and
speeds up the sim, but it is also a very buggy function and most high-end scenery does not
contain any crashable objects. So even if it is enabled you can still drive through walls
5. Get your voice connection working first.
INITIALIZATION (ALL INSIDE THE SIM)
Note: it is best to do any changes to the settings (like roles) AFTER the connection and session
are established!
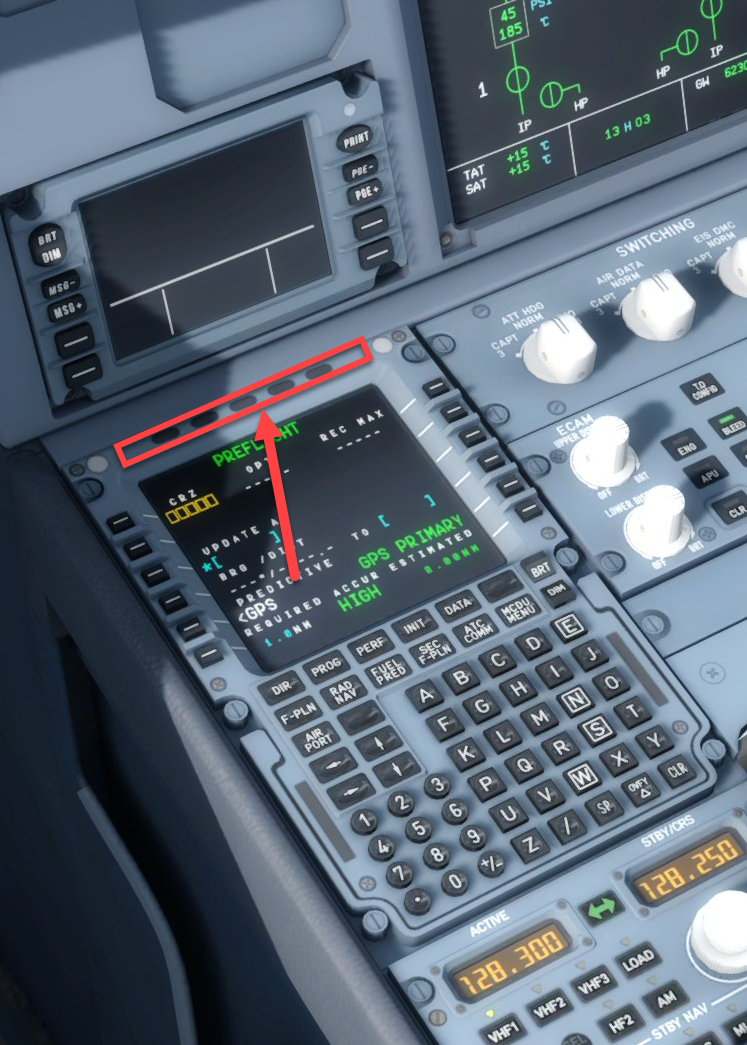
1) Click to open the Settings MCDU
(A318/319/320/321), on the A330 the Settings
MCDU is the third MCDU:
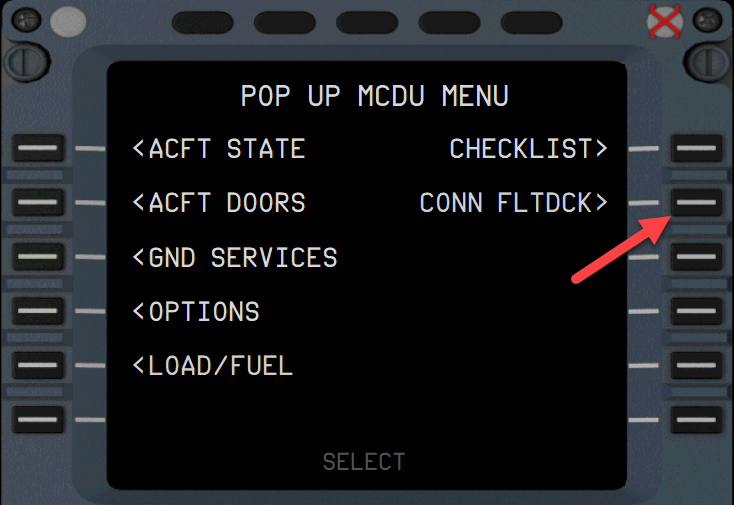
2) The Settings MCDU will show, click CONNECTED
FLIGHT DECK

A318/A319/A320/A321
Professional
The A318/A319/A320/A321 In P3D
Vol
1
01-03-20
16 April 2019
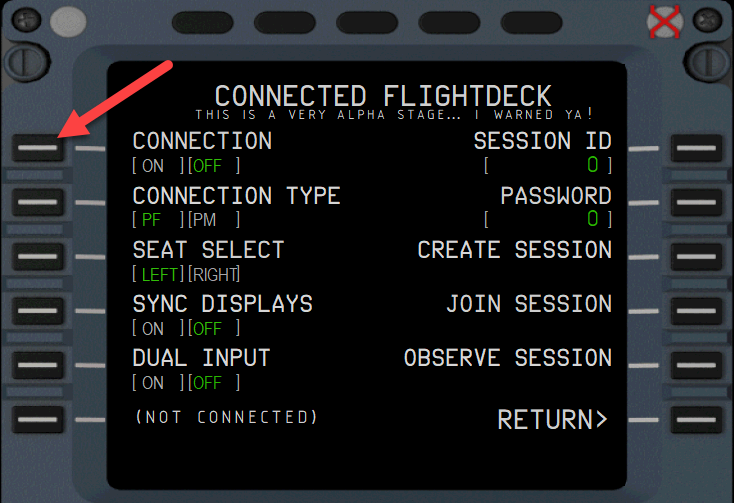
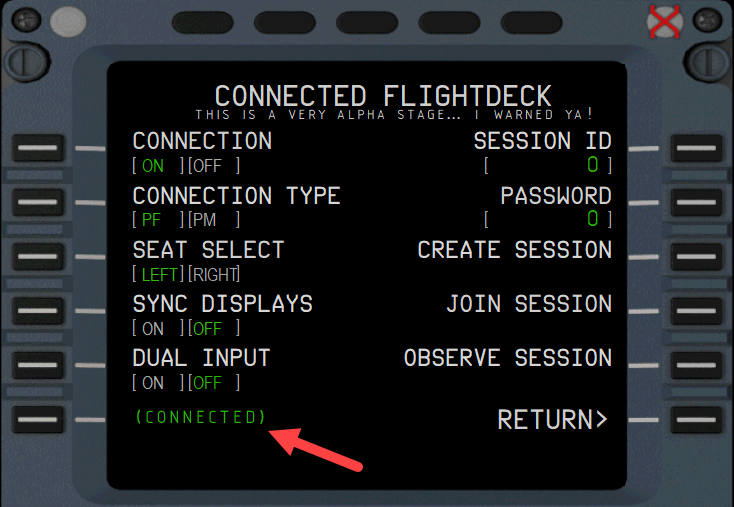
3) Click CONNECTION
4) when a connection is made it will
show CONNECTED. This means you are connected
to the server.
5) Click CREATE SESSION. A session ID and
Password will now be shown. This is the ONLY
information you must give to your crew
members! If you want to be the First Officer,
you can select that now (or later).
6) Done! There is now a session running on the server that others can connect to.

A318/A319/A320/A321
Professional
The A318/A319/A320/A321 In P3D
Vol
1
01-03-21
16 April 2019
JOINING SESSION AS FIRST OFFICER OR OBSERVER
PREPARATION
(none of these things are really needed but they make life a lot easier)
1. Make sure both pilots are at the same location
2. Make sure both pilots are in the same aircraft
3. Make sure both pilots are using the same weather
4. Make sure both pilots have Crash Detection off. Not only does this prevents some problems and
speeds up the sim, but it is also a very buggy function and most high-end scenery does not
contain any crashable objects. So even if it is enabled you can still drive through walls
5. Get your voice connection working first.
INITIALIZATION (ALL INSIDE THE SIM)
Note: it is best to do any changes to the settings (like roles) AFTER the connection and session
are established!
1) Click to open the Settings MCDU
(A318/319/320/321), on the A330 the Settings
MCDU is the third MCDU:

A318/A319/A320/A321
Professional
The A318/A319/A320/A321 In P3D
Vol
1
01-03-22
16 April 2019
2) The Settings MCDU will show, click CONNECTED
FLIGHT DECK
3) Click CONNECTION
4) when a connection is made it will
show CONNECTED. This means you are connected
to the server.
5) Enter the Session ID and Password you got
from the Captain on the Scratchpad and insert it
by clicking the buttons. We do now longer advise
settings like roles to be done before the
connection is made and the session is entered.

A318/A319/A320/A321
Professional
The A318/A319/A320/A321 In P3D
Vol
1
01-03-23
16 April 2019
6) Now click JOIN SESSION if you want to be able
to fly or OBSERVE SESSION if you just want to sit
on the observer seat.
Note that as observer you can do everything you
can normally do, pan around, move in the cockpit
and even click buttons (you should not do that).
But nothing will be sent to the server, it's a receive
only role
SAVING AND LOADING MODES
There are so many systems in the Busses that it is simply not possible to start up the sim and take-off.
Many systems would simply not work. That’s why we include an option to save AIRCRAFT STATES. In these
saved states all the systems (except the MCDU) are stored. There are 4 predefined states that are most
used: COLD & DARK, TURN AROUND, TAXI and TAKE-OFF.
Note: when you used COLD & DARK you will need to activate the Batteries (or External
Power) to be able to use the right MCDU.
NON-STANDARD SHADERS AND COLOR SETTINGS
Many users prefer to tweak their shader (the tables used by the simulator to determine how to show
colors). We are not big fans of many of them because they mean that the colors we use will not be what
you see. Even worse they often level colors, or in simple terms reduce the amount of colors. Before you
comment on any texturing make sure you checked the product with the default shaders!
Also make sure that your graphics card is set to show the full color range (000<>255) and not a limited
color range (16<>235). You will find this setting on your graphics driver. It makes a huge difference on
how the sim looks as the cockpit contains a lot of colors in the 000 to 016 range and the sky is often in the
235 to 255 range.

A318/A319/A320/A321
Professional
The A318/A319/A320/A321 In P3D
Vol
1
01-03-24
16 April 2019
VOICE SETS
There are three different voice sets in this product
• GROUND: the voices of the ground staff that you communicate with when you are starting or
shutting down.
• CAPTAIN (PF): The left seater.
• CO-Pilot (PM) (also called ‘pnf’ in the file names): The right seater.
We included complete sets, and these and these are used for the checklists etc. They use terminology,
that is common at Lufthansa (airlines differ slightly in these things). There are additional sets available in
our forums: http://forum.aerosoft.com/index.php?/forum/865-voice-sets/ and you will also find
instructions there on how to make your own.
TOOLS
With the A318/A319/A320/A321 there are several tools we provide: The RAAS, that is configured from
inside P3D (via the ADDON | RAAS dropdown menu), the Fuel Planner and the Flight Data Recorder can be
started from the Windows Start Menu |Aerosoft | Aerosoft A318_A319 Professional.
CONFIGURATOR
The configurator allows you to configure the product before starting it.
NAVIGATION DATA SOURCE: Allows you to select either NavDataPro (Lufthansa data) or Navigraph if that
is installed.
FADEC: Please make sure you select the right configuration here.

A318/A319/A320/A321
Professional
The A318/A319/A320/A321 In P3D
Vol
1
01-03-25
16 April 2019
LOGGING: Useful for debugging it can affect performance and we suggest keeping it all off unless
requested.
Performance: On some hardware (laptops) the ECAMs will not show. Setting this option will move the
drawing actions from the GPU to the CPU.
ND (Navigation Display): Offer opportunities to reduce the number of drawn elements.
MCDU: Allows configuration of the MCDU options
FS2CREW: Allows you to activate or FS2Crew (assuming it is installed)
You will find the configurator in the Aerosoft A318-A319 Professional\Configurator folder.
FUEL PLANNER
Included with the product is a fuel planning tool.
It does a bit more than that as it also allows you
to load passengers and cargo. The tool has two
main modes, Simple and Advanced. In the simple
mode you can move sliders and set the number
of passengers and cargo and set the departure
and destination airports.
On normal passenger flights you would most
likely not carry a lot of cargo (the luggage of the
passengers is calculated in the weight of the
passengers). When any of the weights is too high
it will show in red meaning you cannot fly like
that. You will have to lose passengers or cargo!
Keep in mind, that flying with a lighter aircraft is
most likely more pleasant.
If you want to do a more detailed fuel planning
use the Advanced Mode. Here you have control over far more variables, but things are a lot more
complex.

A318/A319/A320/A321
Professional
The A318/A319/A320/A321 In P3D
Vol
1
01-03-26
16 April 2019
After setting the variables you must push Generate Loadsheet. There are two ways to load the data
(passengers, cargo and fuel) to the aircraft. Automatically if “Autoload with aircraft” is ticked or manually
using the MCDU2 LOAD/FUEL menu. The fuel will be loaded correctly, so the center tank will only be used
when the wing tanks are full, and the balance of the aircraft will be set correctly.
Note that every airline has its own layout of seats and additional equipment and every airline has its own
specific rules about fuel load. Even simple things and the Zero Fuel Weight can vary far more than we
expected. What we used is an average of many airlines and might not be spot on for your preferred
airline.
You will find the fuel planner (Livery Manager A318-A319.exe) in the C:\Users\your
name\Documents\Aerosoft\General\A3XX Fuel Planner.
LIVERY MANAGER
There are hundreds of liveries available for the A318/A319/A320/A321 and there is a simple livery
manager that will assist you in adding and removing them. You will find the livery manager (Livery
Manager A318-A319.exe) in the \Aerosoft A318-A319 Professional\Livery Manager folder. After starting it
will ask for the P3D folder.
Installing a livery is as simple as dragging the zip file you downloaded on top of the livery manager. For
90% of the additional liveries this will work. All other livery ZIP files that meet the following conditions will
be handled automaticaly (if this method does not work ask the livery designer to be compliant with our
standards):
• There must be a txt-file ("readme.txt" or different name as long as it's the only txt-file) with the
code snippet for the aircraft.cfg included.
• The snippet starts with [FLTSIM.X] and ends with a blank line.
• In this snippet the line "ui-type=*aircraft_type*" must be contained, otherwise the manager
doesn't know which plane the livery should be added to.
• Each ZIP-file can only contain one livery / alternative versions must be separated into two ZIP
files.

A318/A319/A320/A321
Professional
The A318/A319/A320/A321 In P3D
Vol
1
01-03-27
16 April 2019
• The whole file must be a proper ZIP-file containing the file and folder structure on the first level.
So do not zip the folder with the files but only the files themselves.
• Beside the text file there needs to be the texture folder with its extension name, containing a
"thumbnail.jpg"
COMPANY ROUTE EDITOR
This simple tool makes it possible to edit, create and save company routes that you can call up in the
MCDU. It’s faster than doing all that in the MCDU! You will find the company route editor in the
C:\Users\your name\Documents\Aerosoft\General folder.
MCDU INTERFACES
The MCDU has three hidden
click zones. One to toggle
keyboard input, one to open the
MCDU as a 2D panel and the last
one to open the third ‘settings’
MCDU. This last one contains all
the settings of the add-on.
With the keyboard activated you
can use your normal keyboard to
enter data in the MCDU. Keep in
mind that this disables any
keyboard command to P3D!
The 2D MCDU panel can be
undocked and moved to other
displays.
MCDU WEB INTERFACE
Because the MCDU is arguably the most complex instrument in the cockpit it makes sense to allow it to be
used as simply as possible. So by using a simple webserver that runs inside P3D (don’t worry it hardly uses
any resources) you are able to connect any device that has a web browser to the A318/A319/A320/A321
and use the MCDU on that devise. Tablets are ideal because you will not need a mouse.
To use the web interface, start WebInterface.exe that is in \Documents\Aerosoft\General\A3XX Connect
Pro. You can do this before starting P3D or later. It will open a small window showing you the iP address
and the port, something like this: 123.123.123.123:4040. You can enter this in the address bar of the
browser on any device that is connected to the same network. It will open showing a simple information
screen. This one is ideal to keep track of your long flights via your smartphone. Click on MCDU and you
can use the left MCDU it as you would in the aircraft.
MCDU COMPANY ROUTES

A318/A319/A320/A321
Professional
The A318/A319/A320/A321 In P3D
Vol
1
01-03-28
16 April 2019
The MCDU allows you to store flight plans as ‘company routes’. The saving and loading of company routes
is done via the left MCDU. Press the MCDU MENU button to access these options. These company routes
are very useful when an aircraft flies the same route day after day. A company route consists of the
departure and arrival airport plus the routing. It does not contain the runway and SID/STAR because those
can differ (for example because of the wind). The route is made up of waypoints and the airway name
between them: AIRPORT > WAYPOINT > ROUTE > WAYPOINT > ROUTE,…., WAYPOINT > AIRPORT
Now an actual flight starts on a runway, then follows a SID (Standard Instrument Departure) before
following airways to the destination. Close to the destination you follow a STAR (Standard Terminal Arrival
Route) to the runway: RUNWAY > SID > WAYPOINT > ROUTE > WAYPOINT > ROUTE,…., WAYPOINT > STAR
> RUNWAY
The A318/A319/A320/A321 defaults to the realistic company route format, but if you prefer to save your
company routes with the runways and SID/STAR it will allow you to do so by editing a configuration file.
Look for the FMGS.ini file in the \Aerosoft A318-A319 Professional\Data folder You will find:
[CoRte]
FullRoute=0
Default this is [0] indicating it will save realistic company routes. Change it to [1] and it will save the
complete but slightly less realistic flight routes.
/
