Page is loading ...

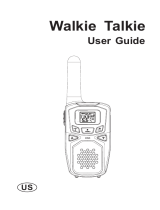
1. Antenna
2. Volume Knob
3. Backl it LCD Display
4. External Speaker/
Microphone
5. Up Button
6. Down Button
7. Microphone
8. Speaker
9. Menu/Power Buttonn
10. NOAA/Scan Button
11. Cal l/Lock Button
12. PTT(Pull to talk) Butto
13. Wrist Strap Connection
14. Belt Clip
15. Battery Compartment
16. Battery Door Latch
1
2
3
4
5
6
7
8
9
10
11
12
13
14
15
16
CAUTION
Read this operating instruction carefully before
using your Retevis RT41 two way radio, including
the part on Product Safety and RF Energy Exposure
Compliance
Product Features
Product number
Frequency range
Channel number
Channel spacing
Working voltage
Frequency stability
Operating temperature range
The antenna impedance
Overall dimensions
Weight
RT41
FRS
22
12.5KHz
3.6V
±2.5ppm
-10℃~50℃
50Ω
160*54*41mm
120g
TECHNICAL PARAMETERS
Rf power
Modulation method
Noise and harmonic
Residual Radiation
Modulation distortion
Maximum deviation
0.5w
1.0W
F3E
-40dB
≤-35dB
≤7%
≤±5KHz
TRANSMITER
The sensitivity
Modulation receiver bandwidth
Adjacent selective
Intermodulation interference resistance
Spurious response inhibition
Audio output power
Audio distortion
≤0.2uV
±5KHz
≥40dB
≥35dB
≥70dB
≥300mW
≤8%
RECEIVER
Product Features
Channel
1
2
3
4
5
6
7
8
9
10
11
Frequency(MHz)
Frequency(MHz)
462.5625
462.5875
462.6125
462.6375
462.6625
462.6875
462.7125
467.5625
467.5875
467.6125
467.6375
Channel
12
13
14
15
16
17
18
19
20
21
22
467.6625
467.6875
467.7125
462.5500
462.5750
462.6000
462.6250
462.6500
462.6750
462.7000
462.7250
1 2
(Include Antenna)

Backlit LCD Display
1. Battery Level Indicator
2. Roger Beep Icon
3. VOX Icon
4. Weather Icon
5. Lock Icon
6. Hi/Low Power Icon
7. DCS/CTCSS Icons
8. Scan/Memory Icon
9. Weather Alert Icon
10. DCS/CTCSS Privacy Code
Numbers
11. Power Saver Icon
12. Channel Numbers
13. Receive/Transmit Icon
14. Memory Channel Number
15. Key Tone Icon
1
2
3
4
5
6
11
12
13
10
8
7
9
14
15
Features
• 22 Channels
Seven shared with FRS/GMRS,
seven FRS only,
eight GMRS only.
• 10 Channel NOAA All
Hazards Radio
• Weather Alert
• 121 Privacy Codes
(38 CTCSS codes/83 DCS codes)
• Hands-Free Operation
(VOX)
• Scan
Channels, privacy codes
• Backl it LCD Display
• Cal l Alert
Ten selectable tones
• Button Lock
• Speaker/Microphone/Jack
• Roger Beep
Selectable On/Off
• Battery/Power Saver
• Keystroke Tones
• Battery Level Indicator
• Low Battery Audible Alert
• Auto Squelch
• Belt Cl ip
Installing Batteries
To install or replace batteries:
1. Remove belt cl ip by releasing belt cl ip latch and sliding clip up.
2. Pull the battery door lock tab down to release the battery cover.
3. Insert the cable of the supplied one lion rechargeable Into the battery
jack.
4.Put the battery cover back into place. Snap the lock tab and belt clip
back into place.
For charging radio(s) :
1. Insert the USB cable into charging jack on right of the radio.
2. Plug the USB cable into power port.
The radio will display flashing battery icon while charging. And when
charging complete, the cycle moving will be stopped.
Recommends your radio be turned off whi le being charged.
Turning on Your Radio
Press and hold the Menu/Power button until you hear
a series of audible tones indicating the radio is on.
Your radio is now in Standby mode,ready to receive
transmissions. The radio is always in Standby mode
except when the Talk, Call or Mode/Power buttons
are pressed.
Quick Start
1. Press and hold the Menu/Power button
to turn on your radio.
2. Press the Menu, Press the Up or Down
button to select a channel.
Both radios must be tuned to the same
channel/privacy code to communicate.
3. Press and hold the PTT button while
speaking into the microphone.
4. When finished talking, release the PTT
button and listen for a response.
3
4
Important FCC Licensing Information
This radio operates on General Mobile Radio Service (GMRS)
frequencies which require a Federal Communications Commi-
ssion (FCC) license. See page 15 for licensing and other
related information.
Maximum range may vary and is based on unobstructed
line-of-sight communication under ideal conditions.

To Adjust Volume
Rotate Volumen Knob until you reach a comfortable
listening level. Rotate Volume Knob clockwise to increase
the volume or counterclockwise to decrease the volume.
Call Button
Press and release the Cal l button.
The other person wi l l hear a two second cal l tone. This
tone is used only to establ ish voice communications.
See page 13 on how to select between ten cal l tone
settings.
Lock Function
The Lock function locks the Up, Down and Mode/Power
buttons to prevent accidental operation.
To turn the lock on or off:
– Press and hold the Cal l/Lock button for two seconds.
A double beep sound is used to confirm your lock on
or off request. When in Lock mode,the Lock icon will
be displayed.
Scrolling Through the Menu Function
By scrolling through the MENU function, you will be able to select or
turn on preferred features of your radio. When scrolling through the
Menu function, your radio features will be displayed in the same
predetermined order:
Set Channels
Set CTCSS Privacy Codes
Set DCS Privacy Codes
Set Vox On/Off
Set Vox Sensitivity
Set Cal l Tones 1-10
Set Roger Beep On/Off
Set Key Tones On/Off
Battery Low
When battery power is low, the final bar in the Battery
Low icon will blink and an audible tone will sound twice
before the radio shuts off. Your batteries should be
replaced or recharged, if using rechargeable batteries.
Auto Battery Save
If there are no transmissions within 10 seconds, the radio
will automatically switch to Battery Save mode and the
Power Saver icon will flash in the display. This will not
affect the radio’s ability to receive incoming transmissions.
Communicating with Another Person
1. Press and hold the PTT button.
2. With the microphone about two inches (5 cm) from your mouth,
speak in a normal voice.
3. Release the PTT button when you are finished talking and l isten for
a response. You cannot receive incoming cal ls while pressing the
PTT button. Both radios must be tuned to the same channel/privacy
code to communicate.
To Select a Channel
With the radio on, select any of the 22 channels by
pressing Menu and the Up or Channel Down button.
Both radios must be tuned to the same channel to
communicate.
Channels 1 through 7 are GMRS only.
Channels 8 through 14 are FRS only.
Channels 15 through 22 are GMRS only.
Listening for a Response
Release the PTT button to receive incoming transmissions. Your radio
is always in Standby mode whi le the Talk or Cal l buttons are not
pressed.
5
6
Battery Low
The radio will display flashing battery icon
whi le charging.
Battery Save Mode
Lock Icon

Privacy Codes
Your radio incorporates two advanced coded squelch systems that can
help to reduce interference from other users on any given channel.
CTCSS (Continuous Tone Coded Squelch System) provides 38 privacy
codes and DCS (Digital ly Coded Squelch)provides 83 privacy codes.
This provides a total of 121 Privacy Codes. Either system can be used
on al l channels, but both systems cannot be used on the same channel
at the same time.
Set CTCSS Privacy Codes
To select a CTCSS privacy code:
1. After selecting a channel, press the Menu/Power
button until the CTCSS icon appears and the small
numbers next to the channel number flash on the
display.
2. Press using the Up or Down button to select a privacy
code. You can hold the Up or Down button for fast
advance.
3. When your desired CTCSS privacy code is displayed,
press the Mode/Power button to enter the new setting
and proceed to other functions, or press PTT button to
enter the new setting and return to Standby mode.
Set DCS Privacy Codes
To select a DCS privacy code:
1. After selecting a channel, press the Menu/Power
button until the DCS icon appears and the small
numbers flash on the display (01 through 83).
2. Press using the Up or Down button to select a DCS
privacy code. You can hold the Up or Down button for
fast advance.
3. When DCS privacy code is displayed, press the Mode
/Power button to enter the new setting and proceed to
other functions, or press PTT button to enter the new
setting and return to Standby mode.
Voice Activated Transmit (VOX)
In VOX mode, your radio can be used “hands-free,” automatical ly
transmitting when you speak. You can set the VOX sensitivity level to
fit the volume of your voice and avoid transmissions triggered by
background noise.
To set VOX sensitivity:
1. Press the Mode/Power button unti l the VOX icon
flashes and the current sensitivity level is displayed.
The current VOX sensitivity level is displayed with
letters “LE” and a Number 1 through 3, with Number
3 being the most sensitive level and Number 1 being
the least sensitive level.
2. Press the Up or Down button to change the setting.
3. Press the Mode/Power button to enter the new setting
and proceed to other functions, or press PTT button
to enter the new setting and return to Standby mode.
Do not press any buttons for 15 seconds to enter the
new setting and return to Standby mode.
7
8
To successfully communicate using a privacy code, both the
sending and receiving radios must be tuned to the same
channel and to the same privacy code system (CTCSS or
DCS) and privacy code number. Each channel will remember
the last privacy code system and number you select.
The privacy code 0F is not a privacy code, but allows all
signals to be heard on a channel that is set to 0F on both
the CTCSS and DCS systems.
If DCS is turned on at the channel selected, the
display will flash the CTCSS icon and “OFF”. To
switch from DCS to CTCSS, press the Up or Down
button while the display is flashing “OFF”. The
display will then show the small numbers flashing
and you will then be able to proceed to step 2.
If CTCSS is turned on at the channel selected,
the display will flash the DCS icon and “OFF”.
To switch from CTCSS to DCS, press the
Channel Up or Channel Down button whi le the
display is flashing “OFF”. The display will then
show the small numbers flashing and you will
then be able to proceed to step 2.
Privacy Code
DCS Privacy Code
VOX Icon
VOX Sensitivity Level

To turn VOX mode on or off:
1. Press the Menu/Power button unti l the VOX icon
flashes on the display. The current On or Off setting
is displayed.
2. Press the Up or Down button to turn VOX On or Off.
3. Press the Mode/Power button to enter the new setting
and proceed to other functions, or press PTT button
to enter the new setting and return to Standby mode.
Do not press any buttons for 15 seconds to enter the
new setting and return to Standby mode.
Ten Call Tone Settings
You can choose between ten different Call Tone Settings
to transmit a call alert.
To change a call tone setting:
1. Press the Menu/Power button until the letter “C” and
the current call tone number (01 through 10) is
displayed. The current cal l tone will sound for three
seconds.
2. Press the Up or Down button to hear the other call
tone settings.
3. Choose one of the following:
a. Press the Menu/Power button to enter the new
setting and proceed to other functions.
b. Press and hold the Mode button to enter the new
setting and return to Standby mode.
c. Press PTT or Call/Lock button to enter the new
setting and return to Standby mode.
d. Do not press any buttons for 15 seconds to enter
the new setting and return to Standby mode.
Roger Beep Confirmation Tone
Your listener wi l l hear an audible tone when you release the PTT
button.This alerts the other party that you are finished talking and it
is OK for them to speak.
To turn roger beep on or off:
1. Press the Menu/Power button until the Roger Beep
icon flashes. The current on or off setting is displayed.
2. Press the Up or Down button to select roger
beep on or off.
3. Choose one of the fol lowing:
a. Press the Menu/Power button to enter the new
setting and proceed to other functions.
b. Press and hold the Menu button to enter the new
setting and return to Standby mode.
c. Press PTT or Call/Lock button to enter the new
setting and return to Standby mode.
d. Do not press any buttons for 15 seconds to enter
the new setting and return to Standby mode.
Key Tone On/Off
When Key Tone is On, the Key Tone icon will be displayed, an
audible tone will sound each time a button is pressed.
To turn key tone on or off:
1. Current key tone status On/Off will flash.
2. Press the Up or Down button to select key tone on or
off.
3. Choose one of the fol lowing:
a. Press the Menu/Power button to enter the new
setting and proceed to other functions.
b. Press and hold the Menu button to enter the new
setting and return to Standby mode.
c. Press PTT or Cal l/Lock button to enter the new
setting and return to Standby mode.
d. Do not press any buttons for 15 seconds to enter
the new setting and return to Standby mode.
Channel Scan
Your microTALK® radio can automatical ly scan channels.
To scan channels:
1. Press and release the Scan button unti l the Scan
icon and the channel numbers appear on the display.
2. Press and hold the Scan button to begin scanning
channels.
9
10
The current VOX sensitivity level is displayed with
letters “L” and a Number 1 through 3, with Number
3 being the most sensitive level and Number 1
being the least sensitive level.
Call Tone Setting
Roger Beep Off

The Scan icon will continue to be displayed when scan
is on. Your radio will continue to scan all channels and
stop if an incoming transmission is detected. Your radio
will remain on that channel for 10 seconds.
During scanning (while receiving an incoming
transmission), you can choose from the following:
a. Press and hold the Talk button to communicate on
that channel. Your radio will remain on that channel
and return to Standby mode.
b. Press the Up or Down button to resume scanning
channels.
c. Press and hold the Scan button to return to Standby.
Privacy Code Scan
Your radio can automatically scan the Privacy Codes (either CTCSS 01
through 38 or DCS 01 through 83) within one channel. Only one set of
privacy codes (CTCSS or DCS) can be scanned at a time.
To scan privacy codes:
1. While in Standby mode, press and release the Scan
button twice (CTCSS) or three times (DCS) until the
CTCSS or DCS icon and numbers are flashing.
2. Press and hold the Scan button to begin scanning
privacy codes within the selected channel.
The Scan icon wi l l continue to be displayed when
privacy code scan is on. Your radio wi l l continue to
scan privacy codes and stop as an incoming transmission
is detected. Your radio wi l l remain on that channel/
privacy code for 10 seconds.
During scanning (while receiving an incoming
transmission),you can choose from the following:
a. Press the Menu/Power button to enter the new setting
and proceed to other functions.
b. Press and hold the Menu button to enter the new
setting and return to Standby mode.
c. Press PTT or Cal l/Lock button to enter the new
setting and return to Standby mode.
d. Do not press any buttons for 15 seconds to enter
the new setting and return to Standby mode.
NOAA* All Hazards Radio Channels
You can use your radio to l isten to NOAA Al l Hazards Radio channels
transmitting in your area.
To l isten to Al l Hazards Radio channels:
1. Press and hold the Weather( ) button until the All
Hazards Radio icon and the currently selected All
Hazards Radio channel are displayed.
2. Use the Up or Down button to change All Hazards
Radio channels.
3. The All Hazards Radio icon will continue to be
displayed when All Hazards Radio is on.
4. To exit All Hazards Radio, press and hold the Weather
button until On or Off is displayed.
* National Oceanographic and Atmospheric Administration
Hazards Radio Icon
Weather (WX) Alert Mode
Turning On the Weather Alert function will allow your radio to
automatically receive NOAA Hazard Alert radio signals and warnings
from designated NOAA broadcast stations. If the radio is turned ON,
it will alert to Weather and other emergency alerts broadcast by NOAA.
To turn Weather Alert On or Off:
1. Press the MENU/Power button unti l the Weather
Alert icon flashes on the display. The current On or Off
setting is displayed.
2. Press the Up and Down button to turn Weather Aler
On or Off.
3. Press and hold the Weather/Scan button again to
save the new setting and exit the Weather Alert Mode
and return to Standby mode.
This radio is rain resistant to JIS4 standards.
11
12
The radio ignores specific privacy codes while
scanning channels.
Scan Channels
This feature is set
to OFF by default.
Make sure the strongest Weather
channel is selected for your area
using the channel selection in the
previous menu.
Hazards Radio Icon
Select Channel
Scan Privacy Codes

The Stylized RETEVIS logos are registered trademarks of Shenzhen
Retevis Technology Co., Ltd, which are used under license. All other
trademarks are the property of their respective owners. 2017 Shenzhen
Retevis Technology Co., Ltd. All rights reserved.
Guarantee
Remarks:
1. This guarantee card should be kept by the user, no replacement if
lost.
2. Most new products carry a two-year manufacturer's warranty from
the date of purchase. Further details, please read at
http://www.retevis.com/after-sale/
3. The user can get warranty and after-sales service as below:
• Contact the seller where you buy the product.
• Products Repaired by Our Local Repair Center
4. For warranty service, you will need to provide a receipt from the
actual seller for verification
Exclusions from Warranty Coverage
1. To any product damaged by accident.
2. In the event of misuse or abuse of the product or as a result of
unauthorized alterations or repairs.
3. If the serial number has been altered, defaced, or removed.
Warnings
RF ENERGY EXPOSURE AND PRODUCT SAFETY GUIDE FOR
PORTABLE WALKIE TALKIE
This walkie talkie uses electromagnetic energy in the radio frequency
(RF) spectrum to provide communications between two or more users
over a distance. It uses radio frequency (RF) energy or radio waves to
send and receive calls. RF energy is one form of electromagnetic
energy. Other forms include, but are not limited to, sunlight and x-rays.
RF energy, however, should not be confused with these other forms of
electromagnetic energy, which when used improperly, can cause
biological damage. Very high levels of x-rays, for example, can damage
tissues and genetic material.
Experts in science, engineering, medicine, health, and industry work
with organizations to develop standards for safe exposure to RF
energy. These standards provide recommended levels of RF exposure
for both workers and the general public. These recommended RF
exposure levels include substantial margins of protection.
All Retevis walkie talkie are designed, manufactured, and tested to
ensure they meet government-established recommend specific
operating instructions to users of walkie talkie. These instructions are
important because they inform users about RF energy exposure and
provide simple procedures on how to control it.
Please refer to the following websites for more information on what RF
energy exposure is and how to control your exposure to assure
compliance with established RF exposure limits: http://www.who.int/en
Local Government Regulations
When walkie talkie are used as a consequence of employment, the
Local Government Regulations requires users to be fully aware of and
able to control their exposure to meet occupational requirements.
Exposure awareness can be facilitated by the use of a product label
directing users to specific user awareness information. Your Retevis
13
14
Model Number:
Serial Number:
Purchasing Date:
Dealer:
Telephone:
User’s Name:
Telephone:
Country:
Address:
Post Code:
Email:
Guarantee
ATTENTION!
Before using this radio, read this guide which contains
important operating instructions for safe usage and RF
energy awareness and control for compliance with
applicable standards and regulations.

walkie talkie has a RF15Exposure Product Label. Also, your Retevis
user manual, or separate safety booklet includes information and
operating instructions required to control your RF exposure and to
satisfy compliance requirements.
Radio License
Governments keep the radios in classification, most of the classified
walkie-talkie need to get local government License, and operation is
allowed. The detailed classification and the use of your two radios,
please contact the local government radio mana gement departments.
For the following specified classification: the USA FRS, Australian CB,
the individual license is not required.
Compliance with RF Exposure Standards (If appropriate,
Reference to the actual products Safety Marking)
Your Retevis walkie talkie is designed and tested to comply with a
number of national and International standards and guidelines (listed
below) for human exposure to radio frequency electro-magnetic energy.
FCC ID
The FCCID means: This radio complies with the IEEE (FCC) and
ICNIRP exposure limits for occupational/controlled RF exposure
environments at operating duty factors of up to 50% talk-50% listen
and is approved for occupational use only.
IC ID
This device complies with Industry Canada license-exempt RSS
standard(s). Operation is subject to the following two conditions:
(1) This device may not cause interference, and
(2) This device must accept any interference, including interference
that may cause undesired operation of the device.
In terms of measuring RF energy for compliance with these exposure
guidelines, your radio generates measurable RF energy only while it is
transmitting (during talking), not when it is receiving (listening) or in
standby mode.
Note: The approved batteries, supplied with this radio, are rated for a
5-5-90 duty factor (5% talk-5% listen-90% standby) even though
this radio complies with FCC occupational exposure limits and
may operate at duty factors of up to 50% talk.
RF energy exposure standards and guidelines (if appropriate)
Your Retevis walkie talkie complies with the following RF energy
exposure standards and guidelines:
• United States Federal Communications Commission (FCC), Code of
Federal Regulations; 47 CFR part 2 sub-part J.
• American National Standards Institute (ANSI) / Institute of Electrical &
Electronic Engineers (IEEE) C95. 1-2005
• IEEE Std. 1528:2013 and KDB447498, Evaluating Compliance with
FCC Guidelines for Human Exposure to Radio Frequency
Electromagnetic Fields.
• Institute of Electrical and Electronic Engineers (IEEE) C95.3-2002
• International Commission on Non-Ionizing Radiation Protection
(ICNIRP)
• Ministry of Health (Canada) Safety Code 6 & Industry Canada
RSS-102.
• International Electrotechnical Com-mission IEC62209-2:2010
RF Exposure Compliance and Control Guidelines and
Operating Instructions
To control your exposure and ensure compliance with the occupational/
controlled environment exposure limits, always adhere to the following
procedures.
Guidelines:
• User awareness instructions should accompany the device when
transferred to other users.
• Do not use this device if the operational requirements described
herein are not met.
Operating Instructions:
• Transmit no more than the rated duty factor of 50% of the time. To
Transmit (Talk), push the Push To Talk (PTT) button. To receive calls
(listen), release the PTT button. Transmitting 50% of the time, or less,
is important because the radio generates measurable RF energy
exposure only when transmitting in terms of measuring for standards
compliance.
• Transmit only when people outside the vehicle are at least the
recommended minimum lateral distance away from a properly installed
15
16

instructions, externally mounted antenna.
• When operating in front of the face, worn on the body, always place
the radio in a Retevis approved clip, holder, holster, case, or body
harness for this product. Using approved body-worn accessories is
important because the use of Non-Retevis approved accessories may
result in exposure levels, which exceed the IEEE/ICNIRP occupational
/controlled environment RF exposure limits.
• If you are not using a body worn accessory and are not using the
radio in the intended use position, in front of the face or at the body in
the PTT mode or alongside of the head in the phone mode, then
ensure the antenna and the radio are kept 2.5 cm (one inch) from the
body when transmitting. Keeping the radio at a proper distance is
important because RF exposures decrease with increasing distance
from the antenna.
Hand-held Mode
• Hold the radio in a vertical position with the microphone
(and other parts of the radio including the antenna)
at least 2.5 cm (one inch) away from the nose or lips.
The antenna should be kept away from the eyes.
Keeping the radio at a proper distance is important
as RF exposure decreases with increasing distance
from the antenna.
Phone Mode
• When placing or receiving a phone call, hold your radio product as
you would a wireless telephone. Speak directly into the microphone.
Electromagnetic Interference/Compatibility
Note: Nearly every electronic device is susceptible to electromagnetic
interference (EMI) if inadequately shielded, designed, or
otherwise configured for electromagnetic compatibility.
Avoid Burns
Small Parts. Not for children under 3 years.
Turn off your radio power in the following conditions:
• Turn off your radio before removing (installing) a battery
or accessory or when charging battery.
• Turn off your radio when you are in a potentially hazardous
environments: Near electrical blasting caps, in a blasting
area, in explosive atmospheres (inflammable gas, dust
particles, metallic powders, grain powders, etc.).
• Turn off your radio while taking on fuel or while parked at
gasoline service stations.
To avoid electromagnetic interference and/or
compatibility conflicts
• Turn off your radio in any facility where posted notices
instruct you to do so, hospitals or health care facilities
(Pacemakers, Hearing Aids and Other Medical Devices)
may be using equipment that is sensitive to external RF
energy.
• Turn off your radio when on board an aircraft. Any use of
a radio must be in accordance with applicable regulations
per airline crew instructions.
Note:
- Pacemakers
Defibrillators or other Implanted Medical Devices Persons
with pacemakers, Implantable Cardioverter-Defibrillators
(ICDs) or other active implantable medical devices (AIMD)
should:
• ALWAYS keep the radio more than 15cm from their
pacemaker when the radio is turned on.
• Consult with their physicians regarding the potential risk
of interference from radio frequency transmitters, such as
portable radios (poorly shielded medical devices may be
more susceptible to interference).
17
18
WARNING
WARNING

• Turn the radio OFF immediately if they have any reason
to suspect that interference is taking place.
• Do not carry the radio in a chest pocket or near the
implantation site, and carry or use the radio on the
opposite side of their body from the implantable device
to minimize the potential for interference.
- Hearing Aids
Some digital wireless radios may interfere with some
hearing aids. In the event of such interference, you may
want to consult your hearing aid manufacturer to discuss
alternatives.
- Other Medical Devices
If you use any other personal medical device, consult the
manufacturer of your device to determine if it is adequately
shielded from RF energy. Your physician may be able to
assist you in obtaining this information.
Protect your hearing:
• Use the lowest volume necessary to do your job.
• Turn up the volume only if you are in noisy surroundings.
• Turn down the volume before adding headset or earpiece.
• Limit the amount of time you use headsets or earpieces
at high volume.
• When using the radio without a headset or earpiece, do
not place the radio's speaker directly against your ear.
Note: Exposure to loud noises from any source for extended
periods of time may temporarily or permanently affect
your hearing. The louder the radio's volume, the less
time is required before your hearing could be affected.
Hearing damage from loud noise is sometimes
undetectable at first and can have a cumulative effect.
Avoid Burns
- Forbid
• Do not use charger outdoors or in moist environments,
use only in dry locations/ conditions.
• Do not disassemble the charger, that may result in risk
of electrical shock or fire.
• Do not operate the charger if it has been broken or
damaged in any way.
• Do not place a portable radio in the area over an air bag or
in the air bag deployment area. The radio may be propelled
with great force and cause serious injury to occupants of
the vehicle when the air bag inflates.
- To reduce risk
• Pull by the plug rather than the cord when disconnecting
the charger.
• Unplug the charger from the AC outlet before attempting
any maintenance or cleaning.
• Contact Retevis for assistance regarding repairs and
service.
- Use of Communication Devices While Driving
• Always check the laws and regulations on the use of radios
in the countries and areas where you drive.
• Give your full attention to driving and to the road.
• If available, use the hands-free facility.
• If driving conditions or regulations require it, pull off the
road and park before making or answering a call.
Approved Accessories
• This radio meets the RF exposure guidelines when used
with the Retevis accessories supplied or designated for
the product. Use of other accessories may not ensure
compliance with the RF exposure guidelines and may
violate regulations.
• For a list of Retevis-approved accessories for your radio
model, visit the following website: http://www.Retevis.com
19
20
WARNING
WARNING
WARNING
/