Page is loading ...

SB_ INSTALL 1.0
STOP
ATTENTION:
Is your product damaged?
Need help or spare parts? For fastest service, contact
NewAge Products at 1-877-306-8930; for U.K 0800-031-4069
or support@newageproducts.com.
Do not return to the retailer.
Use two or more people to move, assemble or install slatwall to avoid
back or other injury. Do not leave children unattended near slatwall.
High risk of injury if installed incorrectly: Follow instructions carefully
and routinely inspect your system to ensure all components are
fastened securely.
For assistance, call 1.877.306.8930; for U.K 0800.031.4069; e-mail at
info@newageproducts.com.
WARNING: Excessive weight hazard!
!
16sqft. Diamond Plate Slatwall Kit

2
www.newageproducts.com
Unpacking
• Begin by placing the package on a covered at surface.
• Remove all cardboard, foam packaging material and clear plastic bags.
• Dispose / recycle all packaging materials.
• Verify all the contents in the box and gather the required tools. See “Tools Needed”, and
“Parts Supplied” list.
Index
Tools Needed/ Weight Capacity 3
Warranty 4
Parts Supplied 5
Preparing for Installation 6
Installing Slatwall 7-9
Thank you for purchasing a NewAge Product!
Please give us a call or visit online if you have any questions.
Call 1.877.306.8930; for UK 0800.031.4069; e-mail at info@newageproducts.com

3
www.newageproducts.com
1 x 12” MagneticLevel
1 x #2 Phillips Bit
1 x Tape Measure
1 xCordless
Power Drill
1 x Stud Finder
1 x Pencil
1 x #2 Phillips head
screwdriver
1 x Hammer Drill 1 x Masonry Bit
[optional for masonry]
1x
3 mm or 1/8”
Drill Bit
Tools Needed
Weight Capacity
75lbs Per Square Foot evenly distributed when securely mounted to wood
joist or support capable of supporting such a load.
Works with Most Standard 3in On-Centre Slatwall Hooks
75lbs

4
www.newageproducts.com
Manufacturer Warranty Limited Lifetime
1. Service calls to correct the installation of any NewAge products or to instruct you how to use or install them.
2. Damage resulting from improper handling or shipping of products, or products damaged by accident, misuse, abuse, re,
ood, improper installation, acts of God, neglect, corrosion, modication or mishandling.
3. Products damaged by improperly loading beyond the specied maximum weight capacity outlined in the instructions provided
with the product.
4. Repairs or replacement when your product is used in other than normal, single-family household use, such as a commercial
environment, or handled in anyway inconsistent with the installation instructions included with the product.
5. Cosmetic damage, including scratches, dings, dents or cracks in paint that do not aect the structural or functional capability
of the product.
6. Surfaces damaged due to chemical interaction resulting in corrosion of paint or metal.
7. Replacement parts for NewAge products outside Canada and the United States.
8. Loss of product contents due to theft, re, ood, accident or acts of God.
9. Shipping or freight fees to deliver replacement products or to return defective products.
10. Any labor costs during the limited warranty period.
When this product is installed, operated and maintained according to the instructions attached to or furnished with the product,
NewAge Products Inc. will replace the defective product or parts if the part fails as a result of defective materials or workmanship
for the Lifetime of the product.
NEWAGE PRODUCTS INC. WILL NOT PAY FOR:
IMPLIED WARRANTIES, INCLUDING TO THE EXTENT APPLICABLE WARRANTIES OF MERCHANTABILITY OR FITNESS FOR A PARTICULAR
PURPOSE, ARE EXCLUDED TO THE EXTENT LEGALLY PERMISSIBLE. ANY IMPLIED WARRANTIES THAT MAY BE IMPOSED BY LAW ARE LIMITED
TO ONE YEAR, OR THE SHORTEST PERIOD ALLOWED BY LAW. SOME STATES AND PROVINCES DO NOT ALLOW LIMITATIONS OR EXCLUSIONS
ON HOW LONG AN IMPLIED WARRANTY OF MERCHANTABILITY OR FITNESS LASTS, SO THE ABOVE LIMITATIONS OR EXCLUSIONS MAY NOT
APPLY TO YOU. THIS WARRANTY GIVES YOU SPECIFIC LEGAL RIGHTS, AND YOU MAY ALSO HAVE OTHER RIGHTS WHICH VARY FROM STATE
TO STATE OR PROVINCE TO PROVINCE
DISCLAIMER OF IMPLIED WARRANTIES; LIMITATION OF REMEDIES

5
www.newageproducts.com
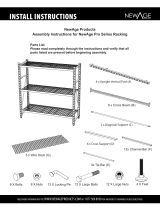
16sqft. Diamond Plate Slatwall Parts
Top Cover Strip
#8 Philips Pan Head
Screw 2in long
Slatwall
Sections
Bottom Strip
Side Cover
Plastic
Hole
Covers
Parts Supplied
Bottom Strip
16sqft. Diamond Plate
Slatwall Kit
Slatwall Section
Top Cover Strip
#8 Philips pan head
screw 2in long
2
7
2
4
8
36
Side Cover
Plastic Hole Covers
Plastic Hole Covers
Close-Up View
When installing a 4x4ft conguration, you will
have the following pieces left over:
x1 Top Cover Strip
x1 Bottom Strip
When installing a 2x8ft conguration, you will
have the following pieces left over:
x1 Slatwall Section

6
www.newageproducts.com
Preparing for Installation
16in 16in 16in
24in24in 24in 24in
Level Line
24 - 30
inches
48.25
inches
Level Line
48
inches
24.25
inches
Determine your setup.
Locate Wall Studs and mark a vertical line
along the center of all studs in the
installation area.
Diagram below shows position relative to the
standard 16in stud spacing.
Diagram below shows position relative to the
standard 24in stud spacing.
Diagram below shows the position of two 4ft
slatwall’s next to each other.
Note: Connected ends between Slatwalls should
be installed into the same stud
B. For a 2x8ft slatwall conguration,
measure 24.25in down from the intended top of
slatwall and mark a level line.
Recommended guidelines shown below:
1
2
A. For a 4x4ft slatwall conguration, measure
48.25in down from the intended top of slatwall
and mark a level line.
Recommended guidelines shown below:

7
www.newageproducts.com
Preparing for Installation
3
Installing Slatwall
Place bottom strip tight against the wall
aligning it to your marked level line.
Interlock bottom of Slatwall section with
the top of bottom strip. Repeat step 5 to
securely fasten
“Slatwall Section”.
Interlock Top Magnet Cover on top of the
slatwall section and secure in position
with magnets.
Recommended Heights:
4x4ft : 24-30 inches
2x8ft: 48 inches
Pre-drill 3mm (1/8”) holes into each stud
then fasten slatwall section to each wood
stud with screws provided.
Repeat steps 4 & 5 to install additional
“slatwall sections”. For a 4x4ft conguration,
install 6 remaining sections. For a 2x8ft
conguration, install 2 additional sections.
Masonry.
4
5
7
6
• Follow steps 3 to 7.
• Drill pilot holes through the perforated
strip each 16in with hammer drill &
masonry bit.
• Use 2” x ⁄” Tapcon Concrete Anchor
for each pilot hole. (Not Included)
• OR use #8 x 2” Screw with masonry plug
for each pilot hole. (Not Included)

8
www.newageproducts.com
Remove the lm on the adhesive from the
side cover.
Align one side cover to the top slatwall
panels while aligning the next cover to the
bottom panels.
The adhesive side will be applied to the
front of the slatwall panels.
Press rmly on the adhesive to secure
the cover strip in place
9
10
11
Add the plastic hole covers to the top
and bottom of the side covers. Repeat
steps 8 to 10 for the opposite end.
If you are installing multiple kits
together go to page 9 before installing
plastic hole covers.
8

9
www.newageproducts.com
Installing Multiple Slatwalls Together
Install rst slatwall section following steps
1-10.
Measure and mark a vertical line 4mm’s
(1/8in) away from the side cover strip and
a second line levelled with the bottom of
the installed slatwall.
Place xed bottom strip tight against the
wall aligning it to your marked lines.
Install remaining slatwall sections, top
and side covers following step 4 - 11 on
pages 7 and 8.
4mm
When installing a 4x4ft conguration, you will
have the following pieces left over:
x1 Top Cover Strip
x1 Bottom Strip
When installing a 2x8ft conguration, you will
have the following pieces left over:
x1 Slatwall Section
1
2
3
4

SB_ INSTALL 1.0
Kit de panneaux murals à plaque de diamant
16 pieds carrés
!
Déplacer, assembler ou installer les panneau mural avec l’aide de deux personnes
ou plus pour éviter le dos ou d’autres blessures. Risque élevé de blessure si installé
incorrectement: Suivez attentivement les instructions et inspectez régulièrement
votre système pour vous assurer que tous les composants sont bien xés.Pour
obtenir de l’aide, composer le 1.877.306.8930; au R.-U., composer le 0800.031.4069;
ou envoyer un courriel à l’adresse info@newageproducts.com.
AVERTISSEMENT:
RISQUE DE POIDS EXCESSIF!
ATTENTION:
Est votre produit endommagée?
Avez vous besoin d’aide ou de pièces de rechange? Contactez NewAge Products a
1-877-306-8930; ou support@newageproducts.com.
Ne pas retourner au détaillant.
ARRÊT

2
www.newageproducts.com
Index
Outils nécessaires/ Capacités poids 3
Garantie 4
Pièces fournies 5
Préparation à l’installation 6
Installation des panneaux murales 7-9
Déballage
• Commencer par placer la boîte sur une surface plate recouverte.
• Retirer tout le carton, le matériel d’emballage en mousse et les sacs en plastique transparent.
• Mettre au rebus ou recycler tous les matériaux d’emballage.
• Vérier tout le contenu de la boîte et rassembler les outils nécessaires. Voir Pièces fournies et Outils
nécessaires ci-dessous.
Merci d’avoir acheté un produit NewAge!
Veuillez nous appeler ou consulter notre site Web si vous avez la moindre question.
Composer le 1.877.306.8930; au R.-U., composer le 0800.031.4069; ou envoyer un
courriel à l’adresse info@newageproducts.com.

3
www.newageproducts.com
75lbs
Capacité de poids
75 lb par pied carré répartis uniformément lorsque xés solidement à
les poteaux d’un mur en bois ou à un support capable de supporter une
telle charge.
Fonctionne avec la plupart des panneaux murals sur le dessus standard 3
po au centre
Les outils nécessaires
1 x tournevis #2
Philips
1 x Tête Phillips n 2
(facultative)
1 x localisateur
de montants
1 x ruban à
measurer
1 x marteau
perforateur
1 x foret à
maçonerrie
1 x perceuse
mecanique sans l
1 x Crayon
1 x vérin magnétique
de 12 po
1 x Foret de 3 mm
ou / po
facultatif pour la maçonnerie

4
www.newageproducts.com
Garantie à vie limitée du fabricant
1. Les appels de service pour corriger l’installation de tout produit NewAge ou pour vous montrer comment les utiliser ou les installer.
2. Les dommages causés par une manutention ou une expédition inadéquate du produit, ou des produits endommagés par un accident,
une mauvaise utilisation, un abus, un incendie, une inondation, une installation inadéquate, un cas fortuit, une négligence, la
corrosion, une modication ou une mauvaise manipulation.
3. Les produits endommagés en raison d’une charge supérieure au poids maximum précisé dans les instructions fournies avec le produit.
4. Les réparations ou le remplacement lorsque votre produit est utilisé pour un autre usage que celui d’un ménage unifamilial normal,
comme un milieu commercial ou d’une façon non conforme aux directives d’installation incluses avec le produit.
5. Les dommages cosmétiques, y compris les éraures, les marques, les entailles ou les ssures dans la peinture qui n’aectent pas la
capacité fonctionnelle ou structurelle du produit.
6. Les surfaces endommagées en raison d’une interaction chimique entraînant la corrosion de la peinture ou du métal.
7. Les pièces de rechange pour des produits NewAge à l’extérieur du Canada et des États-Unis.
8. La perte des produits y étant contenus en raison d’un vol, d’un incendie, d’une inondation, d’un accident ou de cas fortuits.
9. Les frais d’expédition ou de transport pour livrer les produits de rechange ou pour retourner des produits défectueux.
10. Tout coût de main-d’œuvre pendant la période de garantie limitée.
Lorsque ce produit est installé, utilisé et entretenu conformément aux instructions ci-jointes ou fournies avec le produit, NewAge
Products Inc. remplacera les pièces ou le produit défectueux advenant que ceux-ci découlent d’un défaut de matériel ou de
fabrication pendant la durée de vie du produit.
NEWAGE PRODUCTS INC. N’ASSUMERA PAS LES COÛTS SUIVANTS :
LES GARANTIES IMPLICITES, Y COMPRIS LES GARANTIES APPLICABLES DE QUALITÉ MARCHANDE OU DE CONVENANCE PRÉCISE, SONT EXCLUES DANS
LA LIMITE OÙ LA LOI LE PERMET. TOUTE GARANTIE IMPLICITE QUI POURRAIT ÊTRE IMPOSÉE PAR LA LOI DOIT SE LIMITER À UN AN, OU À LA PÉRIODE LA
PLUS COURTE PERMISE PAR LA LOI. CERTAINS ÉTATS AINSI QUE CERTAINES PROVINCES NE PERMETTENT PAS LES LIMITATIONS OU LES EXCLUSIONS SUR LA
DURÉE D’UNE GARANTIE IMPLICITE DE QUALITÉ MARCHANDE OU DE CONVENANCE PRÉCISE. PAR CONSÉQUENT, IL EST POSSIBLE QUE LES LIMITATIONS OU
EXCLUSIONS PRÉCITÉES NE S’APPLIQUENT PAS À VOUS. CETTE GARANTIE VOUS DONNE DES DROITS LÉGAUX PARTICULIERS ET VOUS POURRIEZ ÉGALEMENT
DISPOSER D’AUTRES DROITS VARIANT SELON L’ÉTAT OU LA PROVINCE.
EXONÉRATION DE GARANTIES IMPLICITES; LIMITATION DE RECOURS

5
www.newageproducts.com
Pièces pour les panneaux murals à plaque de
diamant - 16 pieds carrés
Bande de couverture
supérieure
Sections de
panneau
mural
Bande inférieure
Couvercle
latéral
Cache-vis
Pièces fournies
Bande inférieure
Kit de panneau mural à plaque de diamant
16 pieds carrés
Panneau mural
Bande de couverture
supérieure
Tête cylindrique Phillips
n° 8 de 2 po de long
2
7
2
4
8
36
Couvercle latéral
Cache-vis
Couvertures en plastique
Lors de l’installation d’une conguration 4x4ft,
vous aurez les pièces suivantes qui reste:
x1 Bande de couverture supérieure
x1 Bande inférieure
Lors de l’installation d’une conguration 2x8ft,
vous aurez les pièces suivantes qui reste:
x1 Panneaux Mural
Vis à tête cylindrique
Philips n ° 8 de 2 po
de long

6
www.newageproducts.com
Préparation pour l’installation
16po 16po 16po
24po24po 24po 24po
Ligne de
niveau
24 - 30
pouces
48.25
pouces
Ligne de
niveau
48
pouces
24.25
pouces
Déterminez votre conguration.
Localisez les poteaux muraux et marquez
unligne verticale le long du centre de tous
les goujons dans la zone d’installation.
Le diagramme ci-dessous montre la position par
rapport à l’espacement standard des montants de
16 pouces.
Le diagramme ci-dessous montre la position par
rapport à l’espacement standard des montants
de 24 pouces.
Le diagramme ci-dessous montre la position de
deux panneaux murals de 4 pieds l’un à côté de
l’autre.
Remarque: Les extrémités connectées entre les panneaux
doivent être installées dans le même montant
B. Pour une conguration de slatwall de 2 x 8
pieds, mesurez 24,25 pouces vers le bas depuis le
dessus prévu de la paroi de la plaque et marquez
une ligne de niveau. Directives recommandées
illustrées ci-dessous:
1
2
A. Pour une conguration de panneau mural de
4 x 4 pi, mesurez 48,25 pouces vers le bas depuis
la partie supérieure de la paroi de slatwall prévue
et marquez une ligne de niveau. Directives
recommandées illustrées ci-dessous:

7
www.newageproducts.com
Préparation pour l’installation
3
Installation des panneaux murals
Placez la bande inférieure xe contre le
mur en l’alignant sur votre ligne de niveau
marquée.
Verrouillez le bas de la section de panneau
avec le haut de la bande inférieure xe.
Répétez l’étape 5 pour xer solidement
chaque section de panneau.
Verrouillage de l’aimant supérieur
Couvrir sur la section de la paroi de la
latte et xer en place avec des aimants.
Hauteurs recommandées:
4x4pi: 24-30 pouces
2x8pi: 48 pouces
Percez des trous de 3 mm (1/8 po) dans
chaque montant, puis xez la section de
panneau à chaque poteau de bois avec les
vis fournies.
Répétez les étapes 4 et 5 pour installer
chaque section supplémentaires. Pour une
conguration 4x4ft, installez 6 sections
restantes. Pour un 2x8pi conguration,
installer 2 section supplémentaires
4
5
7
6
• Suivre les étapes 3 à 7.
• Pré-percez des trous à travers la bande
perforée de 16 po à l’aide d’une perceuse à
percussion et d’une mèche à maçonnerie
• Fixer 2 po x 5/16 po ancrages pour béton
Tapcon (2 po x 5/16 po) dans le mur. (Non
inclus)
• OU #8 x 2 po vis nº 10 x 2 po avec cheville de
maçonnerie. (Non inclus)
Maçonnerie.

8
www.newageproducts.com
Retirez le lm sur l’adhésif du couvercle
latéral.
Alignez un des panneaux latéraux sur les
panneaux latéraux supérieurs tout en
alignant le capot suivant sur les panneaux
inférieurs. Le côté adhésif sera appliqué à
l’avant des panneaux de murals
Appuyez fermement sur la couverture
pour xer la bande d’adhésif en place.
9
10
11
Ajouter les couvercles de trous en
plastique au haut et au bas des
couvercles latéraux. Répétez les étapes
8 à 10 pour l’extrémité opposée.
Si vous installez plusieurs kits
ensemble, allez à la page 9 avant
d’installer les couvercles de trous en
plastique.
8

9
www.newageproducts.com
Installation de plusieurs panneaux ensemble
Installez la première section de slatwall en
suivant les étapes 1 à 10.
Mesurez et tracez une ligne verticale à 4 mm
(1/8 po) de la bande de couverture latérale et
une deuxième ligne au niveau du bas du mur à
lattes installé.
Installez les sections restantes des pan-
neaux murales, les couvercles supérieur et
latéral après l’étape 4 - 11
4mm
1
2
3
4
Lors de l’installation d’une conguration 4x4ft,
vous aurez les pièces suivantes qui reste:
x1 Bande de couverture supérieure
x1 Bande inférieure
Lors de l’installation d’une conguration 2x8ft,
vous aurez les pièces suivantes qui reste:
x1 Panneaux Mural
Placez la bande inférieure xe contre le mur
en l’alignant sur les lignes tracées.
/