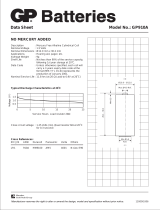
4.4 Operating Environment
In environments with airborne liquids, particles, or
corrosive gases, ensure that the IP/Type rating of the
equipment matches the installation environment. For
specications regarding ambient conditions, see
chapter 9.4 Ambient Conditions.
NOTICE
CONDENSATION
Moisture can condense on the electronic components
and cause short circuits. Avoid installation in areas
subject to frost. Install an optional space heater when
the drive is colder than the ambient air. Operating in
standby mode reduces the risk of condensation as long
as the power dissipation keeps the circuitry free of
moisture.
NOTICE
EXTREME AMBIENT CONDITIONS
Hot or cold temperatures compromise unit performance
and longevity.
•
Do not operate in environments where the
ambient temperature exceeds 55 °C (131 °F).
•
The drive can operate at temperatures down to
-10 °C (14 °F). However, proper operation at
rated load is only guaranteed at 0 °C (32 °F) or
higher.
•
If temperature exceeds ambient temperature
limits, extra air conditioning of the cabinet or
installation site is required.
4.4.1 Gases
Aggressive gases, such as hydrogen sulde, chlorine, or
ammonia can damage the electrical and mechanical
components. The unit uses conformal-coated circuit boards
to reduce the eects of aggressive gases. For conformal-
coating class specications and ratings, see
chapter 9.4 Ambient Conditions.
4.4.2 Dust
When installing the drive in dusty environments, pay
attention to the following:
Periodic maintenance
When dust accumulates on electronic components, it acts
as a layer of insulation. This layer reduces the cooling
capacity of the components, and the components become
warmer. The hotter environment decreases the life of the
electronic components.
Keep the heat sink and fans free from dust buildup. For
more service and maintenance information, refer to
chapter 8 Maintenance, Diagnostics, and Troubleshooting.
Cooling fans
Fans provide airow to cool the drive. When fans are
exposed to dusty environments, the dust can damage the
fan bearings and cause premature fan failure. Also, dust
can accumulate on fan blades causing an imbalance which
prevents the fans from properly cooling the unit.
4.4.3 Potentially Explosive Atmospheres
WARNING
EXPLOSIVE ATMOSPHERE
Do not install the drive in a potentially explosive
atmosphere. Install the unit in a cabinet outside of this
area. Failure to follow this guideline increases risk of
death or serious injury.
Systems operated in potentially explosive atmospheres
must fulll special conditions. EU Directive 94/9/EC
(ATEX 95) classies the operation of electronic devices in
potentially explosive atmospheres.
•
Class d
species that if a spark occurs, it is
contained in a protected area.
•
Class e prohibits any occurrence of a spark.
Motors with class d protection
Does not require approval. Special wiring and containment
are required.
Motors with class e protection
When combined with an ATEX approved PTC monitoring
device like the VLT
®
PTC Thermistor Card MCB 112, instal-
lation does not need an individual approval from an
approbated organization.
Motors with class d/e protection
The motor itself has an e ignition protection class, while
the motor cabling and connection environment is in
compliance with the d
classication. To attenuate the high
peak voltage, use a sine-wave lter at the drive output.
When using a drive in a potentially explosive
atmosphere, use the following:
•
Motors with ignition protection class d or e.
•
PTC temperature sensor to monitor the motor
temperature.
•
Short motor cables.
•
Sine-wave output lters when shielded motor
cables are not used.
Mechanical Installation Operating Guide
MG22A202 Danfoss A/S © 04/2018 All rights reserved. 13
4 4