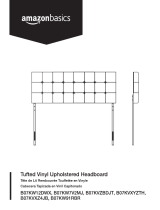
AmazonBasics N/A User manual

Type
User manual

This manual is also suitable for

3
Welcome Guide
English
Contents:
Before getting started, ensure the package contains the following components:
A
x1
E4
x4
B
x5
F
x1
C1
x1
F1
x2
C2
x1
F2
x2
C3
x1
G
x5
D
x2
G1
x5
E1
x4
H1
x2
E2
x4
H2
x2
E3
x8
4
Tools you will need
Electric drill
Tape measure
Screwdriver
Wrench and
socket set
Level
Router
Drill bit
7/64” (2.8 mm),
1/8” (3 mm),
1/4” (6.5 mm),
5/16” (8 mm),
7/16” (11 mm)
Marking tools
IMPORTANT SAFEGUARDS
Read these instructions carefully and retain them for future use. If this product is passed
to a third party, then these instructions must be included.
When using the product, basic safety precautions should always be followed to reduce the risk of
injury including the following:
If your door opening has trim around it, it is recommended that you install the track onto a
header board above the door opening.
If your door opening does not have trim around it, the track can be installed directly into the
drywall provided you find the studs in your walls.
The track CANNOT be mounted directly into the drywall.
Before First Use
Check for transport damage.
Risk of suffocation! Keep any packaging materials away from children – these
materials are a potential source of danger, e.g. suffocation.
DANGER
5
Installation
Step 1: Track Preparation
Door height
+ 1.75" (44 mm)
Keep level
Door opening
Floor
Door
2” (51 mm) minimum
on one side of the
door
Header board
(1 x 6 recommended)
Floor clearance:
Using the dimensions
shown will allow for a
3/8” (9.5 mm) space
between the door
and floor.
If your door opening DOES NOT have trim going around it, follow the below
steps.
1. Using the layout above as reference, position the track where you would like it.
2. Using a stud finder, locate the studs where you want to attach the track.
3. Using a small nail, tap it into the drywall and make sure you have located the stud.
4. Using a pencil, mark the location of the stud.
5. Repeat steps 2 and 3 until you have five marks indicating you have found five wall studs.
6. Place the track on the wall and make sure the five pencil marks on the wall match up with the
five holes in the track.
7. If the holes in the track DO ALIGN with the marks on the wall, proceed to Track Installation.
8. If the holes in the track DO NOT ALIGN with the marks on the wall, then a header board will
need to be used.
NOTICE
6
Installation
Step 2: Header Board Installation
Door height + 1.75” (44 mm)
Keep level
Door opening
Floor
2” (51 mm) minimum
on one side of the
door
Header board
(1 x 6 recommended)
Floor clearance:
Using the dimensions
shown will allow for a
3/8”(9.5 mm) space
between the door
and floor.
Draw a straight vertical line of at least 3.5” (
89 mm), going through the mark that
you made for the stud location.
1. Locate and mark the center of the 1 x 6.
2. Using the center line of the header board, line it up to the stud marks.
3. Using interior screws, mount the header board to the wall.
Use a level to ensure the header board is level when installing it to the studs.
NOTICE
NOTICE
7
Installation
Step 3: Track Installation
C3
A
B
G1
G
Attaching the track directly to the studs:
1. Using the 5 marks you made, drill a 1/4” (6 mm) pilot hole 1” - 3” (25 - 76 mm) deep on each
mark.
2. Slide the washer (G1) over the screw (G) and repeat for all 5 screws.
If the door is going to stop before the last hole (8” / 20 cm) on either end, then
the door stop C1 or C2 will need to be installed onto the rail first.
3. Position the track over the drilled holes.
4. Starting at one end of the track, insert the screw (G) through the track and then through the
spacer (B) and into the pilot hole.
5. Use a wrench to tighten the screw.
Do not tighten the screw completely until all screws are installed and the track
is level.
6. Repeat steps 4 and 5 for the remaining holes (checking with a level for each screw installed).
NOTICE
NOTICE
8
Attaching the track to the header board:
1. Place the track in the center of the header board and determine where you want it to be
installed.
Make sure the track is level before making your hole marks.
2. Mark locations for all 5 holes.
3. Using the 5 marks you made, drill a 1/4” (6 mm) pilot hole 1” - 3” (25 - 76 mm) deep on each
mark.
4. Follow steps 2 through 6 under “Attaching the track directly to the studs”.
Installing door stops
1. Slide one door stop (C1, C2) on each end of the tack, making sure the hex screws are facing
up and the actual stops are facing the door.
2. Determine where you want the door to stop in both directions, then move the door stop to that
location and tighten down the hex screws with the hex wrench.
Step 4: Installing Hangers and Anti-Jump Disc
3 - 15/16” (100 mm)
3 - 15/16” (100 mm)
1 - 1/2” (38 mm)
1 - 1/2” (38 mm)
3 - 9/16” (90 mm)
3 - 9/16” (90 mm)
Ø7/16” (11 mm)
Ø7/16” (11 mm)
2” (51 mm)
2” (51 mm)
NOTICE
9
D
H1
E4
E3
E2
H2
/
E1
Installing hanger brackets
1. Starting from the left side of the door, measure in 2” (5.1 cm) and make a mark.
2. Measure down 1-1/2” (3.8 cm) and make a mark.
3. Take the hanger bracket and center the top hole over the line intersection.
4. Mark the bottom hole (making sure the center of the bottom hole is 2” (5.1 cm) away from the
door edge).
5. Remove the bracket and drill a 7/16
” (1,1 cm) hole through the door for each bracket hole.
Door thickness will determine which bolt size to use.
6. Slide the washer (E3) over the screw (E1 or E2) and insert through the back of the door.
7. Slide the washer (E3) over the screw and screw on nut (E4), then hand-tighten.
8. Repeat steps 6 and 7 for the bottom hole.
9. Tighten down nuts.
10. Repeat for other side.
Installing anti-jump disk
1. Measure 3-15/16” (10 cm) from the inside of the hanger and make a mark in the center of the
door edge.
2. Screw the anti-jumper disc into the door top.
3. Do not tighten the anti-jumper disc all the way.
Prior to hanging the door, the anti-jump discs must be hanging over the front
edge of the door.
4. Repeat for other side.
NOTICE
NOTICE
10
Installation
Step 5: Hanging Door
1
2
H1
A
D
D
1. Lift the door onto the track.
2. Turn the anti-jumper discs to where they are now centered on the door edge.
3. Tighten.
11
Installation
Step 6: Installing Floor Guide
1/4” (6 mm)
3/4” (19 mm)
F
F1
If your door already has a groove in the bottom of the door:
1. With the door at open position, place the floor guide (F) into the center of the groove. (The floor
guide should not be sticking outside the edge of the door.)
2. Loosen the back door stop (C2) and slide the door backwards (enough to see the floor guide).
3. Screw the floor guide (F) into the floor using 2 screws (F1).
4. Slide the door forward and reposition the door stop (C2) and tighten.
If your door does not have a groove in the bottom of the door:
1. Loosen the anti-jumper disc turn (to where they are hanging over the front edge of the door).
2. Lift the door off the track and place on a flat surface.
3. Find the center of the door edge and draw a line that reaches the entire length of the door edge.
4. Using a router, make a groove in the bottom of the door.
5. Hang the door back on the track.
6. Turn the anti-jumper discs to where they are now centered on the door edge.
7. Follow the steps above (If your door already has a groove in the bottom of the door).
12
Installation
Step 7: Checking Operation of Door
Slide the door back and forth and make sure it rolls smoothly and isn’t hitting or dragging on
anything.
Cleaning and Maintenance
Check the components regularly to make sure all screws and bolts are tightened.
13
Warranty Information
To obtain a copy of the warranty for this product:
Visit amazon.com/AmazonBasics/Warranty
— or —
Contact Customer Service at 1-866-216-1072
Feedback
Love it? Hate it?
Let us know with a customer review.
AmazonBasics is committed to delivering customer-driven products that live up to your high
standards. We encourage you to write a review sharing your experiences with the product.
Please visit: amazon.com/review/review-your-purchases#
For further services:
Visit amazon.com/gp/help/customer/contact-us
— or —
Contact Customer Service at 1-866-216-1072
MADE IN CHINA
amazon.com/AmazonBasics
  • Page 1 1
  • Page 2 2
  • Page 3 3
  • Page 4 4
  • Page 5 5
  • Page 6 6
  • Page 7 7
  • Page 8 8
  • Page 9 9
  • Page 10 10
  • Page 11 11
  • Page 12 12
  • Page 13 13
  • Page 14 14
  • Page 15 15
  • Page 16 16
  • Page 17 17
  • Page 18 18
  • Page 19 19
  • Page 20 20
  • Page 21 21
  • Page 22 22
  • Page 23 23
  • Page 24 24
  • Page 25 25
  • Page 26 26
  • Page 27 27
  • Page 28 28
  • Page 29 29
  • Page 30 30
  • Page 31 31
  • Page 32 32
  • Page 33 33
  • Page 34 34
  • Page 35 35
  • Page 36 36

AmazonBasics N/A User manual

Type
User manual
This manual is also suitable for

Ask a question and I''ll find the answer in the document

Finding information in a document is now easier with AI