Toro Pick-Up Broom Water Kit, TXL 2000 Tool Carrier Installation guide

Type
Installation guide

Toro Pick-Up Broom Water Kit, TXL 2000 Tool Carrier is designed to enhance the cleaning performance of your pick-up broom by adding a water spraying system. With a 30-gallon water tank, you can spray water onto the ground while sweeping, reducing dust and improving cleaning efficiency. The kit includes adjustable spray nozzles to ensure precise water coverage and a flow rate adjustment knob for controlling the water flow. It's easy to install and operate, with a simple on/off switch for the water pump.

Toro Pick-Up Broom Water Kit, TXL 2000 Tool Carrier is designed to enhance the cleaning performance of your pick-up broom by adding a water spraying system. With a 30-gallon water tank, you can spray water onto the ground while sweeping, reducing dust and improving cleaning efficiency. The kit includes adjustable spray nozzles to ensure precise water coverage and a flow rate adjustment knob for controlling the water flow. It's easy to install and operate, with a simple on/off switch for the water pump.

FormNo.3426-139RevC
Pick-UpBroomWaterKit
TXL2000ToolCarrier
ModelNo.22545
InstallationInstructions
Safety
SafetyandInstructional
Decals
Safetydecalsandinstructionsareeasilyvisibletotheoperatorandarelocatednearanyarea
ofpotentialdanger.Replaceanydecalthatisdamagedormissing.
decal138-0543
138-0543
1.Warning—readtheOperator’sManual;onlyusewater.
decal139-2835
139-2835
1.Tippinghazard—readtheTXL2000Operator’sManualfor
loadlimits;themaximumloadis523kg(1,155lb);donot
raiseorextendtheattachment.
©2019—TheToro®Company
8111LyndaleAvenueSouth
Bloomington,MN55420
Registeratwww.Toro.com.
OriginalInstructions(EN)
PrintedintheUSA
AllRightsReserved
*3426-139*C
Installation
LooseParts
Usethechartbelowtoverifythatallpartshavebeenshipped.
Description
Qty.
Use
Nopartsrequired
Preparethemachine.
Watertankassembly1
Tankmount1
Bolt(5/16x3/4inch)
6
Flatwashers(5/16inch)
6
Bolt(1/2inchx1-1/4inches)
4
Locknut(1/2inch)
6
Ratchetstraps2
Spraybarmountingbrackets
2
Bolt(5/8x1-1/2inches)
2
Locknut(5/8inch)
2
Spraybarassembly
1
Carriagebolt(1/2x1-1/4inches)
2
Flatwasher(1/2inch)
2
Longhose1
Hoseclamp1
Longwireharness1
Switchandswitchwireharness
1
Capacitydecal
1
Installthewaterkit.
Tee1
Hoseclamp2
Spraynozzlemount
1
Hoseclip1
Bolt(3/8x1inch)
1
Locknut(3/8inch)
1
Installthegutterbrushspraynozzle(optional).
PreparingtheMachine
Important:Thiskitrequirestheinstallationofthe
pick-upbroombeforeinstallation.
Note:Determinetheleftandrightsidesofthe
machinefromthenormaloperatingposition.
1.Parkthetractionunitonalevelsurface.
2.Disengagetheauxiliaryhydraulics.
3.Loweranyequippedattachments;refertoyour
Operator’sManual.
4.Engagethetractionunitparkingbrake.
5.Shutoffthetractionunitengineandremovethe
key.
6.Disconnectthetractionunitbattery;refertoyour
Operator’sManual.
2
InstallingtheWaterKit
1.Installthewatertankassemblytothewatertank
mountusing6bolts(5/16x3/4inch)andat
washers(5/16inch)asshowninFigure1.
Important:Donotovertightenthehardware;
overtighteningmaycausedamagetothe
tank.
g269777
Figure1
1.Watertankassembly
3.Flatwasher(5/16inch)
2.Watertankmount
4.Bolt(5/16x3/4inch)
2.Installthetankandmountassemblytothe
mounttabontopofthepick-upbroomusingthe
4bolts(1/2inchx1-1/4inches)andlocknuts
(1/2inch)asshowninFigure2.
g269790
Figure2
1.Locknut(1/2inch)
3.Pick-upbroommounttab
2.Mountandtankassembly
4.Bolt(1/2inchx1-1/4
inches)
3.Securethetankwiththe2ratchetstraps(Figure
3).
g269791
Figure3
1.Ratchetstraps
4.Securethespraybarmountingbracketstothe
tabsonthefrontofthepick-upbroomwiththe2
bolts(5/8x1-1/2inch)andlocknuts(5/8inch),
butdonotcompletelytightenthehardware.
g272312
Figure4
Rightsideshown
1.Bolt(5/8x1-1/2inch)
3.Rightmounttab
2.Spraybarmounting
bracket
4.Locknut(5/8inch)
3
5.Installthespraybarassemblytothespraybar
mountingbracketswiththecarriagebolts(1/2
x1-1/4inches),atwashers(1/2inch),and
locknuts(1/2inch)inthelowestholeonthe
spraybarmountingbrackets(Figure13).
Note:Forthemostefcientsprayingpattern,
thespraynozzletipsshouldbeapproximately
13inchesabovethegroundwiththebroom
sittingontheground.
Adjustthespraybarpositionuntilthecorrect
heightisachieved;refertoAdjustingthe
Spray-BarHeight(page7).
6.Tightenthehardwarethatsecuresthespraybar
mountingbrackets.
7.Routethelonghosebelowthetankmount,
throughthecenterhoseguideandconnectitto
thecenterteeonthespraybar.
8.Securethehosetotheteewithahoseclamp.
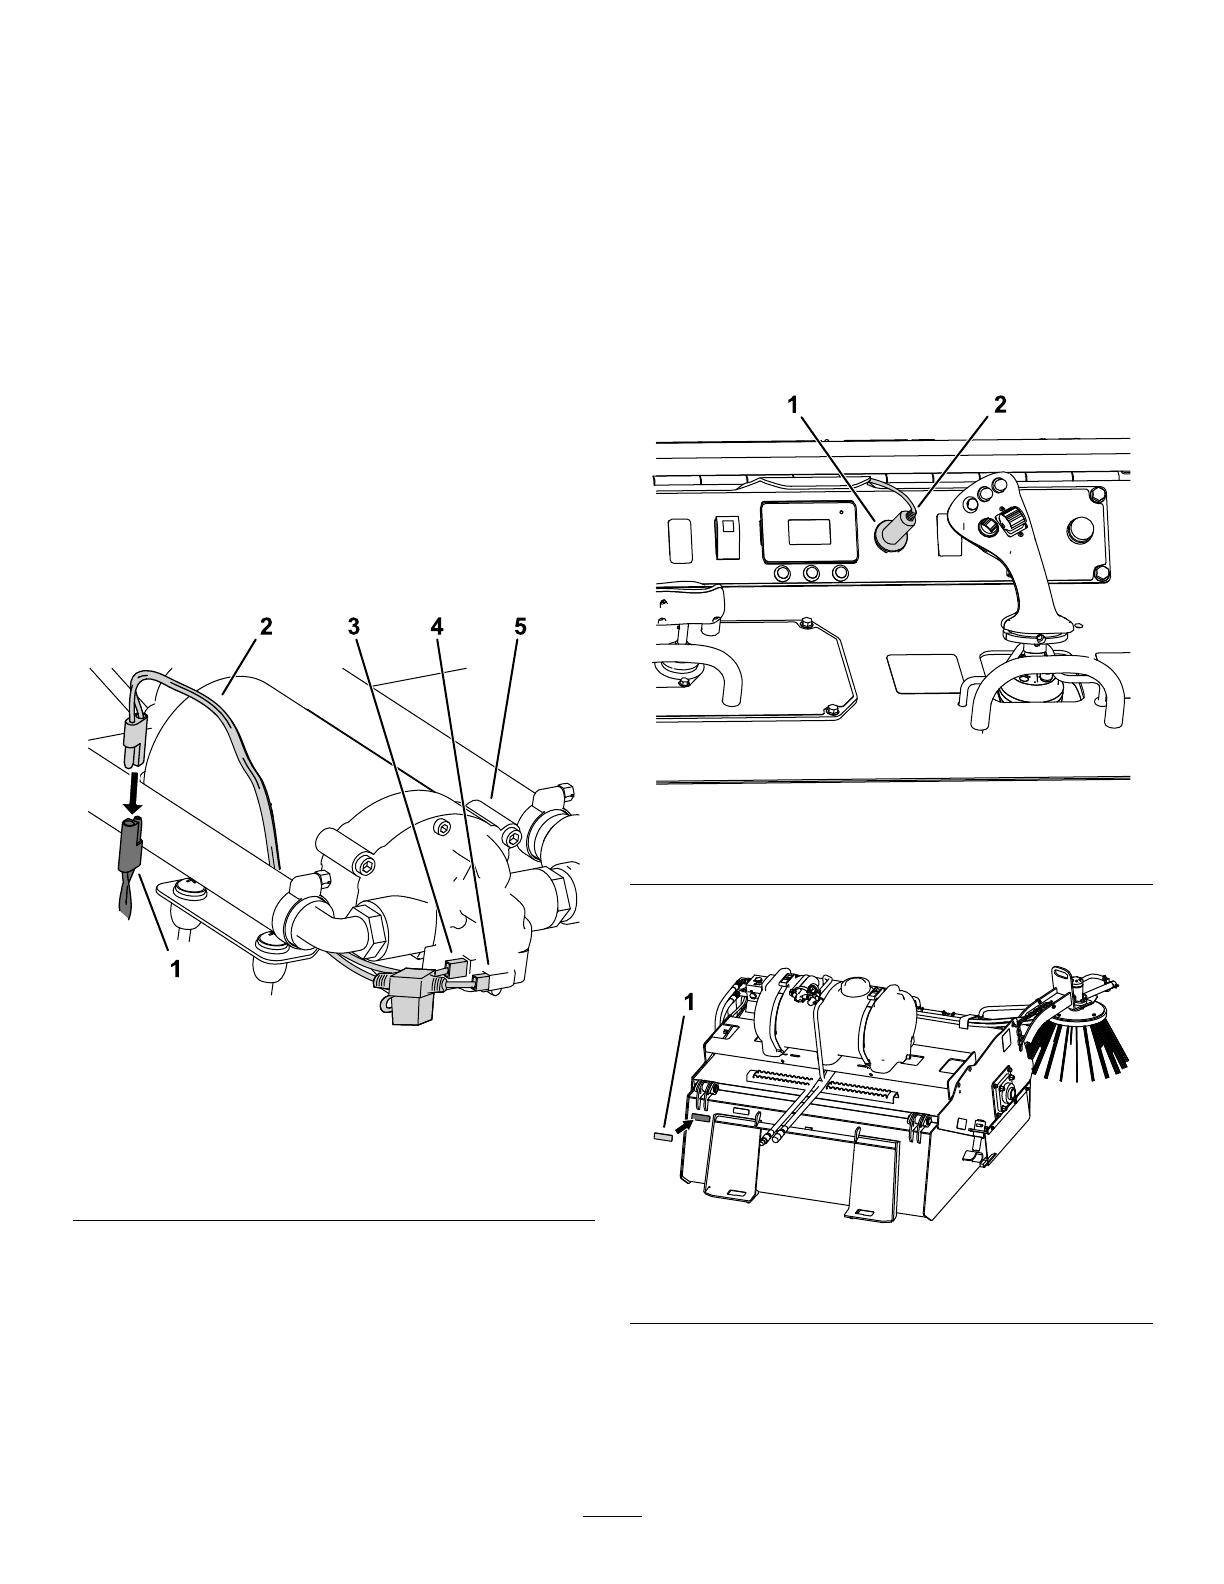
9.Connecttheshortwireharnesstothelongwire
harness(Figure5).
g270369
Figure5
1.Longwireharness
4.Connectorwithattached
relay
2.Shortwireharness
5.Waterpump
3.Connectorwithout
attachedrelay
10.Connecttheoppositeendofthelongwire
harnesstotheswitchwireharness.
11.Routetheswitchwireharnessandswitchalong
thehydrauliclines,pastthemachinecouplers,
andtothecontrolpanelofthetractionunit.
Important:Routethewireharnessaway
fromanysharp,hot,ormovingparts,and
secureitwithcabletiesasneeded.Ensure
thattheharnesswillnotbepinchedwhen
themachineisoperating.
12.Plugthepowerconnectorintothe12V
accessoryoutletonthecontrolpanel(Figure6).
g269951
Figure6
1.Accessoryoutlet2.Powerconnector
13.Installthekitcapacitydecalovertheexisting
capacitydecal(Figure7).
g283980
Figure7
1.Kitcapacitydecal
4
InstallingtheGutterBrush
SprayNozzle(Optional)
Ifthepick-upbroomisequippedwithagutterbrush,
thiskitincludesaspraynozzlethatcanbemounted
toit.
1.Onthespraybar,cutthehosebetweenthelast
2nozzlesnearestthegutterbrushandinstall
theteewithhoseclamps.
g269813
Figure8
1.Tee
2.Loosenthehardwaresecuringthegutterbrush
motor,slidethespraynozzlemountunder
thegutterbrushmotormount,andtightenthe
hardware(Figure9).
g269815
Figure9
1.Bolt
3.Spraynozzlemount
2.Gutterbrushmotormount
4.Nut
3.Securethehosetotheholeinthegutterbrush
armwiththehoseclip(7/8inch)andbolt(3/8x1
inch)andlocknut(3/8inch)asshowninFigure
10.
g269816
Figure10
1.Locknut(3/8inch)3.Bolt(3/8x1inch)
2.Hoseclip(7/8inch)
5
Operation
WARNING
Afullwatertankcanaffectthestabilityof
themachine,whichmayleadtoatip-over,
causingseriousinjuryordeath.
Donotextendtheattachmentarmswhen
operatingthepick-upbroom.
Donotraisethearmshigherthan
necessarytodumpthebucket.
Donottravelwiththepick-upbroomraised
abovetheground.
PreparingtoOperate
1.Alwaysensurethattheratchetstrapsholdingthe
tankaresecurebeforeoperatingthemachine.
2.Alwaysllthetankwithwaterbeforeturningthe
pumpon.
Important:Operatingthepumpwithout
waterinthetankmaydamagethepump.
Note:Afulltankofwater(30gallons)lasts
approximately20minutesofcontinuous
sprayingdependingonconditionsandsettings.
TurningOntheWaterPump
Usethewaterpumpswitchtocontrolthewaterpump.
g283983
Figure11
1.Turnthewaterpumpon.
2.Turnthewaterpumpoff.
AdjustingtheFlowRate
Adjusttheowratetothedesiredsettingusingthe
knobonthepressureregulator.
g269753
Figure12
1.Flowrateadjustmentknob
6
AdjustingtheSpray-Bar
Height
Asthepick-upbroombristleswear,thespray-bar
heightmayneedtobeadjustedtoensurecomplete
spraycoverage.Refertothefollowingsteps:
1.Turnonthespraypumpandensurethatthe
spraypatternprovidescompletecoveragetothe
areainfrontofthepick-upbroom.
2.Ifthespraypatterndoesnotprovidefull
coverage,loosenthenutonthecarriagebolt
(1/2inch)andslidethespraybarupintheslots
onthespraybarormovethespraybaruptothe
nextavailableholeinthespraybarmounting
bracket(Figure13).
g269754
Figure13
Rightsideshown
1.Nut4.Adjustmentslot
2.FlatWasher
5.Carriagebolt
3.Spraybarmounting
bracket
3.Tightenthehardwarethatsecuresthespraybar
tothemountingbrackets.
4.Testandadjustuntilthespraypatternprovides
completecoverage.
Maintenance
UncloggingtheNozzles
ServiceInterval:Beforeeachuseordaily
1.Turnonthespraypumpandensurethatall
nozzlesareoperatingcorrectly.
2.Removethenozzlecapfromthecloggednozzle
(Figure14).
3.Cleanthescreeninsidethenozzlecapwitha
smallbrush.
g269732
Figure14
1.Spraynozzle
2.Nozzlecap
4.Installthecleannozzlecapandensurethatit
operatescorrectly.
7
CleaningtheStrainer
ServiceInterval:Beforeeachuseordaily
1.Locatethetankstrainerfromtheinsideofthe
tank(Figure15).
2.Cleananydebrisfromthestrainerscreen.
g269730
Figure15
1.Tankstrainer
Storage
StoringtheMachine
1.Ifthetankisnotgoingtobeusedforan
extendedperiodoftime,completelydrainthe
tank,pump,andlines.
2.Inareaspronetofreezing,youmustalso
winterizethemachinetopreventdamagefrom
freezing;pumpasolutionofRVanti-freeze
throughtheentiresystem.
8
  • Page 1 1
  • Page 2 2
  • Page 3 3
  • Page 4 4
  • Page 5 5
  • Page 6 6
  • Page 7 7
  • Page 8 8

Toro Pick-Up Broom Water Kit, TXL 2000 Tool Carrier Installation guide

Type
Installation guide

Toro Pick-Up Broom Water Kit, TXL 2000 Tool Carrier is designed to enhance the cleaning performance of your pick-up broom by adding a water spraying system. With a 30-gallon water tank, you can spray water onto the ground while sweeping, reducing dust and improving cleaning efficiency. The kit includes adjustable spray nozzles to ensure precise water coverage and a flow rate adjustment knob for controlling the water flow. It's easy to install and operate, with a simple on/off switch for the water pump.

Ask a question and I''ll find the answer in the document

Finding information in a document is now easier with AI