Page is loading ...

Page 1
05/11/2012
Ins-30202 Net2 Entry - Monitor
Technical Support
Technical help is available: Monday - Friday from 07:00 - 19:00 (GMT)
Saturday from 09:00 - 13:00 (GMT)
01273 811011 [email protected]
Documentation on all Paxton products can be found on our website - http://www.paxton.co.uk/
Paxton
The Net2 Entry monitor is an audio/video monitor used to remotely communicate with visitors. It is powered using
power over Ethernet (PoE) and communicates with the other elements of the system using IPv6, providing 'plug
and play' installation. The only conguration required is the allocation of a monitor ID which the system uses to
identify the correct monitor.
If used in conjunction with Net2 access control software, this must be version 4.25 or later.
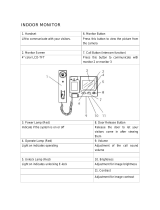
Description of product
2
3
4
5
1
6
1. Colour 3.5' Touch screen
2. Volume control
3. Speaker
4. Open door button
5. Microphone
6. Handset

Page 2
Installation
A desk mount stand is also available (PN: 337-847)
See also: AN1127 - Net2 Entry - Planning and installation < http://paxton.info/1896 >
Determine where the monitor will be sited. The top right corner of the unit is regarded as the reference point for
drilling and measurements. Screws and wall plugs are provided in the tting kit.
1. Determine the position of the top mounting screw. Drill the hole and tap in one of the No 8 wall plugs.
2. Put in one of the screws, leaving a suitable gap to the wall surface and slide the bracket over it.
3. Mark the hole positions for the lower 2 screws and the network cable entry.
4. Remove the bracket and drill the additional holes.
5. Tap in the other 2 wall plugs and hang the bracket back on the top screw. Secure the bracket with the 3 screws.
Power is supplied via the network connection from a Net2 Entry controller or a network PoE switch.
30 mm
79 mm
170 mm
55 mm
186 mm
88 mm
120 mm
53 mm
118 mm
℄
93 mm
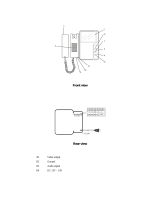
A white network cable is supplied with the stand.
Feed this through the mount and push it into the
socket at the rear of the monitor. Clip the mount to
the monitor.

Page 3
Once PoE power is available at the unit, touch the screen to activate the menu.
Where it is not practical to run a patch cable to the rear of the unit, it can be directly wired to the network cable
via the supplied IDC module.
If a terminated cable is used, feed this through the bracket and push it into the socket at the rear of the monitor.
If unterminated cable is used, clip the supplied IDC module into the wall bracket. Connect the cable as per the
wiring label and use the small patch lead to connect the monitor to the module.
Fit the monitor to the bracket by hooking the unit onto the two top pins and push the bottom edge until it clicks.
Paxton recommend that the network cable is run to each location and terminated in a network box. A patch
cable should then be used to link the unit to the network. This makes unit replacement or removal for building
maintenance much easier.

Page 4
Conguration
When the monitor is rst connected to the
network it will not have a Monitor ID number.
3. Touch the 'Installer settings' option.
Next, if the system has an Engineer code it must
be entered.
4. Touch the 'Enter monitor ID' option.
Setting the Monitor ID
The monitor ID is the number that a visitor will
call to request entry (unless they are using a text
only list) so it should relate to the location of the
monitor where possible e.g. Flat Number.
1. Touch the screen to display the menu.
2. Touch the 'Monitor settings' option.
5. Enter the Monitor ID number.
Use the on-screen keypad and press 'Accept'.
'Language' and 'Easy read' options may be
selected during the conguration process.
Touch the 'Display settings' option to change
these if required. Return to the 'Settings' screen
once this has been completed.

Page 5
2. Incoming call
3. Answering a call
4. Unlock the door
When a visitor calls a monitor, it will sound its ring
tone until it is answered or it times out.
The 'open door' button will illuminate green and the
video image will be displayed.
Operation - Answering a call
The monitor will normally have no display.
The button is not illuminated.
Touch the 'Answer' option to talk handsfree to the
visitor or lift the handset.
You can press the 'open door' button at any time to
unlock the door.
You can terminate the call at any time by touching
the 'Hang up' option or replacing the handset.
Pressing the 'open door' button will unlock the
door and cause the button to ash green.
If the door has a contact switch, the door icon
will show the actual position of the door. If not, a
padlock icon will display the condition of the lock.
1. Default state

Page 6
2. Select the camera (if more than one)
1. Select 'View video' mode
Operation - Viewing a camera
If more than one panel is installed, this screen will
display. Use the up and down arrows to select the
required camera and touch 'Accept'.
Each camera may have the 'View video' option
enabled/disabled. The audio and open door
functions may also be enabled/disabled by the panel.
3. Viewing with the camera
Where this function is permitted, the 'View video'
option will display. This allows the camera to be
used for an external view at any time.
Touch the screen to display the default menu.
Touch the 'View video' option.
The camera view will display on the monitor.
Touch the 'Hang up' option to terminate the session.
At the end of the permitted viewing time a
'Continue to view' option will display. At this point a
timer must be reset or viewing will be ended.
Default Menu
Monitor settings
QDisplays the 'Monitor settings' menu.
Do not disturb
QSee 'Operation - Do not disturb mode'.
View video
QDisplays the 'Viewing a camera' option.
Display off
QTurns off the display screen.
If the display is blank, touching the screen will display the Menu.

Page 7
Volume settings
QAllows the volume of the speaker and ringtone to be adjusted.
Call ring tone
QAllows a choice of ringtone.
Ring time
QSets the period the monitor will ring unless the call is answered.
Sound Settings
Monitor settings
Sound settings
QDisplays the Sound settings.
Display settings
QDisplays the Language, Alarm and 'Easy read' settings.
About
QDisplays the Software version in use on this monitor.
Installer settings
QDisplays the Installer settings for this monitor.
Name
QAllows the user to edit the name of this monitor.
QThis option may be restricted in software by the installer.
Installer Settings
Enter monitor ID
QThis option is used to set up the Monitor ID. See Conguration.
Factory reset
QReturns the monitor settings to factory defaults.
Touch 'Monitor settings' to
display the menu.
Alarm options
QSelects if Alarms will be displayed on this Monitor.
Easy read
QDisplays the Easy read options.
Language
QSets the language that this monitor will display.
Display Settings

Page 8
Operation - Do not disturb mode
Visitors can be stopped from calling the monitor
by putting it into 'Do not disturb' mode.
If the screen is blank, touch the screen to display
the menu.
Touch the 'Do not disturb' option. The button will
illuminate red.
Touch the button again to
exit this mode.
186 mm 170 mm 45 mm
12.95W
1000
0 °C 45 °C
Specications
Power over Ethernet (PoE) power rating
Monitors per system
Operating temperature
Electrical
Environment
Dimensions
Max
Width
Height
Depth
Features
Indoor use only
Low Vandal resistance
IP Rating
Min
Min
Min
Min
Max
Max
Max
Ethernet bandwidth requirement
Communication
Two way
100kb/s multicast 1Mb/s multicast
IEEE 802.3af class 0
Screen size
per call in progress
Screen resolution
Handset audio
Hands free audio
Screen illumination
Two way
LED backlight
4.3 inch colour TFT
480x272 pixels
Monitors should be cleaned using a clean damp cloth. Chemical cleaning products must not be used.
Alarm display
Alarm messages will display to the user at the
monitor if the option has been set in the local
Installer screen.
The user may view the camera to investigate the
alarm.
Note: Door left open alarms will only be available if
Net2 Entry is connected to a Net2 system. The Net2
system must be running v4.25 software or later.
/