Philips DVR5100 HDMI 1080i Digital Video Recorder User manual
- Category
- DVD players
- Type
- User manual
This manual is also suitable for

English
HIGH DEFINITION DIGITAL VIDEO RECORDER
DVR5100
DVR7100
User Manual

2
AUSTRALIA - Philips Manufacturers Warranty for Australia only
These Warranty conditions are valid for the following consumer electronics products: Colour Televisions,
Projection TV, Plasma & LCD TV, DVD Players, DVD Recorders, DVD Recorders with HDD, Personal Video
Recorders, Audio Systems, Home Theatre systems, Digital Set Top Box, Digital Photo Display, MP3 players &
Portable Audio products.
The benefits given to the purchaser by this warranty are in addition to all other rights and remedies, which the
purchaser has in respect of the product under the Trade Practices Act or other Commonwealth or State Law.
Version 9: 1 February 2007 Warranty valid for all new products purchased after 1
st
January 2007
1
Philips Consumer Electronics warrants its products to the purchaser
as follows and subject to the stated conditions.
U
1
UThis warranty does not
cover:
a) Mileage or travel outside the
normal service area covered by
selected Authorised Service
Centre.
b) Service costs arising from failure
to correctly adjust the controls of
the product or to observe the
instructions, or inspections that
reveal that the product is in
normal working order.
c) Product failures caused by
misuse, neglect, accidental
breakage, transit damage,
inexpert repairs or modification
by un-authorised persons,
external fires, lightning strikes,
floods, vermin infestation or
liquid spillage.
d) Cleaning of video or audio
heads.
e) Inadequate receiving antennae.
f) Replacement of worn or used
batteries or other consumables.
g) Consumer products used in
commercial applications (This
warranty is limited to 3 months
only)
h) Second hand products.
1
Y
Y
e
e
a
a
r
r Free Repair Service – at Philips ASC
Colour Television, Plasma Television, LCD Television, Projection Television
DVDR/VCR Combo, DVD Recorder with Hard Drive, Personal Video Recorder,
LCD Projector, Wireless Audio System, Audio System, Home Theatre System &
Digital Photo Display (Photo Frame) & Digital Set-Top-Box.
U
1
1
Y
Y
e
e
a
a
r
r Free Replacement – at your Retailer
Portable Audio, MP3 players, DVD Players, DVD/VCR Combo Players,
DVD Recorders without HDD & Portable DVD/LCD players.
UConditions of Repair Warranty
1. All claims for warranty service should be made to your nearest Philips Authorised
Service Centre or the Philips Technology Care Centre. Reasonable evidence of
date of purchase must be provided.
2. This warranty extends only to defects in material or workmanship occurring under
normal use of the product when operated in accordance with the instructions.
3. If a replacement product is supplied under the repair policy, it is warranted for the
remainder of the warranty period of the original purchased product only.
4. Home service is provided only within the normal service area of one of our
recommended Authorised Service Centres (ASC). It will be provided for television
receivers only with a screen size of 67cms or above (product includes CRT,
LCD TV, PTV, and Plasma TV). Televisions with screen sizes less than 67 cms
and all other product types are to be taken or sent by the consumer to the
workshop of your nearest Authorised Service Centre, at the Consumer’s
expense.
5. This Manufacturers Warranty is limited to 3 months for the above listed Consumer
Electronics Products if used in commercial applications.
6. Philips may, at its discretion choose to replace rather than repair any product
covered by this warranty.
7. Product accessories are covered by the same warranty period. Please contact the
Philips Technology Care Centre for free replacement of faulty accessories.
8. This Manufacturers Warranty is neither transferable nor valid in countries other
than Australia.
The conditions contained in this warranty card replace and override the provision of the Philips World-Wide Guarantee for
products purchased in Australia and used in Australia.

3
English
Philips Consumer Electronics a division of Philips Electronics Australia Limited ABN 24 008 445 743,
Level 1, 65 Epping Road NORTH RYDE NSW 2113.
Service is provided through more than 100 accredited Authorised Service Centres throughout Australia.
For direct contact with the nearest recommended Authorised Service Centre in capital & regional cities/towns
Version 9: 1 February 2007 Warranty valid for all new products purchased after 1
st
January 2007
2
A
A
u
u
t
t
h
h
o
o
r
r
i
i
s
s
e
e
d
d
S
S
e
e
r
r
v
v
i
i
c
c
e
e
C
C
e
e
n
n
t
t
r
r
e
e
N
N
e
e
t
t
w
w
o
o
r
r
k
k
Customer support is provided in Australia by our trained call centre staff
For assistance with product features and specifications, please call
T
T
e
e
c
c
h
h
n
n
o
o
l
l
o
o
g
g
y
y
C
C
a
a
r
r
e
e
C
C
e
e
n
n
t
t
r
r
e
e
Please record the following information for your records and keep in a safe place.
We recommend retaining your purchase receipt to assist with any warranty claim
Model number : ………………………………………………………..
Serial number : ………………………………………………………..
Date of purchase : ………………………………………………………..
Retailer : ………………………………………………………..

4
‘CONSUMERS SHOULD NOTE THAT NOT ALL HIGH
DEFINITION TELEVISION SETS ARE FULLY
COMPATIBLE WITH THIS PRODUCT AND MAY CAUSE
ARTIFACTS TO BE DISPLAYED IN THE PICTURE. IN
CASE OF 525 OR 625 PROGRESSIVE SCAN PICTURE
PROBLEMS, IT IS RECOMMENDED THAT THE USER
SWITCH THE CONNECTION TO THE ‘STANDARD
DEFINITION’ OUTPUT. IF THERE ARE QUESTIONS
REGARDING OUR TV SET COMPATIBILITY WITH THIS
MODEL 525p AND 625p DVD PLAYER, PLEASE
CONTACT OUR CUSTOMER SERVICE CENTER.’
HDMI, and HDMI logo and High-De nition
Multimedia Interface are trademarks or
registered trademarks of HDMI licensing
LLC.
Manufactured under license from Dolby
Laboratories. “Dolby” and the double-D
symbol are trademarks of Dolby
Laboratories.
Trade mark of the DVB Digital Video
Broadcasting Project (1991 to 1996)

5
English

6
English
Table of contents
General
General Information ........................................................................................................8
Setup precautions .................................................................................................................................................8
Accessories supplied ...........................................................................................................................................8
About recycling .....................................................................................................................................................8
Product Overview
Main Unit ........................................................................................................................... 9
Remote Control ......................................................................................................... 10-11
Using the remote control ................................................................................................................................12
Connections
Basic Connections .....................................................................................................13-16
Step 1 : Connecting the antenna cables .......................................................................................................13
Step 2 : Connecting the video cable .............................................................................................................14
Option 1: Using the Video (CVBS) socket ..........................................................................................14
Option 2: Using the S-Video socket ......................................................................................................14
Option 3: Using the COMPONENT Y P
B
P
R
sockets .......................................................................14
Option 4: Connecting to a HDMI compatible TV .............................................................................15
Step 3 : Connecting the audio cables ............................................................................................................15
Option 1: Using the analogue audio sockets ......................................................................................15
Option 2: Using the digital audio socket (COAXIAL or OPTICAL) ...........................................16
Step 4 : Connecting the mains lead ...............................................................................................................16
Basic Setup
Getting Started ......................................................................................................... 17-19
Guide to Displays ...............................................................................................................................................17
Main menu .....................................................................................................................................................17
Sub-menu.......................................................................................................................................................17
Initial Setup .........................................................................................................................................................18
Quick Setup ..................................................................................................................................................18
Operations
Watching TV ............................................................................................................. 20-24
Selecting a channel from the Channel List ................................................................................................. 20
Selecting a channel from the Favourite List ............................................................................................... 20
Making your own Favourite List ............................................................................................................. 20
View your Favourite List .......................................................................................................................... 20
Additional Viewing Methods ...........................................................................................................................21
Checking programme information .........................................................................................................21
Watching digital text programme (TELETEXT) ................................................................................21
Pausing a TV broadcast (Pause Live TV) ..............................................................................................21
About temporary HDD storage (Time Shift Buffer) ....................................................................... 22
Watching another programme in the sub-picture (Picture-in-Picture) ..................................... 22
Guide (Electronic Programme Guide) Overview ......................................................................................23
Watching a programme from the Guide ..............................................................................................23
Recording from the Guide ........................................................................................................................24
Recording ................................................................................................................... 25-27
Recording the Programme You are Watching .......................................................................................... 25
Extending the current recording (Quick Timer) ............................................................................... 25
Setting the Timer ...............................................................................................................................................26
Checking/changing/canceling timer settings (Timer List) ................................................................26
About simultaneous two-channel recording and priorities ............................................................27
Recording Time ...................................................................................................................................................27

7
English
Playback ..................................................................................................................... 28-30
Playing a Recorded Programme (HDD) ..................................................................................................... 28
To check playback information ...............................................................................................................29
Playing from the beginning of the programme you are recording (Chasing Playback) ........... 30
Playing a previous recording while making another (Simultaneous Rec and Play)................... 30
Labelling a Title (Entering Characters) .......................................................................................................31
Protecting a Title ...............................................................................................................................................31
Freeing up space on the HDD ........................................................................................................................31
Erasing a title ................................................................................................................................................31
Erasing all titles (Format Hard Disk) ....................................................................................................32
Setup Options
Setting and Adjustment .......................................................................................... 33-38
Accessing the setup menu ................................................................................................................................33
Operation Setting (Installation) .................................................................................................................... 34
Digital TV settings (Channel) .................................................................................................................34-35
Video/Audio Setting (Video/Audio)........................................................................................................ 36-37
HDD Setting ........................................................................................................................................................37
System Setting (General) .......................................................................................................................... 37-38
Others
Troubleshooting ........................................................................................................ 39- 40
Glossary............................................................................................................................ 41
Index ................................................................................................................................. 42
Speci cations ..................................................................................................................43
Table of contents

8
English
WARNING!
This unit does not contain any user-
serviceable parts. Please leave all
maintenance work to quali ed
personnel.
Setup precautions
Finding a suitable location
– Place this unit on a at, hard and
stable surface. Never place the unit on a
carpet.
– Never place this unit on top of other
equipment that might heat it up (e.g.,
receiver or ampli er).
– Never put anything under this unit
(e.g., CDs, magazines).
– Install this unit near the AC outlet
where the AC power plug can be easily
reached.
– For MAINS powered apparatus and
for apparatus producing internal voltages
greater than 35 V (peak) a.c. or d.c.,
having no protection against splashing
water, the apparatus shall not be exposed
to dripping or splashing and no objects
lled with liquids, such as vases, shall be
placed on the apparatus.
– With regard to devices for
disconnection from the MAINS, where
the MAINS plug or an appliance coupler
is used as the disconnect device, the
disconnect device shall remain readily
operable.
– The appliance coupler is used as the
disconnect device, the disconnect device
shall remain readily operable.
Space for ventilation
– Place this unit in a location with
adequate ventilation to prevent internal
heat build up. Allow at least 10 cm (4”)
clearance from the rear and the top of
this unit and 5 cm (2”) from the left and
right to prevent overheating.
Avoid high temperature, moisture,
water and dust
– This unit must not be exposed to
dripping or splashing.
– Never place any object or items that
can damage this unit (e.g., liquid lled
objects, lighted candles).
Accessories supplied
– 1 audio/video cable
– 1 component video cable
– 1 remote control with batteries
– 1 RF antenna cable
– 1 antenna interconnected cable
– 1 power cable
– Quick Start Guide
About recycling
These operating instructions have been
printed on non-polluting paper. The
electronic equipment contains a large
number of materials that can be recycled.
If you are disposing of an old machine,
please take it to a recycling centre.
Please observe the local regulations
regarding disposal of packaging materials,
exhausted batteries and old equipment.
General Information

9
English
a STANDBY-ON
– Turns the recorder on or to standby
mode.
b Display panel
– Shows information about the current
status of the recorder.
c PLAY/PAUSE u
– Starts playback of the selected title.
– Pauses the playback or recording.
d RECORD
– Starts recording the current TV
programme.
e MENU
– Enters or exits the recorder’s system
menu.
f bB:
– Cursor keys for moving to the left/right
in the menu.
– skips to the previous/next 10 seconds
during playback; moves the sub-picture
position in PIP mode.
vV:
– Cursor keys for moving up/down in the
menu.
– selects previous/next TV channel for the
sub-picture in PIP mode.
g OK
– Con rms an entry or selection in the
menu.
Main Unit

10
English
2
3
4
5
6
7
8
9
10
11
12
1
13
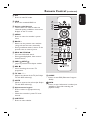
a 2
– Turns the recorder on or to standby
mode.
b PIP SWAP
– Swaps between the main and sub-pictures
in PIP mode.
c TEXT
– Enters or exits Teletext mode.
d TIMER
– Enters or exits the timer recording menu.
e bB:
– Cursor keys for moving to the left/right
in the menu; skips to the previous/next
10 seconds during playback; moves the
sub-picture position in PIP mode.
vV:
– Cursor keys for moving up/down in the
menu; selects previous/next TV channel
for the sub-picture in PIP mode.
f OK
– Con rms an entry or selection in the
menu.
g DISPLAY
– Displays the playback/recording time bar
on rst press and {1-Plate} on second
press.
– While in Live TV mode, displays the
{I-Plate}.
h PAUSE LIVE TV u
– While in HDD List, starts playback of
currently active title from resume point.
– Pause live TV and resume playback.
i STOP x
– Stops playback or recording.
j P +-
– While in tuner mode, selects the next/
previous TV channel.
k AUDIO
– Toggles through available audio tracks.
l FAVORITE
– Enters or exits favourite channel list.
m CH LIST
– Enters or exits channel list.
Remote Control

11
English
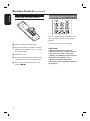
14
15
16
17
18
19
20
21
22
23
24
25
27
26
n PIP
– Enters or exits PIP mode.
o HDD
– Enters the recorded HDD List.
p Colour coded buttons
– These buttons are used to select the
coloured options available in some menu
displays on the TV screen.
q MENU
– Enters or exits the recorder’s system
menu.
r BACK
– Returns to the previous menu without
saving and exits the menu eventually.
– During installation wizard, returns to the
previous item or exits any menu.
s REW m, FFW M
– Fast reverse/forward search.
– During paused playback, slow reverse/
forward search.
t PREV , NEXT
– Jumps to previous/next chapter marker.
u REC z
– Starts recording the current TV
programme.
v TV VOL +-
– Adjusts the volume of the TV (for Philips
TV with RC5 code only).
w MUTE
– Mutes or restores the volume (for Philips
TV with RC5 code only).
x Alphanumeric keypad
– Enters numbers in appropriate entry
elds.
– Selects the recorder’s preset TV tuner
channel.
y SUBTITLE
– Enters or exits subtitles.
z GUIDE
– Enters or exits EPG (Electronic Program
Guide).
INFO
– Enters or exits ‘Information’ window (not
available in Time-shift recording and
playback mode).
Remote Control (continued)

12
English
Using the remote control
A Open the battery compartment.
B Insert two batteries type R03 or AAA,
following the indications (+-) inside
the compartment.
C Close the cover.
D Point the remote control directly at the
remote sensor (iR) on the front panel.
E Then select the desired function (for
example , ).
Using the alphanumeric keypad to
enter the characters
– Press a number button repeatedly until
the required character or the number
appears.
– To enter a space, press button {0}.
CAUTION!
– Remove batteries if they are
exhausted or if the remote control
is not to be used for a long time.
– Never mix batteries (old and new
or carbon and alkaline, etc.).
– Batteries contain chemical
substances, they should be disposed
of properly.
Remote Control (continued)

13
English
Basic Connections
L
R
DIGITAL ANTENNA
RS-232
AUDIO OUTPUTVIDEO OUTPUT
COMPONENT
S-VIDEO
CVBS
PCM / DOLBY DIGITAL
COAXIAL
Manufactured under license from
Dobly Laboratories. “Dolby” and
the double-D symbol are
trademarks of Dolby Laboratories.
OPTICAL
ANALOG
HDMI
Y
L
R
P
b
Pr
1 2
RF IN RF IN
RF OUTTO TV
LOOP
TH
ROUGH
2
4
3
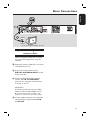
Step 1: Connecting the
antenna cables
These connections enable you to watch
and record TV programmes using this
recorder.
A Unplug the antenna cable that is currently
connected to your TV.
B Plug in the antenna cable into the
DIGITAL ANTENNA INPUT socket
on the recorder.
C Use the supplied RF antenna cable to
connect the TO TV ANTENNA
socket on this recorder to the Antenna
In socket on the TV.
Helpful Hints :
Use the best quality AV connectors (CVBS/
S-Video/Component Video/HDMI), not the
RF connections from this recorder to the
television, to achieve the best video quality.
D Use the supplied antenna interconnected
cable to loop through between RF IN
and RF OUT.
Set up for integrated Digital TV only

14
English
L
R
DIGITAL ANTENNA
RS-232
AUDIO OUTPUTVIDEO OUTPUT
COMPONENT
S-VIDEO
CVBS
PCM / DOLBY DIGITAL
COAXIAL
Manufactured under license from
Dobly Laboratories. “Dolby” and
the double-D symbol are
trademarks of Dolby Laboratories.
OPTICAL
ANALOG
HDMI
Y
L
R
P
b
Pr
1 2
RF IN RF IN
RF OUTTO TV
LOOP THROUGH
Basic Connections (continued)
Step 2: Connecting the video
cable
This connection enables you to view the
playback from this recorder. You only
need to choose one of the options below
to make your video connection.
– For a standard TV, follow option 1, 2
or 3.
– For a HDMI TV, follow option 4.
Option 1: Using the Video (CVBS)
socket
Use a composite video cable (yellow) to
connect the VIDEO OUTPUT -
CVBS socket on the recorder to the
video input socket (or labelled as A/V In,
Video In, Composite or Baseband) on the
TV.
– Audio connection is required in order
to hear the sound, see page 15.
Option 2: Using the S-Video socket
Use an S-video cable (not supplied) to
connect the S-VIDEO socket on the
recorder to the S-Video input socket (or
labelled as Y/C or S-VHS) on the TV.
– Audio connection is required in order
to hear the sound, see page 15.
Option 3: Using the COMPONENT
Y P
B
P
R
sockets
Use the component video cables (red/
blue/green) to connect the VIDEO
OUTPUT-COMPONENT - Y P
B
P
R
sockets on the recorder to the
corresponding component video input
sockets (or labelled as Y P
b
/C
b
P
r
/C
r
or
YUV) on the TV.
– Audio connection is required in order
to hear the sound, see page 15.
Option 1
Option 2
Option 3

15
English
Basic Connections (continued)
L
R
DIGITAL ANTENNA
RS-232
AUDIO OUTPUTVIDEO OUTPUT
COMPONENT
S-VIDEO
CVBS
PCM / DOLBY DIGITAL
COAXIAL
Manufactured under license from
Dobly Laboratories. “Dolby” and
the double-D symbol are
trademarks of Dolby Laboratories.
OPTICAL
ANALOG
HDMI
Y
L
R
P
b
Pr
1 2
RF IN RF IN
RF OUTTO TV
LOOP THROUGH
L
R
DIGITAL ANTENNA
RS-232
AUDIO OUTPUTVIDEO OUTPUT
COMPONENT
S-VIDEO
CVBS
PCM / DOLBY DIGITAL
COAXIAL
Manufactured under license from
Dobly Laboratories. “Dolby” and
the double-D symbol are
trademarks of Dolby Laboratories.
OPTICAL
ANALOG
HDMI
Y
L
R
P
b
Pr
1 2
RF IN RF IN
RF OUTTO TV
LOOP
THROUGH
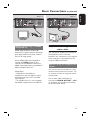
Step 3: Connecting the
audio cables
This connection enables you to listen to
the playback from this recorder.
However, this connection is not required
if this recorder is connected to the TV
using the HDMI connectors.
Option 1: Using the analogue audio
sockets
You can connect the recorder to a two
channel stereo system (mini system, TV)
or receiver in order to enjoy the stereo
sound system.
Use an audio cable (red/white) to
connect the AUDIO OUTPUT - L/R 1
or 2 sockets to the audio input sockets
of the connected device.
Option 4: Connecting to a HDMI
compatible TV
HDMI (High De nition Multimedia
Interface) is a digital interface that allows
pure digital video transmission without
the loss of image quality.
Use an HDMI cable (not supplied) to
connect the HDMI socket on this
recorder to the HDMI IN socket on a
HDMI compatible device (e.g. HDMI TV,
HDCP compliant DVI TV).
Helpful Hints:
– Digital devices from different
manufacturers may have different output
standards which may result in unreliable
signal transfers.
– The HDMI connector is only compatible
with HDMI compliant devices and DVI-TV.
Option 4 Option 1

16
English
Basic Connections (continued)
RS-232
D
IO OUTPUT
C
M / DOLBY DIGITAL
COAXIAL
Manufactured under license from
Dobly Laboratories. “Dolby” and
the double-D symbol are
trademarks of Dolby Laboratories.
OPTICAL
A
NALOG
HDMI
OR
1
2
Option 2: Using the digital audio
socket (COAXIAL or OPTICAL)
You can connect the recorder to an AV
ampli er/receiver in order to enjoy
multichannel surround sound.
Use a coaxial cable (not supplied) to
connect the COAXIAL socket to the
digital coaxial input socket (or labelled as
COAXIAL IN or DIGITAL IN) of the
connected device.
– an A/V receiver or ampli er with a
digital multi-channel sound decoder.
– a receiver with two-channel digital
stereo (PCM).
OR
Use an optical bre-optic cable (not
supplied) to connect the OPTICAL
socket to the optical input socket of the
connected device.
– Make sure that both plugs are fully
inserted (until a click is heard).
Step 4: Connecting the
mains lead
Connect the supplied mains lead to the
AC IN terminal of the recorder. Then
plug the recorder into the mains. After
you connect the mains lead, you must
wait for a short while before
operating the recorder. You can
operate the recorder once the front
panel display lights up and the recorder
enters standby mode.
AV ampli er/receiver
to mains
to AC IN
Option 2

17
English
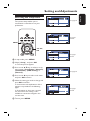
Guide to Displays
The { Main Menu } provides entries to
all of the recorder’s main functions.
Main Menu
A Press MENU on the remote control.
> { Main Menu } appears.
B Press cursor v V keys to select an
option and press OK to enter.
Getting Started
{ Setup }
Displays { Setup } for setting up the
recorder to suit your preferences.
Sub-menu
The sub-menu appears when you select
an item from a list menu (e.g., { HDD
List }), and press OK. The sub-menu
displays options applicable only to the
selected item. (The displayed options
differ depending on the situation.)
Select an option by pressing cursor v V
keys and press OK.
{ HDD List }
Displays the list of the recorded titles,
including the recording information,
which allows you to select a title to play.
{ Guide }
Displays { Electronic Program Guide },
which allows you to watch or record a
programme.
{ Timer List }
Displays { Timer Recording }, which
allows you to set the timer manually.
{ Quick Setup }
Displays { Quick Setup }, which allows
you to make initial settings in the
following order:
Setting time zone
Channel search
mode City Scan channel

18
English
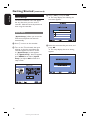
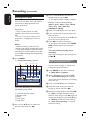
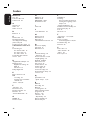
Getting Started (continued)
Quick Setup
Select channel search mode.
Quick Channel Search
Auto Channel Search
ENTEREXIT
Back Select OK
Follow the
g
uide to make initial
Initial Setup
The basic installation menu will appear
the very rst time you turn on the
recorder. Make the basic adjustment to
start using the recorder.
Quick Setup
{ Quick Setup } allows you to set the
time zone and preset the channels
automatically.
A Press 1 to turn on the recorder.
B Turn on the TV and switch the input
selector so that the signal from the
recorder appears on the TV screen.
{ Quick Setup } menu appears.
If { Quick Setup } does not appear,
press MENU, then select { Quick
Setup } and press OK to enter the
setup screen.
C Select { YES }, and press OK.
The setup display for selecting the
time zone appears.
D Select the time zone for your area, and
press OK.
The setup display for tuner setting
appears.

19
English
Getting Started (continued)
E Select the tuning method, and press OK.
If you select { Quick Channel Search },
select your city and press OK.
The recorder automatically starts
searching for all of the receivable
channels and presets them.
Other option:
{ Auto Channel Search }
Presets all receivable channels. For
details, see page 34.
F Press OK when { Finish } appears.
{ Quick Setup } is completed.
To return to the previous step
Press BACK.
To select the picture size according
to your TV
Set { TV Shape } in { Video/Audio }
menu (page 36).
To select the type of video signals
output from the HDMI OUT or
COMPONENT VIDEO OUT
sockets
Set { Video Format } in { Video/
Audio } menu (page 36).
To select the audio output method
from the DIGITAL AUDIO OUT
socket
Set {
Digital Audio Output } in { Video/
Audio } menu (page 37).
Helpful Hint:
− If you want to run { Quick Setup } again,
press MENU, then select { Quick Setup }
and press OK.
Note about the clock setting:
This recorder automatically adjusts its
clock according to the time signals from
the broadcaster in the area selected in
step 4 above, or { Time Zone } in the
{ Installation } menu. You do not need
to, (and cannot manually) adjust the clock
for Day Light Savings Time, and these are
the ONLY settings that affect the clock.
Since the clock entirely depends on the
broadcaster sending the correct time
signals, if { Time Zone } in
{ Installation } menu Setup is correct
and yet the clock is wrong, it is not a
malfunction.

20
English
Watching TV
No. Channel Name
Program List
Select
0021
0022
0200
0201
0007
0070
0020
ABC2
ABC TV
ABC DIG Radio
ABC DIG Jazz
7 Digital
7 HD Digital
ABC HDTV
ENTER
OK
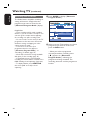
E Enter your four-digit password using the
alphanumeric keypad.
If you have not yet set a password,
enter ‘0000’ (default). To set or change
the password, see page 35.
A list of all receivable channels appears.
F Select the channel you want to add to
your Favourite List, and press the
Yellow button.
{ y } appears next to the selected
channel.
G
To cancel the selection, select the
channel and press the Yellow button.
{ y } disappears.
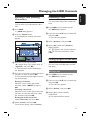
View your Favourite List
A Press FAVORITE.
{ Favourite List } appears.
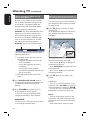
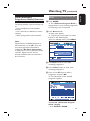
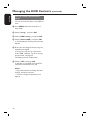
Selecting a channel from the
Channel List
The Channel List display allows you to
select a channel from a scrollable list of
all available TV channels.
A Press CH LIST.
The scrollable channel list appears.
B Press cursor v V keys to select the
channel you want to watch and press OK.
Selecting a channel from the
Favourite List
You can list your favourite TV channel,
and select the channel from the list
display.
Making your own Favourite List
You can create one Favourite List.
A Press MENU.
{ Main Menu } appears.
B Select { Setup }, and press OK.
{ Setup } appears.
C Select { Channel } and press OK.
D Select { Channel Edit } and press OK.
The display for entering the password
appears.
B Press cursor v V keys to select the
channel you want to watch, and press
OK.
To select a channel not on the
{ Favourite List }, press FAVORITE
to turn off the list, and press CH LIST
to select the channel from { Channel
List }.
After step 2, the P +/– buttons select
only the channels on { Favourite List }.
To return the button’s status, press CH
LIST to display { Channel List }, then
select a channel and press OK.
Page is loading ...
Page is loading ...
Page is loading ...
Page is loading ...
Page is loading ...
Page is loading ...
Page is loading ...
Page is loading ...
Page is loading ...
Page is loading ...
Page is loading ...
Page is loading ...
Page is loading ...
Page is loading ...
Page is loading ...
Page is loading ...
Page is loading ...
Page is loading ...
Page is loading ...
Page is loading ...
Page is loading ...
Page is loading ...
Page is loading ...
-
 1
1
-
 2
2
-
 3
3
-
 4
4
-
 5
5
-
 6
6
-
 7
7
-
 8
8
-
 9
9
-
 10
10
-
 11
11
-
 12
12
-
 13
13
-
 14
14
-
 15
15
-
 16
16
-
 17
17
-
 18
18
-
 19
19
-
 20
20
-
 21
21
-
 22
22
-
 23
23
-
 24
24
-
 25
25
-
 26
26
-
 27
27
-
 28
28
-
 29
29
-
 30
30
-
 31
31
-
 32
32
-
 33
33
-
 34
34
-
 35
35
-
 36
36
-
 37
37
-
 38
38
-
 39
39
-
 40
40
-
 41
41
-
 42
42
-
 43
43


Philips DVR5100 HDMI 1080i Digital Video Recorder User manual
- Category
- DVD players
- Type
- User manual
- This manual is also suitable for
Ask a question and I''ll find the answer in the document
Finding information in a document is now easier with AI
Related papers
-
Philips DVDR7300H/75 Quick start guide
-
Philips DVR5100/75 Quick start guide
-
Philips DVDR9000H/75 Owner's manual
-
-
-
Philips DVDR5570H/05B User manual
-
-
-
Philips DVDR9000H/10 User manual
-

