Page is loading ...

© 2015 ZOOM CORPORATION
Copying or reprinting this manual in part or in whole without
permission is prohibited.
Operation Manual
USB 3.0

02
Contents/Introduction
Contents
Introduction ...................................................................................... 02
Usage and Safety Precautions ........................................................ 03
Names of Parts ................................................................................. 04
Basic Connections ............................................................................ 06
Installing the Driver ......................................................................... 07
Turning the Power On and Off ........................................................ 08
Independent mic preamp function (standalone mode) ................ 10
iPad connection (class compliant mode) ....................................... 11
Setting Input and Output Devices ................................................... 12
Playback ............................................................................................ 13
Recording.......................................................................................... 14
Using Digital Audio Equipment ...................................................... 16
About Digital Audio Clock ............................................................ 16
Connecting S/PDIF Devices ........................................................ 16
Connecting ADAT Optical Devices .............................................. 18
Connecting the WORD CLOCK Connectors ............................... 20
Connecting MIDI Devices ........................................................... 22
Restoring Factory Default Settings ................................................. 23
Troubleshooting ............................................................................... 24
Specifications ................................................................................... 25
Introduction
Thank you very much for purchasing a ZOOM USB 3.0
Audio Converter.
The has the following features.
18-in/20-out USB3.0 Audio Converter
The is an audio converter with a SuperSpeed USB3.0
interface.
In addition to supporting Windows and Mac, using class compliant
mode it can also be connected to an iPad. Since it also supports
recording and playback at up to 24-bit/192kHz, it can also be used
for the playback of high-resolution sound sources delivered with
superior audio quality over the Internet.
Attention to audio performance
An asynchronous transfer system that is not impacted by computer
jitter is used. The latest AD/DA converter, which supports 192 kHz, is
used. So, the entire system reproduces the original audio faithfully.
Built-in high-performance mic preamps
The high-performance mic preamps are based on those developed
for our H Series. Hi-Z input is supported. The gain can be raised by
up to 60 dB, and +48V phantom power can be supplied.
Flexible built-in mixer and dedicated mixer
application
The has a built-in mixer that allows you to freely route up
to 20 output channels from among the 18 input channels and 20
computer playback channels. By using the application
designed for this interface, you can make settings for the built-in
mixer and monitoring effects from a computer.
For details about , see the ZOOM website (http://www.
zoom.co.jp/downloads/).
Please read this manual carefully to fully understand the functions
of the so that you can make the most of it for many years.
After reading this manual, please keep it with the warranty in a safe
place.

03
Usage and Safety Precautions
Usage and Safety Precautions
Safety Precautions
In this operation manual, symbols
are used to highlight warnings and
cauti o ns tha t you must r e ad to
prevent accidents. The meanings of
these symbols are as follows.
Warning
Something that could cause
serious injury or death
Caution
Something that could cause
injury or damage to the
equipment
Other symbols used
An action that is mandatory
An action that is prohibited
Warning
Warning
Alterations
Do not open the case or modify the
product.
Operation using an AC adapter
Never use any AC adapter other
than a ZOOM AD-19.
Always hold the AC adapter itself
when disconnecting it from an
outlet.
Warning
Caution
Product handling
D o no t d r o p , b u m p o r ap p l y
excessive force to the unit.
Be careful not to allow foreign
objects or liquids to enter the unit.
Operating environment
Do not use in extremely high or low
temperatures.
Do not use near heaters, stoves and
other heat sources.
Do not use in very high humidity
or where it could be splashed by
water.
Do not use in places with frequent
vibrations.
Do not use in places with much
dust or sand.
Connection cables and input/
output jacks
Always turn the power OFF for all
equipment before connecting any
cables.
Always disconnect all connection
cables and the AC adapter before
moving the unit.
Volume
Do not use at a loud volume for a
long time.
Usage Precautions
Interference with other electrical
equipment
In consideration of safety, the
has been designed to minimize its
emission of electromagnetic waves and
to suppress interference from external
electroma gnetic waves. H owever,
equipment that is very susceptible to
interference or that emits powerful
electromagnetic waves could result
in interference if placed nearby. If this
occurs, place the
and the other
device farther apart.
With any type of electronic device
that uses digital control, including the
, electromagnetic interference
could cause malfu n ction, corrupt
or destroy data and result in other
un exp e c t ed t r o u bl e . Always use
caution.
Rack mounting
If you are unable to mount the
in the rack you are using, remove the
rubber feet from its bottom panel.
Cleaning
Use a soft cloth to clean the exterior of
the unit if it becomes dirty. If necessary,
use a damp cloth that has been wrung
out well to wipe it.
Never use abrasive cleansers, wax or
solvents such as alcohol, benzene or
paint thinner.
Temperature considerations
Continuous use of this interface for
long periods of time, for example,
might cause it to become warm. This is
normal as long as it does not become
too hot to touch.
Breakdown and malfunction
If the should mal func tion
or operate abnormally, disconnect
it immediat ely. Cont act the st ore
where you bought the unit or ZOOM
service with the following information:
product model, serial number and
specific symptoms of breakdown or
malfunction, along with your name,
address and telephone number.
Copyrights
t8JOEPXT
®
is a registered trademark
of Microsoft
®
Corporation.
t.BD
®
, iPad
®
an d Li ghtning™ are
trademarks or registered trademarks
of Apple Inc.
t" % " 5 BOE "%"5 0QUJDBM BSF
trademarks of inMusic Brands Inc. in
the US and other countries.
t.*%* JT B SFHJTUFSFE USBEFNBSL PG
Association of Musical Electronics
Industry (AMEI).
t0UIFS QSPEVDU OBNFT SFHJTUFSFE
trademarks and company names in
this document are the property of
their respective companies.
Note: All trademarks and registered trademarks in
this document are for identification purposes only and
are not intended to infringe on the copyrights of their
respective owners.
Recording for any purpose other than personal use from
copyrighted sources, including CDs, records, tapes, live
performances, video works and broadcasts, without
permission of the copyright holder is prohibited by law.
Zoom Corporation will not assume any responsibility
related to infringements of copyrights.

04
Names of Parts
Names of Parts
Front Panel
INPUT jacks
These analog signal input jacks have mic preamps.
You can connect mics, keyboards and guitars to them.
These can be used with both XLR and 1/4-inch
(balanced or unbalanced) phone plugs.
CLOCK SOURCE
indicators
These show the clock source
that is being used: ADAT,
S/PDIF, WORD CLOCK or
INTERNAL.
Level indicators
The LED lights red when the
signal clips.
Input gain knobs
Use to adjust the input gain of
the mic preamp.
Power indicator
This lights when the is
turned on.
PHONES 1 and 2 volume knobs
Use these to adjust the
headphone volumes of the
PHONES 1 and 2 jacks.
MAIN OUTPUT level knob
Use to adjust the volume of
the audio signal output from
the MAIN OUTPUT jacks.
PHONES 1 and 2 jacks
Connect headphones to these.
Hi-Z switches
Use to switch the input
impedances of inputs 1 and 2.
Turn them on when connecting a
guitar or bass guitar.
PHANTOM switches
Set these to on to supply
phantom power to inputs 1–4 and
5–8.
12
3
XLR TRS
1 GND
2 HOT
3 COLD
TIP HOT
RING COLD
SLEEVE GND
Standalone mode (→P. 10)
The will function as an eight-channel mic preamp and digital input/
output device in standalone mode if its power is turned on when it is not
connected to a computer.
When used in standalone mode, operation is set in advance using the
mixer application.
Inputs 1 to 8

05
Names of Parts
Rear Panel
POWER switch
Turns the
ON/OFF.
DC 12V AC adapter
connector
Connect the included
AC adapter here.
USB 3.0 port
Connect a computer or
iPad here.
CLASS
COMPLIANT
MODE switch
Use to turn Class
Compliant Mode
ON/OFF.
Use when
connecting an iPad.
(
→
P. 11)
LINE OUTPUT jacks
Connect monitors for
multichannel monitoring or
external effects.
These support balanced
output with 1/4-inch phone
plugs.
MAIN OUTPUT jacks
Connect speakers with built-
in amplifiers or an amplifier
and speaker system.
These support balanced
output with 1/4-inch phone
plugs.
S/PDIF IN/OUT jacks
Connect coaxial cables
that comply with the S/
PDIF standard.
Two channels of digital
audio signals in S/PDIF
format can be sent and
received at resolutions up
to 24-bit/192kHz .
WORD CLOCK
IN/OUT connectors
Use these to send and
receive word clock
signals between the
and other
devices.
MIDI IN/OUT jacks
Connect a MIDI keyboard or
MIDI controller to the MIDI IN
jack.
Connected MIDI sound module
or other device to the MIDI
OUT jack.
ADAT OPTICAL IN/OUT jacks
Connect optical cables that comply with
the ADAT Optical standard.
These can send and receive digital audio
signals in ADAT, SMUX and SMUX4
formats.
Sampling rates and inputs/outputs
Sampling rate
Analog inputs/
outputs
S/PDIF inputs/
outputs
ADAT inputs/
outputs
Total inputs/
outputs
44.1 or 48kHz 8/10 2/2 8/8 18/20
88,2 or 96kHz 8/10 2/2 4/4 14/16
176.4 or 192kHz 8/10 2/2 2/2 12/14
*Except when in Class Compliant Mode. (→ P. 11)
NOTE
When shipped new from the factory, the AD/DA converter upsampling
function is enabled. This will cause operation with a 4x sampling
rate when the sampling rate is 44.1/48 kHz. See the
Reference Guide to disable it.
Upsampling
When the original sampling rate is 44.1 kHz or 48 kHz, internal
processing can allow operation at 176.4 kHz or 192 kHz (enabled
when shipped new from the factory). This eliminates aliasing noise
from the sound during A/D conversion and makes the sound with D/
A conversion even clearer than before.

06
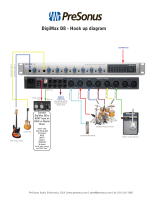
Basic Connections
Computer
DAT deck
Synthesizer
Drum set
Bass guitar
Guitar amp
Monitor speakers
Monitor speakers
Headphones
Mic preamp that supports
ADAT optical connection
Master clock
generator
Basic Connections

07
Installing the Driver
Installing the Driver
1.
Download the "ZOOM UAC-8 Driver" from http://www.
zoom.co.jp/downloads/ to the computer.
NOTE
t:PVDBOEPXOMPBEUIFMBUFTU ;00.6"$%SJWFSGSPNUIF
above website.
t%PXOMPBE UIFESJWFS GPS UIFPQFSBUJOH TZTUFN UIBUZPV BSF
using.
NOTE
Do not connect the
until installation completes.
2.
Launch the installer and install the driver.
Follow the instructions that appear on screen to install the ZOOM
UAC-8 Driver.
NOTE
t4FF UIF*OTUBMMBUJPO (VJEFJODMVEFEJO UIF ESJWFSQBDLBHF GPS
detailed installation procedures.

08
Turning the Power On and Off
Turning the Power On
1.
Minimize the volume of output devices connected to
the
.
2.
Pl ug the AD-19 adap ter
designed for this unit into
an outlet.
3.
Set to OFF.
NOTE
Connection to a computer is not possible when the CLASS
COMPLIANT MODE switch is set to ON.
4.
Use a USB cable to connect the and the
computer.
NOTE
Although also compatible with USB 2.0, connection using USB
3.0 enables operation with even higher performance.
5.
Set to ON.
NOTE
If the driver is not installed on the connected computer, the
will not be recognized. (→P.7)
Turning the Power On and Off

09
Turning the Power On and Off
6.
Confirm that the power indicator is lit.
NOTE
startup and connection with the computer takes time,
and the power indicator might blink longer sometimes.
If it continues to blink even after waiting some time, try turning
the power off and on again.
Turning the Power Off
1.
Minimize the volume of devices connected to the
.
2.
Turn off connected amps and monitor speakers, for
example.
3.
Set to OFF.

10
Independent mic preamp function
Independent mic preamp function (standalone mode)
1.
Minimize the volume of output devices connected to
the
.
2.
Pl ug the AD-19 adap ter
designed for this unit into
an outlet.
3.
Disconnect the USB cable.
NOTE
The
detects the USB connection status and switches
the mode automatically as follows.
· When connected to a computer:
→ The will function as an audio interface. (→ P.08)
· When not connected to a computer:
→ The will function in standalone mode.
4.
Set to ON
In st a n da lo n e mod e, th e u ni t
operates by itself according to the
settings made in .
5.
Confirm that the power indicator is lit.
HINT
In standalone mode, the power will automatically turn off after
10 hours. If you want the power to always stay on, set the
power management function to OFF (refer to
the software reference guide).

11
iPad connection
iPad connection (class compliant mode)
1.
Minimize the volume of output devices connected to
the
.
2.
Pl ug the AD-19 adap ter
designed for this unit into
an outlet.
3.
Set to ON.
NOTE
· Connection to an iPad is not possible when the CLASS
COMPLIANT MODE switch is set to OFF.
· Turn the power OFF before changing the CLASS COMPLIANT
MODE switch setting. If the power is already ON, changing
the CLASS COMPLIANT MODE switch will have no effect.
4.
Connect the and the iPad using an Apple iPad
Camera Connection Kit or Lightning to USB Camera
Adapter.
5.
Set to ON.
6.
Confirm that the power indicator is lit.
NOTE
When in Class Compliant Mode, the 8 ANALOG input and 10
ANALOG output channels are available.

12
Setting Input and Output Devices
Setting Input and Output Devices
1.
Select the as the computer sound device.
NOTE
t4FF UIF*OTUBMMBUJPO (VJEFJODMVEFEJO UIF ESJWFSQBDLBHF GPS
procedures to set the sound device in different operating
systems.
2.
Select the as the audio input and output
device in the DAW software.
The inputs correspond to the ports as follows.
NOTE
Yo u c a n u s e
to route output signals to output
jacks freely.
For details, see the Reference Guide.
HINT
See the owner's manual for the DAW software that you are
using for instructions about how to set the input and output
devices.
Input device
Device name Port name Corresponding input
ZOOM UAC-8 1 INPUT1
2 INPUT2
3 INPUT3
4 INPUT4
5 INPUT5
6 INPUT6
7 INPUT7
8 INPUT8
9 S/PDIF L
10 S/PDIF R
11 ADAT1
12 ADAT2
13 ADAT3
14 ADAT4
15 ADAT5
16 ADAT6
17 ADAT7
18 ADAT8
NOTE
Settings must be made in DAW software to use the
with it for recording and playback.

13
Adjusting Headphone and Speaker Volume
Playback
Adjusting Headphone and Speaker Volume
Adjusting Headphone Volume
1.
Connect headphones to PHONES 1 or PHONES 2.
Headphones
2.
Turn the for PHONES 1 or PHONES 2 to adjust the
headphone volume.
NOTE
t5IF TBNFTJHOBMT BSF PVUQVU GSPN 1)0/&4BT UIF."*/
OUTPUT jacks.
t'PS1)0/&4ZPV DBO VTF
to set the output
signal to MAIN OUTPUT or LINE OUTPUT 1/2, 3/4, 5/6 or 7/8. By
default, the same signals are output as the MAIN OUTPUT jacks.
For details, see the Reference Guide.
Adjusting Speaker Volume
1.
Connect monitor speakers to the MAIN OUTPUT jacks.
Monitor speakers
2.
Turn the to adjust the speaker volume.
NOTE
The OUTPUT volume only affects the MAIN OUTPUT. Use
to adjust other output volumes.
For details, see the Reference Guide.

14
Using Instruments and Mics
Recording
Using Instruments and Mics
Connecting Instruments
Connect instruments to INPUTS 1 to 8 using TRS/mono
phone cables.
Bass guitar
(TRS phone cable)
(mono phone cable)
Keyboard
Guitar
NOTE
Using the Hi-Z function
t8IFOVTJOH BQBTTJWFHVJUBSPSCBTT HVJUBS DPOOFDU
it to INPUT 1 or 2, and push that input's
button so
that it lights.
t8IFODPOOFDUJOH BLFZCPBSEPSPUIFS JOTUSVNFOUUP
INPUT 1 or 2, press its so that it becomes unlit.
Connecting Mics
Using XLR cables, connect mics to INPUTS 1 to 8.
Dynamic mic
(XLR cable)
NOTE
Using Phantom Power
t5PVTFBDPOEFOTFSNJDQSFTT
for the
connected INPUT so that it lights. Phantom
power is supplied when this switch is lit.
t8IFO UIF DPSSFTQPOEJOH TXJUDI JT MJU
phantom power is supplied to INPUTS 1–4
or INPUTS 5–8 at the same time.
t5P VTF EZOBNJD NJDT BOE DPOEFOTFS
mics at the same time, consider the use of phantom power when
connecting them to the inputs.
Dynamic mics Condenser mics
Condenser mic
(XLR cable)

15
Using Instruments and Mics
Recording
1.
Check to see the status of an input signal.
Lit green: Input signal present.
Lit red: Input signal is clipping.
2.
Turn to adjust the input gain.
HINT
Set it so that the level indicator does not light red.
Adjusting the Input Gain
You can adjust the gain of each INPUT.

16
Using Digital Audio Equipment
Using Digital Audio Equipment
About Digital Audio Clock
When the is connected to other digit al aud io
equipment, audio clock must be synchronized in order to transfer
audio data between them. If they are not synchronized, noise
and various other problems will occur.
To synchronize audio clock, one device must operate as the
master, which sets the reference clock, and the other must
operate as a slave.
Audio clock
Reference
clock
Synchronized
clock
Master
Slave
Digital device
The is operating as the master, and the audio clock of the
and the other digital device are synchronized.
Connecting S/PDIF Devices
1.
Minimize the volume of output devices connected to
the
.
HINT
When connected, noise might occur until clock synchronizes.
2.
Set the same sampling rates for the and the
connected device.
NOTE
For instructions about how to change the sampling rate of the
, see the Reference Guide.

17
Using Digital Audio Equipment
►Inputting an S/PDIF signal to the
3.
Use to set CLOCK SOURCE to S/PDIF.
T h e S / P D I F C L O C K S OU RC E
indicator will blink.
4.
Connect the S/PDIF device to the S/PDIF IN jack.
S/PDIF OUT jack
S/PDIF IN jack
S/PDIF device
(output)
(input)
5.
The S/PDIF CLOCK SOURCE indicator will
light, confirming synchronization.
►Outputting a S/PDIF signal from the
3.
Use t o s e t C LO C K S O U R C E t o
INTERNAL.
The INTERNAL CLOCK SOURCE
indicator will blink.
4.
Connect the S/PDIF device to the S/PDIF OUT jack.
S/PDIF IN jack
S/PDIF OUT jack
S/PDIF device
(input)
(output)
NOTE
t5P TZODISPOJ[F BVEJPDMPDLUIF
and the connected
device must have the same sampling rate settings.
t8IFOVTJOHBO41%*'EFWJDFXJUIBXPSEDMPDLGVODUJPOZPVDBO
connect the WORD CLOCK OUT connector to the S/PDIF
device word clock input connector and synchronize them. (→P. 2 0 )
t*G$-0$,4063$&JTTFUUP41%*'CVUTZODISPOJ[BUJPOXJUIBO
S/PDIF device is not possible, the CLOCK SOURCE indicator will
blink. In this case, the will operate using its internal clock.

18
Using Digital Audio Equipment
Connecting ADAT Optical Devices
1.
Minimize the volume of output devices connected to
the
.
HINT
When connected, noise might occur until clock synchronizes.
2.
Set the same sampling rates for the and the
connected device.
NOTE
For instructions about how to change the sampling rate of the
, see the Reference Guide.
►Inputting an ADAT optical signal to the
3.
Use to set CLOCK SOURCE to ADAT.
The ADAT CLOCK SOURCE indicator
will blink.
4.
Connect the ADAT optical device to the ADAT OPTICAL
IN jack.
ADAT OPTICAL OUT jack
ADAT OPTICAL IN jack
ADAT OPTICAL
device (output)
(input)
5.
The ADAT CLOCK SOURCE indicator will
light, confirming synchronization.
Using Digital Audio Equipment (continued)

19
Using Digital Audio Equipment
►Outputting an ADAT Optical signal from the
3.
Use t o s e t C LO C K S O U R C E t o
INTERNAL.
The INTERNAL CLOCK SOURCE
indicator will blink.
4.
Connect the ADAT Optical device to the ADAT OPTICAL
OUT jack.
ADAT OPTICAL OUT jack
ADAT OPTICAL IN jack
ADAT OPTICAL
device (input)
(output)
NOTE
t5PTZODISPOJ[FBVEJPDMPDLUIF
and the connected
device must have the same sampling rate settings.
t8IFO VTJOH BO "%"5 0QUJDBM EFWJDF XJUI B XPSE DMPDL
function, you can connect the WORD CLOCK OUT
connector to the ADAT Optical device word clock input
connector and synchronize them. (→P.20)
t*G $-0$,4063$&JTTFUUP"%"5 CVUTZODISPOJ[BUJPOXJUI
an ADAT Optical device is not possible, the CLOCK SOURCE
indicator will blink. In this case, the will operate using
its internal clock.

20
Using Digital Audio Equipment
Using Digital Audio Equipment (continued)
Connecting the WORD CLOCK Connectors
Use the WORD CL OCK connector s when you want to
synchronize with a master clock generator, for example.
1.
Minimize the volume of output devices connected to
the
.
HINT
When connected, noise might occur until clock synchronizes.
2.
Set the same sampling rates for the and the
connected device.
NOTE
For instructions about how to change the sampling rate of the
, see the Reference Guide.
►Using the connected device as the master clock
3.
Use to set CLOCK SOURCE to WORD
CLOCK.
The WORD CLOCK CLOCK SOURCE
indicator will blink.
4.
Connect the other device to the WORD CLOCK IN
connector.
WORD CLOCK OUT connector
WORD CLOCK IN connector
Master clock
generator, etc.
(master)
(slave)
5.
The WORD CLOCK CLOCK SOURCE indicator
will light, confirming synchronization.
/