Page is loading ...

Series 322 Ice Cube Machine Installation Instructions
© 2004-2007, IMI Cornelius Inc. - 1 - Publication Number: 166240006INS
INSTALLATION MANUAL
Series 322 Ice Cube Machine
SPECIFICATIONS
UNPACKING
1. Uncrate machine and/or bin by removing the staples from around the bottom of cardboard crate and
lift off.
2. Remove bolts fastening the crate skid to the bottom of the unit. If auxiliary legs have been
purchased for the bin, they should be installed at this time.
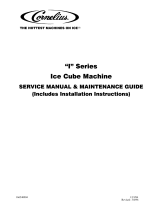
FIGURE 1
Net weight 122 lbs.
Shipping weight 138 lbs.
Compressor Copeland 4170 BTU/Hr.
Refrigerant R404A
Electrical
Freeze cycle amps draw 15.0
Time delay fuse retains (amps) 20.0
Minimum circuit ampacity (amps) 20.0
Power supply (single phase) 115V/60 Hz
Plumbing connections
Inlet water supply Max. pressure 50 PSI 3/8” SAE MFL Ftg
Bin drain Through bin
Waste water (from water-cooled models) Two 3/8” SAE MFL fittings
Pump out drain connection 1/2” ID tubing
Air In
15.00
C
A
6 ft electrical
cord
14.75
2.00
1.00
22.00
5.00
23.50
21.00
7.00
16.38
11.25
5.00
23.50
2.25
2.75
.75
Front
Opening
22.00
F
E
B
A. Water inlet
B. Pump out drain
C. Electrical connection
D. Condensate drain
E. Condenser (water out) (W/C only)
F. Condenser (water in) (W/C only)
Note: Must use 20 amp receptacle
D
Release Date: February
www.cornelius.com Revision: A

Series 322 Ice Cube Machine Installation Instructions
Publication Number: 166240006INS - 2 - © 2004-2007, IMI Cornelius Inc.
LEVELING
If legs are used, adjust the leveling legs of the storage bin until the unit is level and all four (4) legs are in
sold contact with the floor. Leveling is very important to obtain proper draining and to maintain the proper
level in the water pump pan of the ice cuber.
Note: If the bin is to be installed flush to the floor, the bin must be sealed to floor with an approved mastic
such as Dow R.T.V. #732, 734, or G.E. #102, 108. This is an N.S.F. requirement and is the responsibility
of the installer.
UNIT LOCATION
1. Allow at least a minimum of six inches at the rear and side of the ice machine for proper air RHP
circulation.
2. This unit has been designed to be installed in an indoor location which is clean and which can be
adequately ventilated. The air and water temperatures should never exceed 100°F or fall below
50°F. (Temperatures above 100°F will cut the ice making capacity below an economical level.
Temperatures below 50°F will cause a malfunction of thermostatic sensors.)
3. The unit should be located where air circulation is not restricted. The unit should not be located
near a kitchen grill. Air which contains grease vapors will deposit grease on the condenser. The
condenser should always be kept clean.
FIGURE 2

Series 322 Ice Cube Machine Installation Instructions
© 2004-2007, IMI Cornelius Inc. - 3 - Publication Number: 166240006INS
UNIT SET-UP
1. Take off front panel of machine and remove hardware bag and service manual envelope.
2. Mount the ice maker to the top of the ice storage bin or adapter in the proper position over the ice
drop opening. The ice maker must then be sealed both on the outside and the inside bottom edges
with an approved N.S.F. mastic such as Dow R.T.V. #732, 734, or G.E. R.T.V. #102, 108. This is an
N.S.F. requirement and the responsibility of the installer.
3. Remove shipping tape from evaporator curtains.
MAKE ELECTRICAL POWER SUPPLY CONNECTION
Requirements: 115V/60 Hz 1 ph., 230V/60 Hz. 1 ph., or 220V/50 Hz. 1 ph when used.
Refer to serial plate for minimum circuit ampacity and maximum time delay fuse size.
All wiring must conform to national and local electrical codes.
MAKE PLUMBING CONNECTIONS
Water supply – (install per local codes) (see Figure 4).
The water inlet connection to the unit is a 3/8” male flare connection located at the rear of the ice
machine.
Warning - If the water pressure exceeds 50 pounds, a water pressure regulator should be
installed in the water inlet line between the water shut-off valve and the strainer.
Install a reducer fitting on the shut-off valve to accommodate the water stainer, which is supplied with
each ice machine and MUST be used. This is very important for cleaning. Connect either 3/8” or 1/2”
copper tubing between the water inlet fitting of the ice machine and the water strainer.
For water cooled units
Two water inlet connections are provided. One is for the ice making (evaporator) section which is located
on the back of the machine and is a 3/8” flared connection. The other is for the water cooled condenser.
FIGURE 3

Series 322 Ice Cube Machine Installation Instructions
Publication Number: 166240006INS - 4 - © 2004-2007, IMI Cornelius Inc.
The reason for the separate water inlet connections is that some installations use a water tower for
cooling the water used in the water cooled condenser and some installations use treated water (filtered)
for the ice making inlet water connections. Be sure to install water line (incoming) to the 3/8” male flare
connection on the back of the unit that supplies water to the water regulating valve inside.
DRAIN
Provide a suitable trapped open drain as close as possible to the area where the ice maker is going to be
installed. This may be an existing floor or a 1-1/4” trapped open drain. Two separate drain lines are
required for air cooled units, one for the storage bin and one for the dump valve drain hose.
An additional separate drain line will be required for water cooled units from the outlet of the condenser
coil to the drain. Run all gravity drain lines with a good fall to the open drain.
All Plumbing Must Be Installed in Accordance with Local Codes.
NOTE: In some cases it may be necessary to insulate the water supply line and drain line. Condensate
dripping to the floor can cause serious staining of carpets or hardwoods.
DRAIN CONNECTION INSTALLATION INSTRUCTIONS
Taking care not to kink or collapse vinyl tubing at any point, route tubes to any open, trapped or vented
floor drain. Run tubing to drain separately. Do not tee any drain hoses together. Add drain tubing required
to reach floor drain.
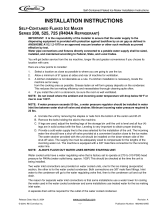
Typical installation: All electrical and plumbing must be done per local codes.
FIGURE 4
Note: Take care not to kink or
collapse vinyl tubing.
Power cord
(322) unit only)
Strainer water
(non-directional)
Service valves 50
PSI max. water
pressure
Water supply ice
making
Water supply WC
condenser
Dump valve drain
Drain pipe
Vent
Open trapped or vented drain
Vent
Drain WC condenser
Drain condensation
Bin drain

Series 322 Ice Cube Machine Installation Instructions
© 2004-2007, IMI Cornelius Inc. - 5 - Publication Number: 166240006INS
WATER LEVEL RESERVOIR
The Float Valve is mounted in a fixed position through its mounting bracket to maintain the proper water
level in the water reservoir. For the 300 & 322 series units the bracket is mounted through the bottom hole
of the bracket.
Warning - Ice maker will not operate properly when water supply temperature is below 50°F or
above 100°F. Water supply flowing pressure must not exceed 50 PSI.
STARTING THE UNIT
After the ice cuber has been unpacked and leveled and all plumbing and electrical connections have
been made, start the unit, and check for proper operation.
A cuber has three separate circuits: the water circuit, the refrigerant circuit and the electrical circuit.
1. Start checking the water circuit by making sure that there are not thread of flare joint leaks, either
outside the unit or in the compressor section. Next check the water flow over the evaporator and
make sure that all holes in the water distributor are open (see Figure 6) and that there is no undue
splash or loss of water into the ice bin.
2. Check to see if the float valve is functioning properly and the correct water level is being maintained.
Adjust if necessary.
3. Check the refrigerant circuit by making sure that the condenser fan is running. (This will be evident
by air noise.) Is the compressor running? (Feel the casing for vibration.) Is the evaporator getting
cold?
4. Check bin-harvest switch operation. (See procedure in manual.)
FIGURE 5
Support web
Adjust here
Reservoir
1/4”
Float assembly
Water level

Series 322 Ice Cube Machine Installation Instructions
Publication Number: 166240006INS - 6 - © 2004-2007, IMI Cornelius Inc.
INSTALLATION INSTRUCTIONS FOR MOUNTING ON DRINK DISPENSERS
For mounting ice machine on to an ice/drink dispenser, you should have the proper install kit.
CHECKOUT PROCEDURE FOR HARVEST BIN SWITCHES
Turn on the ice machine and move the evaporator curtain(s) away from the evaporator(s). The ice
machine should then shut off in approximately 10 seconds. (See Details A and B.)
Slowly let the evaporator curtain(s) move back toward the evaporator(s) until the bottom edge of the
curtain(s) is at least at the bent edge of the water reservoir or closer to the evaporator. With the curtain(s)
at that position, the machine should start. (See Detail C.)
ADJUSTMENT PROCEDURE FOR HARVEST BIN SWITCHES.
If adjustment is necessary, loosen acorn nuts and move proximity switch closer to the curtain(s) and
make sure the curtain is properly mounted. (See Detail A.)
Re-check per above procedure.
FIGURE 6
Detail A
Curtain edge
Magnet
Evaporator
curtain
Water
reservoir
Acorn nut
Sensor
thermowell
Proximity
switch
Acorn nut
Bottom edge of
evaporator
curtain
Detail C
Detail B

Series 322 Ice Cube Machine Installation Instructions
© 2004-2007, IMI Cornelius Inc. - 7 - Publication Number: 166240006INS
SANITIZING AND CLEANING PROCEDURE
1. Remove front panel to gain access to the on-off clean switch.
2. Push switch to “Clean” and allow the ice on the evaporator to release or melt away.
3. Remove ice from storage bin.
4. If lime scale is present, add 3 oz. of “Calgon Nickel Safe Ice Machine Cleaner” directly into water
reservoir. Circulate for not longer than 10 minutes. Depress dump valve switch on side of control
box and allow cleaner or sanitizer to drain away. Allow float valve to fill reservoir with clean, fresh
water. Circulate for approximately 1 minute. Depress dump valve switch and allow water to drain
away. Repeat three times.
CAUTION - All ice machine cleaner musts be flushed out of the system before the sanitizing
solution is used in Step 5. The reaction of the two chemicals can cause hazardous gasses to be
generated.
5. Pour 1/4 oz. of household bleach into the water reservoir and circulate for 10 minutes to sanitize the
circulating water system, including the evaporator, pump, distributor and all interconnecting vinyl
tubing. Depress dump valve switch on side of control box and allow cleaner or sanitizer to drain
away. Allow float valve to fill reservoir with clean, fresh water. Circulate for approximately 1 minute.
Depress dump valve switch and allow water to drain away. Repeat three times.
6. Mix sanitizing solution of 1/2 oz. household bleach to one gallon of water. This mixture will provide
200 ppm chlorine. Using a non-metallic bristle brush, scrub the following:
A. Inside surface of the ice bin including top and door.
B. Inside surface of the ice maker to include evaporator section in the ice machine including the
top, front panel and evaporator splash curtain.
C. Make sure splash curtain is correctly positioned.
7. Depress dump valve switch and allow cleaner to drain away. Allow float valve to fill reservoir with
clean, fresh water. Circulate for approximately 1 minute. Depress dump valve switch and allow
water to drain away. Repeat three times.
8. Push switch from “clean” to “on” position.
9. Replace front panel.
FIGURE 7
Electrical box
Switch, dump
Switch, on/off/clean
Water pump

Series 322 Ice Cube Machine Installation Instructions
Publication Number: 166240006INS - 8 - © 2004-2007, IMI Cornelius Inc.
WATER TREATMENT
Depending on the water source for the ice maker, water treatment may be necessary to prevent calcium
or lime scale deposits, bad taste and odor, chlorine problems, as well as slime growth. If these conditions
exist, contact your Cornelius Distributor or Dealer for information on water treatment systems Cornelius
offers.
WINTER STORAGE
If the unit is to be stored in an area where the temperature will drop below freezing, it is most important
that all water lines be drained to prevent them from freezing and possible rupture.
To blow out the waterline, disconnect the water supply at the cabinet inlet and use air pressure to force
the water into the water reservoir pan. This can then be removed from the water pan.
CLEANING THE AIR COOLED CONDENSER COIL
In order to produce at full capacity, the refrigeration condenser must be kept clean. The frequency of
cleaning will be determined by surrounding conditions. A good maintenance plan calls for an inspection
at least every two months.
CAUTION - Condenser cooling fins are sharp. Use care when cleaning.
Clean the air condenser coil from the back of the machine with a vacuum cleaner. Remove all the
accumulated dust, lint, and dirt.
/