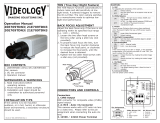
Digital Watchdog DWC-D4365T User manual

Category
Security cameras
Type
User manual

Digital Watchdog DWC-D4365T is an indoor dome camera featuring a 1/3” PIXIM Nightwolf CMOS sensor for clear 690 TVL images. Its 3.3-12mm varifocal lens with auto iris and 8x digital zoom allows for precise field of view adjustment. With its TDN5 technology, it handles day and night surveillance effortlessly. Advanced features like 3D DNR and Star-Light enhance image quality in various lighting conditions. It also offers programmable motion detection and privacy zones, making it ideal for security applications. UTP and RS-485 connectivity options provide flexible integration.

Digital Watchdog DWC-D4365T is an indoor dome camera featuring a 1/3” PIXIM Nightwolf CMOS sensor for clear 690 TVL images. Its 3.3-12mm varifocal lens with auto iris and 8x digital zoom allows for precise field of view adjustment. With its TDN5 technology, it handles day and night surveillance effortlessly. Advanced features like 3D DNR and Star-Light enhance image quality in various lighting conditions. It also offers programmable motion detection and privacy zones, making it ideal for security applications. UTP and RS-485 connectivity options provide flexible integration.

ABOUT MANUAL
Before installing and using the camera, please read this manual carefully.
Be sure to keep it handy for future reference.
PIXIM Indoor Dome Camera
DWC-D4365T
07062012
2
PRECAUTIONS
FCC COMPLIANCE
Do not open or modify.
Do not open the case except during maintenence and installation, for it may be dangerous and can
cause damages.
Do not put objects into the unit.
Keep metal objects and flammable substances from entering the camera.
It can cause fire, short-circuits, or other damages.
Be careful when handling the unit.
To prevent damages, do not drop the camera or subject it to shock or vibration.
Do not install near electric or magnetic fields.
Protect from humidity and dust.
Protect from high temperature.
Be careful when installing near the ceiling of kitchen or a boiler room, as the temperature may rise
to high levels.
Cleaning:
To remove dirt from the case, moisten a soft cloth with a soft detergent solution and wipe.
Mounting Surface:
The material of the mounting surface must be strong enough to support the camera.
This equipment has been tested and found to comply with the limits for a Class B digital device,
pursuant to part 15 of the FCC rules. These limits are designed to provide reasonable protection against
harmful interference, when the equipment is operated in a residential environment. This equipment
generates, uses, and radiates radio frequency energy; and if it is not installed and used in accordance
with the instruction manual, it may cause harmful interference to radio communications.
WARNING: Changes or modifications are not expressly approved by the manufacturer.
TABLE OF CONTENTS
3
Introduction
Installation
Module OSD Menu
Troubleshooting
Warranty Information
Specifications
Features
Parts and Descriptions
Dimensions
Inside the Box
Mount Installation Instructions
Connecting to Monitors
Adjusting the Camera Lens
4
5
6
7
8-9
10-11
12
14-25
26
27-28
29-30
Adjusting the 3-Axis Gimbal 13
4
FEATURES*
1/3” PIXIM Nightwolf CMOS Sensor
690 Horizontal TV Lines
3.3~12mm Varifocal Auto Iris Lens
TDN (True Day and Night/ TDN5)
Powerful Wide Dynamic Range
3D DNR (3D Digital Noise Reduction)
8X Digital Zoom
Ultra Low Light Sensitivity
Smear Cancelation
Low Power Consumption
Star-Light (Super Low Light Technology)
AGC/ BLC/ AWB
Programmable Privacy Zones (6) & Motion Detection
OSD Menu with Built-In Joystick
UTP & RS485 Built-In
Auto Sensing 12VDC or 24VAC with Line Lock
Secondary Video-BNC Output
5
PART & DESCRIPTIONS*
1
Lens
3
UTP
4
RS-485
2
Power Input Connctor
12VDC/24VAC Dual Voltage
6
Primary Video BNC-Output Connector
5
10
Secondary Video-BNC
Output Connector
9
Camera Control Board
7
Bubble Dome Cover
8
Upper Case
Mounting Screws
2
3
4
8
1
NO IR
IR
5
6
7
10
9
6
DIMENSIONS IN MILLIMETERS (IN)*
Surface Mount
89
(3.5”)
108(7.09”)
Top View
40.5(1.59”)
56.3(4.25”)
96.8(3.81”)
108(4.25”)
7
INSIDE THE BOX*
Included with Snapit Indoor Dome Camera
User Manual
Mounting Template
2 Machine Screws and 2 Dry Wall Anchors
Secondary Video-BNC Cable
1
2
3
4
4
8
SURFACE MOUNT INSTALLATION INSTRUCTIONS*
Squeeze the sides of the
camera and separate the
camera module from the
dome cover.
Use the camera’s mounting
template or your camera to
mark the holes as required.
Drill holes into the drywall and
insert the drywall mounts into
the holes.
Pull wires through and make
connections. Then, mount the
camera to the wall using the
included machine screws.
1 2 3
4
Adjust the camera lens
position by using the 3-Axis
Gimbal.
Snap the dome cover over
the camera module.
5 6
WALL MOUNT INSTALLATION INSTRUCTIONS*
Check to see all parts are in
the box.
Use the mount to mark the
pilot holes that are required.
Drill holes into the drywall and
insert the drywall mounts.
Secure the wall mount to the
wall using the mounting
screws.
Attach the base of the camera
to the wall mount with the
smaller machine screws.
Adjust the camera lens, and
snap the dome cover over
the camera module.
9
1 2 3
4 5
CONNECTING TO MONITORS*
Power Connection: 12VDC & 24VDC Dual Voltage (Auto Polarity Detection and Protection)
All cameras are equipped with a second video output for on-site configuration.
Use the diagram below to connect to a Monitor or CRT Monitor properly.
DC 12V / AC 24V
CCTV Monitor
Monitor
300.0mm(11.8”)
Second Video Output
NO IRIR
10
UTP SYSTEM*
Passive to Passive
Passive to Active
UTP Cable (Max.300ft)
Passive UTP
DVR(Digital Video Recorder)
Monitor
Including the Passive UTP
DVR(Digital Video Recorder)
Monitor
UTP Cable (Max 3,000ft)
Including the Passive UTP
Active UTP
11
12
ADJUSTING THE CAMERA LENS*
Follow the instructions provided below to make any lens adjustments.
Loosen the Zoom & Focus Handles by rotating them counter-clockwise.
Adjust the field of view by moving the handles to the RIGHT (Tele) to zoom in, or to the LEFT (Wide) to zoom out.
Adjust the focus the same way as described above AFTER the desired zoom position is established.
Once the desired adjustments have been made, please tighten the handles back by turning them clockwise.
NO IR IR
ZOOM
FOCUS
Zoom:
Focus:
Tele - Wide
Far - Near
1
2
3
4
13
ADJUSTING THE 3-AXIS GIMBAL*
The Gimbal mechanism yields maximum rotation and placement as shown below.
Rotation 360 Panning 360
NO IR IR NO IR IR
Tilting 90
NO IR
Tilting 82
IR
14
MODULE OSD MENU*
LENS
MANUAL / DC
AE PREFERENCE
OUTDOOR / INDOOR
BLC
OFF / ON
WDR
LOW / NORMAL / MEDIUM / HIGH / CUSTOM
AGC
LOW / MEDIUM / HIGH
STARLIGHT
OFF 2X 30FPS ~ X64
METER ZONE
ADJUST ZONE1 / ADJUST ZONE2
EXIT JUMP
SAVE & EXIT / EXIT
WB MODE
AWC / ATW / PUSH LOCK / MANUAL
COLOR GAIN
-8 ~ 8
EXIT JUMP
SAVE & EXIT / EXIT
D&N MODE
AUTO / COLOR / BW
BW BURST
OFF / ON
EXIT JUMP
SAVE & EXIT / EXIT
MIRROR
OFF / MIRROR / V-FLIP / ROTATE
SHARPNESS
-8 ~ 8
GAMMA
25(0.25) ~ 100(1.0)
3DNR
OFF / LOW / MEDIUM / HIGH
D-ZOOM
ZOOM / PAN / TILT
EXIT JUMP
SAVE & EXIT / EXIT
MOTION
OFF / ON
MOTION ZONES
1 / 1~2 / 1~3 / 1~4
ADJUST ZONE 1
ADJUST ZONE 2
ADJUST ZONE 3
ADJUST ZONE 4
RETURN
EXIT JUMP
SAVE & EXIT / EXIT
PRIVICY MASK
OFF / ON (AREA 1~6)
RETURN
MASK COLOR
WHITE / BLACK / RED
EXIT JUMP
SAVE & EXIT / EXIT
PC CONTROL
CAM ID(1~255) / PROTOCOL /
BAUDRATE / RETURN
TITLE
OFF / ON
LANGUAGE
ENGLISH / DEUTSCH / FRANCAIS /
ITALIAN / ESPANOL / DUTCH
OMNI LENS
ALARM / READ TIEM /ALRAM ZOOM /
STAND BY / RETURN
FLUORESCENT
OFF / CRR / CRR2
DIGITAL VIDEO OUTPUT
DIGITAL OUT / FIELD ORDER / FRAME
RPT / RETURN
EXIT JUMP
SAVE & EXIT / EXIT
EXIT
SAVE & EXIT
FACTORY SET
INT 1
INT 2
OFF / AUTO
LL
LL LIMIT (0.25% / 0.50% / 1.00% / 5.00%)
V PHASE(0~624)
RETURN
EXIT JUMP
SAVE & EXIT / EXIT
MOTION (MOT) PRIVACY (PRI)
EXPOSURE (EXP) COLOR (RGB) FUNCTION (FUN)
SYNC (SYC)
DAY NIGHT (D&N)
EXIT (EXT)
SETUP (SET)
15
EXPOSURE (EXP)
LENS
FOCUST METER helps you to find the clear
focus. When the dark line alligns with the gray
bar, the camera will be adjusting the focus.
When it’s set on the maximum, you get the clear
image.
- Set the lens Focus Meter to maximum (See above
for more information).
- DC GAIN is to adjust Iris speed.
0 ~ 255. It is
recommended to set the AUTO Gain to 120.
- AI THOLD is to define gain level.
-48 ~ 60.
DC mode is supported for Auto-iris
Varifocal lens.
Set the Focus Meter to maximum.
MANUAL: Manual iris or Fixed board lens.
DC: Auto-iris Varifocal lens.
16
EXPOSURE (EXP)
SHADOW GAIN (10~50) The higher the number, the stronger the BLC masking.
AE PREFERENCE
BLC
Auto Exposure
Set AE PREFERENCE depending on the environment in
which the camera is installed. Select from the following
options:
INDOOR / OUTDOOR
Backlight compensation prevents subjects in defined areas from appearing too dark
when backlighting is present.
If BLC is enabled, adjust the SHADOW GAIN as desired.
17
EXPOSURE
Enables the camera to capture clear images in the same frame,
even when there are both very bright and very dark areas in the
same field.Select from the following options:
LOW / NORMAL / MEDIUM(Factory Default) / HIGH/ CUSTOM
If CUSTOM is selected, adjust the Bias / Limit as you wish.
- BIAS (-30~30): Decide the WDR level in the range of LIMIT.
The higher the number, the stronger the WDR
adjustment.
- LIMIT (0~36): Decide the range of WDR effect level.
0 means WDR is OFF. The higher the number, the
stronger the WDR will be.
WDR (Wide Dynamic Range)
WDR OFF WDR ON
18
AGC (Auto Gain Control)
EXPOSURE
STARLIGHT
Starlight mode automatically activates slow shutter function when the
image is too dark. You can adjust the frame integration level from
X2-30FPS ~ X64**. x2 - 30FPS is the default.
EXPOSURE (EXP)
Auto Gain Control automatically adjusts the video gain to
enhance picture brightness in low light conditions.The higher
number the better sensitivity. However, higher settings mean
more digital noise in the image.
Select one of the options.
LOW / MEDIUM / HIGH(Factory Default)
**Note: Increase the setting may cause the image to lag.**
19
METER ZONE
EXPOSURE (EXP)
You can setup up to two (2) zones.
1. Select the zone you wish to adjust and enter edit mode.
2. The zone’s borders will appear in white. Use the camera’s joystick contrller to move the zone across the image.
When the zone’s desired position is achieved, press the joystick controller.
3. The zone’s borders will appear in green. Use the camera’s joystick controller to increase the size of the zone.
a. Moving the joystick to the right will move the zone’s right border further to the right.
b. Moving the joystivk to the left will move the zone’s left border further to the left.
c. Moving the joystivk up will move the zone’s top border further up.
e. Moving the joystivk down will move the zone’s bottom border further down.
4. Press the joystick again. The zone’s borders will appear red. Use this option to reduce the size of the zone.
a. Moving the joystick to the right will move the zone’s left border further to the right.
b. Moving the joystivk to the left will move the zone’s right border further to the left.
c. Moving the joystivk up will move the zone’s bottom border further up.
e. Moving the joystivk down will move the zone’s top border further down.
5. To exit edit mode, press & hold the camera’s joystick controller for three (3) seconds.
Defines an area in the image where the AE and WB settings will be applied. This option is
useful when a camera is installed in an environment such as an ATM.
EXIT_JUMP
Go to the Exit menu to save & exit, or exit without saving
20
COLOR (RGB)
WB MODE
Select on of the options:
ATW- Auto Tracking White Balance Control mode compensates for color
temperature changes between 2500K and 9500K. It is
recommended to set the low level to 2.5K, and the high tp 11K.
MANUAL**- Users can control the white balance manually by
changing RED GAIN and BLUE GAIN (see below).
KELVIN (2K~11K)-
The color temperature level that will trigger the AWB.
The lower the number, the cooler the image will appear.
The higher the number, the warmer the image will appear.
R-GAIN (-20~20) Adjusts the amount of red in the image.
The higher the number, the image will appear red.
The lower the number, the image will appear green.
B-GAIN (-20~20)- Adjusts the amount of blue in the image.
The higher the number, the image will appear blue.
The lower the number, the image will appear yellow.
PUSH LOCK- Pushlock is to fix the white balance based on current lighting.
AWC - Auto White Balance Control mode compensates for
color temperature changes between 2000K and 18000K.
COLOR GAIN
-8 (complete B/W) ~ 8 (Full Color)
(Factory setting is 0.)
It’s to adjust the amount of color in the image.
EXIT_JUMP
**All user properties will be written to ROM.**
Go to the Exit menu to save & exit, or exit without saving
  • Page 1 1
  • Page 2 2
  • Page 3 3
  • Page 4 4
  • Page 5 5
  • Page 6 6
  • Page 7 7
  • Page 8 8
  • Page 9 9
  • Page 10 10
  • Page 11 11
  • Page 12 12
  • Page 13 13
  • Page 14 14
  • Page 15 15
  • Page 16 16
  • Page 17 17
  • Page 18 18
  • Page 19 19
  • Page 20 20
  • Page 21 21
  • Page 22 22
  • Page 23 23
  • Page 24 24
  • Page 25 25
  • Page 26 26
  • Page 27 27
  • Page 28 28
  • Page 29 29
  • Page 30 30
  • Page 31 31
  • Page 32 32
  • Page 33 33
  • Page 34 34
  • Page 35 35
  • Page 36 36

Digital Watchdog DWC-D4365T User manual

Category
Security cameras
Type
User manual

Digital Watchdog DWC-D4365T is an indoor dome camera featuring a 1/3” PIXIM Nightwolf CMOS sensor for clear 690 TVL images. Its 3.3-12mm varifocal lens with auto iris and 8x digital zoom allows for precise field of view adjustment. With its TDN5 technology, it handles day and night surveillance effortlessly. Advanced features like 3D DNR and Star-Light enhance image quality in various lighting conditions. It also offers programmable motion detection and privacy zones, making it ideal for security applications. UTP and RS-485 connectivity options provide flexible integration.

Ask a question and I''ll find the answer in the document

Finding information in a document is now easier with AI