Page is loading ...

TB-9009 Page 1 of 6
© 2016 DESCO INDUSTRIES, INC.
Employee Owned
SCS - 926 JR Industrial Drive, Sanford, NC 27332
East: (919) 718-0000 | West: (909) 627-9634 • Website: StaticControl.com
980 Ionized Air Gun
Installation, Operation and Maintenance
December 2016
Description
The SCS 980 Ionized Air Gun provides efficient static
charge neutralization by effectively removing particle
contamination even on some of the most static-sensitive
products. The SCS 980 Ionized Air Gun includes a
North American power adapter. The SCS 980E Ionized
Air Gun does not include a power adapter, and it must
be purchased separately. All references to model
980 throughout this user’s guide pertain to both of the
models, unless otherwise noted.
Proprietary technology provides constantly balanced
ionization for consistent control of surface charges. The
Ionized Air Gun virtually never needs adjustment and
requires very little maintenance.
Compact and lightweight, the console for the Ionized
Air Gun can be mounted almost anywhere on the
workstation for easy access. It connects to a supply
of clean, dry air or nitrogen, and an internal disposable
filter collects particles from the gas supply. The
electrical feed from the console to the Ionized Air Gun is
incorporated into the light, flexible air hose. The Ionized
Air Gun itself is very lightweight and ergonomically
designed for long-term user comfort and efficient
operation. The console, Ionized Air Gun, and air hose
are all designed to be static-dissipative and ESD-safe.
The Ionized Air Gun helps reduce a static charge of
±1000V to ±100V in less than 1 second at a distance
of 6 inches (15 cm) and 30 psi (2 bars) inlet pressure
when tested in accordance with the ESD Association
ionization standard ANSI/ESD-S3.1. Balance (offset
voltage) is within ±30V at a distance of 6 inches (15
cm).
Made in the
United States of America
USER GUIDE TB-9009
The Ionized Air Gun and its accessories are available as
the following item numbers:
Item Description
980 Ionized Air Gun, with North America Power
Adapter
980E Ionized Air Gun, without Power Adapter
980-F Air Filter, Pack of 3
980-S Foot Switch
980-T Emitter Tip
960X/980X Power Adapter, 120VAC Input, 24VAC Output,
North America Plug
770753 Power Adapter, 230VAC Input, 24VAC Output,
UK Plug
770754 Power Adapter, 230VAC Input, 24VAC Output,
Europe Plug
Packaging
1 Ionized Air Gun with Hose
1 Console
1 Console Mounting Plate
1 Air Filter
1 Power Adapter, 120VAC Input, 24VAC Output, North
America Plug (980 only)
1 Female Quick Connect Coupling
1 S-Hook
4 Mounting Screws
1 Certificate of Calibration
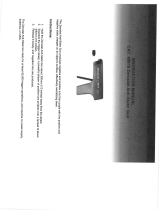
Figure 1. SCS 980 Ionized Air Gun

TB-9009 Page 2 of 6
© 2016 DESCO INDUSTRIES, INC.
Employee Owned
SCS - 926 JR Industrial Drive, Sanford, NC 27332
East: (919) 718-0000 | West: (909) 627-9634 • Website: StaticControl.com
MOUNTING TO A GAS SUPPLY
When a gas supply is close to the work area and
fitted with a U.S. standard industrial interchange quick
coupling, you may attach it to the console directly using
the included female quick connect coupling. If a U.S.
standard industrial interchange quick coupling is not
available on the gas supply, be sure to use a suitable
interconnect between the gas supply and the console.
Use a prefilter as defined in the COMPRESSED GAS
REQUIREMENTS section if necessary.
ASSEMBLY
NOTE: Protect the hose from sharp objects, abrasion
and high temperatures. Do not pull or pinch the hose
while assembling the components.
1. Insert the large end of the filter into the fitting at the
end of the flexible hose. Push the filter gently until
the metal release tab clicks and locks the filter into
place.
Installation
COMPRESSED GAS REQUIREMENTS
NOTE: Failure to use clean dry air or nitrogen may
result in damage to the Ionized Air Gun that is not
covered under the Limited Warranty.
The compressed gas supply must be clean dry air or
nitrogen supplied by a delivery system that utilizes
a refrigerated dryer or equivalent water removal to
achieve a limit of about 550 ppm water vapor at 35°F
(1.66°C) Dew Point. To prevent particles from entering
the console, a 2 micron coalescing filter or better is
recommended upstream of the gun console. Note that
the filter in the console collects small residual particles
and aerosols and does not act as a primary filter. The
console filter is rated at 0.01 micron for particulates and
is effective down to 0.008 micron for aerosols.
An adequate filter that can be recommended for the inlet
of the Ionized Air Gun would be a Finite Filter Grade 10
Media Specification. This provides a 95% coalescing
efficiency for aerosols with a 0.7 micron (and greater)
particle retention. This removes gross amounts of
particles, water and/or oil and aerosols.
A Grade 6 Media provides 99.98% efficiency when
almost total removal of liquid aerosols and particles are
required in all pressure ranges down to 0.01 microns.
Fine filters need to be changed more often.
MOUNTING THE CONSOLE
Choose a location convenient to the work area and gas
supply. The console takes up very little space and is
adaptable to a variety of permanent or non-permanent
installations. To minimize bends in the Ionized Air
Gun’s hose, orient the console so that the open end
that accepts the filtered air hose to the hand unit points
toward the work area, and the male connector points
toward the gas supply.
Prior to mounting, plug the RJ-11 cable from the power
supply into the jack located on the back of the console.
Use the included screws to attach the mounting plate
to the threaded holes on the back of the console. Use
suitable screws and fasteners to attach the mounting
plate to a flat surface such as a wall or the back of a
workbench. When mounting to a hollow wall, be sure
to use adequate screws and wall anchors to ensure
stability of the installation.
Figure 2. Securing the console to the mounting plate
Point this end to
the gas supply
Figure 3. Connecting the air filter to the hose assembly
Metal release tab

TB-9009 Page 3 of 6
© 2016 DESCO INDUSTRIES, INC.
Employee Owned
SCS - 926 JR Industrial Drive, Sanford, NC 27332
East: (919) 718-0000 | West: (909) 627-9634 • Website: StaticControl.com
2. Insert the hose and filter assembly into the console
until the console’s release button latches on with a
click. The small plastic fitting on the end of the filter
must align with the metal guide coupling inside the
console. You may have to wiggle the filter slightly
while inserting it.
5. Use the included S-hook to hang the gun at the
workstation if desired.
6. Ensure that the power switch on top of the console
is in the OFF position. Connect the power adapter
to an appropriate power outlet.
NOTE: Use only SCS 960X/980X, 770753 or
770754 power adapters. Use of other power
adapters may result in damage to the unit and void
the warranty.
For optimal safety and ionization, set the pressure
regulator on the compressed gas supply to 25-65 psi
(1.4-4.5 bar). Neutralization (discharge) times vary on
gas pressure settings.
NOTE: Pressures of 30-40 psi (2.0-2.8 bar) are
commonly used for decontaminating surfaces. Please
refer to the pertinent regulations concerning maximum
air pressure on hand-held air blow devices in order to
determine a safe operating pressure.
The Ionized Air Gun is rated at 65 psi (4.5 bar) inlet
pressure at temperatures up to 75º F (24º C), and the
rating decreases at higher temperatures. When using
high pressures, consider the ambient room temperature
as well as heat from surrounding equipment.
Operation
1. Ensure that the gun’s trigger is not depressed. Set
the console’s power switch to the ON position. The
green power LED located next to the power switch
should illuminate.
2. Aim the gun approximately 6 inches (15 cm) from
the surface to be neutralized and cleaned.
3. Hold down the trigger to blow ionized air. The
green LED on the back of the gun will illuminate to
indicate ionization. Typically, static charges will be
neutralized within one second.
4. Release the trigger when the surface is clean.
SCS recommends turning off the console whenever
the Ionized Air Gun is not in use. This will prevent
unintentional operation.
Filter release button
Figure 4. Inserting the hose and filter assembly into the
console
3. Connect the male air inlet fitting on the console to
the gas supply. The console’s fitting is designed
for a U.S. standard industrial interchange quick
coupling. The console may be connected directly
to a gas supply with the included female quick
connect coupling or hose (not supplied). Use a
prefilter as defined in the COMPRESSED GAS
REQUIREMENTS section if necessary.
4. Connect the optional 980-S Foot Switch to the top
of the console if necessary.
Figure 4. SCS 980-S Foot Switch

TB-9009 Page 4 of 6
© 2016 DESCO INDUSTRIES, INC.
Employee Owned
SCS - 926 JR Industrial Drive, Sanford, NC 27332
East: (919) 718-0000 | West: (909) 627-9634 • Website: StaticControl.com
4. Pull and disconnect the filter from the hose fitting by
depressing the metal release tab. Discard the dirty
filter.
5. Install a new filter by following the ASSEMBLY
instructions on pages 2-3.
REPLACING THE EMITTER POINTS
The emitter points are built into the gun’s plastic nozzle
and usually last the life of the unit. The points should
only be replaced if they are broken, bent or otherwise
damaged. Replacement emitter assebmlies are
available as SCS item 980-T.
1. Turn off the console and disconnect it from its
electrical power and gas supplies.
2. Insert the tip of a screwdriver into the slot located at
the bottom of the gun’s nozzle.
Maintenance
The Ionized Air Gun requires very little maintenance.
Occasional cleaning of the case and emitter points,
and periodic replacement of the air filter are all that is
required. Always be sure to protect all components
from liquids and corrosive chemicals.
CAUTION: Always disconnect the Ionized Air Gun
from its power and gas supplies before performing any
maintenance.
CLEANING THE COMPONENTS
1. Turn off the console and disconnect it from its
electrical power and gas supplies.
2. Moisten a cloth with isopropyl alcohol, and use it to
wipe the exterior surfaces of the console and gun.
Remove any dirt or dust that may have collected.
3. Moisten a swab with isopropyl alcohol, and use
it to gently clean the emitter points in the gun.
Extremely dirty points increase the time needed
to neutralize static charge and affect ionization
balance.
REPLACING THE AIR FILTER
SCS recommends changing the filter every three
months or whenever it looks dirty. Replacement filters
are available as SCS item 980-F.
1. Turn off the console and disconnect it from its
electrical power and gas supplies.
2. Hold down the filter release button on the side of the
console.
3. Disconnect the hose and filter assembly from the
console by pulling the textured plastic ring nearby
the hose’s spring. Rocking the ring back and forth
may help loosen the filter from the console. DO
NOT pull the hose itself.
Figure 5. Using the Ionized Air Gun
Figure 6. Inserting a screwdriver into the slot located at
the bottom of the gun’s nozzle
3. Use the screwdriver as a lever and loosen the old
clip. Grasp it between your thumb and forefinger,
and detach it from the gun. The emitter points are
very sharp. Touch only the plastic lip, and handle it
carefully. Do not touch the emitter points with hard
objects as they may damage them.
4. To insert the new emitter points, hold the gun with
the barrel pointing up. Grasp the new clip between
your thumb and forefinger, and align it so the curved
edges match the curve inside gun’s nozzle.
5. Align the blunt prongs of the emitters with the holes
inside the gun’s barrel, and set the clip into place.
6. Press the clip all the way in using the tip of a
screwdriver. It should fit snugly between the raised
rim of the barrel and the raised rim of the air nozzle.
If the clip overlaps the air nozzle, it is installed
backward.

TB-9009 Page 5 of 6
© 2016 DESCO INDUSTRIES, INC.
Employee Owned
SCS - 926 JR Industrial Drive, Sanford, NC 27332
East: (919) 718-0000 | West: (909) 627-9634 • Website: StaticControl.com
Calibration
Frequency of recalibration should be based on the
critical nature of those ESD sensitive items handled and
the risk of failure for the ESD protective equipment and
materials. In general, SCS recommends that calibration
be performed annually.
Periodically measure the balance and neutralization
times of the Ionized Air Gun to verify that it is performing
within specifications. These measurements should be
taken using a charged plate monitor such as the SCS
items 711, 770004 and 770005.
Calibration should be performed in accordance with the
ESD Association ionization standard ANSI/ESD-S3.1.
At a line pressure of 30 psi (2 bars) and a distance of
6 inches (15 cm), the neutralization (discharge) time of
±1000V to ±100V should be less than 1 second, and the
balance should be ±30V or better.
Specifications
General
Input Voltage and
Frequency
(120VAC External
Adapter)
AC Power Adapter
Power Input:
120VAC, 60 Hz
Power Output:
24VAC, 500mA
Input Voltage and
Frequency
(230VAC External
Adapter)
AC Power Adapter
Power Input:
230VAC, 50 Hz
Power Output:
24VAC, 500mA
Neutralization
(Discharge) Time at 6",
30 psi
< 1 second
Balance (Oset
Voltage) at 6", 30 psi
±30V
Power Consumption 10 W
Ion Emission Steady-State DC
Emitter Points Tungsten
Audible Noise at 1 m,
30 psi
70 dBA
Ozone < 0.005 ppm
Blow-o Force 41 g @ 30 psi; measured at
3" from a 2" diameter target
Air Hose Static-dissipative
polyurethane, 3/8" outside
diameter; 7' length
Gas Input 20-65 psi, Clean Dry Air
(CDA) or nitrogen
Gas Connection 1/4" male industrial
interchange quick disconnect
Gas Air Filter 99.9% efficient, 0.01 micron
or larger air particles; 99.9%
coalescing efficiency
Mounting Metal mounting plate attaches
to back of console
Enclosure Static-dissipative
polycarbonate
Dimensions (Gun) 8" x 3" x 1"
(20.3 cm x 7.6 cm x 2.5 cm)
Dimensions (Console) 8.5" x 3.0" x 1.6"
(21.6 cm x 7.6 cm x 4.1 cm)
Weight (Gun with Air
Hose)
0.8 lbs (0.4 kg)
Weight (Console) 0.7 lbs (0.3 kg)
Certications cULus, CE, RoHS2
Country of Origin China

TB-9009 Page 6 of 6
© 2016 DESCO INDUSTRIES, INC.
Employee Owned
SCS - 926 JR Industrial Drive, Sanford, NC 27332
East: (919) 718-0000 | West: (909) 627-9634 • Website: StaticControl.com
Regulatory Information
This symbol, per “Marking for the Control
of Pollution Caused by Electronic
Information Products, SJ/T11364-2006,”
means that the product or part does
not contain any substances in excess
of the maximum concentration values
as per “Electronic Industry Standard
of the People’s Republic of China, SJ/T11363-2006,
Requirements for Concentration Limits for Certain
Hazardous Substances in Electronic Information
Products.” This information represents SCS’s knowledge
and belief, which may be based in whole or in part upon
information provided by third party suppliers to SCS.
In the event any product is proven not to conform
with the material content-related information in this
product literature, then SCS’s entire liability and
Buyer’s exclusive remedy will be in accordance with
the Warranty stated below. e-Waste Disposal-Recycle
according to applicable local, state and federal laws for
electrical/electronic waste.
RoHS 2011/65/EU Compliant means that the product or
part does not contain any of the substances in excess
of the maximum concentration values (“MCVs”) in EU
RoHS Directive 2011/65/EU. The MCVs are by weight
in homogeneous materials. This information represents
SCS’s knowledge and belief, which may be based in
whole or in part on information provided by third party
suppliers to SCS.
WEEE Statement
The following information is only for EU-member
States: The mark shown to the right is in
compliance with Waste Electrical and Electronic
Equipment Directive 2002/96/EC (WEEE). The
mark indicates the requirement NOT to dispose the
equipment as unsorted municipal waste, but use the
return and collection systems according to local law.
cULus Statement
Meets cULus requirements .
CE Statement
ElectroMagnectic Compatibility Statement: Meets
2014-35-EU Directive.
Low Voltage: Meets 2014-30-EU Directive.
Limited Warranty, Warranty Exclusions, Limit of
Liability and RMA Request Instructions
See the SCS Warranty -
http://staticcontrol.descoindustries.com/Limited-Warranty.aspx
/