Kenwood KDC-W6031 User manual

Category
Car media receivers
Type
User manual

This manual is also suitable for

CD-RECEIVER
KDC-W6531
KDC-W6031
INSTRUCTION MANUAL
© B64-2995-00/01 (EF)
2
|
English
Contents
Safety precautions 4
Notes 5
About CDs 7
About AAC, MP3 and WMA 8
General features 9
Power
Selecting the Source
Volume
Attenuator
System Q
Audio Control
Audio Setup
Speaker Setting
Subwoofer Output
Switching Display
Faceplate Angle Adjustment
Theft Deterrent Faceplate
TEL Mute
Tuner features 14
Tuning
Station Preset Memory
Auto Memory Entry
Preset Tuning
RDS features 16
Traffic Information
Radio Text Scroll
PTY (Program Type)
Program Type preset
Changing Language for PTY Function
CD/Audio file/External disc control
features 19
Playing CD & Audio file
Playing External Disc
Fast Forwarding and Reversing
Track/File Search
Disc Search/Folder Search
Track/File/Disc/Folder Repeat
Scan Play
Random Play
Magazine Random Play
Disc Random Play
Folder Select
Switching the Play mode
Letter Seek
Disc Naming (DNPS)
Text/Title Scroll
Menu system 24
Menu System
Security Code
Touch Sensor Tone
Manual Clock Adjustment
Synchronize Clock
DSI (Disabled System Indicator)
Selectable Illumination
Dimmer
Switching preout
Built-in Amp Setting
B.M.S. (Bass Management System)
B.M.S. Frequency Offset
AMP Control
News Bulletin with Timeout Setting
Local Seek
Tuning Mode
AF (Alternative Frequency)
Restricting RDS Region (Region Restrict
Function)
Auto TP Seek
Monaural Reception
External Display Control
Auxiliary Input Display Setting & Disc Naming
Text Scroll
Power OFF Timer
CD Read Setting
Voice Index
ACDrive firmware version display
Unique ID display
Audio Preset Memory
Audio Preset Call
Demonstration mode Setting
Accessories/ Installation Procedure
32
Connecting Wires to Terminals 33
Installation 35
Removing the Unit 36
Troubleshooting Guide 37
Specifications 40
English
|
3
The "AAC" logo is trademark of Dolby
Laboratories.
4
|
English
Safety precautions
About CD players/disc changers
connected to this unit
KENWOOD disc changers/ CD players released in
1998 or later can be connected to this unit.
Refer to the catalog or consult your Kenwood
dealer for connectable models of disc changers/
CD players.
Note that any KENWOOD disc changers/ CD players
released in 1997 or earlier and disc changers made
by other makers cannot be connected to this unit.
Unsupported connection may result in damage.
Setting the "O-N" Switch to the "N" position for the
applicable KENWOOD disc changers/ CD players.
The functions that can be used and the information
that can be displayed will differ depending on the
models being connected.
You can damage both your unit and the CD changer if
you connect them incorrectly.
Lens Fogging
Right after you turn on the car heater in cold
weather, dew or condensation may form on
the lens in the CD player of the unit. Called lens
fogging, CDs may be impossible to play. In such
a situation, remove the disc and wait for the
condensation to evaporate. If the unit still does
not operate normally after a while, consult your
Kenwood dealer.
2WARNING
To prevent injury or fire, take the
following precautions:
• To prevent a short circuit, never put or leave any
metallic objects (such as coins or metal tools)
inside the unit.
Attach the panel while you are on the
vehicle
The panel lock arm will be appeared when the
panel is removed. Therefore, the panel must be
attached during the driving.
2CAUTION
To prevent damage to the machine, take
the following precautions:
• Make sure to ground the unit to a negative 12V
DC power supply.
• Do not install the unit in a spot exposed to direct
sunlight or excessive heat or humidity. Also avoid
places with too much dust or the possibility of
water splashing.
• Do not set the removed faceplate or the faceplate
case in areas exposed to direct sunlight, excessive
heat or humidity. Also avoid places with too much
dust or the possibility of water splashing.
• To prevent deterioration, do not touch the
terminals of the unit or faceplate with your
fingers.
• Do not subject the faceplate to excessive shock,
as it is a piece of precision equipment.
• When replacing a fuse, only use a new one with
the prescribed rating. Using a fuse with the wrong
rating may cause your unit to malfunction.
• Do not apply excessive force to the open
faceplate or place objects on it. Doing so will
cause damage or breakdown.
• Do not use your own screws. Use only the screws
provided. If you use the wrong screws, you could
damage the unit.
Do Not Load 8 cm (3 in.) CDs in the CD
slot
If you try to load a 8 cm (3 in.) CD with its adapter
into the unit, the adapter might separate from the
CD and damage the unit.
English
|
5
Notes
• If you experience problems during installation,
consult your Kenwood dealer.
• If the unit fails to operate properly, press the Reset
button. The unit returns to factory settings when
the Reset button is pressed.
• Press the reset button if the disc auto changer fails
to operate correctly. Normal operation should be
restored.
• The characters which can be displayed by this
unit are A-Z 0-9 @ " ‘ ` % & * + – = , . / \ < > [ ] ( ) : ;
^ - { } | ~ .
• The illustrations of the display and the panel
appearing in this manual are examples used to
explain more clearly how the controls are used.
Therefore, what appears on the display in the
illustrations may differ from what appears on
the display on the actual equipment, and some
of the illustrations on the display may represent
something impossible in actual operation.
Cleaning the Unit
If the faceplate of this unit is stained, wipe it with a
dry soft cloth such as a silicon cloth.
If the faceplate is stained badly, wipe the stain off
with a cloth moistened with neutral cleaner, then
wipe neutral detergent off.
Applying spray cleaner directly to the unit may affect its
mechanical parts. Wiping the faceplate with a hard cloth
or using a volatile liquid such as thinner or alcohol may
scratch the surface or erases characters.
Cleaning the Faceplate Terminals
If the terminals on the unit or faceplate get dirty,
wipe them with a dry, soft cloth.
Before using this unit for the first time
This unit is initially set on the Demonstration mode.
When using this unit for the first time, cancel the
<Demonstration mode Setting> (page 31).
About DAB Tuner control
Refer to A group on the Instruction manual of DAB
Tuner KTC-9090DAB (optional accessory) for the
control method of DAB Tuner function.
However, the following control methods of the
function for this unit may be differed from the
Instruction manual; therefore, refer to the following
supplemental instruction.
<Auto Ensemble Memory Entry>
1. Select the preset band for Auto Ensemble
Memory Entry.
2. Press the [AME] button for at least 2 seconds.
Open Auto Ensemble Memory Entry.
After storing in the memory finishes, the
number of the pre-set buttons and the
ensemble label are displayed.
<Searching by programme type and language>
and <Languages to be displayed> in
<Programme Type (PTY) Function>
At the operation to press [DISP] button, press [T.I]
button.
Reset button
6
|
English
About "Media Manager" of PC application
attached to KDC-W6531
• "Media Manager" is recorded in the CD-ROM
attached to this unit.
• Refer to the attached installation manual for the
installation method of "Media Manager".
• Refer to the users manual recorded in the
installation CD-ROM and Help of "Media Manager"
for the operation method of "Media Manager".
• The unit can play CD (hereafter called "ACDrive
disc") created by "Media Manager".
• Refer to the following site for the updated
information of "Media Manager".
http://www.kenwood.mediamanager.jp/
• Contact Kenwood for the function and operation
of the "Media Manager".
• "Media Manager" is a product of PhatNoise.
The marking of products using lasers
(Except for some areas)
CLASS 1
LASER PRODUCT
The label is attached to the chassis/case and says
that the component uses laser beams that have
been classified as Class 1. It means that the unit
is utilizing laser beams that are of a weaker class.
There is no danger of hazardous radiation outside
the unit.
This Product is not installed by the manufacturer
of a vehicle on the production line, nor by the
professional importer of a vehicle into an EU
Member State.
Notes
English
|
7
Handling CDs
• Don’t touch the recording surface of the CD.
• CD-R and CD-RW are easier to damage than a
normal music CD. Use a CD-R or a CD-RW after
reading the caution items on the package etc.
• Don’t stick tape etc. on the CD.
Also, don’t use a CD with tape stuck on it.
When using a new CD
If the CD center hole or outside rim has burrs, use it
after removing them with a ball pen etc.
Burrs
Burrs
CD accessories
Don’t use disc type accessories.
CD cleaning
Clean from the center of the disc and move
outward.
About CDs
Removing CDs
When removing CDs from this unit pull them out
horizontally.
CDs that can’t be used
• CDs that aren’t round can’t be used.
• CDs with coloring on the recording surface or that
are dirty can’t be used.
• This unit can only play the CDs with
.
It may not correctly play discs which do not have
the mark.
• A CD-R or CD-RW that hasn’t been finalized can’t
be played. (For the finalization process refer to
your CD-R/CD-RW writing software, and your CD-
R/CD-RW recorder instruction manual.)
CD storage
• Don’t place them in direct sunlight (On the seat
or dashboard etc.) and where the temperature is
high.
• Store CDs in their cases.
8
|
English
About AAC, MP3 and WMA
The playable AAC/MP3/WMA file (hereafter called
Audio file) and the media format has the following
limitation. The Audio file, which is out of the
specification, may not able to be played normally,
or the file and folder names may not be displayed
correctly.
Attach the correct extension for the Audio file
(AAC: ".M4A", MP3: ".MP3", WMA: ".WMA")
Do not attach the extensions to the other files besides
the Audio file. If it is attached, the file, which is not the
Audio file, will be played and outputs the loud noise, and
then the speaker will be damaged.
The files with copy protection cannot be played.
Playable AAC file
• ".m4a" file encoded by AAC-LC format.
Refer to
http://www.kenwood.mediamanager.jp/
for the details.
Playable MP3 file
• MPEG 1/2 Audio Layer 3 file
• Transfer bit rate: 8-320 kbps
• Sampling frequency
KDC-W6531: 16, 22.05, 24, 32, 44.1, 48 kHz
KDC-W6031: 8, 11.025, 12, 16, 22.05, 24, 32, 44.1,
48 kHz
Playable WMA file
• The file in accordance with Windows Media Audio
(Except for the file for Windows Media Player 9 or
after which applies the new functions)
• Transfer bit rate: 48-192 kbps
• Sampling frequency: 32, 44.1, 48 kHz
Playable media
• CD-ROM, CD-R, CD-RW
Depending on the writing software, it may not be
possible to use quick formatted CD-RW discs.
When recording to the media up to the maximum
capacity at once, the writing soft is set to "Disc at once".
Playable disc format
• ISO 9660 Level 1/2
• Joliet
• Romeo
• Long file name.
The maximum number of characters for
display
File/Folder name:
KDC-W6531: 128 characters
KDC-W6031: 64 characters
MP3 ID3 Tag/ WMA Contents property/ AAC song
information (KDC-W6531 only): 30 characters
File/Folder name is the number of the characters
including the extensions.
MP3 ID3 Tag can only display the tag of Ver1.X. (KDC-
W6031 only)
AAC ID3 Tag cannot be displayed.
Limitation of structure for the file and the
folder
• Maximum number of directory levels: 8
Maximum number of folders: 100
• Maximum number of files per folder:
KDC-W6531: 4096, KDC-W6031: 255
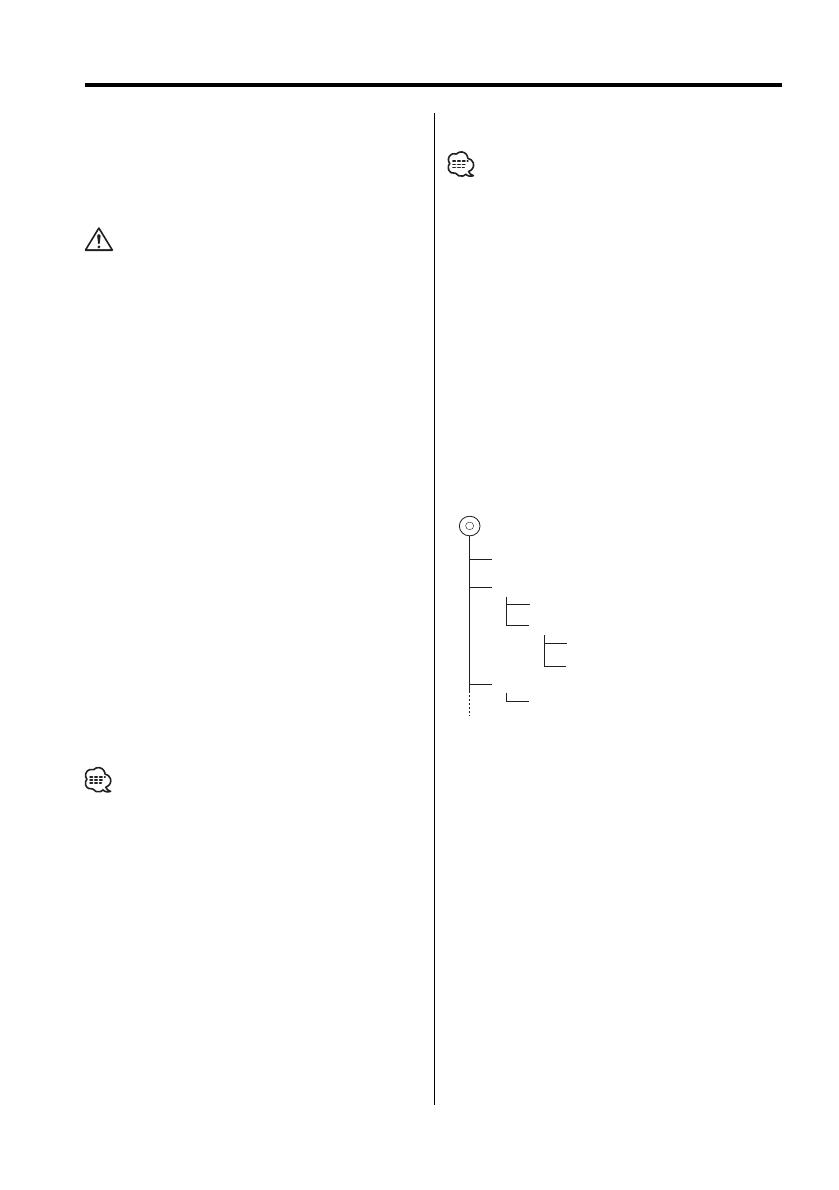
Playing order of the Audio file
The Audio file is played in the order which is written
by writing soft. You may be able to set the playing
order by writing the play sequence numbers such
as "01" to "99" at the beginning of the file name.
Example
CD
¡!
¡"
2
(1)
0
: Folder
¡
: Audio file
3
¡%
4
¡#
¡$
• Playing order
Playing order after ¡! play.
¡", ¡#, ¡$, ¡%...
• File search
Forward file search during ¡# play.
Push the Control knob to [¢] ¡$
• Folder search
Forward folder search during ¡" play.
Push the Control knob to [FM] 3, 4...
• Folder select
When it is set to directory 4, skip to the folder
before the same level by folder select.
Push the Control knob to [4] 2
When it is set to directory 3, makes the level up
by folder select.
Push the Control knob to [AM] 2
English
|
9
General features
Power
Turning ON the Power
Press the [SRC] button.
When the power is ON, the <Security Code> (page
24) is displayed as "CODE ON" or "CODE OFF".
Turning OFF the Power
Press the [SRC] button for at least 1 second.
Selecting the Source
Press the [SRC] button.
Source required Display
Tuner "TUNER"
CD "CD"
External disc (Optional accessory) "CD CH"
Auxiliary input (Optional accessory) "AUX EXT"
Standby (Illumination only mode) "STANDBY"
This unit automatically turns full power OFF after 20
minutes lapses in Standby mode in order to save the
vehicles battery.
The time until full power OFF can be set in <Power
OFF Timer> (page 29).
Volume
Increasing Volume
Turn the [VOL] knob clockwise.
Decreasing Volume
Turn the [VOL] knob counterclockwise.
ATT indicator LOUD indicator
Control knob
Release button
10
|
English
General features
Attenuator
Turning the volume down quickly.
Press the [ATT] button.
Each time the button is pressed, the Attenuator
turns ON and OFF.
When it’s ON, the "ATT" indicator blinks.
System Q
You can recall the best sound setting preset for
different types of music.
1 Select the source to set
Press the [SRC] button.
2 Select the Sound type
Press the [Q] button.
Each time the button is pressed, the sound
setting switches.
Sound setting Display
User memory "USER"
Rock "ROCK"
Pops "POPS"
Easy "EASY"
Top 40 "TOP40"
Jazz "JAZZ"
Natural "NATURAL"
User memory: The values set on the <Audio Control>
(page 10).
Each setting value is changed with the <Speaker
Setting> (page 11).
First, select the speaker type with the Speaker setting.
Audio Control
1
Select the source for adjustment
Press the [SRC] button.
2 Enter Audio Control mode
Press the [VOL] knob.
3 Select the Audio item for adjustment
Press the [VOL] knob.
Each time the knob is pressed, the items that can
be adjusted switch as shown below.
4 Adjust the Audio item
Turn the [VOL] knob.
Adjustment Item Display Range
Subwoofer level *¹ "SW L" –15 — +15
Bass level*² "BAS L" –8 — +8
Middle level*² "MID L" –8 — +8
Treble level*² "TRE L" –8 — +8
Balance "BAL" Left 15 — Right 15
Fader "FAD" Rear 15 — Front 15
Exit Audio Control mode
• *
1
You can control this item when <Switching preout>
(page 26) is set to "SWPRE SW".
• *
1
You can control this item when <Subwoofer
Output> (page 11) is set to "SW ON".
• *
2
Source tone memory: The set up value is put in the
memory per source.
5 Exit Audio Control mode
Press any button.
Press the button which is not [VOL] knob and
[ATT]/ [ANG] button.
English
|
11
Audio Setup
Setting the Sound system, such as Cross over
Network.
1 Select the source for adjustment
Press the [SRC] button.
2 Enter Audio Setup mode
Press the [VOL] knob for at least 1 second.
3 Select the Audio Setup item for adjustment
Press the [VOL] knob.
Each time the knob is pressed, the items that can
be adjusted switch as shown below.
4 Setup the Audio item
Turn the [VOL] knob.
Adjustment Item Display Range
Front High Pass Filter "HPF" Through/40/60/80/100/120/
150/180/220 Hz
Rear High Pass Filter "HPR" Through/40/60/80/100/120/
150/180/220 Hz
Low Pass Filter*
1
"LPF" 50/60/80/100/120/Through
Hz
Subwoofer Phase*
1
"PHAS" Normal (0°)/ Reverse (180°)
Volume offset "V-OFF" –8 — ±0
Loudness "LOUD" OFF/ON
Volume offset: Each source’s volume can be set as a
difference from the basic volume.
Loudness: Compensating for low and high tones
during low volume.
When it's ON, "LOUD" indicator is ON.
• *
1
You can control this item when <Switching preout>
(page 26) is set to "SWPRE SW".
• *
1
You can control this item when <Subwoofer
Output> (page 11) is set to "SW ON".
5 Exit Audio Setup mode
Press [VOL] knob for at least 1 second.
Speaker Setting
Fine-tuning so that the System Q value is optimal
when setting the speaker type.
1 Enter Standby
Press the [SRC] button.
Select the "STANDBY" display.
2 Enter Speaker Setting mode
Press the [VOL] knob.
3 Select the Speaker type
Turn the [VOL] knob.
Each time the knob is turned, the setting
switches as shown below.
Speaker type Display
OFF "SP OFF"
For 5 & 4 in. speaker "SP 5/4"
For 6 & 6x9 in. speaker "SP 6x9/6"
For the OEM speaker "SP OEM"
4 Exit Speaker Setting mode
Press the [VOL] knob.
Subwoofer Output
Turning the Subwoofer output ON or OFF.
Hold down on [AM] of the Control knob for at
least 1 second.
Each time the button is pressed, Subwoofer
output switches ON and OFF.
When it’s ON, "SW ON" is displayed.
You can control this function when <Switching
preout> (page 26) is set to "SWPRE SW".
12
|
English
General features
Switching Display
Switching the information displayed.
1 Enter Switching Display mode
Press the Control knob for at least 1 second.
"DISP SEL" is displayed.
2 Select the Display item
Push the Control knob to [4] or [¢].
In Tuner source
Information Display
Program Service name or Frequency
(FM)
"FREQ/PS"
Radio text, Program Service name or
Frequency (FM)
"R-TEXT"
Frequency (MW, LW) "FREQ"
Clock "CLOCK"
In CD & External disc source
Information Display
Disc title "D-TITLE"*
Track title "T-TITLE"*
Track number & Play time "P-TIME"
Disc name "DNPS"
Clock "CLOCK"
In Audio file source
Information Display
Song title & Artist name "TITLE"*
Album name & Artist name "ALBUM"*
Folder name "FOLDER"
File name "FILE"
Track number & Play time "P-TIME"
Clock "CLOCK"
In Auxiliary input source/ Standby source
Information Display
Source name "SRC NAME"
Clock "CLOCK"
3 Exit Switching Display mode
Press the Control knob.
When LX-AMP is connected, the item setup by the
Display mode of LX-AMP is displayed.
* If the contents of the information cannot be
displayed, Play time is displayed.
Track number at Audio file displays the last 3 digits
when it exceeds 1000 songs (KDC-W6531 only).
Album name cannot be displayed in WMA file. (KDC-
W6031 only)
Song title, Artist name, and Album name cannot be
displayed in AAC file. (KDC-W6031 only)
Faceplate Angle Adjustment
Press the [ANG] button for at least 1 second.
Do not apply excessive force to the faceplate. It can
cause damage.
English
|
13
Theft Deterrent Faceplate
The faceplate of the unit can be detached and
taken with you, helping to deter theft.
Removing the Faceplate
Press the Release button.
The faceplate is unlocked, allowing you to detach
it.
The faceplate is a precision piece of equipment and
can be damaged by shocks or jolts. For that reason,
keep the faceplate in its special storage case while
detached.
Do not expose the faceplate or its storage case to
direct sunlight or excessive heat or humidity. Also
avoid places with too much dust or the possibility of
water splashing.
Reattaching the Faceplate
1 Align the shaft on the unit with the
depression on the faceplate.
2 Push the faceplate in until it clicks.
The faceplate is locked in place, allowing you to
use the unit.
TEL Mute
The audio system automatically mutes when a
call comes in.
When a call comes in
"CALL" is displayed.
The audio system pauses.
Listening to the audio during a call
Press the [SRC] button.
The "CALL" display disappears and the audio
system comes back ON.
When the call ends
Hang up the phone.
The "CALL" display disappears and the audio
system comes back ON.
14
|
English
Tuner features
Tuning
Selecting the station.
1 Select tuner source
Press the [SRC] button.
Select the "TUNER" display.
2 Select the band
Push the Control knob to [FM] or [AM].
Each time the knob is pushed to [FM], it switches
between the FM1, FM2, and FM3 bands.
3 Tune up or down band
Push the Control knob to [4] or [¢].
During reception of stereo stations the "ST" indicator
is ON.
Station Preset Memory
Putting the station in the memory.
1 Select the band
Push the Control knob to [FM] or [AM].
2 Select the frequency to put in the memory
Push the Control knob to [4] or [¢].
3 Put the frequency in the memory
Press the desired [1] — [6] button for at least
2 seconds.
The preset number display blinks 1 time.
On each band, 1 station can be put in the
memory on each [1] — [6] button.
Frequency display
Band display
ST indicator
Preset station number
Control knob
English
|
15
Auto Memory Entry
Putting stations with good reception in the
memory automatically.
1 Select the band for Auto Memory Entry
Push the Control knob to [FM] or [AM].
2 Open Auto Memory Entry
Press the [AME] button for at least 2 seconds.
When 6 stations that can be received are put in
the memory Auto Memory Entry closes.
When the <AF (Alternative Frequency)> (page 28) is
ON, only RDS stations are put in the memory.
When Auto Memory Entry is done in the FM2 band,
the RDS stations preset in the FM1 band aren’t put in
the memory.
Likewise, when it is done in the FM3 band, RDS
stations preset in FM1 or FM2 aren’t put in the
memory.
Preset Tuning
Calling up the stations in the memory.
1 Select the band
Push the Control knob to [FM] or [AM].
2 Call up the station
Press the desired [1] — [6] button.
16
|
English
RDS features
Traffic Information
Switching to traffic information automatically
when a traffic bulletin starts even when you aren’t
listening to the radio.
Press the [TI] button.
Each time the button is pressed, the Traffic
information function turns ON and OFF.
When it’s ON, "TI" indicator is ON.
When a traffic information station isn’t being
received the "TI" indicator blinks.
When a traffic bulletin starts, "TRAFFIC" is
displayed it and it switches to traffic information.
During reception of an AM station when the Traffic
Information function is turned ON, it switches to an
FM station.
During reception of traffic information the adjusted
volume is automatically remembered, and the next
time it switches to traffic information it’s automatically
the remembered volume.
Receiving other traffic information stations
Push the Control knob to [4] or [¢].
Traffic information can be switched when it is on the
Tuner source. However, you cannot switch the Traffic
information during reception of the traffic bulletin
switched from the sources other than the Tuner.
Radio Text Scroll
Scrolling the displayed radio text.
Hold down on [FM] of the Control knob for at
least 1 second.
PTY indicator
Control knob
TI indicator
English
|
17
PTY (Program Type)
Selecting the Program Type and searching for a
station.
1 Enter PTY mode
Press the Control knob.
During PTY mode the "PTY" indicator is ON.
This function can’t be used during a traffic bulletin or
AM reception.
2 Select the Program Type
Push the Control knob to [FM] or [AM].
Each time the knob is pushed, the Program Type
switches as shown below.
No. Program Type Display
1. Speech "SPEECH"
2. Music "MUSIC"
3. News "NEWS"
4. Current Affairs "AFFAIRS"
5. Information "INFO"
6. Sport "SPORT"
7. Education "EDUCATE"
8. Drama "DRAMA"
9. Culture "CULTURE"
10. Science "SCIENCE"
11. Varied "VARIED"
12. Pop Music "POP M"
13. Rock Music "ROCK M"
14. Easy Listening Music "EASY M"
15. Light Classical "LIGHT M"
16. Serious Classical "CLASSICS"
17. Other Music "OTHER M"
18. Weather "WEATHER"
19. Finance "FINANCE"
20. Childrens programs "CHILDREN"
21. Social Affairs "SOCIAL"
22. Religion "RELIGION"
23. Phone In "PHONE IN"
24. Travel "TRAVEL"
25. Leisure "LEISURE"
26. Jazz Music "JAZZ"
27. Country Music "COUNTRY"
28. National Music "NATION M"
29. Oldies Music "OLDIES"
30. Folk Music "FOLK M"
31. Documentary "DOCUMENT"
Speech and Music include the Program type shown
below.
Music: No.12
17, 26 30
Speech: No.3
11, 18 25, 31
The Program Type can be put in the [1] — [6] button
memory and called up quickly. Refer to the <Program
Type preset> (page 17).
The display language can be changed. Refer to
<Changing Language for PTY Function> (page 18).
3 Search for the selected Program Type
station
Push the Control knob to [4] or [¢].
When you want to search for other stations, push
[4] or [¢] of the Control knob again.
When the selected Program Type isn’t found, "NO PTY"
is displayed. Select another Program Type.
4 Exit PTY mode
Press the Control knob.
Program Type preset
Putting the Program Type in the Preset button
memory and calling it up quickly.
Presetting the Program Type
1 Select the Program Type to preset
Refer to <PTY (Program Type)> (page 17).
2 Preset the Program Type
Press the desired [1] [6] button for at least
2 seconds.
Calling up the preset Program Type
1 Enter PTY mode
Refer to <PTY (Program Type)> (page 17).
2 Call up the Program Type
Press the desired [1] [6] button.
18
|
English
RDS features
Changing Language for PTY
Function
Selecting the Program Type display language.
1 Enter PTY mode
Refer to <PTY (Program Type)> (page 17).
2 Enter Changing Language mode
Press the [TI] button.
3 Select the language
Push the Control knob to [FM] or [AM].
Each time the knob is pushed, the language
switches as shown below.
Language Display
English "ENGLISH"
French "FRENCH"
Swedish "SWEDISH"
German "GERMAN"
4 Exit Changing Language mode
Press the [TI] button.
English
|
19
CD/Audio file/External disc control features
Playing CD & Audio file
When there is no disc inserted
1 Open the panel.
Press the [0] button.
2 Insert a disc.
When the faceplate has been slid open, it might
interfere with the shift lever or something else. If this
happens, pay attention to safety and move the shift
lever or take an appropriate action, then operate the
unit.
Insert the disc horizontal to the slot. If you insert the
Disc as you push down the Disc, it may scratch the
Disc.
Refer to <About AAC, MP3 and WMA> (page8) for the
Audio file by models which can be played.
The announcement when selecting the folder can be
canceled by <Voice Index> (page29) during the play
of the ACDrive.
When a disc is inserted the "IN" indicator is ON.
When a disc is inserted
Press the [SRC] button.
Select the "CD" display.
Pause and play
Press the Control knob.
Each time the knob is pressed, it pauses and
plays.
Eject the disc
1 Eject the disc
Press the [0] button.
2 Return the panel to the original position
Press the [0] button.
Control knob
Disc numberIN indicator
Track number
Track time
Play mode
20
|
English
CD/Audio file/External disc control features
Playing External Disc
Playing discs set in the optional accessory disc
player connected to this unit.
Press the [SRC] button.
Select the display for the disc player you want.
Display examples:
Display Disc player
"CD CH" CD changer
"MD CH" MD changer
Pause and play
Press the Control knob.
Each time the knob is pressed, it pauses and
plays.
Disc 10 is displayed as "0".
The functions that can be used and the information
that can be displayed will differ depending on the
external disc players being connected.
Fast Forwarding and Reversing
Fast Forwarding
Hold down on [¢] of the Control knob.
Release your finger to play the disc at that point.
Reversing
Hold down on [4] of the Control knob.
Release your finger to play the disc at that point.
The sound is not output while the Audio file is being
searched.
Fast Forwarding and Reversing cannot be done while
AAC is being played. (KDC-W6031 only)
Fast Forwarding and Reversing cannot be done
depending on AAC file format. (KDC-W6531 only)
Track/File Search
Searching for a song on the disc or in the Audio
file folder.
Push the Control knob to [4] or [¢].
If the remote with number buttons is used as optional
accessories, a song you’d like to listen to can directly
be selected with the operation below.
1. Enter a track/file number.
Press the number buttons on the remote.
2. Do the Track/File Search.
Push the Control knob to [4] or [¢].
Function of disc changer/ Audio file
Disc Search/Folder Search
Selecting the disc set in the Disc changer or the
folder recorded on the Audio file media.
Push the Control knob to [FM] or [AM].
Track/File/Disc/Folder Repeat
Replaying the song, disc in the Disc changer or
Audio file folder you’re listening to.
Press the [REP] button.
Each time the button is pressed, the Repeat Play
switches as shown below.
In CD & External disc source
Repeat play Display
Track Repeat "TRAC REP"
Disc Repeat (In Disc Changer) "DISC REP"
OFF "REP OFF"
In Audio file source
Repeat play Display
File Repeat "FILE REP"
Folder Repeat "FOLD REP"
OFF "REP OFF"
  • Page 1 1
  • Page 2 2
  • Page 3 3
  • Page 4 4
  • Page 5 5
  • Page 6 6
  • Page 7 7
  • Page 8 8
  • Page 9 9
  • Page 10 10
  • Page 11 11
  • Page 12 12
  • Page 13 13
  • Page 14 14
  • Page 15 15
  • Page 16 16
  • Page 17 17
  • Page 18 18
  • Page 19 19
  • Page 20 20
  • Page 21 21
  • Page 22 22
  • Page 23 23
  • Page 24 24
  • Page 25 25
  • Page 26 26
  • Page 27 27
  • Page 28 28
  • Page 29 29
  • Page 30 30
  • Page 31 31
  • Page 32 32
  • Page 33 33
  • Page 34 34
  • Page 35 35
  • Page 36 36
  • Page 37 37
  • Page 38 38
  • Page 39 39
  • Page 40 40

Kenwood KDC-W6031 User manual

Category
Car media receivers
Type
User manual
This manual is also suitable for

Ask a question and I''ll find the answer in the document

Finding information in a document is now easier with AI