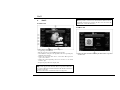
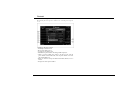
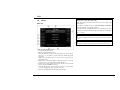
VISTEON VNMC-1000 Owner's manual
- Category
- Car navigation systems
- Type
- Owner's manual


Preface
- 2 -
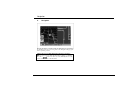
This manual explains how to properly use the Visteon Navigation
Radio System and contains the information that a driver should know
for an enjoyable and safe driving experience.
Please keep this manual available inside the car for other drivers and
passengers to refer to.
:
Danger:
It provides information that the users must keep to prevent from the
possibility of serious or fatal injury to themselves or others.
:
Caution:
It provides information that the users must keep to prevent from the
possibility of vehicle or product damage.
:
Recycling:
It provides information for environmental protection.
:
Note:
It provides additional information.
2008
All rights reserved. No part of this manual may be reproduced, copied,
transmitted, disseminated, transcribed, downloaded or stored in any
storage medium, in any form or for any purpose without the express prior
written consent. Furthermore, any unauthorized commercial distribution
of this manual or any revision hereto is strictly prohibited.
Information in this document is subject to change without notice. Visteon
Corporation reserves the right to change the content herein without the
obligation to notify any person or organization of such changes.
All trademarks used herein remain the exclusive property of their
respective owners. Nothing contained in this manual should be construed
as granting, by implication or otherwise, any license or right to use any of
the trademarks displayed herein. Misuse of any trademarks or any other
content in this manual is strictly prohibited.

Preface
- 3 -
USA-Federal Communications Commission (FCC)
This device complies with part 15 of the FCC Rules. Operation is
subject to the following two conditions: (1) This device may not
cause harmful interference, and (2) this device must accept any
interference received, including interference that may cause
undesired operation.
This equipment has been tested and found to comply with the limits
for a Class B digital device, pursuant to Part 15 of FCC Rules.
These limits are designed to provide reasonable protection against
harmful interference in a residential installation. This equipment
generates, uses, and can radiate radio frequency energy. If not
installed and used in accordance with the instructions, it may cause
harmful interference to radio communications. However, there is no
guarantee that interference will not occur in a particular installation.
If this equipment does cause harmful interference to radio or
television reception, which can be determined by tuning the
equipment off and on, the user is encouraged to try and correct the
interference by one or more of the following measures:
-Reorient or relocate the receiving antenna
-Increase the distance between the equipment and the receiver.
-Connect the equipment to outlet on a circuit different from that to
which the receiver is connected.
-Consult the dealer or an experienced radio/TV technician for help.
Any changes or modifications not expressly approved by the party
responsible for compliance could void the user’s authority to
operate the equipment.
Caution: Exposure to Radio Frequency Radiation.
To comply with FCC RF exposure compliance requirements, for
mobile configurations, a separation distance of at least 20 cm must
be maintained between the antenna of this device and all persons.
This device must not be co-located or operating in conjunction with
any other antenna or transmitter.
Manufactured under license from Dolby
Laboratories.
"Dolby" and the double-D symbol are trademarks
of Dolby Laboratories.
Note:
This product incorporates copyright protection technology that is
protected by U.S. patents and other intellectual property rights. Use
of this copyright protection technology must be authorized by
Macrovision, and is intended for home and other limited viewing
uses only unless otherwise authorized by Macrovision. Reverse
engineering or disassembly is prohibited.

Contents
- 4 -
1. Cautions............................................................................ 5
Precautions ..............................................................................5
Discs........................................................................................5
Safety Instructions....................................................................7
Cautions before Use.................................................................7
Cautions while Using the Product .............................................8
Cautions before Install, and anytime during the Use of this Product.8
2. Product Features.............................................................. 9
Main Unit..................................................................................9
Remote Control ......................................................................10
3. Basic Operation.............................................................. 12
Initial Use and Power Supply ..................................................12
Volume Adjustment.................................................................12
Mute.......................................................................................12
Adjusting the Slope of LCD Panel...........................................13
Inserting and Removing Disc/SD Memory Card ......................13
Using the Touch Screen..........................................................14
Replacing the Remote Control Batteries .................................14
4. Selecting Source............................................................ 15
Selecting a Source on the Main Menu ....................................15
Moving to the Main Menu .......................................................15
5. Common GUI .................................................................. 16
6. Navigation....................................................................... 17
7. Radio............................................................................... 18
Radio GUI ..............................................................................18
Inputting Radio Frequency......................................................18
8. Disc ................................................................................. 19
Disc GUI.................................................................................19
Inputting Title/Chapter/Track...................................................20
DVD/VCD Control...................................................................20
9. iPod™ ............................................................................. 21
iPod Video GUI.......................................................................21
iPod Music GUI ......................................................................21
iPod Menu & List ....................................................................22
10. AV-IN................................................................................ 25
11. SIRIUS (Optional) ............................................................ 26
SIRIUS GUI............................................................................ 26
Channel List ........................................................................... 27
Direct Channel Number Entry ................................................. 27
Preset ....................................................................................28
Memo – Song Seek & Alert..................................................... 28
Jump – Shortcut to favored channel........................................ 29
Option – INFO ........................................................................ 29
Option – Channel ................................................................... 30
Option – Song Seek Alert ....................................................... 31
12. Bluetooth......................................................................... 33
Bluetooth GUI.........................................................................33
Phone Book ...........................................................................34
13. Movie ............................................................................... 36
Movie GUI.............................................................................. 36
Movie Playlist Edit ..................................................................37
Inputting File No. ....................................................................37
Movie Playlist .........................................................................38
14. Music ............................................................................... 39
Music GUI ..............................................................................39
Music List............................................................................... 40
15. Photo ............................................................................... 42
16. Rear View Camera........................................................... 43
17. Phone Mute ..................................................................... 44
18. Setup................................................................................ 45
Display...................................................................................45
Sound ....................................................................................48
System................................................................................... 51
Version...................................................................................57
19. Appendix ......................................................................... 59
Trouble Shooting ....................................................................59
Notices for Installation and Service.........................................61
Installation and Removal of the Main Unit ............................... 62
Components and Accessories ................................................63
System Connection ................................................................64
Specifications ......................................................................... 65

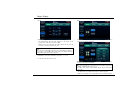
Cautions
- 5 -
1. Cautions
Precautions
WARNING:
TO PREVENT FIRE OR ELECTRICAL SHOCK, DO NOT
EXPOSE THIS PRODUCT TO RAIN OR MOISTURE.
CAUTION:
TO REDUCE THE RISK OF ELECTRIC SHOCK, DO NOT
REMOVE COVER (OR BACK). NO USER SERVICEABLE PARTS
INSIDE. REFER SERVICING TO QUALIFIED SERVICE
PERSONNEL.
This symbol warns the user of uninsulated voltage
within the unit that can cause dangerous electric
shocks.
This symbol alerts the user that there are important
operating and maintenance instructions in the literature
accompanying this unit.
CAUTION:
THIS DVD VIDEO RECORDER IS A CLASS 1 LASER PRODUCT.
USE OF CONTROLS, ADJUSTMENTS OR PERFORMANCE OF
PROCEDURES OTHER THAN THOSE SPECIFIED HEREIN MAY
RESULT IN HAZARDOUS RADIATION EXPOSURE. DO NOT
OPEN COVERS AND DO NOT REPAIR THE PLAYER
YOURSELF. REFER SERVICING TO QUALIFIED PERSONNEL.
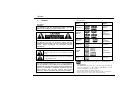
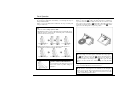
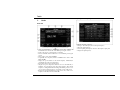
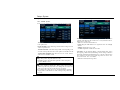
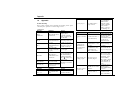
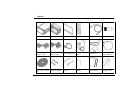
Discs
• Playable Discs
Type of
Media
Mark
(Logo)
Recorded
Signals
DVD-Video
Digital Video
(MPEG2)
DVD-RW
DVD-R
Digital Video
Divx
Digital Audio
MP3/WMA/OGG
DVD+RW
DVD+R
Digital Video
Divx
Digital Audio
MP3/WMA/OGG
Audio CD
Digital Audio
CD-RW
CD-R
Divx
Digital Audio
MP3/WMA/OGG
VCD
Digital Video
is a trademark of DVD Format/Logo Licensing Corporation.
• Unplayable Discs
- DVD-RAM, DVD-audio, CD-i, photo CD, super audio CD, DVD with
region codes other than 1 or ALL, DTS-CD, DVD-ROM for personal
computers, CD-ROM for personal computers.
- Any other discs without compatibility indications.
- Do not insert any disc that is not round such as specialty or novelty discs.
- Any disc size that is not either 120mm or 80mm in diameter.

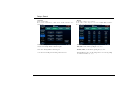
Cautions
- 6 -
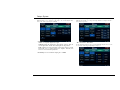
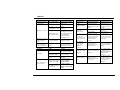
• DVD Region Code
DVD Video System assigns the region code to DVD Video Players and
DVD Discs, according to the regions of the world where they are sold. For
example, DVD Video Players that are sold in U.S.A. can only play discs
with the correct number (‘1’ or ‘ALL’ or any combination of numbers
including ‘1’) The DVD region number is indicated on the disc as shown
below.
Please, refer to the provided manual in the DVD Title which you purchased
for the detailed information of region codes per country.
• Handling Discs
Do not use discs with rough edges. Using such discs could cause the
product to malfunction or be damaged.
Do not attach labels to the disc surface or mark it with a pencil or a pen.
Doing so could cause the product to malfunction or be damaged.
Do not use discs if they have tape or other adhesive materials or traces of
such material on them. Using such discs could cause the product to
malfunction or be damaged.
Do not use discs that are badly scratched, deformed or cracked. Using such
discs could cause the product to malfunction or be damaged.
Do not use commercially available CD protectors or disc stabilizers. Doing
so could cause the product to malfunction or be damaged.
Do not touch the disc surface when inserting or removing the disc.
• Cleaning Discs
Use a soft cloth to wipe the disc from the center out towards the
circumference.
Do not use any cleaner, static-proof spray or thinner on the disc. The discs
can be damaged.
• Keeping Discs
Do not store discs in places that may experience extreme hot or cold
temperatures. Doing so could deform the disc. Using a deformed disc could
cause the product to malfunction or be damaged.
Do not keep discs in places exposed to direct sunlight or close to heaters.
Doing so could deform the disc. Using a deformed disc could cause the
product to malfunction or be damaged.
Do not keep discs in places that are exposed to high levels of dust or
humidity. Using discs stored in such places could cause the product to
malfunction or be damaged.
• Color Monitor System
DVD player can only play discs with NTSC or PAL video formats, it will
not play discs with SECAM format.

Cautions
- 7 -
Safety Instructions
• Do not use when the product contains a defect or malfunction.
Do not operate the product while it is in abnormal conditions. When any
foreign material is inserted or a smoke or strange smell is continuously
detected, stop using the product and contact with a purchase site or
customer support center. It may cause an accident, fire, or electric shock.
• This product uses 12V DC vehicle power supply.
This product operates on 12V vehicle power supply. Be sure to use the
cable enclosed with the product. Or it may cause a product failure or serious
malfunction of the vehicle.
• Be cautioned not to damage any vehicle parts during installation.
Be careful not to damage any vehicle parts (electric devices, wiring, pipes,
screws, etc.) while installing the product. When the product is abnormally
installed, it may cause an abnormal control of vehicle, fire, electric shock,
or traffic accident by damage of vehicle parts.
• Never arbitrarily disassemble or modify the product.
Do not arbitrarily disassemble or modify the product. It may cause a fire,
electric shock, or product damage. If a product failure was caused by a
user’s fault, the user cannot get after-sales services.
• Set the volume at an adequate level while using the product.
When the product is used in a large volume, a traffic accident may happen
because the driver cannot hear sound from outside. Adjust the volume level
of the product for right use.
• Use genuine parts only.
Use genuine parts only. Or it may cause product damage, wrong installation,
or malfunction. In this case, the user assumes all responsibility for errors.
When any parts are lost or damaged, contact with a purchase site or
customer support center.
• Preserve the product from humidity or by direct contact with liquid,
and do not block the ventilation hole.
When any humidity or liquid substance is inserted inside the product, it may
cause a product failure or fire. Do not block the ventilation hole. If it is
blocked, a product failure or fire may happen due to accumulated heat.
• Do not cut or modify the provided cable.
Do not cut or modify the provided cable. The power cord has its own fuse
for preventing over current. If the user uses the cord without the fuse, the
protection circuit does not work and it may cause a product failure or fire.
• Never manipulate or watch the product while driving.
Do not manipulate or watch the product while driving. It may cause a traffic
accident by careless driving. Be sure to park or stop the car in a safe area to
manipulate or watch the product.
Cautions before Use
• Install the product correctly for use.
Before using the product, correctly install the product after reading the
system connection section in this user guide.
• Use the product after starting the engine.
Using the product for a long time without the engine running can drain the
battery and may result in not being able to start the engine.
• Configure all settings for use before driving.
If the driver manipulates or changes the settings while driving, operation
can be interrupted. When the user especially uses the navigation function,
start driving after finishing the configuration for path setting, search, and
similar features. If any configuration change is needed while driving, park
the car in a safe place, change to the desired settings, and drive the car again.
• Use only the navigation GPS antenna provided.
For the navigation GPS antenna to be connected to the product, use the
provided antenna and extension cable only. Place the navigation antenna
over 30cm away from metal body surfaces.
When the antenna is installed outside the car, its cable may be damaged,
disconnected, or stolen.

Cautions
- 8 -
Cautions while Using the Product
• The operation temperature range of the product is +15 to +140
degrees F (-10 to +60 degrees C).
Use the product only when the ambient temperate is within the temperature
range. If the product is used out of the temperature range, it may cause a
product malfunction. Because of the nature of LCD panel, the screen may
be darker when it is initially operated at very low temperatures. After
several minutes, the brightness of the screen returns to normal.
Do not operate the product after turning on the heater when the temperature
in the car is very low. It may cause a product malfunction or damage due to
frost or condensation on the optical lens surface.
• Be cautioned when using the LCD panel.
Be careful not to manually pull out or push in the LCD panel. Do not apply
an impact to the LCD panel. It may cause damage to the panel.
When any foreign material is caught between the LCD panel and its body
while adjusting the slope of the panel, product damage may happen.
Do not forcibly press the case around the touch panel. It may cause a
product malfunction or damage.
• Observe actual traffic laws and regulations.
While the navigation function is active, the driver can encounter guidance
information that is different from actual traffic situation due to change of
traffic regulations. Be sure to follow the actual traffic regulations. Visteon
assumes no responsibility for damage or injury caused by not observing
actual traffic regulations. Drive carefully all the time.
Cautions before Install, and anytime during the Use of this Product
• Do not disable or circumvent the parking brake safety interlock of
this unit, which is designed to prohibit viewing of movies or
pictures while the vehicle is moving, unless the vehicle parking
brake is engaged.
Many states prohibit the display of video and/or television in view of the
driver of the vehicle. Check your local state and federal laws and
regulations for more information.

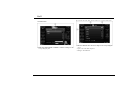
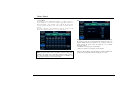
Product Features
- 9 -
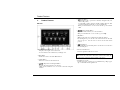
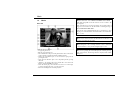
2. Product Features
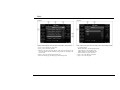
Main Unit
Wide TFT LCD Touch Screen
- It displays video signals on the touch screen.
- You can select the various functions by touching its icon.
[Mute] Button
- It mutes the sound or cancels the Mute function.
[Volume] Button
- It increases or decreases the volume level.
[ ] Repeat Voice & Navigation Button
- It repeats the recent navigation voice message.
- When pressed and held for over one second, it selects the navigation
function.
[ ] Power Button
- It turns ON the radio’s power if it is currently off. (Ignition key is in
ACC or ON position)
- It sequentially switches between currently running functions when
pressed momentarily and the radio’s power is currently ON.
- When pressed and held for over one second, the radio’s power is turned
OFF.
[ ] Home & Setup Button
- It goes to the main menu for you to select a function.
- When pressed and held for over one second, it goes to Setup.
[Tilt] Button
- While pressing it, the slope of LCD panel continuously changes.
- By adjusting the slope to the end of the V direction the two SD Card
slots are exposed. You can insert or remove the SD cards in this
position.
[ ] Eject Button
- It automatically moves the LCD panel to eject the disc or to insert a disc
into the DVD player.
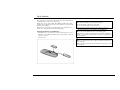
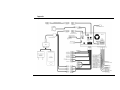
Remote Control Receiver
- It receives signals from the remote control.
:
Note: Use of Remote Control
When you have any other devices with remote controls in the vehicle, the
use of the remote control may interfere with the other devices.
Reset Button (recessed)
- It will reset the radio system in case of a malfunction by poking a paper-
clip or other blunt wire through this hole.

Product Features
- 10 -
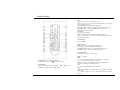
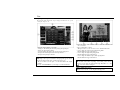
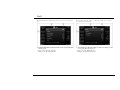
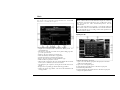
Remote Control
[PWR/SRC] Power & Source Select Button
- It functions the same as the [ ] button on the radio.
[BAND] Button
• Radio: Switches the frequency band (AM → FM1 → FM2→ AM).
• SAT Radio: Switches the preset bank A/B/C.
Numeric Button
• Radio
- Selects any of stations stored in Presets (1–6).
- When pressed for over one second, the current frequency is stored in the
corresponding preset (1–6).
- Enters the frequency in the frequency input panel.
• Disc: Enters values for Chapter, and Track in the corresponding panel.
• Movie/Music/Photo: Selects a file in the file No. input panel.
• Phone: Enters the phone number.
• SAT Radio
- Selects the preset number.
- Enters the channel number in the direct channel input keypad.
- When pressed for over one second, the current frequency is stored in the
corresponding preset (1–6).
[SETUP] Button
- It goes to Setup.
[DIRECT] Button
• Radio: Opens or closes the frequency input panel.
• Disc: Opens or closes the Chapter/Track input panel.
• Movie/Music/Photo: Opens or closes the file No. input panel.
• SAT Radio: Opens or closes the Channel input panel.
[VOLUME] Button
- It increases or decreases the volume level.
[▲/▼//] Button
• Radio
- /: Scans Up/Scan Down tunes to next station for 8 seconds then
moves to next station. Press again to stop Scan.
- ▼: Removes the frequency entered in the frequency input panel.
• Disc: Moves the cursor on the DVD control.
• iPod
/: Performs the Rewind/Fast Forward function.
• Photo
- ▲/▼: Doubles/Halves in size each time you press until it is 0.25/4X
normal size.
- /: Rotates the photo by 90° to the counter-clockwise/ clockwise
direction.

Product Features
- 11 -
• SAT Radio
- ▲/▼: Selects the category.
- /: Selects the channel.
[ENT] Button
• Radio: Selects a frequency that has been entered in the frequency input
panel.
• Disc
- Selects values for Chapter, and Track entered in the corresponding input
panel.
- Selects the item where the cursor is located in the DVD control.
• iPod: Stops the Rewind/Fast Forward function.
• Phone: When a phone call is placed or received for the entered phone
number, it answers.
• Movie/Music/Photo: Selects a file entered in the file No. input panel.
• SAT Radio: Selects a channel that has been entered in the channel input
keypad.
[RETURN] Button
• Radio: Closes the frequency input panel.
• Disc: Closes the Title/Chapter/Track input panel.
• Movie/Music/Photo: Closes the file No. input panel.
• SAT Radio: Jumps to a pre-registered channel.
[MUTE] Button
- Performs or cancels the Mute function.
[PLAY/PAUSE] Button
• Disc/iPod/Phone/Movie/Music: Plays back a file or pauses it.
• Photo: Starts or stops a slideshow.
:
Note: Manipulation of MP3 Player on the Bluetooth Mobile Phone
This function works only when your mobile phone supports the Bluetooth
stereo headset and has the MP3 player function.
[STOP] Button
• Disc/iPod/Phone/Movie/Music/Photo: Stops the playback.
[SEEK] Button:
• Radio: Used to select a previous or next receivable frequency.
• Disc: Used to select a previous or next chapter/track.
• iPod/ Phone/Movie/Music/Photo: Used to select a previous or next file.
:
Note: Multi Zone Rear Source Usage
When Multi Zone Rear Source is active, the remote controls the rear
source only. In this case, the front source is controlled by touching the
icons.
~ Buttons are only for the navigation source.
[▲/▼//] Button
- It moves the map up/down/left/right on menu.
[MENU] Button
- It displays menu, jump to main menu.
[MAP] Button
- It centers map on current vehicle location.
[ ] Select Button
- It selects the currently highlighted item.
[ ] Repeat Voice Button
- It repeats voice instruction.
[PAGE] Button
- It pages up/down in displayed list.
[ZOOM] Button
- It zooms in the map to show a smaller area or out it to show a larger area.

Basic Operation
- 12 -
3. Basic Operation
Initial Use and Power Supply
The power of this product is set to Off by default. Accordingly when you
use this product for the first time after installation, move the ignition key
location to ACC or ON and press the [ ] button to supply power to the
product. When the power is supplied, the LCD panel is moved inside and
returns to the original position.
:
Caution: Battery Discharge
It is recommended to use this product while the car engine is running. If
you use this for a long time while the engine is not started, the battery
may become exhausted and you may not be able to start the car engine.
When the ignition key is turned to LOCK or extracted, the current source
and settings are automatically saved and the power is turned off. When the
ignition key is turned to ACC or ON, the power is automatically turned on
and the saved settings are returned.
When the [ ] button is pressed for over one second, the power is turned
off. In this case, turn the ignition key to ACC or ON and press the [ ]
button to supply power.
:
Note: Automatic Start
When you press the [ ] button for over one second to turn off the
power, the power of the product will not be automatically turned on when
starting the engine. To automatically turn on the product with the Ignition
key, do not use the [ ] button to turn off power. Simply let the
product power down when the ignition key is turned to OFF.
:
Note: Disk Resume Play
If you turned off the power with a disc inserted, when you play back the
disc after turning on the power, it is played back from the location where
you previously listened.
:
Note: Illumination at Night Driving
When you turn on the headlights the buttons will be illuminated whether
the product is turned on or off.
Volume Adjustment
When you press the [Volume] button or Volume (+)/(-) icons on the LCD
screen, the volume level increases or decreases.
:
Danger:
Volume for Safe Driving
Set to a comfortable volume level in which you can still hear the sounds
from outside.
:
Danger:
Max. Volume Setting
If the power is turned off while the volume is higher than the Max.
Volume set in Setup > Sound > Speaker Control, when you turn on the
power again, the volume is adjusted down to Max. Volume setting.
Mute
When you press the [Mute] button or the Mute icon on the LCD screen, the
Mute function is activated and a red X appears over the speaker icon. When
you press the icon again, the Mute function is deactivated.
:
Note: No Sound
When the video of the product is normal but no sound is heard, check
whether the Mute function is active.

Basic Operation
- 13 -
Adjusting the Slope of LCD Panel
By pressing the [Tilt] button momentarily, you can change the slope of
LCD panel little by little.
When you press the [Tilt] button continuously, the slope of LCD panel
changes continuously.
:
Note: Auto Close
• You can set this in Setup > System > ETC.
• ON: When the engine is stopped, the LCD panel is automatically closed.
When the engine is started, the tilt of the LCD panel is automatically
adjusted to the last saved position.
Angle adjustment during use Power OFF by ignition key Power ON by ignition key
• OFF: Even if the engine is stopped or started, the LCD panel is not
automatically closed and stays at the current angle.
Angle adjustment during use Power OFF by ignition key Power ON by ignition key
:
Caution: LCD Panel TILT Mechanism
Do not forcibly move the LCD panel or press it
hard. It may result in product damage or
malfunction.
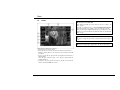
Inserting and Removing Disc/SD Memory Card
When you press the [ ] button, the LCD panel moves downward to
expose the slot for disc insertion. Push a disc into the slot as shown to insert
it. To remove a disc push the [ ] Eject button. The LCD panel moves
downward and extracts the disc. After removing it, press the [ ] button
again to move the LCD panel to its previous position.
:
Note: Disc Ejection and LCD Panel Angle
If the current angle of the LCD panel is lower than the moving angle of
the [ ] button, when you press the [ ] button, the LCD panel does
not move but (if a disc is inserted) just extracts the disc. When you
insert/remove/replace a disc and press the [ ] button again, the LCD
panel does not move. In this case, adjust the angle by using the [Tilt]
button.
By using the [Tilt] button, you can move the LCD panel downward to
remove or insert an SD memory card as shown above.
:
Note: SD Card Slot
The SD card slot on the right is used exclusively by the Navigation
Function, it is not for any other use. The SD card slot on the left is for the
storing of Movie, Music or Photo files the user may desire for use with
the radio’s multimedia playback features.

Basic Operation
- 14 -
Using the Touch Screen
This product uses a touch screen LCD display. You can perform functions
by touching their respective icons on the screen.
When video sources such as DVD, iPod VIDEO, AV-IN, Movie, Photo,
and Rear View CAM are played, the previous function is stopped and the
function pressed will play.
When the icon does not appear, touch the LCD screen to display the icon.
Be sure not to manipulate the touch screen while driving.
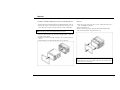
Replacing the Remote Control Batteries
Push the battery cover of the remote control in arrow direction to open it.
Install two AAA (AM4 1.5V) batteries with correct polarity as shown in
the remote control.
Close the cover.
:
Danger:
Handling Remote Control Batteries
• If you do not use batteries properly, they may explode.
• Do not disassemble or apply heat to the batteries.
• Do not place the batteries near any heat source.
• After removing the batteries, please recycle or dispose of properly.
:
Recycling: Disposing of used Remote Control Batteries
• If you do not use the batteries any more, scrap them properly.
• If the batteries are left for a long time, it may cause harms to children or
animals, or cause environmental pollutions. Scrap in a designated place
after keeping them.
:
Note: Handling Remote Control Batteries
• When you replace batteries, always replace both batteries with new ones
of the same type.
• Remove the batteries from the remote control if it is not going to be used
for a long time.

Selecting Source on
- 15 -
4. Selecting Source
Selecting a Source on the Main Menu
• Click any source icon on the main menu to run it.
• If you select any other source when a source is running, the sources are
running at the same time or the former is ended automatically.
• When you press the [ ] button on the body or [PWR/SRC] button on
the remote control, the next source among the currently running sources is
selected.
• The sources that cannot be run with the currently running source are
deactivated. (Grayed Out) In order to run a deactivated source, stop the
running source first and then select the desired source.
• The currently running sources appear on the bar at the bottom. The
exception is the rear view camera source which does not appear.
:
Note: Source to Run Automatically
• A rear source can be selected in Setup > Display > Zone > Multi Zone.
• When the phone rings, Bluetooth automatically runs.
• When you back your car, Rear View Camera automatically runs (If
equipped).
:
Note: Source Deactivation
When the Movie is set for rear source, Disc, iPod, AV-IN, and Music are
deactivated.
:
Note: Movie is ended automatically if you execute Navi
• If you could execute the Navigation source while the Movie source is
running on, the Movie source is ended automatically.
• If you run the Navigation when the Movie is set for rear source, the
Movie source is ended and Multi Zone is switched to Single Zone
automatically.
Moving to the Main Menu
• When you press the [ ] button on the body or the [SETUP] button
on the remote control while a source is running, the main menu appears.
• When you click the menu icon on the upper left corner, the main menu
appears while the current source is running.
• When you click the [ X ] icon on the upper right corner, the current source
stops running and the main menu appears.
• When video sources such as DVD, VCD, iPod VIDEO, AV-IN, Movie,
Photo, and Rear View CAM are played, the icon disappears in three
seconds.
• When the icon does not appear, touch the LCD screen to display the icon.

Common GUI
- 16 -
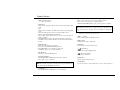
5. Common GUI
Changes to the main menu while the current source is running.
Changes to the main menu after stopping the current source running.
Performs or stops the Mute function. The shape of icon changes
according to the Mute function’s activation.
Increases or decreases the volume level.
Displays the currently running sources. Depending on the source, some
sources cannot run at the same time.
Multi Zone Rear Source appears in Setup > Display > Zone. When
Single Zone is selected, it does not appear.
Displays the current output source.
Indicates that the product is connected to a Bluetooth mobile phone.
Indicates that a disc (DVD/CD/VCD/MP3CD) is inserted.
Displays the current time.

Navigation
- 17 -
6. Navigation
Insert the SD memory card that contains the Navigation map program into
the NAVI slot and refer to the user guide for the Navigation map program
that is separately provided.
:
Note: Moving to the Main Menu while Navigation is Running
The icon does not appear while the Navigation is running or outputting.
Press the [ ] button on the body or the [SETUP] button on the
remote control to move to the main menu.

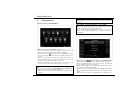
Radio
- 18 -
7. Radio
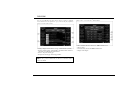
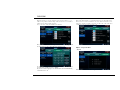
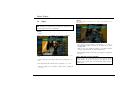
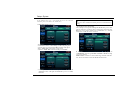
Radio GUI
Saves local frequencies to maximum 6 presets after scanning the
bandwidth for the selected radio band. When pressed again, it ends.
Seeks to the previous or next frequency on the band.
Scans for available stations and holds for 7 seconds. When pressed again,
it ends.
Shows a radio source such as AM-FM.
Sequentially select frequency bands for AM-FM sources such as AM,
FM1, and FM2.
Displays the preset number for the current frequency. Additionally it
sequentially selects the stored frequencies.
Opens the frequency input touch pad panel.
Displays the preset frequencies that have been set automatically or
manually. You can directly select the desired frequency. The selected
frequency is distinguished with blue background. When pressed for over
one second, the current frequency is stored in the corresponding preset.
Displays the currently listening PS (program service code), Stereo or not,
frequency, band, RT (radio text), and the like.
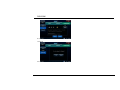
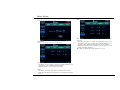
Inputting Radio Frequency
Enter the frequency to listen to.
Changes to the main display and sets the input frequency.
Deletes the input frequency.
Cancels inputting the frequency and closes the frequency input panel.
Displays the input frequency.

Disc
- 19 -
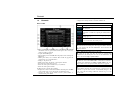
8. Disc
Disc GUI
• DVD
Plays a disc or pauses it.
Pauses the disc playback and displays the message, “Press Play Key To
Continue”. When pressed again, it ends.
In case of DVD, it plays back the previous/next chapter. In case of CD,
VCD, or MP3CD, it plays back the previous/next track.
Selects Random or Repeat for the playback mode. If not selected, it
repeatedly plays back all chapters or tracks in a disc.
:
Note: Exceptional Cases for Disc Playback
• DVD: Does not support the random playback mode.
• MP3CD: Repeatedly plays back all tracks in the folder (not in the disc).
Displays the playback information. When pressed, it opens the
corresponding input panel. It does not support the playback period.
- In case of DVD, it displays the title, chapter, and played time.
- In case of CD/VCD, it displays the track and played time.
- In case of MP3CD, it displays the track and folder name.
Changes to the DVD/VCD control. If the disc is CD/MP3CD, this is not
supported.
Displays the current playback position. You can change it by clicking the
desired position on the bar or dragging the arrow.
Displays the played time and the running time.
:
Note: Disc Auto-Play When a Disc Inserted into
When you insert a DVD/CD/VCD/ MP3CD into the slot, it begins playing
automatically. But in the case that the Movie is set for rear source, Disc
Auto-Play doesn’t work.
• MP3CD
Displays the list of MP3 files and playable files in the folder. When
pressed, it is played back.
Changes to the track input panel.
Displays the current folder. When pressed, it opens or closes the folder
playback list panel.
Moves to the previous/next page.
Displays the current page and total page number.

Disc
- 20 -
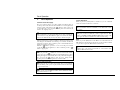
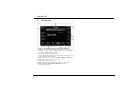
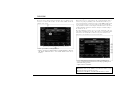
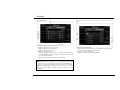
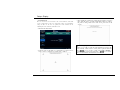
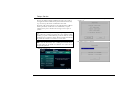
Inputting Title/Chapter/Track
The following figure displays the chapter input panel that has been open by
clicking the chapter icon.
Enter the chapter number to play back.
Changes to the main display and starts playing the input chapter.
Deletes the input chapter number.
Cancels inputting the chapter and closes the chapter input panel.
Displays the current chapter and total chapter number.
Displays the input chapter number.
:
Note: Title/Chapter/Track Input Panel
According to the icon pressed just before the input panel appears, the title
input panel, chapter input panel, or track input panel is open.
• In case of DVD, you can input or set the title number and chapter
number.
• In case of CD/VCD/MP3CD, you can input or set the track number.
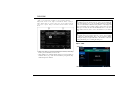
DVD/VCD Control
Moves the cursor on the root/title menu or selects the item where the
cursor is located.
Moves to the DVD root menu.
When pressed for over one second, it moves to the DVD title menu.
Used to change the output of audio while playing DVD.
But the DVD must support this function.
Used to change the angle while playing DVD.
But the DVD must support this function.
Used to change the subtitle (caption) while playing DVD.
But the DVD must support this function.
:
Note: Root/Title Menu
The Root/Title menu differs depending on the DVD product and its
version. You can select the desired item using (▲)/(▼)/()/() and
( ) icons and confirm or change it.
:
Note: VCD Control Screen
In VCD control, only the icon is displayed and supported.
Page is loading ...
Page is loading ...
Page is loading ...
Page is loading ...
Page is loading ...
Page is loading ...
Page is loading ...
Page is loading ...
Page is loading ...
Page is loading ...
Page is loading ...
Page is loading ...
Page is loading ...
Page is loading ...
Page is loading ...
Page is loading ...
Page is loading ...
Page is loading ...
Page is loading ...
Page is loading ...
Page is loading ...
Page is loading ...
Page is loading ...
Page is loading ...
Page is loading ...
Page is loading ...
Page is loading ...
Page is loading ...
Page is loading ...
Page is loading ...
Page is loading ...
Page is loading ...
Page is loading ...
Page is loading ...
Page is loading ...
Page is loading ...
Page is loading ...
Page is loading ...
Page is loading ...
Page is loading ...
Page is loading ...
Page is loading ...
Page is loading ...
Page is loading ...
Page is loading ...
Page is loading ...
Page is loading ...
-
 1
1
-
 2
2
-
 3
3
-
 4
4
-
 5
5
-
 6
6
-
 7
7
-
 8
8
-
 9
9
-
 10
10
-
 11
11
-
 12
12
-
 13
13
-
 14
14
-
 15
15
-
 16
16
-
 17
17
-
 18
18
-
 19
19
-
 20
20
-
 21
21
-
 22
22
-
 23
23
-
 24
24
-
 25
25
-
 26
26
-
 27
27
-
 28
28
-
 29
29
-
 30
30
-
 31
31
-
 32
32
-
 33
33
-
 34
34
-
 35
35
-
 36
36
-
 37
37
-
 38
38
-
 39
39
-
 40
40
-
 41
41
-
 42
42
-
 43
43
-
 44
44
-
 45
45
-
 46
46
-
 47
47
-
 48
48
-
 49
49
-
 50
50
-
 51
51
-
 52
52
-
 53
53
-
 54
54
-
 55
55
-
 56
56
-
 57
57
-
 58
58
-
 59
59
-
 60
60
-
 61
61
-
 62
62
-
 63
63
-
 64
64
-
 65
65
-
 66
66
-
 67
67


VISTEON VNMC-1000 Owner's manual
- Category
- Car navigation systems
- Type
- Owner's manual
Ask a question and I''ll find the answer in the document
Finding information in a document is now easier with AI
Other documents
-
Curtis MPK4099UK Quick start guide
-
Power Acoustik PADVD-230 Owner's manual
-
Xtrons HD1003HD User manual
-
-
 Boss Audio Systems BV7948B User manual
-
Magnadyne M4-LCD User manual
-
-
Pioneer AVH-X7500BT User manual
-
Pioneer AVH-P8400BH User manual
-
Pioneer AVH-8400BT User manual
