Page is loading ...

Date Issued: 10/05/17 IS-15500-US
We’re here to help 866-558-5706
Hrs: M-F 9am to 5pm EST
CAUTION – RISK OF SHOCK –
Disconnect Power at the main circuit breaker panel or main fuse
box before starting and during the installation.
INSTRUCTIONS PERTAINING TO A RISK OF FIRE,OR INJURY TO PERSONS
IMPORTANT SAFETY INSTRUCTIONS
WARNING — Risk of Electric Shock. Install luminaires
10 feet (3M) or more from pools, spas or fountains.
1) Turn off / unplug and allow to cool before replacing lamp.
2) Do not touch lamp or fixture if warm.
3) Do not look directly at lamp when on.
4) Keep lamp away from combustible materials.
5) Use only with wattage and LED lamp marked on fixture.
SAFETY INSTRUCTIONS
READ THIS FIRST
KEEP THESE INSTRUCTIONS
This fixture is intended for installation in accordance with the National
Electric Code (NEC) and Local code specifications. Failure to adhere to
these codes and instructions may result in serious injury and/or property
damage and will void the warranty.
1) This fixture is to be used only with a power unit (transformer) rated a maxi-
mum of 300 W (25 AMPS) 15 volts per circuit.
2) The #18 ga. fixture wire is not intended for direct burial or connection to
transformer.
3) Direct burial rated wire is to be buried a minimum of 6” (152mm) beneath the
surface of the ground. NOTE: If additional Direct Burial wire is needed,
contact your local Kichler® landscape distributor.
• 8 GA wire can be purchased in length of 250’ (76 M), 15503-BK.
• 10 GA wire can be purchased in length of 250’ (76 M), 15504-BK.
• 12 GA wire can be purchased in lengths of 100’ (30 M), 15501-BK; 250’
• (76 M), 15502-BK; 500’ (152M), 15505-BK; and 1000’ (304 M), 15506-BK.
4) Fixture shall not use a tungsten halogen lamp.
5) Wiring connections must be made with approved/listed wire connection
device(s) suitable for the application. Do not exceed manufacturers’ wiring
combination specifications for size and quantity of conductors.
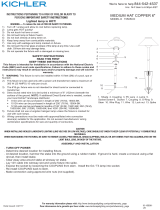
ASSEMBLY AND INSTALLATION:
1. TURN OFF POWER
2. Open the quick link to connect the mounting bracket and remaining parts
3. Install the mounting bracket to your desired ceiling / tree surfaces.
4. Adjust the fixture chain to your desired length by removing links, as needed.
5. Unscrew the shade to expose the socket. Install the MR16 lamp in socket.
Reinstall the shade once lamp has been installed.
6. Connect the mounting bracket with the rest of the fixture by quick link.
7. Make wire connections using approved wire nuts (not supplied).
For warranty information please visit: http://www.landscapelighting.com/portal/warranty_page
Para informacion de la garantia por favor visite: www.landscapelighting.com/portal/warranty_page
CAUTION
WHEN INSTALLING KICHLER LANDSCAPE LIGHTING (LINE VOLTAGE OR LOW VOLTAGE),
CARE SHOULD BE TAKEN TO KEEP CLEAR OF POTENTIALLY COMBUSTIBLE MATERIALS.
WHEN MAINTAINING THE FIXTURES, BE SURE TO REMOVE LEAVES, PINE NEEDLES, GRASS
CLIPPINGS, MULCH, OR ANY DEBRIS THAT HAS ACCUMULATED ON THE LIGHT BULB, LENS,
OR BODY OF THE FIXTURE.
1. MOUNTING BRACKET
2. CONNECTOR
3. QUICK LINK
4. CHAIN
5. COUPLING
6. BUSHING
7. SHADE HOLDER
8. SOCKET BRACKET
9. SOCKET
10. SHADE
11. PLUG
12. O-RING
13. SCREW
14. SCREW
15. CABLE
TWINKLER HANGING LIGHT
MODEL # 15500CBR
/