Natures Composites SF FENCE 6X8 TB/BLK Installation guide

Type
Installation guide

This manual is also suitable for

Santa Fe & Mesa Fence Installation Instructions
BEFORE YOU BEGIN:
d
Verify location of underground utilities before you dig!
Your local building department, utility company or a
utility location service may be able to aid you with this.
d
Locate property lines.
d
Review local and regional building codes, regulations
and zoning laws which may aect your fence.
d
Obtain all necessary permits as required by local
building codes.
TOOLS REQUIRED:
Stakes
String Line
Tape Measure
Spray Paint
Post Hole Digger & Shovel
Level
Wheel Barrow
Miter Saw
9/16" End Wrench or Socket
Drill with 3/16" nut driver bit
d
The Santa Fe and Mesa Fence's versatile modular design allows for a multitude of congurations suitable for at, sloping
and uneven terrain.
Step Conguration
Sloping Conguration
Variable Height Conguration
Mesa Fence
Santa Fe Fence
Mesa Fence Santa Fe Fence
d
POST INSTALLATION:
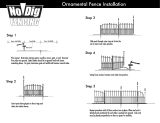
1. Dig 12" diameter holes 30" deep in all post hole locations marked earlier.
2. Each eight-foot panel of Santa Fe Fence requires a post at each end. The posts for each adjacent panel must be bolted together
before the fence is assembled. Mate each adjacent post to each other, making certain to adjust for step, sloping or variable
height congurations. Corner posts must be bolted at right angles to each other. T-Posts, where two sections of fence come
together, require three posts, with the center post bolted at right angles to the outside posts. Fasten each pair of posts together
using the provided 1/2" long bolts and nuts, using four bolts, equally spaced along the length of the posts.
3. Verify proper hole depth by placing post in hole and making sure the post extends 69" above ground level. It may be necessary
to add or remove additional dirt from the hole to obtain the proper height.
4. Once proper hole depth is achieved, place post in hole and align open channel of post in the
direction of the fence. Fill the hole with concrete to approximately 2" below grade level. Before the
concrete sets, be sure to plumb and level post and align.
5. Allow the concrete to properly cure in accordance with the manufacturer's instructions before
proceeding to the next step.
Line Step Tee Corner
Post Post Post Post
d
LAY OUT FENCE LOCATION:
1. Use stake and string line to mark the location of the fence. It is recommended that you located the fence 3" to 5" inside of
property line to prevent encroachment onto your neighbor's property.
2. Locate the location of gates and mark post hole locations for the gate posts accordingly.
3. Mark the locations of corners and ends of fence.
4. Mark locations of intermediate fence posts between ends, corners and gate posts. Posts should be located no wider than 96"
(eight feet) from center of post to center of post.
When laying out post locations you may end up with a non-uniform section at the end. To prevent this and create a uniform
fence, you should space all panel sections at equal lengths. To do this, measure the total length of that line of fence in feet, divide
this measurement by eight, and round up. This number will give the number of equal sections. Then divide the total length of that
line of fence by the equal section number just calculated. The result will be the width of your post spacing.
96" Max. or
width calculated per above
96" Max. or
width calculated per above
96" Max. or
width calculated per above
30"
69"
93" Max. width
between posts
93" Max. width
between posts
93" Max. width
between posts
4x
per
Post
69"
d
INSTALL BOTTOM RAIL BRACKETS
AND BOTTOM RAIL:
Insert Bottom Rail Bracket into the bottom
of each post as shown. Align the Bottom
Rail Bracket so that the top of the bracket
is parallel to and 2" above the ground.
Tighten the bolt and nut using a 9/16"
wrench. Position the Bottom Rail onto the
brackets.
If your installation requires spacing shorter
than 96" (eight feet) you will need to use a
chop saw to cut the Top Rail and Bottom
Rail to t between the posts.
d
FENCE BOARD INSTALLATION:
1. Fence boards come pre-cut to the maximum post spacing size.
However, if your installation requires post spacing shorter than 96"
(eight feet) you will need to cut the fence boards to the correct length.
Measure the distance between the insides of the U-Channel of the two
posts you are installing the section of fence boards into. Cut the fence
boards to 1/2" shorter than the distance you just measured in order
to maintain a 1/4" gap between each end of the fence board and the
inside of each post.
2. Install Santa Fe Fence Boards with the tongue of the fence board
facing up and the groove in the fence board facing down. hold the
fence board at an angle and insert one end into the channel of a post.
Then rotate the other end of the fence board down until it slides into
the channel of the other post. Push the rst fence board down until it
comes to rest in the Bottom Rail.
Install Mesa Fence Boards with the groove of the rst board inside the
post, and the tongue facing outwards.
3. Install the remaining fence boards, pressing each groove onto the
previous board's tongue. DO NOT USE A HAMMER TO FORCE
THE FENCE BOARDS INTO POSITION, AS IT MAY DAMAGE THE
COMPOSITE FENCE BOARDS!
Measured
Distance
1/4"
Channel
Nut
Posts
Bottom Rail
Bracket
Bolt
Bottom
Rail
2"
Santa Fe
Fence Boards
Mesa
Fence Boards
UP
Tongue
UP
Tongue
Groove
Post
Groove
INSTALLING
SANTA FE
FENCE BOARDS
INSTALLING
MESA FENCE
BOARDS
4. On Santa Fe Fences, the last fence board may extend above the top of the post, or end too far below the top of the post. If this
happens, simply adjust the Bottom Rail Brackets to achieve the correct alignment before installing the Top Rail.
On Mesa Fences, all the fence boards may extend above the top of the post, or end too far below the top of the post. If this
happens, adjust the Bottom Rail Brackets to achieve the correct alignment before installing the Top Rail.
5. Install the Top Rail between the posts. No fasteners are necessary because the Top
Rail will be secured by the Post and Rail Caps.
1302 Industrial Park Avenue
Torrington, WY 82240
307-532-9942 Tel
307-532-9943 Fax
877-810-4029 Toll Free
www.naturescomposites.com
Natures Composites’ products are manufactured in the U.S.A. and are distributed through retail and wholesale
channels throughout United States, Canada, Mexico, and Europe. Learn more about Natures Composites and our
product lines by visiting www.naturescomposites.com today.
d
GATES:
Santa Fe Gates and Mesa Gates are
available pre-assembled for ease of
installation.
Patent Pending.
d
POST AND RAIL CAP INSTALLATION:
Complete construction of the fence panel by installing the Post and Rail Cap. The
Post and Rail Cap ts over the top of the post and extends over the Top Rail. Postion
the Post and Rail Cap by centering on post so that the cap extends onto the top
rail equally on both sides of the post. Fasten the cap with se-tapping screws by
positioning in the predrilled holes in the Post and Rail Cap and driving the screw into
the Top Rail.
TOO HIGH
TOO LOW
ADJUST RAIL
ANGLE BRACKET
TOP RAIL
POST
POST AND
RAIL CAP
SANTA FE GATE MESA GATE
ADJUSTABLE
GATE HINGE
GATE LATCH
  • Page 1 1
  • Page 2 2
  • Page 3 3
  • Page 4 4

Natures Composites SF FENCE 6X8 TB/BLK Installation guide

Type
Installation guide
This manual is also suitable for

Ask a question and I''ll find the answer in the document

Finding information in a document is now easier with AI