1
Accessories List:
● 2 x Receiver ● 1 x Transmitter
● 1 x User Manual ● 1 x Double-sided adhesive
● 1 x 3 volts CR2032 battery for transmitter
Technical Specification:
● Frequency: 433.92MHz+100KHz
● Modulation Type: ASK
● Ring Volume: 85dB(within 0.5m)
● Channel space1 million sets of auto-learning codes
● Receiver bandwidth: ±180KHz
● Reception Sensitivity: -80dBm
● Transmitting power:10mW
● Power consumption: Receiver:0.3W ; Transmitter: standby :5uA working:10mA
● Power Supply: ReceiverAC 110V ; Transmitter: DC 3V (CR2032)
● Operating Range:150m (in the open air)
Note: Each receiver can be configured with the same or different tones, you
can set two different melodies for the two chimes!
Set up: A: Press the Auto-learning Code Button for 30 seconds until it starts flashing and making
sounds.
B: Next choose melody by pressing Melody Selector to choose your favorite one.
C: Then again press the Auto-learning Code Button for 30 seconds until it starts flashing,
which means the new melody has been matched successfully!
Instruction Manual
Auto-leaning Code Wireless Door Chime
SKU: O00QH-0761
All doorchime with Easy Chime
Logo working together

● Stick the Transmitter on the wall or the door with
double-sided adhesive tape.
Plug-in Receiver Installation:
● Plug the Receiver into any
socket of AC110V power.
2
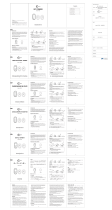
LED Indicator
Volume Button
Melody Selector
Sound-and-Flash Switch Button
Auto-learning Code Button
Receiver Transmitter
Push Button
Transmitter Installation:
● Open the Transmitter by pushing in the interface located at the bottom with a flat screw driver.
● Place the CR2032 battery (included).
CR2032 3V
Lithium
Battery
VOLMODE
VOLMODE
Names for Parts:

3
1
2
Receiver Installation:
● Drill two holes on the wall at your required height.
The holes are about 6mm in diameter. The distance
between the two holes should be about 75mm.
Then insert two wall plugs (included) into the holes.
After that, insert two screws (included) into the wall
plugs.
Be noted that you should not insert completely the
screws into the wall plug, but keep a suitable length
out of the wall surface, which is to hold the receiver.
Finally you can hang the receiver.
Important Note:
● If you do not plan to use the device for a long time, such as at a vacation, please remove the
battery from Transmitter, then put them in a safe place.
● Improperly using a battery may cause it to leak and damage nearby items, and can create the
risk of fire and personal injury. Batteries should not be left in an area where the children can
reach them as they may pose a chocking hazard.
● Recycle used batteries following environmental protection practices.
Functions Instruction
1. Plug the Receiver into any socket of AC 110V powerthen open the transmitter and
place the battery as shown in the diagram.
2. Press the auto-learning code button on the side of the Receiver and hold for 2 or 3 seconds, A
“beep” sound comes out and the LED indicator light will lit.Then press the push button on the
Transmitter unit once. The Receiver will sound to indicate that new operation code is registered
and memorized. Thus the Transmitter works successfully with the Receiver. Maximum 60 codes
can be matched and saved in the receiver within 10 seconds.Press the button once can only
match one transmitter. If there is no code matched and saved within the 10s, the receiver will
automatically exit and there will be two “beeps”.
3. If you want to add Receivers, you just need to plug the Receiver into any socket of AC 110V
power. Then operate in the same way as step 2.
4. There is a melody selector located on the side of the Receiver (see diagram).
Selectable Tone: Total 36 melodies available.
Note: You must select the desired ring first, then match the transmitter. You could use different
music to distinguish visitors in different position. If you want to change ring tones, you must
delete all the information saved in the receiver and reset.
Press the melody selector button and hold for 5 seconds, you can delete all the information
within the receiver. At the same time, the LED indicator light will lit.

5. There is also a volume button on the side of the Receiver (see diagram). Press it to adjust the
sound volume to be high, medium and low.
6. There is a Sound and Flash Switch Button on the side of the receiver. Press this button for three
options, working only with sound, only LED flash, sound and LED flash:
A. If a “beep” sound comes out and the LED indicator does not light. the Receiver will work only
with sound
B. If a “beep” sound comes out and the LED indicator light, the Receiver will work with sound and
LED flash
C. If the LED indicator light without “beep” sound, the Receiver will work only with LED flash.
Notes:
If the Receiver sounds for no reason during the digital code setting, it is indicated that it has been
interfered by other similar Doorbell nearby, reset the auto-learning code as per point 2 above.
IMPORTANT: PLEASE KEEP THESE INSTRUCTIONS FOR FUTURE REFERENCE WHEN
REPLACING BATTERIES
1byone Products Inc.
2313 E,Philadelphia Street,Unit M, Ontario,CA 91761
www.1byone.com
/