Visualint VI-7000-PTZ-S-WH-VT Owner's manual

Type
Owner's manual
Visualint
Mini Maxx NVRs
R3 Firmware
IP Cameras
R6 Firmware
Interface Manual
Version 180322-1347
Introduction
is manual covers the VI-M series of cameras and NVRs.
e main dierence between the camera interface and the NVR interface
is that the NVR interface allows—and oen requires—the user to choose one
particular camera (channel) for any commands or operation.
In addition, there are some commands that are exclusive to PTZ cameras or
non-PTZ cameras. ese exceptions are noted in the headings used in the text.
ere are also slight variations between the interfaces seen on dierent
devices. ese variations are due to the dierent capabilities of the equipment.
is manual strives to be as comprehensive as possible; capabilities that your
equipment lacks may not appear as options on your interface, or may be disabled.
Contents
Live View Page ....................................................3
Playback Page .....................................................7
Log Page .........................................................10
Conguration Page ...............................................12
Audio Video Set ..................................................13
Camera Set (Static) | Dome Set (PTZ) | Image Setting (NVR) ............16
VCA ............................................................22
OSD ............................................................26
Storage Management ..............................................27
Network Management .............................................29
User Management ................................................31
Alarm Management ...............................................32
Advance Set ......................................................34
Return to Contents
Live View Page
Once you have logged in to your system, the live view page is where you’ll spend
most of your time. It has all of the controls youll need for day-to-day operations.
e groups of controls are described below.
Header & Menus
Camera View Area
Live View Parameters
Tool Bar
Video Parameters
PTZ and Preset Controls
Header & Menus
At the top, the header area gives you the SKU of the system that you are using.
e le end of the blue bar has the four major tabs for navigating the interface
and accessing the various tools. Each of these tabs leads to a separate page; to
review the contents of these pages, use the hotlinks below.
} Live View: is button returns you here from other pages.
} “Playback Page” on page 8.
} “Log Page” on page 11.
} Conguration Page” on page 13.
At the right end is the account name under which you are logged in, as well
as a button to log out.
Return to Contents
Camera View Area
e camera view dominates the area. At the far right is an right-arrow button
next to the PTZ controls. Click this to collapse (or reopen) the PTZ controls.
If you right-click in the camera view area, you get the
small pop-up menu with the following commands:
Disconnect: Terminate the currently connected video
stream from the live view.
E-zoom: Click and drag across the video screen to select
an area. e camera then creates a oating window that shows a digital
zoom of the selected area. Note that if the aspect ratio of this area diers
from that of the camera, the image will be distorted. You can close the
digital zoom window by clicking the X in the upper right corner. If you
need to preserve the aspect ratio, use the optical zoom buttons described in
the PTZ and Preset Controls.
3D locate: Click and drag across the video screen to select an area. e camera
then pans and zooms to show that area in detail.
Flip: Rotate the video image 180° (upside-down).
Snap Shot: Copies the full screen of the live view window and saves it as an
image onto the cameras SD card. is action has no eect if your camera
has no SD card installed.
Defog: Starts the automatic defogging algorithm. When complete, the
function closes down; this is not a toggle switch.
Live View Parameters
In this area, you determine how to
handle the video stream.
e rst group of buttons determines which of the three video streams you
wish to view. ese streams are congured separately under Audio Video Set >
Stream Set (see “Stream Set” on page 14).
e second pair of buttons determines whether you want to lock the
viewing screen to its current resolution (which may distort the video feed), or
adapt the screen to the video resolution.
Tool Bar
e tool bar allows you to interact with the camera and its accessories.
e manual tracking slider
lets you override the auto-tracking
feature (cameras with auto-tracking only). When activated, click anywhere on
the screen to track that object. e slider acts as a zoom control. e camera
must have the auto-tracking feature, and this will not work unless you have
congured Linkage Tracking and Intelligent Tracking under VCA.
Return to Contents
e next two buttons let you manually record or take a snapshot
of the screen. ese are saved to the cameras SD card.
e button activates the Talkback feature, allowing you to speak through
your microphone to whatever speaker is attached to the audio output of the
camera. Note that some models have a built-in speaker. Talkback only supports
one user at a time, so switch this o when nished to avoid inadvertently
blocking other users.
You can adjust the view based on a key area of the screen. You can set the
focus and the exposure button. Click the button to activate it, then
click and drag your mouse across the screen to highlight your area of interest.
e camera focuses on that area, and adjusts its exposure to set that area in the
middle of the spectrum (that is, if the area is dark, it brightens the whole view
screen, and if it’s bright, it darkens the whole screen. Click the button again to
deactivate this capability.
Press to activate digital zoom. Click and drag across the video screen to
select an area. e camera creates a oating window that shows a digital zoom
of the selected area. Note that if the aspect ratio of this area diers from that of
the camera, the image will be distorted. You can close the digital zoom window
by clicking the X in the upper right corner. If you need to preserve the aspect
ratio, use the optical zoom buttons described in the PTZ and Preset Controls.
e button shis to full-screen mode. Double-click the image or press
Esc to exit full-screen mode.
e volume slider
adjusts the computer speaker to hear the
signal from the cameras microphone.
Video Parameters
is is a set of three dropdown dialogs. One dialog is always open; clicking on a
title bar opens the dialog and closes the other two.
For each, pressing Call begins the activity, while pressing Set give you a special
submenu that you can use to edit the action.
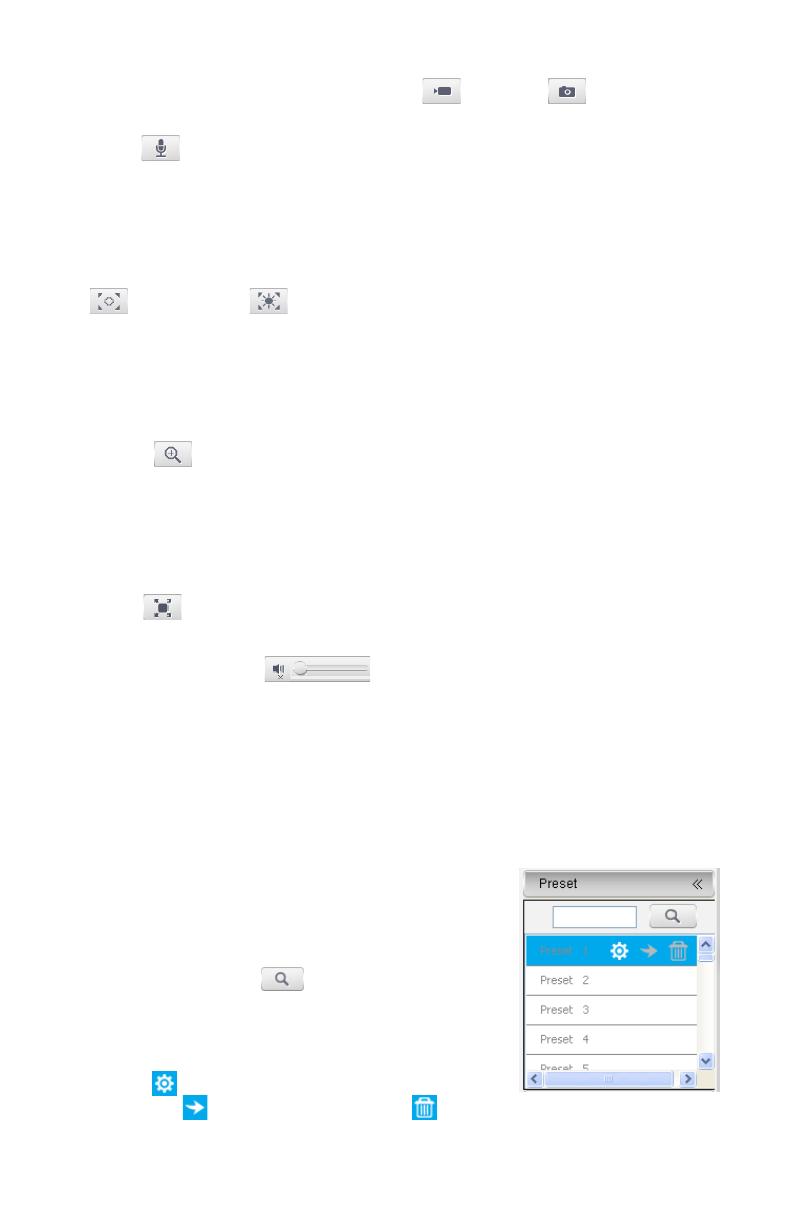
e Preset dropdown allows you to save and
load a specic orientation for the PTZ camera. You
can have up to 256 presets. Each preset species
the cameras pan position, tilt, zoom, focus, etc.,
for future use. Press Search the target preset
number. Note that empty preset slots have gray text;
existing presets have black text.
When you click on a preset, several buttons
appear. Save the cameras current orientation for
that preset. Call that preset position. Delete that preset position.
Return to Contents
e Automatic Action dropdown lets you put the camera into auto cruise
mode (moves the camera through a series of preset positions), auto scan mode
(moves the camera through a selected routine that has been precongured at
the factory), or pattern mode (the camera runs through a set of movements that
you recorded, sort of like a macro). You can have eight (each) cruises, scans, and
patterns; use the dropdown to call whichever one you desire.
e Stream Set dropdown lets you adjust the way
the camera presents the current stream.
e four sliders allow you to adjust the brightness,
contrast, saturation, and hue of the camera
image.
Press Default to remove all adjustments made in this
dialog from the camera.
Finally, the radio buttons at the bottom let you decide what level of quality
you want to view.
PTZ and Preset Controls Panel
e PTZ control panel gives you total control of the orientation of your camera.
is panel is a yout panel; you can open it by clicking on the arrow just to the
right of the live view area. When the panel is open, you can close it by clicking
on the small arrow at the le edge of the panel.
At the top is the navigation area. Clicking and holding any
of the arrow buttons moves your camera in the indicated
direction. Clicking the button in the center moves your camera
back to its default position, with all coordinates (zoom, pan,
focus, etc.) set to zero.
Below that is the speed slider . Adjusting this increases
or decreases the speed at which the camera moves.
Below that, a set of three rocker buttons allows you to adjust the cameras
zoom, focus, and lens iris.
e set of six icon buttons control various capabilities of the camera.
e light and power buttons have no function at the moment. ey
are reserved for future compatibility.
e other buttons activate the wiper , the defog capability ,
highlight enhancement , and wide dynamic range . ese buttons
(with the exception of the wiper button) are toggles; click turn them on or o.
Return to Contents
Channels Panel (NVRs)
e channels panel lets you arrange your
cameras in the NVR grid view.
is panel is a yout panel; you can open it
by clicking on the arrow just to the le of the
live view area. When the panel is open, you can
close it by clicking on the small arrow at the
right edge of the panel.
To arrange your camera channels in the
live view, rst click on a camera window. e
channel gets a red outline to show that it is
selected.
en click on a camera in the channel list.
at camera gets a checkmark in its icon in
the list, and it becomes the active camera in
that frame. You can click on the camera to
deactivate it in that channel.
Return to Contents
Playback Page
On the playback interface, you can review video recordings, take snapshots
from the recording, extract clips, etc.
e groups of controls are described below.
Header & Menus
Playback Area
Playback Controls
Tool Bar
Event Search Controls
Calendar and File Area
Header & Menus
At the top, the header area gives you the SKU of the system that you are using.
e le end of the blue bar has the four major tabs for navigating the interface
and accessing the various tools. Each of these tabs leads to a separate page; to
review the contents of these pages, use the hotlinks below.
} “Live View Page” on page 3.
} Playback Page: is button returns you here from other pages.
} “Log Page” on page 11.
} Conguration Page” on page 13.
At the right end is the account name under which you are logged in, as well
as a button to log out.
Playback Area
is displays the video being played. Double-click the screen to enter or exit
full-screen mode.
Return to Contents
At the bottom is a standard scrub bar that you can use to move the playback
to your preferred time.
Playback Controls
ese generally match the standard controls on most video players:
Stops the playback.
Slows the playback to 1/2x. Subsequent clicks further reduce the speed
to 1/4x, 1/6x, and 1/8x.
Play/pause.
Speeds the playback to 2x. Subsequent clicks further increase the speed
to 4x, 6x, and 8x.
Advances the playback by one frame, then pauses.
Volume control.
Tool Bar
Click browse to search for previously saved videos and view them.
Take a snapshot of the current frame. You can select where it is stored
under Advance Set > File Locations. See “File Locations” on page 36.
Use this button to download a section of the video being played. Click
this button, then click on the desired start and end points of the extract. You
can select where it is stored under Advance Set > File Locations. See “File
Locations” on page 36.
Display just the current channel (recorder only).
Play 4 channel on the screen simultaneously (recorder only).
Enter full-screen mode. You can double-click the screen or press Esc to
quit full screen mode.
File mode toggle (see below).
Calendar and File Area
Click the date in calendar to choose the les according to conditions
Mode switching: You can review les in either of two modes. e button
looks like in table mode, where les are listed in a spreadsheet with date
and time; pressing the button toggles it to and opens a timeline along the
bottom of the window, where the recordings are shown graphically.
In timeline mode, click and drag on the timeline to move it to the time
of interest. e + and - buttons in the top right of the timeline change its
magnication. Click a recording to begin playback.
Return to Contents
In table mode, you can lter by recording type and whether or not the le was
created manually (using the Remote checkbox).
ese buttons navigate the les.
Jump to the rst page.
Jump to the previous page.
Jump to the next page.
Jump to the last page.
Finally, these three buttons help
handle your downloads.
Download to your computer.
Download to an FTP server.
Manage ongoing downloads.
Return to Contents
Log Page
On the playback interface, you can review video recordings, take snapshots
from the recording, extract clips, etc.
e groups of controls are described below.
Header & Menus
Filter Query Area
Log List
Navigation Tools
Header & Menus
At the top, the header area gives you the SKU of the system that you are using.
e le end of the blue bar has the four major tabs for navigating the interface
and accessing the various tools. Each of these tabs leads to a separate page; to
review the contents of these pages, use the hotlinks below.
} “Live View Page” on page 3.
} “Playback Page” on page 8.
} Log Page: is button returns you here from other pages.
} Conguration Page” on page 13.
At the right end is the account name under which you are logged in, as well
as a button to log out.
Filter Query Area
Here you set the parameters for the log events you want shown in the list area.
Channel No. only applies to the NVR interface, and lets you select a specic
camera to search for.
Return to Contents
Log Type lets you search for specic types of events.
Start Time and End Time allow you to set the specic time frame to search
within.
Once you have set your search parameters, press the Query button top execute
your search and ll the log list with the events that t the lter.
Log List
is area has the list of events that t the lters from your most recent search
query.
Navigation Tools
e buttons across the bottom help you move through the events list if you have
more than one page of results.
e buttons in the lower le move you throughout the list. You can also use
the Jump To dropdown to go to a specic page.
You can press Export Current Page or Export All Page to download a *.log
le to your computer.
Return to Contents
Conguration Page
On the playback interface, you can review video recordings, take snapshots
from the recording, extract clips, etc.
e groups of controls are described below.
Header & Menus
Menu
Conguration Tools
Header & Menus
At the top, the header area gives you the SKU of the system that you are using.
e le end of the blue bar has the four major tabs for navigating the interface
and accessing the various tools. Each of these tabs leads to a separate page; to
review the contents of these pages, use the hotlinks below.
} “Live View Page” on page 3.
} “Playback Page” on page 8.
} “Log Page” on page 11.
} Conguration Page: is button returns you here from other pages.
To the right is your account name, as well as a button to log out.
Menu
is area lists the various pages for customization, grouped by category. Click
on a category to view the pagers associated with it; click on a page to go to it.
Conguration Tools
is area has the specic tools based on which menu item you have chosen. e
options are described in the following pages (all hotlinked).
Audio Video Set” on page 14
Camera Set (Static) | Dome Set (PTZ)
| Image Setting (NVR)” on page 17
Channels (NVR)” on page 23
OSD” on page 28
Storage Management” on page 29
“Network Management” on page 31
“User Management” on page 33
Alarm Management” on page 34
Advance Set” on page 36
Return to Contents
Audio Video Set
is section lets you edit the audio and video streams, plus select key areas of
the screen to focus on.
Stream Set
Here you can set the parameters for the various streams from the camera(s).
Under the General Set section, you can set the stream type (whether or not
it has audio), resolution, bitrate, frame rate, NP mode (select NTSC for North
America), priority (choosing Quality preserves the image, while choosing
Frame Rate preserved the uidity of the stream), video quality (adjustable if
you select Variable under encoding mode, below), I-frame interval, encoding
method (use Constant for a stable data rate, or Variable to preserve data), and
stream smoothing for each of the streams. e other items within the section are
determined by the cameras specications.
Return to Contents
Under the Advanced Set section, you select video encoding (H264, H265,
MotionJPEG), extended code (If H.264 is selected, choose high prole, main
prole, or baseline), channel type (xed to local for cameras), encryption type
(that is, whether or not to require a password) and password, electronic image
stabilization, and SVC (scalable video coding).
Save activates the new settings. You can also Import and Export the settings
as a *.dat le.
Audio Set
is page controls the audio stream.
Choose the audio encoding format (G.711A, G.711U, ADPCM_D, AAC_LC),
as well as the audio sample rate (8k, 32k, 48k).
If your camera has an associated microphone, select it under audio control
type (MicIn for a built-in microphone, LineIn if the camera has a separate
attached microphone), and set its volume value and opt whether or not to use
audio denoising (larger numbers increase denoising; 0 disables it).
Return to Contents
If your camera has an associated speaker, select it under audio output type
(built-in speaker, external audio course for a separate speaker, or o) and set its
volume value.
Press Save to keep all changes. is may cause the camera to reboot.
Key Region
To improve the image quality where you need it, use the key region capability.
is adjusts the video for up to seven unique areas. Other parts of the screen
may lose image quality as the camera preserve these key regions as best it can.
is option is only aects the cameras rst and second video streams.
Use the type selection dropbox to choose whether to use a xed area or
dynamic tracking.
With dynamic tracking, check the enable box. Also, set the upgrade level,
which determines how much the camera adjusts the video feed as it tracks.
With xed area, you can create up to 7 areas to include in the calculation by
using the Start to Draw button, then clicking and dragging your mouse in the
camera view.
Return to Contents
Camera Set (Static) | Dome Set (PTZ) | Image Setting (NVR)
is is where you set up the cameras basic parameters.
Image Set
At the top, you can select which of the eight camera modes to adjust, and give
it a custom name.
Below are a series of submenus. Click the drop arrow to open that submenu.
ese adjustments only aect the selected camera mode.
Image Adjustment: Set the cameras brightness, contrast, saturation, hue, and
sharpness.
Exposure Set: Here you control the cameras shutter speed and aperture, as
well as the brightness that your camera attempts to achieve.
Focus Set: Set the cameras behavior when focusing the lens. In semi-auto
mode, the lens only refocuses when a PTZ event is called; it does not adjust
aer that.
Day/Night Switch: In this page, you set the cameras behavior regarding low-
light conditions. Set IR use, when the camera switches to night mode, and
how easily it reacts to changes in lighting.
Back Light Set: Adjust the camera settings for wide dynamic range and
highlight compensation.
White Balance: Here you set the ambient light situation, which the camera
uses to adjust coloration automatically.
Return to Contents
Image Enhancement: Choose the style of image you want, specify whether
the cameras view is inside or outside, and decide whether or not to use
defog.
For digital denoising, either select Close to keep it o, or choose your
style. In expert mode, space-domain has the camera reference the entire
image for denoising calculation, while time-domain watches individual
pixels’ behavior frame to frame. Note that in any setting, high denoising
levels can cause “tails” to appear on moving objects.
At the bottom, you have buttons to save the settings, restore all settings to
their factory defaults, or import/export a *.dat le of the settings.
Schedule
is lets you adjust your cameras video-settings behavior throughout the day,
switching modes as needed based on the time and expected lighting.
At the top, select Time Range to give your camera a rigid schedule that
depends on the clock, or Day/Night status to have your camera switch behavior
based on the level of illumination it detects.
If you choose time range, you are given a table of time slots. Activate a slot
by clicking its checkbox. e system automatically provides a time bracket for
that slot; you can adjust the time by clicking and dragging the dividers in the
graphical timeline at the bottom of the window (note that the up/down arrows
in the time boxes dont work in this interface). en, for each slot, use its
corresponding dropdown to pick the cameras activity.
If you choose day/night status, use the dropdowns to select the cameras
behaviors during daytime and nighttime.
At the bottom, buttons allow you to save your changes, restore system defaults,
or import or export a custom schedule le.
D/N Set (Static only)
is section tells your camera when to switch from daytime mode (color) to
nighttime mode (black and white).
At the top, the Realtime Brightness entry tells you, on a scale of 1–100, how
bright the camera thinks its view is. is number can help you calibrate the
switch.
Color to B/W Type is a dropdown menu that lets you select which method
you want the camera to use when switching from daytime mode to nighttime,
and vice versa.
Auto (inside)
Use this for cameras installed indoors, if you want them to change modes
based on the ambient light.
Return to Contents
Day Range: Brightness of this level or higher is always treated as daytime and
recorded in color. Lighting between this setting and the Night Range setting
may be recorded in either mode.
Night Range: Brightness of this level or lower is always treated as nighttime
and recorded in black and white. Lighting between this setting and the Day
Range setting may be recorded in either mode.
Delay: You can set a delay for how rapidly a camera switches between day
mode and night mode, and vice versa. is keeps the camera from ipping back
and forth between modes.
Infrared Lamp Power: Use this to set the brightness of the cameras IR lamp.
B/W
Use this to force the camera to record in black and white at all times.
Infrared Lamp Power: Use this to set the brightness of the cameras IR lamp.
Color
Use this to force the camera to record in color at all times.
Auto (outside)
Use this for cameras installed out of doors, if you want them to change modes
based on the ambient light.
e controls are identical to the Auto (inside) controls, described on the
previous page.
Schedule
Use this to force the camera to switch modes at specic times of day. is is
most useful in an environment where the lighting also changes on a set schedule.
Sunrise Time: When the camera switches from black and white to color.
Sunset Time: When the camera switches from color to black and white.
Infrared Lamp Power: Use this to set the brightness of the cameras IR lamp.
Basic Set (PTZ only)
is section adjusts the physical parameters of the cameras operation.
Basic Information
Auto Flip Enable: is auto-rotates the picture when it tilts past 90°.
Preset Freeze Enable: If this is on when the camera moves to a new preset, it
wont update the video image until the camera is at the new preset.
Enable Digital Zoom: Without this, cameras cannot move beyond the
mechanical limitation on their zoom level. When this is enabled, using
the Zoom + button beyond the cameras mechanical limitation causes the
Return to Contents
camera to switch automatically to digital zoom. However, digital zoom may
cause a grainy image.
Enable Preset Snapshots: Automatically saves a snapshot to the cameras SD
card when a new preset is called.
Enable Proportion Zooming: is moderates the cameras pan speed in
proportion to its zoom value, so that panning at high zoom is not just a blur.
Enable Scan Record: When enabled, the camera records while scanning, and
saves it to the cameras SD card.
Enable Mode Record: When enabled, the camera records while in pattern
mode, and saves it to the cameras SD card.
Tilt Angle Adjustment: e cameras nominal zero point may still leave
mechanical space that the lens can move upward. is allows you to re-zero
the camera and use that space.
Control Speed: Sets the maximum control speed.
Zoom Speed Level: Sets the maximum zoom speed.
Temperature Control Mode: Decides how your camera handle temperature.
Auto Stop-time(s): For cameras with auto-tracking, this sets the time for the
camera to stop PTZ movement since the last manual operation.
Preset Speed: Sets the speed at which the camera moves to a new preset.
Standby Action: is is what the camera does when it is otherwise idle.
Standby Time(s): How long the camera must remain idle before it takes the
standby action.
Power-lost Memory Mode: When enabled, this saves the time and PTZ
settings when power is lost.
Title
You can specify a title for each of the scans, cruises, patterns, presets, and
zones. Enter the desired text in the Title Name text box.
e Dwell Time determines how long the OSD remains on screen, measured
from when it is rst called. Select Close to disable the OSD.
Display Coordinate Direction: Adds the cameras orientation to the OSD.
Display Title Background: Places a contrasting highlight behind your OSD.
PTZ Control (PTZ only)
is page lets you control the cameras PTZ behavior. is page, in large part,
duplicates the PTZ controls from the live view page.
e Set Origin and Set North buttons dene the cameras current position to
be its default orientation; henceforth dening all measurements by this position.
  • Page 1 1
  • Page 2 2
  • Page 3 3
  • Page 4 4
  • Page 5 5
  • Page 6 6
  • Page 7 7
  • Page 8 8
  • Page 9 9
  • Page 10 10
  • Page 11 11
  • Page 12 12
  • Page 13 13
  • Page 14 14
  • Page 15 15
  • Page 16 16
  • Page 17 17
  • Page 18 18
  • Page 19 19
  • Page 20 20
  • Page 21 21
  • Page 22 22
  • Page 23 23
  • Page 24 24
  • Page 25 25
  • Page 26 26
  • Page 27 27
  • Page 28 28
  • Page 29 29
  • Page 30 30
  • Page 31 31
  • Page 32 32
  • Page 33 33
  • Page 34 34
  • Page 35 35
  • Page 36 36
  • Page 37 37

Visualint VI-7000-PTZ-S-WH-VT Owner's manual

Type
Owner's manual

Ask a question and I''ll find the answer in the document

Finding information in a document is now easier with AI