Page is loading ...


ASSEMBLY & OPERATION
INSTRUCTIONS (HS-UM011SB)
GAS Grill
WARNING
Important! Please read these instructions carefully before use!
UNIVERSAL LPG
FOR
OUTDOOR
USE ONLY
FOR YOUR SAFETY
If you smell gas:
1. Shut off gas to the appliance.
2. Extinguish any open flame.
3. Open hood.
4. If odour continues, immediately call your
gas supplier.
FOR YOUR SAFETY
1. Do not store or use gasoline or other
flammable vapours or liquids in the vicinity
of this or any other appliance.
2. An LP cylinder not connected for use shall not
be stored in the vicinity of this or any other
appliance.
For outdoor use only.
Improper installation, adjustment, alteration, service or
maintenance can cause property damage, injury or death.
Read the installation, operating and maintenance
instructions thoroughly before installing or servicing this
equipment.
Warning: accessible parts may be very hot. Keep young
children away.
Do not move the appliance during use.
Turn off the gas supply at the gas cylinder after use.
Any modification of the appliance may be dangerous.
Installer to leave instructions with the consumer and
consumer to retain them for future reference.
Do not replace the grill with an extra hotplate. The warranty
will be voided and it violates the gas approval, the grill
provides the ventilation needed for the BBQ to operate safely.
It is not designed to be a solid hotplate device.
Please ensure all packaging and transit protection materials
are removed prior to using the BBQ.

SAFETY INSTRUCTIONS
IMPORTANT: Read the assembly instruction of this booklet before removing the
contents of this carton.
IMPORTANT SAFETY INSTRUCTIONS
1.
This barbecue is an outdoor appliance only. Under no circumstances should it be use
indoors.
2. READ ALL OPERATING INSTRUCTION BEFORE LIGHTING.
3. Do not perform any servicing on the barbecue yourself. This includes internal adjustment of
the regulator and gas valves. Servicing can only be carried out by authorized technicians.
4. When cylinder is replaced or reconnected, check for leaks.
5. Do not store chemicals or flammable materials near this appliance.
6. Unsupervised children should not be near a barbecue while cooking or during warm up or
cool down.
7. People with flammable clothing such as nylon etc. should keep well away from the
barbecue when it is operating.
8. Do not leave food unattended on the barbecue.
9. In case of fat fire, turn cylinder off.
10. Particular care must be taken when removing drip tray. Hot fat can cause serious injury.
11. This BBQ should not be located under overhead combustible construction and proper
clearances must be maintained at all times from combustible construction and/or materials,
with MINIMUM clearances as follow:
From Sides 450mm
From Back 450mm
High 1000mm
12. Turn all gas valves off including cylinder after use.
13. Never leave burners on high for more than 10 minutes unless actually cooking. If the burner
makes hissing sound when lit, it may be burning inside. Turn burner off, allow it to cool and
try again.
14. Do not allow build up of unburned gas.
15.
Remove sticker from hood before use.
DO NOT OPERATE THIS APPLIANCE BEFORE READING THE
INSTRUCTION BOOKLET
DO NOT PLACE ARTICLES ON OR AGAINST THIS APPLIANCE
DO NOT STORE CHEMICALS OR FLAMMABLE MATERIALS OR
SPRAY AEROSOLS NEAR THIS APPLIANCE
DO NOT OPERATE THIS APPLIANCE INDOORS
DO NOT ENCLOSE THIS APPLIANCE
DO NOT LIGHT OR OPERATE WITH COVER ON

IMPORTANT
"This appliance shall only be used in an above ground open-air situation with natural
ventilation, without stagnant areas, where gas leakage and products of combustion are
rapidly dispersed by wind and natural convection"
WARNING
A strong gas smell or the hissing sound of gas indicates a serious problem with your gas grill or
the LP gas tank. Failure to immediately follow the steps listed below could cause serious bodily
injury, death, or property damage.
Shut off gas supply to the gas grill.
Turn the control knobs to OFF position.
Put out any flame with a class B fire extinguisher.
Open Grill Lid.
Get away from the LP gas tank.
Do not try to fix the problem yourself.
If odour continues or you have a fire you cannot extinguish, call your fire department. Do not
call near the LP gas tank because your telephone is an electrical device and could create a spark
resulting in fire and/or explosion.
NOTE:
The normal flow of gas through the Regulator and Hose Assembly can create a
humming sound. A low volume of sound is perfectly normal and will not interfere with
operation of the grill. If humming sound is loud and excessive you may need to purge air from
the gas line or reset the regulator excess gas flow device. This purging procedure should be done
every time a new LP gas tank is connected to your grill.
OTHER CONSIDERATION
Strong winds and low temperatures can affect the heating and performance of your gas grill so
factor in these elements when positioning your grill outdoors for cooking.
Never use your gas grill in a garage, porch, shed, breezeway or any other enclosed area. Your
gas grill is to be used outdoors only, at least 70cm from the back and side of any combustible
surface. Your gas grill should not be placed under any surface that will burn. Do not obstruct the
flow of ventilation air around the gas grill housing. This gas grill is not intended to be installed
in or on recreational vehicles and/or boats.

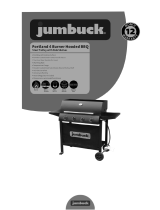
Part list

PART NUMBER PART NAME SUPPLIER CODE
1 THERMOGRAPH UM011SB01
2 LID PLATE UM011SB 02
3 LID SIDE PLATE R UM011SB 03
4 LID SIDE PLATE L UM011SB 04
5 LID PLATE PART UM011SB 05
6 LID HANDLE UM011SB 06
7 LID HANDLE PART UM011SB 07
8 WARMING GRILL UM011SB 08
9 COOKING PLATE UM011SB 09
10
COOKING GRILL
UM011SB 10
11 HEATING PLATE UM011SB 11
12 BBQ BODY UM011SB 12
13 MAIN VALVE UM011SB 13
14 CONTROL PLATE UM011SB 14
15 KNOB SUPPORT UM011SB 15
16 KNOB UM011SB 16
17 BURNER UM011SB 17
18 GREASE TRAY UM011SB 18
19 OIL CUP UM011SB 19
20 UM011SB 20
21 SIDE PANNEL FORNT L UM011SB 21
22 SIDE PANEL L UM011SB 22
23 SIDE PANEL R UM011SB 23
24 SIDE VALVE UM011SB 24
25 SIDE PANEL FRONT R UM011SB 25
26 SIDE LID UM011SB 26
27 SIDE WARMING GRILL UM011SB 27
28 FIRE PIN UM011SB 28
29 SIDE BURNER UM011SB 29
30 SIDE BURNER SUPPORT UM011SB 30
31 CART SIDE PLATE UM011SB 31
32 CART BOTTOM PLATE UM011SB 32
33 DOOR R UM011SB 33
34
DOOR L
UM011SB 34
35 CART BACK PLATE UM011SB 35
36 CART FRONT SUPPORT UM011SB 36
37 CLAPBOARD UM011SB 37
38 CART FIXING PLATE UM011SB 38
39 MAGNET UM011SB39
40 WHEEL UM011SB40

1.Wheel...…. 4pcs
2.Cart side plate........ 1pc
3. Cart bottom plate..... 1pc
4. Magnet .... 1pc
5. Cart back plate... 1pc
6 . Cart front support ...
1pc
7.Door L.............1pc
8.Door R........1pc
9.Body asm.. 1pc
10.Left panel…... 1pc
11.Left panel front…... 1pc
12.Right panel front...1pc
13. Knob support .....1pc
14.Right panel... 1pc
15. Side burner grill....... 1pc
16.Knob..... 1pc
17.Heating plate... 2pcs
18.Cooking grill..... 1pc
19. Cooking plate..... 1pc
20 Warning grill... 5pcs
21.Grease tray.... 1pc
24.Cart plate……1PC
23.clapboard….1 pc
24. thermometer…1pc

Hardware Pack
A
Bolt: M6x15
41pcs
B
Bolt: M4x10
8pcs
C
Bolt: M5x10
4pcs
D
Washer:M4
4pcs
E
Nut M4
4pcs
F
Spanner
1pc
25.Body side U-plate
L…1pc
26. Body side U-plate
R……1pc
27. Body back U-plate…1pc
28.Oil cup…..1pc
29.Lid handle ….1pc
30.Lid handle part….2pcs
31.Lid plate part…1pc

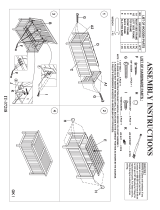
Assembly Instructions
Remove all contents from packaging, and make sure all parts are present before attempting to assemble! Tighten all
bolt connections by hand first, then when the BBQ is fully assembled, re-tighten all nuts and bolts.
STEP 1
Assemble the wheel (Part 1)onto the cart side plate (Part2) as shown.

STEP 2
Assemble cart bottom plate(part 3) as shown.
STEP 3
Assemble the cart back plate(Part 5) ,Cart plate(part 22) and Magnet (part 4) as shown.

STEP 4
Assemble Cart plate(part 22) and Magnet (part 4) as shown.
STEP 5
Assemble the cart front support (part 6 ) onto the cart as shown.

STEP 6
Assemble the door l ( part 7) and door r (part 8 ) onto the cart as shown;
STEP 7
Assemble the clapboard ( part 23 )onto the cart as shown;

STEP 8
Assemble the Body side U-plate L (part 25) and Body side U-plate R(part 26) onto the body as shown.
STEP 9
Assemble the body back U-plate(part 27) onto the body as shown.

Step 10
Assemble the body onto the cart as shown.
Step 11
Assemble the lid handle(part 28) , lid handle part(part 29) and the thermometer(part 24) as shown.
Assemble the lid plate part(part 31) as shown.

Step 12
Assemble the lid onto the body as shown.
Step 13
Assemble the left panel (part 10) and left panel front (part 11) as shown.
Then assemble the left panel onto the body as shown. Use bolt (AX6) to tighten.

STEP 14
Assemble the side valve , right panel front(part 12) and knob support (part 13) as shown, use the bolt (BX2) tighten.
STEP 15
Assemble the right panel front onto the right panel(part 14) as shown. Please check that the side burner and side
valve are well connected. And insert the ignition wire into the side valve.

STEP 16
Assemble the right panel onto the body as shown.
STEP 17
Place the side burner grill (part 15) onto the right panel as shown.
Insert the knob into the side valve as shown.

STEP 18
Place the heating plate(part 17) over the burners as shown
.
STEP 19
Place the cooking grill (part 18),the cooking plate (part 19 )and the warming grill (part 20) onto the body as shown.

Step 20
Insert the grease tray (part 21) into the body as shown.
Step 21
Insert the oil cup (part 28) into the grease tray as shown.

Fully-Assembled
/