Page is loading ...

Notes
13
CO1601 2 Dial Tap Timer Manual V2.indd 15 30/01/14 9:37 AM
Notes
13
CO1601 2 Dial Tap Timer Manual V2.indd 15 30/01/14 9:37 AM
Notes
13
CO1601 2 Dial Tap Timer Manual V2.indd 15 30/01/14 9:37 AM
Notes
13
CO1601 2 Dial Tap Timer Manual V2.indd 15 30/01/14 9:37 AM
Table of Contents
Introduction........................
...........
.
p1
Glossary..................................
.......
.p2
Battery Installation..........................p3
Controller Installation....................
.
p4
Technical Data.................................p5
Programming
Set Automatic Watering.................
.
p6
Changing Start Time.................
.....
p7
Manual Start....................................
.
p8
Stop or NO Watering......................
.
p9
Red LED - Operating States...........p10
Extra Watering Cycles....................p11
Fault Finding...................................p12
Notes...............................................
.
p13
Warranty..............................Back Page
CO3001 Professional 2 Dial Tap Controller Manual.indd 25/11/13 3:36 PM
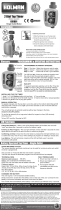
CO3001 - 2 Dial Tap Controller
Thank you for purchasing this device, please read the
operating instructions carefully to familarize yourself
with the features and modes of operation before
using the 2 Dial Tap Controller.
Introduction
1
CO3001 Professional 2 Dial Tap Controller Manual.indd 35/11/13 3:36 PM
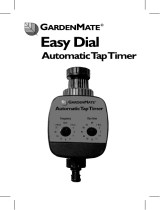
2 Dial
programming
adaptor
Glossary
2
CO3001 Professional 2 Dial Tap Controller Manual.indd 45/11/13 3:36 PM
adaptor
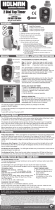
Battery Installation
3
• Hold the controller with the battery compartment facing you.
• Remove the battery compartment cover, lifting from one side.
• Connect a 9V battery to the battery connector.
• Insert the connected battery
and press on the battery
cover.
NOTE:
When battery
is first fitted, it takes
up to 1 minute for
the battery indicator
to assess the
battery strength.
NOTE: When
changing the
battery, make
sure the battery
compartment
stays dry.
USE ONLY ALKALINE BATTERIES.
CO3001 Professional 2 Dial Tap Controller Manual.indd 55/11/13 3:36 PM
Controller Installation
4
Make sure the lter (washer) is in place, then screw
the controller to the faucet/tap by attaching the side
with the female swivel hose thread connector to the
tap or hose end, then turn it clockwise (hand tighten
only). Connect the controller hose male thread side
to your system.
CO3001 Professional 2 Dial Tap Controller Manual.indd 65/11/13 3:36 PM
Technical Data
5
HOLMAN Professional - 2 Dial Tap Controller
Product Code: CO3001.
Maximum Water Pressure: 800 KpA.
Battery: Use a standard 9 Volt ALKALINE battery.
Fluid: Only use cold water with NO added chemicals.
Frequency Options:
Every 6 hrs, 12 hrs, 24 hrs, 48 hrs, Every 3rd Day,
Every 4th Day, Every 5th Day, Every 7th Day.
Run Time Options:
2, 5, 10, 15, 30, 60, 120 or 240 Minutes.
CO3001 Professional 2 Dial Tap Controller Manual.indd 75/11/13 3:36 PM
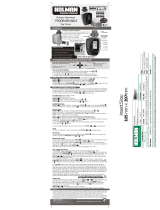
Set Automatic Watering
6
SET RUN TIME & WATERING INTERVAL
1. Turn “LEFT” dial to select RUN TIME.
2. Turn “RIGHT” dial to select INTERVAL.
3. Push “ENTER” - The Red LED will appear solid for
10 seconds to conrm your selections, and then run.
Watering will start in 24 hrs at the selected INTERVAL.
CO3001 Professional 2 Dial Tap Controller Manual.indd 85/11/13 3:36 PM
TO CHANGE THE START TIME (Minimum 6 Hours)
1. While the Red LED is solid ON, turn the “RIGHT”
dial to select the DELAY time & press “ENTER”
again. This moves the START time forward by the
hours selected.
RUN TIME will begin then & thereafter at selected
INTERVAL.
Changing Start Time
7
CO3001 Professional 2 Dial Tap Controller Manual.indd 95/11/13 3:36 PM
SETTING THE CONTROLLER TO START MANUALLY
1. Turn
“LEFT”
dial to select RUN TIME.
2. Turn
“RIGHT”
dial to MAN and press “ENTER”.
Note:
Running a manual run time will not change any
program previously entered.
Watering will begin and end at selected RUN TIME.
Manual Start
8
CO3001 Professional 2 Dial Tap Controller Manual.indd 105/11/13 3:36 PM
HOW TO STOP THE CONTROLLER WATERING
1. Turn “LEFT” dial to the OFF position.
While the RUN TIME (Left) dial is in the “OFF”
position NO watering will happen.
Note:
To re-commence automatic operation, move
the
“RUN TIME”
dial to any other position.
Manual Start
Stop or No Watering
9
CO3001 Professional 2 Dial Tap Controller Manual.indd 115/11/13 3:36 PM
Red LED - OPERATING STATES
as follows:
1. SOLID:
Conrms program & allows “START TIME” change.
2. FLASHING - 20 Seconds:
“ALL IS RUNNING CORRECTLY”.
3. FLASHING - 1 Second:
“BATTERIES NEED CHANGING”.
Red LED - Operating States
10
CO3001 Professional 2 Dial Tap Controller Manual.indd 125/11/13 3:36 PM
Red LED - Operating States
Extra Watering Cycles
11
The manual operation mentioned previously, can
be used for running an extra cycle whilst the timer
is programmed.
The “Manual” cycle will run immediately after the
enter button is pressed.
The timer will resume the automatic program once
the manual time has elapsed.
CO3001 Professional 2 Dial Tap Controller Manual.indd 135/11/13 3:36 PM
Fault Finding
12
1. Ensure your tap is turned on.
2. Ensure your battery is in good condition.
USE ONLY ALKALINE BATTERIES.
3. Your program will start immediately and then
in 24 hours at the frequency selected.
Note: When the controller is not using an automatic
program, it must be in the “OFF” position.
Turn the tap “OFF” when the controller is not in use.
CO3001 Professional 2 Dial Tap Controller Manual.indd 145/11/13 3:36 PM
Warranty: We will honour all statutory
guarantees that this product
is of acceptable quality.
(including that it is t for purpose)
HOLMAN Industries:
47 Walters Drive,
Osborne Park, WA 6017.
Ph: +61 8 9204 1011
www.holmanindustries.com.au
Warranty
CO3001 Professional 2 Dial Tap Controller Manual.indd 165/11/13 3:36 PM
Notes
13
CO1601 2 Dial Tap Timer Manual V2.indd 15 30/01/14 9:37 AM
CO3001
N10372
INSTRUCTION MANUAL
CO3001 Professional 2 Dial Tap Controller Manual.indd 15/11/13 3:36 PM
CO3001 V4 Sheet M.indd 1 30/01/14 3:05 PM
/