Page is loading ...

Page 1Rev. 032018
DiscountRamps.com • 1-888-651-3431
Aluminum Motorcycle Dolly
Instructions for Part # BW-PRO-DOLLY
General Guidelines
• It is the user’s responsibility to read and follow all instructions.
• Keep these instructions with the product at all times and review before each use.
• It is the responsibility of this product’s owner to furnish the instructions to any person that borrows or purchases the
product.
• Inspect the product before use to ensure it is assembled properly and all parts are in safe working order and free of
defects.
• Never modify this product in any way.
• All circumstances cannot be addressed in these instructions. Please use common sense and practice general safety
measures when using this product.
• Parts and/or instructions are subject to change without notice.
Safety
• Keep the dolly clean and well maintained for safe performance.
• The weight capacity is 1,500 lbs. Do not exceed this rated capacity.
• Make sure the rear caster wheels are placed at least 10" from the end of the dolly before loading. (See Operation)
• This dolly is designed for moving a motorcycle. Do not use it for any other purpose it is not designed to perform.
• Do not use the dolly to carry or move a person, and do not sit on the dolly.
• Keep children and unauthorized people away from the work area.
• Remove loose clothing, ties, watches, rings, and other loose jewelry and tie back long hair.
• Keep proper balance and footing. Do not overreach and wear non-skid footwear.
• Only use the dolly on a surface that is stable, level, dry, not slippery, and capable of sustaining the load.
• Lock the wheels when not in use. Keep the dolly in a safe, dry place away from children.
• Always keep hands and feet away from moving parts.
• Do not operate the dolly when you are tired or under the inuence of alcohol, drugs, or any intoxicating medication.
• Do not expose the dolly to rain or snow.
• If the dolly is in need of repair and/or there is any part which needs to be replaced, have it repaired by an authorized
technician and only use replacement parts supplied by the manufacturer.
Maintenance
• Check all hardware to make sure it is securely in place.
• Periodically check all the joints. Do not use if there are any cracks or if the frame is bent or deformed.
• Lubricate the wheels periodically for best use.
• Lock all wheels when not in use.

Page 2Rev. 032018
DiscountRamps.com • 1-888-651-3431
Parts
Part Description Quantity
I M10x30 Hex Bolt 2
J M10x30 Button Head Bolt 8
K M10x25 Button Head Bolt 2
L M10 Lock Washer 10
M M10 Washer 10
N M10 Lock Nut 10
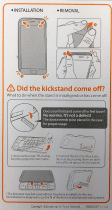
O Kickstand Tray Protector* 1
Part Description Quantity
A Base 1
B Kickstand Tray 1
C Wheel Bracket 5
D Caster Wheel 5
E Double-Hole Bracket 4
F Single-Hole Bracket 2
G M12x40 Button Head Bolt 5
H M12 Lock Nut 5
A
C F
G H I J K L M N
D E
B
Tools Needed: 17mm Wrenches, 19mm Wrenches
Assembly
Step 1. Loosely attach the double-hole brackets (E) to four of the wheel brackets (C) using M10x30
button head bolts (J), lock washers (L), and washers (M).
(1a) (1b)
O
*This optional protective sheet may simply be placed in the
kickstand tray, or, for additional security, can be xed into
place with double-sided tape (not included).

Page 3Rev. 032018
DiscountRamps.com • 1-888-651-3431
Step 3. Attach caster wheels (D) to each wheel bracket (C) using the M12x40 bolts (G) and lock
nuts (H). Secure with the included Allen wrench and a 19mm wrench.
Step 2. Loosely attach the single-hole brackets (F) to the kickstand tray (B) using the M10x25 button
head bolts (K), lock washers (L), and washers (M). Attach the remaining wheel bracket (C) to the kick
-
stand tray (B) using M10x30 hex bolts (I), washers (M), and lock nuts (N). Secure with 17mm wrenches.
(2b)(2a)
(3b)(3a)
Step 4. Slide the kickstand tray assembly and wheel assemblies onto the base (A) track. Slide two
wheel assemblies onto one side. On the other side, slide on one wheel assembly, then the kickstand
assembly, the other wheel assembly, so that the kickstand assembly is between the two wheel as-
semblies.
Step 5. Tighten the bolts using the included Allen wrenches.
(4a)
(5a) (5b)
(4b)

Page 4Rev. 032018
DiscountRamps.com • 1-888-651-3431
Product Warranty and Liability
GENERAL PRODUCT WARRANTY: Products purchased from the Authorized Dealer (original place of purchase) or Merchant (“Deal-
er”) will be free of defects in material and workmanship at the time of receipt, and will meet the specications stated at the place of pur-
chase transaction or online at the Dealer’s website, under normal use and service when correctly installed, operated and maintained.
This product warranty is eective for the period of time stated below, unless otherwise stated in the product instructions or depicted in
the product advertisement. All Authorized Dealer warranties are NON-TRANSFERABLE and cover only the original end purchas-
er. This limited warranty does not cover products purchased through non-authorized dealers. Non-authorized dealer receipts are not
accepted for warranty verication.
***Warranty claims must be made directly to the original place of purchase.***
WARRANTY PERIOD: This warranty remains in force for one year from the date of the product’s accepted delivery. The Authorized
Dealer oers a one year manufacturer’s warranty for most products unless otherwise specied on the product advertisement.
WARRANTY SERVICE: The Authorized Dealer will replace any defective or malfunctioning part at no charge, including payment of the
shipping costs of parts or replacement product to and from the manufacturer. The purchaser is responsible for labor charges. If the
product does not meet specications as depicted in the advertisement, the Authorized Dealer will refund the full purchase price of the
product.
Questions regarding the warranty on a specic product and warranty claims should be directed to the Authorized Dealer with whom the
purchase transaction was made.
WARRANTY LIMITATIONS: The above warranty does not apply to products that are repaired, modied or altered by any party other
than the Authorized Dealer; are subjected to unusual physical stress or conditions (such as overloaded ramps or corrosion), natural
disaster, governmental actions, wars, strikes, labor disputes, riots, theft, vandalism, terrorism or any reason beyond reasonable control;
are damaged due to improper installation, misuse, abuse, accident or negligence in use, storage, transportation or handling, or tamper-
ing; or to products that are considered consumable items or items requiring repair or replacement due to normal wear and tear.
Product should be inspected prior to signing for delivery. Product damage incurred during shipping, unless noted on the Bill of Lading at
the time of delivery, renders this warranty void.
LIMITED LIABILITY: In no event shall THE AUTHORIZED DEALER be liable to the purchaser or any third party for any indirect, inci-
dental, consequential, special, exemplary or punitive damages arising out of the use of the product, including, without limitation, prop-
erty damage, loss of value of the product or any third party products that are used in or with the product, or loss of use of the product or
any third party products that are used in or with the product.
Operation
The motorcycle dolly is designed to tilt upward while
driving the motorcycle on. The rear caster wheels
should be placed at least 10" from the end of the dolly.
The greater the distance the caster wheels are placed
from the rear of the dolly, the less the dolly will tilt. Once
you have the rear caster wheels set at 10", measure the
wheelbase of your motorcycle and set the front caster
wheels to match the wheelbase measurement.
• Make sure all wheels are locked before loading the
motorcycle.
• Put down the kickstand onto the kickstand tray to
support the bike.
• After the motorcycle is properly loaded, unlock the
wheels to allow the dolly to move again.
Minimum
distance 10"
Motorcycle
wheelbase
measurement
/