Page is loading ...

SAFETY PRECAUTIONS:
WARNINGS:
• Toavoidfire,shock,andseriouspersonalinjury,followallinstructions
carefully.Readandsavetheseinstructionsforfuturereference.
• Donotinstallorusethisunitifanypartisdamagedormissing.
NOTICE:
1. Thiscontrolisdesignedtooperateonlyoneceilingfanandnotan
accessorylightkit.
2.
Thiswallcontrolisratedfor1.25ampsat120volts.Ifyourceilingfan
isequippedwithavariablespeedpullchainswitchcontrol,makesure
tosetitatthehighestspeedbeforeinstallingthewallcontrol.Thiswill
avoiderraticspeedsandpossibledamagetoyourceilingfan.
3. Makesurenobarewiresareexposedoutsideoftheconnectors.
4.
AllwiringmustconformtoNationalandLocalElectricalCodes.Ifyoufeelthat
youdonothaveenoughelectricalwiringknowledgeorexperiencehaveyourfan
controlinstalledbyalicensedelectrician.
Any electrical work not described
in this manual should be performed by a licensed electrician.
5. Useofthiscontrolwithsomeceilingfanscouldresultinfire,shock,
andseriouspersonalinjury.Usethisfancontrolwithcapacitorspeed
controlledceilingfansonly.
MAKING THE ELECTRICAL CONNECTIONS:
.
Settheceilingfan’sspeedtotheHIGHpositionbeforeinstallation.Donot
changetheceilingfan’spullchainspeedsettingafteryourspeedcontrolis
installed,sincedamagetoyourceilingfanorcontrolmayresult.
2.
Verifyproperoperationoftheceilingfanwallswitchbeforeinstallation.
Improperwiringcandamagethecontrolandwillvoidthewarranty.
3. Disconnectpowertotheceilingfanatthemainelectricpanel.Removethe
fuseorswitchthecircuitbreakertotheOFFposition.
4. Removethewallplatetoexposethewiringanddisconnecttheexisting
switch.Installwallcontrolinametalorplasticwallbox.
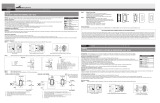
5. Connectoneoftheblackwiresfromthewallcontroltothefanleadwire.
Connectthesecondblackwirefromthewallcontroltothe120vAChot
wire.Usewireconnectors provided to secure theconnections.
NOTE:
Refer to the diagram on the back of the wall control.
6.
Securethewallcontroltotheoutletboxusingthetwo6-32x
3
⁄
4
"screwsprovided.
7.
Securethefaceplateoverthewallcontrolwiththetwo6-32x
1
⁄
4
"screwsprovided.
8. Restorepoweratmainelectricalpanel.
9.
Operate ceiling fan by sliding dial to the desired speed. For best
operation, select HIGH speed until the motor starts, then select the
desired speed.
WARNING! HOOK UP “IN SERIES” ONLY!
Do not connect to hot and common wire of electric circuit or switch will
be damaged. Refer to diagram above.
TROUBLESHOOTING GUIDE
PROBLEM: CEILING FAN SLIDE WALL CONTROL FAILS TO OPERATE
Check:
• Istherepowertothecontrolunit?
• Isthecontrolunitwiredcorrectly?
• Arethefanandlightswitchessetonthehighestposition?
LIMITED WARRANTY
TheWestinghouseceilingfanwallcontroloffersalimitedwarrantyofoneyearfromthe
dateofpurchasetotheoriginalowneragainstdefectsinmaterialandworkmanship.Allspare
partsarecoveredforninetydaysonly.Thiswarrantyisinlieuofallotherwarrantiesexpressed
orimplied.
Westinghousewill repair or replace this ceiling fan wallcontrol if it is defective due
tofaultymaterialsorworkmanship.Thiswarrantydoesnot coverservicecharges,defects
resultingfromaccidents,damages caused throughabuseoralterationsor by affixingany
attachmentnotprovidedwiththeproduct,improperinstallationormaintenance,failureof
supportingdevices notsuppliedasoriginalmountinghardware,exposures toextremesof
heatorhumidity,incorrectvoltage,surgesincurrent,unauthorizedrepair,orfailurescausedby
modificationsoftheproductortheactsofthirdparties.Seemanualforproperinstallation.
Ifawarrantyclaimismadeinthefirstyear,simplyreturntheceilingfanslidewallcontrol
withacopyoftheoriginalsalesreceipt,freightprepaidtoWestinghouseLightingCorporation,
who,atitsoption,shallrepairorreplacetheslidewallcontrolorrefundthepurchaseprice.
Please pack product correctly to eliminate shipping damage.Sendallslidewall
controlsandinquiriesto:
Westinghouse Lighting Corp., 12401 McNulty Rd., Philadelphia, PA 19154-1099
Attn: Customer Service
Ifyouhaveanyquestionsregardingtheinstallationofthisitemorthewarrantycoverage,
pleasecallourconsumerlineat1-888-417-6222andarepresentativewillassistyou.
77872
BLACK
NEGRO
NOIR
WHITE
BLANCO
BLANC
WHITE
BLANCO
BLANC
GREEN TO GROUND
VERDE A TIERRA
VERT DE MISE À LA TERRE
4
3
2
1
6-32 x 3⁄4" SCREWS
TORNILLOS DE 6-32 x 3⁄4"
VIS 6-32 x 3⁄4"
AC 120V INPUT
FAN
VENTILADOR
VENTILATEUR
6-32 x 1⁄4" SCREWS
TORNILLOS DE 6-32 x 1⁄4"
VIS 6-32 x 1⁄4"
BLACK
NEGRO
NOIR
BLACK
NEGRO
NOIR
BLACK
NEGRO
NOIR
PRECAUCIONES DE SEGURIDAD:
ADVERTENCIAS:
• Sigalasinstruccionesalpiedelaletraparaevitarincendios,choques
eléctricos y lesiones personales graves. Lea estas instrucciones y
consérvelasparafuturareferencia.
• Sifaltanpiezasohaypiezasdañadas,noinstaleelventilador.
AVISO:
1. Estecontrolestáprevistoparaoperarunsoloventiladordetechoyno
unjuegodelucesaccesorio.
2.
Estecontroltieneunacapacidadnominaldeamperajede1.25a120voltios.
Sisuventiladordetechoestáequipadoconuninterruptordecontrolpara
velocidad variable con cadenilla de tiro, póngalo a la velocidad más alta
antesdeinstalarelcontroldepared.Deestamaneraevitarálasvelocidades
erráticasylaposibleaveríadesuventiladordetecho.
3.
Cercióresedequeningúncablesinaislaciónquedefueradelosconectores.
4.
Todo el cableado debe cumplir con los códigos eléctricos nacionales y
locales.Sipiensaquenotienesuficientesconocimientosoexperienciaen
cableadoeléctrico,acudaaunelectricistacertificadoparaqueleinstaleel
controldelventilador.
Todo trabajo eléctrico que no se describe en este
manual deberá ser realizado por un electricista certificado.
5. Elempleodeestecontrolpodríacausarincendio,choqueeléctricoy
lesiones personales graves cuando se utiliza paracontrolaralgunos
ventiladoresdetecho.Useestecontroldeventiladorúnicamentecon
ventiladoresdetechodevelocidadcontroladaporcondensador.
EXPLICACIÓN PARA HACER LAS
CONEXIONES ELÉCTRICAS:
1. Antesdelainstalación,pongalavelocidaddelventiladordetechoenla
posiciónALTA.Nocambielaposicióndelavelocidaddelacadenillade
tirodelventiladordetechodespuésdeinstalarelcontroldevelocidad
porquepodríaaveriarelventiladordetechooelcontrol.
2. Verifiqueelfuncionamientoadecuadodelinterruptordepareddelven-
tiladordetechoantesdelainstalación.Elcableadoinadecuadopuede
averiarelcontrolyanularálagarantía.
3.
Desconecteelsuministroeléctricoalventiladordetechoenelpanelprincipal.
QuiteelfusibleopongaelcortacircuitoenlaposicióndeAPAGADO.
4. Saquelaplacadeparedparaqueloscablesquedenexpuestosydesco-
necteelinterruptorexistente.Instaleelcontroldeventiladorenunacaja
deembutirdemetaloplástico.
5. Conecteunodeloscablesnegrosdelcontroldeparedalcabledeali-
mentacióndelventilador.Conecteelsegundocablenegrodelcontrolde
paredalcablevivode120vCA.Uselosconectoresparacablesincluidos
paraasegurarlasconexiones.
NOTA: Consulte el diagrama en la parte
posterior del control de pared.
6. Asegureelcontroldeparedalacajadeembutirusandolosdostornillos
de6-32x
3
⁄
4
"incluidos.
7. Asegurelaplacadelanterasobreelcontroldeparedconlosdostornillos
de6-32x
1
⁄
4
"incluidos.
8. Conecteelsuministroeléctricoenelpanelprincipal.
9.
Haga funcionar el ventilador de techo deslizando el dial a la
velocidad deseada. Para un funcionamiento óptimo, seleccione la
velocidad ALTA hasta que el motor comience a funcionar; selec-
cione luego la velocidad deseada.
¡ADVERTENCIA! ¡CONECTE SÓLO EN SERIE!
No lo conecte al cable vivo y común del circuito eléctrico o se dañará
el interruptor. Consulte el siguiente diagrama.
GUÍA PARA SOLUCIONAR PROBLEMAS
PROBLEMA: EL CONTROL DE PARED DE TIPO DESLIZANTE PARA
VENTILADOR DE TECHO NO FUNCIONA
Revise:
• ¿Leestállegandoelectricidadalaunidaddecontrol?
• ¿Escorrectoelcableadodelaunidaddecontrol?
•
¿Estánenlaposiciónmásaltalosinterruptoresdelventiladorydelalámpara?
GARANTIA LIMITADA
ElcontroldeparedparaventiladoresdetechodeWestinghouseleofrece
alpropietariooriginalunagarantíalimitadadeunaño,apartirdelafechade
compra,contramaterialesymanodeobradefectuosos.Todaslaspiezasde
repuestoestáncubiertaspornoventadíassolamente.Estagarantíareemplaza
atodaslasotrasgarantíasexpresasoimplícitas.
Westinghouse reparará o reemplazará este control de pared de tipo
deslizante para ventilador de techo en caso de defectos ocasionados por
materialesomanodeobradefectuosos.Estagarantíanocubrelosgastosde
reparación,defectosresultantesdeaccidentes,averíasocasionadasporuso
indebidooalteracionesoporlainstalacióndecualquieraccesorioqueno
seasuministradoconelproducto,instalaciónomantenimientoincorrectos,
falladedispositivosdesoportenosuministradosconlosherrajesdemontaje
originales,exposiciónacambiosbruscosdetemperaturaohumedad,voltaje
incorrecto,cambiosdetensión,reparacionesnoautorizadasofallascausa-
daspormodificacionesalproductoointervencionesdeterceros.Consulteel
manualparasuinstalacióncorrecta.
Sihaceunreclamodegarantíadentrodelprimeraño,simplementeenvíe
elcontroldepareddetipodeslizanteparaventiladordetechoconunacopia
delrecibooriginaldecompra,confranqueoprepagoaWestinghouseLighting
Corporation,queasudiscreciónrepararáoreemplazaráelcontroldeparedde
tipodeslizanteoreintegraráelpreciodecompra.
Sírvase embalar el producto
adecuadamente para evitar daños durante el transporte.
Envíetodoslos
controlesdepareddetipodeslizanteydirijatodassuspreguntasa:
Westinghouse Lighting Corp., 12401 McNulty Rd., Philadelphia, PA 19154-1099
Attn: Customer Service
Sitienedudasacercadelainstalacióndeesteartículoodelacobertura
delagarantía,llameanuestroCentrodeatenciónalconsumidoral
1-888-
417-6222
dondeleayudaráunrepresentantecapacitado.
MESURES DE PRÉCAUTION:
AVERTISSEMENTS :
• Afind’éviterlesincendies,leschocsélectriquesetlesblessurescorpo-
relles,suivezattentivementtouteslesinstructions.Lisezetconservez
cesinstructionsauxfinsderéférenceultérieure.
• N’installezpasoun’utilisezpascetappareils’ilmanqueunepièceou
qu’unepièceestdéfectueuse.
AVIS-:
1. Cettecommandeestconçuepourfairefonctionnerunseulventilateur
deplafond,sansélémentd’éclairage.
2.
Lapuissancenominaledecettecommandemuraleestde1,25amps,à120V.
Sivotreventilateurdeplafondestdotéd'unechaînepermettantdecontrôler
lesvitesses,assurez-vousderéglerlavitesseauniveauleplusélevéavant
d'installerlacommandemurale.Ceciéviterad’obtenirvitessesirrégulièreset
peut-êtred’endommagervotreventilateurdeplafond.
3.
Assurez-vousqu’aucunfilnun’estexposéàl’extérieurdesconnecteurs.
4.
Les câbles électriques doivent êtreconformes aux codes national et local
d’électricité. Si vous croyez ne pas avoir suffisamment de connaissances
oud’expérienceen matière d’électricité,faitesinstallercettecommande de
ventilateurparunélectricienagréé.
Tout travail d’électricité qui n’est pas
décrit dans ce manuel doit être réalisé par un électricien agréé.
5.
L’utilisationdecetappareildecommandeaveccertainsventilateursdeplafond
pourraitcauserunincendie,unchocélectriqueetdegravesblessuresperson-
nelles.Utilisez cettetélécommandedeventilateuruniquement aveclesventila-
teursdeplafonddontlavitesseestcommandéeparuncondensateur.
RACCORDEMENT DES FILS ÉLECTRIQUES-:
1. Réglez la vitesse du ventilateursur la position HIGH (AU NIVEAU LE
PLUSÉLEVÉ)avantl’installation.Nepasréglerlachaînepermettantde
contrôlerlesvitessesduventilateuraprèsavoirinstallélacommandede
vitessescarcecipourraitendommagervotreventilateurdeplafondoula
commandedevitesses.
2. Assurez-vousquel’appareilcommandeduventilateurdeplafondfonc-
tionnecorrectementavantdel’installer.Unraccordementincorrectpeut
endommagerlacommandeetannulerlagarantie.
3. Coupezl’alimentationauventilateurdeplafonddanslaboîtededisjonc-
teursprincipale.Retirezlefusibleoumettezlecommutateurdelaboîte
dedisjoncteursenpositionOFF.
4.
Retirezlaplaquemuralepouraccéderaufilsetdébranchezl’interrupteurexistant.
Installezlacommandemuraledansuneboîtemuraleenmétalouenplastique.
5.
Branchez un des fils noirs de la commande murale au fil d’alimentation électrique
duventilateur.Branchezledeuxièmefilnoirdelacommandemuraleaufilchargéde
120 V CA. Effectuez les raccords électriquesà l'aide des connecteurs de fil fournis.
NOTE : Reportez-vous au diagramme situé à l’arrière de la commande
murale.
6. Fixezlacommandemuraleàlaboîtedesortiedecourantàl’aidededeux
vis6-32x
3
⁄
4
"fournies.
7. Fixezlaplaqueavantsurlacommandemuraleàl’aidededeuxvis6-32”
x
1
⁄
4
"fournies.
8. Rétablissezl’alimentationdanslaboîtededisjoncteurs.
9.
Faites fonctionner le ventilateur de plafond en sélectionnant la
vitesse voulue sur la commande à cadran. Pour assurer un fonc-
tionnement optimal, sélectionnez la vitesse la plus ÉLEVÉE jusqu’à
ce que le moteur démarre et sélectionnez par la suite la vitesse
voulue.
MISE EN GARDE ! RACCORDEZ «-EN SÉRIE-» SEULEMENT!
Ne pas brancher au fils chargé et neutre du circuit électrique car ceci pour-
rait endommager l’interrupteur. Reportez-vous au diagramme ci-dessous.
GUIDE DE DÉPANNAGE
PROBLÈME-: L’APPAREIL DE COMMANDE MURALE À CURSEUR POUR
LE VENTILATEUR DE PLAFOND NE FONCTIONNE PAS
Vérifiez les éléments suivants :
• L’appareildecommandeest-ilalimentéenénergie?
•
Lesraccordementsdel’appareildecommandeont-ilsétéeffectuéscorrectement?
• Les commutateurs du ventilateur et de l’élément d’éclairage sont-ils
réglésauniveauleplusélevé?
GARANTIE LIMITÉE
Unegarantielimitéed’unanàpartirdeladated’achatestoffertesurlacommandemuralede
Westinghousepourventilateursdeplafond.Cettegarantieestofferteàl’acheteurinitialetcouvre
toutdéfautdepiècesoudefabrication.Touteslespiècesderechangesontcouvertespendant
quatre-vingt-dixjoursseulement.Laprésentegarantiesesubstitueàtouteautregarantieexpresse
outacite.
Westinghouserépareraouauremplaceracettecommandemuralesielleestsujetteàdes
défautsdematériauxou de fabrication. Cette garantienecouvrepasles frais de service, les
pilesoulesdéfautsrésultantd’accidents,dedommagescausésparuneutilisationabusivede
l’appareiloudesmodificationsapportéesàcedernier,ouenraisondel’ajoutdetoutélément
nonfourniavecleproduit,d’uneinstallationoud’unentretienincorrect,enraisondumauvais
fonctionnementdesdispositifsdesoutiennonfournis,commedelaquincaillerieoriginalede
montage,enraisondel’expositionàdes chaleurs extrêmes ou à l’humidité, enraisond’une
tensionincorrecte,despointesdecourant,desréparationseffectuéespardesréparateursnon
autorisés,ouenraisondespannesattribuablesàlamodificationduproduitourésultantdesactes
d’unetiercepartie.Reportez-vousaumanuelpourconnaîtrel’installationappropriée.
Lorsquelaréclamationest faite pendantlapremièreannéed’utilisation, tout simplement
renvoyezlacommandeàdoublecurseurpourleventilateurdeplafond/élémentd’éclairageavec
une copie du ticket decaisse original, frais de transport prépayés,à WestinghouseLighting
Corporationqui,àsonproprechoix,répareraouremplaceralacommandeàdoublecurseurpour
leventilateurdeplafond/élémentd’éclairageourembourseralemontantduprixd’achat.Merci
d’emballer le produit correctement pour éviter le dommage pendant le transport.
Mercid’envoyertouteslescommandesetvosquestionsà-:
Westinghouse Lighting Corp., 12401 McNulty Rd., Philadelphia, PA 19154-1099
Attn: Customer Service
Si vous avez des questions au sujet de l’installation de cet appareil ou de la garantie,
veuillezcommuniqueravecnotreserviceàlaclientèle,encomposantle1-888-417-6222etun
représentantcompéte
ntvousaidera.
Installation & Operating Instructions for the
Westinghouse Ceiling Fan Slide Wall Control
WARNING: SHUT POWER OFF
AT FUSE OR CIRCUIT BREAKER
Instrucciones para la instalación y modo de empleo del control de
pared de tipo deslizante del ventilador de techo Westinghouse
ADVERTENCIA: DESCONECTE EL
SUMIN
ISTRO DE ENERGÍA QUITANDO EL
FUSIBLE
O APAGANDO EL CORTA
CIRCUITO
Notice d’installation et d’utilisation de la commande murale
à curseur pour le ventilateur de plafond de Westinghouse
MISE EN GARDE : COUPER
L’ALIMENTATION AUX FUSIBLES OU
À LA BOÎTE DE DISJONCTEURS
77872
Westinghouse Lighting Corporation, Philadelphia, PA 19154-1099, U.S.A.
a Westinghouse Electric Corporation licensee • www.westinghouseceilingfans.com
and “Westinghouse are registered trademarks of Westinghouse Electric Corporation
© 2004 WESTINGHOUSE LIGHTING CORP.
Westinghouse Lighting Corporation, Philadelphia, PA 19154-1099, U.S.A.
a Westinghouse Electric Corporation licensee
•
www.westinghouseceilingfans.com
y “Westinghouse” son marcas registradas de Westinghouse Electric Corporation
Westinghouse Lighting Corporation, Philadelphia, PA 19154-1099, U.S.A.
a Westinghouse Electric Corporation licensee
•
www.westinghouseceilingfans.com
et “Westinghouse” sont des marques déposées de Westinghouse Electric Corporation
/