Cadet EBHN500WS-RH Installation guide
- Category
- Space heaters
- Type
- Installation guide

www.cadetheat.com Tel: 360-693-2505 PO Box 1675 Vancouver, WA 98668-1675
SAVE THESE INSTRUCTIONS
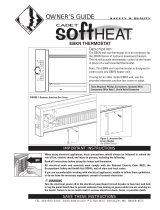
SoftHEAT Baseboard Heater
Owner’s Guide
9½”
24.13
3¼”
8.26
Side
Front
TOOLS REQUIRED:
• Phillips Screwdriver
• Straight Screwdriver
• Wire Strippers
• Drill or Hammer
• Level
• Punch or Chisel
• Drill Bits
• Utility Knife
• (4) Wood Screws
• (3) Wire Connectors
• (1) Strain Relief Connector
• Ideal for nurseries and bedrooms
• Reduces airborne allergen effects
• Hydronic heat uses environmentally friendly
required
• Saves energy by retaining heat to generate
residual warmth, even after thermostat
turns off
• Lowest surface temperatures available
make it perfect for homes with kids and
pets
• Whisper-quiet operation
• Safety features turn heater off if normal
operating temperatures are exceeded
• Your SoftHEAT baseboard heater has been
thoroughly tested and is guaranteed with a
120
4.2
6.3
1000 8.3
10.4
208
2.4
3.6
1000 4.8
6.0
7.2
(1)
2.1
3.1
1000 4.2
6.3
(1)
240 volt models can be used at 208 volts. Wattage equals 75% of 240v rated
wattage.
Left end wiring is standard. Right end wiring available by special order.
Conforms to UL
STD 1042 and
C22.2 No. 46-13
Page 1
cm
cm

SAVE THESE INSTRUCTIONS
www.cadetheat.com Tel: 360-693-2505 PO Box 1675 Vancouver, WA 98668-1675
IMPORTANT INSTRUCTIONS
Before you begin, you should know...
1. Read all instructions before using this heater.
2. A heater has hot and arcing or sparking parts
inside. Do not use it in areas where gasoline,
stored.
3. This heater is hot when in use. To avoid burns,
do not let bare skin touch hot surfaces. If provided,
use handles when moving this heater. Keep
combustible materials, such as furniture, pillows,
bedding, papers, clothes, and curtains away from
heater.
intakes or exhaust in any manner. Do not use on
soft surfaces, like a bed, where openings may
become blocked.
5. Do not insert or allow foreign objects to enter
any ventilation or exhaust opening as this may
heater.
6. Save these instructions.
electric shock, and injury to persons, including the following:
A Cadet wall thermostat is recommended for optimum performance, or you may prefer the convenience of a
built-in EBKN thermostat kit. For instructions on wiring a thermostat, see the instructions that were included
with your thermostat. Refer to the section later in this guide titled “Step 3: Thermostat” prior to installing the
baseboard, or if you are installing a wall thermostat.
Wire connection is standard from the left end of the baseboard heater. Determine on which side of the base-
board you are making wire connections by locating the supply wires. Heaters may be purchased special or-
You must locate the supply wires before mounting the heater.
It is extremely important that you verify the electrical supply wires are the same voltage as the heater (i.e. 120
volt heater to 120 volt power supply and 240 volt heater to 240 volt power supply). If replacing an existing
heater check the labels of the old heater and replace using same voltage. Hooking a 240 volt heater to a 120
volt power supply will drastically reduce the heater’s output. Hooking a 120 volt heater to a 240 volt power
supply will destroy the heater.
The SoftHEAT baseboard heater must be properly leveled when installed, in order for the heating chamber to
function properly.
Inside a SoftHEAT baseboard, an imperviously sealed heat
the solution is heated, warmth is generated and transmitted
(it could initially take 30 to 60 minutes to warm a room,
depending on the room size).
As the warmth spreads outward from the heater, cooler air
heater. “Convection air heating” (see Figure 1) means no
noisy fans are needed and the room is warmed with even,
comfortable heat. There will be no cold and hot spots in the
room as found with other types of heaters. SoftHEAT won’t
blow or burn dust particles, making it recommended for
those with severe allergies.
Page 2

INSTALLATION INSTRUCTIONS
Knockout
Location
Knockout
Location
1. All electrical work and materials must comply
with the National Electric Code (NEC), the Occu-
pational Safety and Health Act (OSHA), and all
state and local codes.
2. Use copper conductors only.
3. Do not install below an electrical receptacle.
4. A heater has hot and arcing or sparking parts
inside. Do not use it in areas where gasoline,
stored.
5. Do not install the heater against combustible
the wall.
7. Remove any obstructions between the back
of the unit and the surface of the wall.
surface, including carpet.
9. Maintain at least 12 inches minimum clearance
from objects hanging above (i.e., drapes), and 6
inches minimum clearance to any adjacent wall.
1. Locate wall studs closest to supply wires and posi-
tion heater (See Figure 4). NOTE: Wire connection is
from left side only on standard models.
STEP 1
STEP 2
This heating unit is designed for permanent installa-
tion. All wiring should be routed in compliance with the
National Electrical Code and all local codes, where
applicable. A maximum of No. 10 AWG wire may be
used with this heater. All wiring should be planned
and run before heating units are set in place. Left
end wiring is sold standard. (See Figure 2 for internal
heater wiring). The volume of the EBHN wiring com-
partment is 31.4 cubic inches (515 cubic centimeters).
When wiring unit through rear, remove knockout and
place heater on wall. Mark knockout location on wall.
-
ing and knockout in bottom of wiring compartment,
measure 1-1/2” (38mm) from wall and 2-1/4” (57mm)
centered on the measured location (See Figure 3).
Connect the grounding lead to the green grounding
screw (provided), using a connector. (See Figure 2).
Protect electrical supply from kinks, sharp objects, oil,
grease, hot surfaces or chemicals.
2. Carefully remove front cover from heater by lifting
cover up from the bottom, and then outwards. Set
aside.
3. Remove wiring compartment cover, held by one
screw. (Figure 5).
4. Remove slotted knockout closest to the supply
wires and install a strain relief connector.
5. Pull supply wires through the connector and
secure, leaving 6 inch wire leads for later use.
6. NOTE: If you plan to install a built-in EBKN
thermostat, you should do so now before mounting
your baseboard to the wall. See your EBKN
thermostat Owner’s Guide for instructions.
7. Position the heater and fasten one end of heater
to wall stud with screw in safe drill area as shown in
Figure 6. Before fastening to wall stud at other end,
place level across top of heater and make sure heater
is level. (Figure 7).
heater to wall stud with screw to wall.
Page 3
Finished
Wall
Supply
Wire
Wall Studs
Floor
Grounding
Screw
Left end wiring shown
Drill areas; left end wiring shown
Checking with level
Left end wiring
(standard)
*Distance measured from

INSTALLATION INSTRUCTIONS (continued)
Single Pole
Thermostat
Single Pole
Thermostat
Single Pole
Thermostat
Single Pole
Thermostat
Single Pole
Thermostat
Single Pole
Thermostat
Single Pole
Thermostat
Single Pole
Thermostat
Single Pole
Thermostat
Single Pole
Thermostat
STEP 3
STEP 4
Tuck wires into wiring compartment cover, and replace one screw previously removed. Replace front heater
cover.
For best results, use a Cadet electronic wall thermostat or an EBKN double pole thermostat kit. It is recom-
mended that a thermostat be provided for each room. The location of the wall thermostat should be selected
carefully. Thermostats should not be located near drafts from an open doorway or within 18” (45.7cm) of an
outside wall, or in direct sunlight or unusual heat sources. A television set or appliance that builds up heat near
a thermostat will prevent the thermostat from functioning properly. A wiring diagram illustrating typical wiring of
the thermostat is included in the literature provided with the thermostat.
Illustrated in Figures 8 through 12 are wiring diagrams typical of a single unit controlled by a single pole ther-
mostat, a single unit controlled by a double pole thermostat, and two units controlled by a double pole thermo-
stat.
Page 4

OPERATING INSTRUCTIONS
MAINTAINING YOUR HEATER
Before cleaning, turn the electrical power off at the electrical panel board (circuit breaker
or fuse box). Lock or tag the panel board door to prevent someone from accidentally turning the power
on while you are working on the heater. Failure to do so could result in serious electrical shock, burns,
or possible death.
1. The heater must be properly installed before it
is used.
2. DANGER: High temperatures may be gener-
ated under certain abnormal conditions. Do not
partially or fully cover or obstruct the front of this
heater.
3. If the heater over temperature limit trips more
than once per day, the heater must be replaced.
4. Clean heater at least every 24 months or as
required. See “Maintaining Your Heater” section.
5. Any other service not detailed in this Owner’s
Guide should be performed by an authorized ser-
vice representative.
Maintenance As Needed, or every 24 months minimum.
1. It is important that you verify power has been turned
off and no power is going to the heater before pro-
ceeding. Circuit breakers are often not marked cor-
rectly and turning the wrong breaker off could mean
does not appear to be working. If you are uncomfort-
able working with electrical appliances, unable to fol-
low these guidelines, or do not have the necessary
2. Once you verify the power has been turned off cor-
rectly, proceed to the next step.
3. Remove cover.
4. Wash cover with hot soapy water and dry immedi-
ately.
5. Use a hair dryer, or vacuum on blow cycle, to blow
debris through the element (do not touch element).
6. Vacuum area without touching the element.
7. Replace cover and secure.
8. Turn thermostat to desired setting.
9. Turn power back on at the electrical panel board.
How to operate your heater
The room temperature is controlled by a line voltage thermostat located either on the wall, or on
the heater. Once installation is complete and power has been restored, if you have a mechanical
thermostat, follow steps 1 through 3 below.
If you have an electronic thermostat, follow the instructions in the programming and operating
guide included with your thermostat.
1. Turn the thermostat fully on.
2. When the room reaches your comfort level, turn the thermostat knob counterclockwise until the
heater turns off. The heater will automatically cycle around this preset temperature.
3. To reduce the room temperature, turn the knob counterclockwise. To increase the room tem-
perature, turn the knob clockwise.
Page 5

Troubleshooting Chart
Symptom
Problem
Solution
Warranty
Gurgling
noise.
1. Unit may not be level.
2. Unit may have developed
a leak.
1. Check to be sure unit is level. If gurgling doesn’t stop
within 30 minutes, unit needs to be replaced.
2. Replace element or heater.
Heater not
working.
1. Heater does not have
proper voltage to function
correctly.*
2. Unit wired incorrectly.*
1. Circuit breaker could be positioned incorrectly. Relocate
breaker. Check voltage at the heater between supply wires
and make sure it matches required heater voltage.
2. Using Owner’s Guide, verify wires are connected properly
and securely with appropriate wire nuts. If the unit is still not
operating, further testing should be done with ohmmeter.
Consult an electrician.
Liquid found in
or around unit.
escaping from element.
1. Immediately discontinue use. Replace element or heater
(elements are not repairable).
Room does
not heat
quickly.
1. Unit is slow to heat.
2. Unit wired incorrectly.*
1. No solution necessary - typical initial warm-up takes 30-60
minutes.
2. Check voltage at the heater between supply wires and
make sure it matches required heater voltage.
Heater will not
shut off.
1. Heat loss from room is
greater than heater capacity.
2. Defective thermostat.
3. Thermostat wired
incorrectly to heater.
1. Close doors and windows. Provide additional insulation,
install a higher-wattage heater or multiple heaters, if
necessary.
2. Adjust thermostat to its lowest setting. If heater continues
to run (allow two minutes for the thermostat to respond),
replace thermostat.
3. Refer to thermostat documentation and correct wiring.
request). This solution is non-toxic if ingested, and there is no immediate health concern with air quality following
a spill. Take adequate precautions to keep people and animals away from leakage. Non-porous rubber gloves
and eye protection should be worn during clean-up if exposure and contact lasts longer than two hours.
Soak up spill with an absorbent material such as paper towels. Once excess liquid or residue has been ab-
sorbed, a non-oxidizing cleanser such as an orange citrus cleaner can be used to remove any remaining dried
remove any remaining cleanser. Several applications of the cleanser may be required, depending on size and
amount of spill.
For more effective and safer operation and to prolong the life of
the heater, read the Owner’s Guide and follow the maintenance
instructions. Failure to properly maintain the heater will void any
warranty and may cause the heater to function improperly. War-
ranties are non transferable and apply to original consumer only.
Warranty terms are set out below.
Cadet will repair or
replace any SoftHEAT (EBHN) heater found to be defective
within seven years after the date of purchase.
1. Damage occurs to the product through improper installation or
incorrect supply voltage;
2. Damage occurs to the product through improper maintenance,
misuse, abuse, accident, or alteration;
3. The product is serviced by anyone other than Cadet;
4. If the date of manufacture of the product cannot be deter-
mined;
5. If the product is damaged during shipping through no fault of
Cadet.
6. CADET’S WARRANTY IS LIMITED TO REPAIR OR RE-
PLACEMENT AS SET OUT HEREIN. CADET SHALL NOT BE
LIABLE FOR DAMAGES SUCH AS PROPERTY DAMAGE OR
FOR CONSEQUENTIAL DAMAGES AND/OR INCIDENTAL EX-
PENSES RESULTING FROM BREACH OF THESE WRITTEN
WARRANTIES OR ANY EXPRESS OR IMPLIED WARRANTY.
7. IN THE EVENT CADET ELECTS TO REPLACE ANY PART
OF YOUR CADET PRODUCT, THE REPLACEMENT PARTS
ARE SUBJECT TO THE SAME WARRANTIES AS THE PROD-
UCT. THE INSTALLATION OF REPLACEMENT PARTS DOES
NOT MODIFY OR EXTEND THE UNDERLYING WARRANTIES.
REPLACEMENT OR REPAIR OF ANY CADET PRODUCT OR
PART DOES NOT CREATE ANY NEW WARRANTIES.
also have other rights which vary from state to state. Cadet nei-
ther assumes, nor authorizes anyone to assume for it, any other
obligation or liability in connection with its products other than as
set out herein.
If you believe your Cadet product is defective, please contact
Cadet Manufacturing Co. at 360-693-2505, during the warranty
period, for instructions on how to have the repair or replacement
processed. Warranty claims made after the warranty period has
expired will be denied. Products returned without authorization
will be refused.
Visit cadetheat.com/parts-service for information on where to
obtain parts and service.
This product is made primarily of recyclable materials. You
can reduce your carbon footprint by recycling this product at
the end of its useful life. Contact your local recycling support
center for further recycling instructions.
©2014 Cadet Printed in USA Rev 03/14 #706955
Page 6
Page is loading ...
Page is loading ...
Page is loading ...
Page is loading ...
Page is loading ...
Page is loading ...
Page is loading ...
Page is loading ...
Page is loading ...
Page is loading ...
Page is loading ...
Page is loading ...
-
 1
1
-
 2
2
-
 3
3
-
 4
4
-
 5
5
-
 6
6
-
 7
7
-
 8
8
-
 9
9
-
 10
10
-
 11
11
-
 12
12
-
 13
13
-
 14
14
-
 15
15
-
 16
16
-
 17
17
-
 18
18


Cadet EBHN500WS-RH Installation guide
- Category
- Space heaters
- Type
- Installation guide
Ask a question and I''ll find the answer in the document
Finding information in a document is now easier with AI
in other languages
- français: Cadet EBHN500WS-RH Guide d'installation
- español: Cadet EBHN500WS-RH Guía de instalación
Related papers
-
Cadet Softheat EBHN500-8 Operating instructions
-
-
-
-
-
-
-
-
-
Other documents
-
 Cadet Manufacturing 13170 Installation guide
-
 Cadet Manufacturing 68070 Installation guide
-
Lifesmart FP2042 Installation guide
-
 Cadet Manufacturing 14910 Installation guide
-
 Berko 2546W User guide
-
Dimplex LC2005W31 User manual
-
World Marketing of America EUH4000R User manual
-
World Marketing of America QDE1340 Owner's manual
-
none RDH1507TCA Installation guide
-
Reznor EBHB Installation guide


