Page is loading ...

cadetheat.com Tel: 360-693-2505 PO Box 1675 Vancouver, WA 98668-1675
Benets You Can Depend On
SAVE THESE INSTRUCTIONS
EBKN Built-In Thermostat Kit
Owner’s Guide
IMPORTANT
Black
Black
Heating Element
High Temperature Limit
Black
Black
Red
Red
L2
L1
Ground
All wiring connections inside wiring compartment
Black
Black
Heating Element
High Temperature Limit
Black
Red
Red
White
Neutral
L1
Ground
All wiring connections inside wiring compartment
TOOLS REQUIRED:
• Phillips Screwdriver
• (4) Insulated Wire Connectors • (1) Strain Relief Connector if new
installation
• Economical choice for controlling your Cadet
SoftHEAT baseboard heater
• Offers a 3° to 5° comfort range
• Available in white or white sand color to match
your SoftHEAT baseboard heater
• Use with Cadet SoftHEAT EBHN or EBHA
208, 240, or 120 volt baseboard models
• Double pole (4 wires) with positive off position
• 25 Amp
• Your EBKN SoftHEAT built-in thermostat is
guaranteed with a 1 year limited warranty
1. Read all instructions before installing or using
this heater.
2. High temperatures may be generated under
certain abnormal conditions. Do not partially or
fully cover or obstruct the front of this heater.
3. Do not operate any heater after it malfunctions.
Disconnect power at service panel and have
heater inspected by a qualied electrician before
reusing.
4. To disconnect heater, turn controls to off, and
turn off power to heater circuit at main disconnect
panel.
5. Do not insert or allow foreign objects to enter
any ventilation or exhaust opening as this may
cause an electric shock or re, or damage the
heater.
6. To prevent a possible re, do not block air
intakes or exhaust in any manner.
7. A heater has hot and arcing or sparking parts
inside. Do not use it in areas where gasoline,
paint, or ammable vapors or liquids are used or
stored.
8. Do not use outdoors.
When using electrical appliances, basic precautions should always be followed to reduce the risk of re,
electric shock, and injury to persons, including the following:
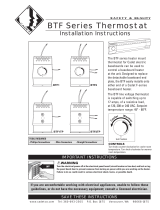
Figure 1
Figure 3
Wiring
Compartment
Cover
Wiring Diagram for use with 240 and 208 volt heater
EBKN
Figure 2
Wiring Diagram for use with 120 volt heater
Page 1

Operating your thermostat
INSTALLATION INSTRUCTIONS
Warranty
1. All electrical work and materials must comply
with the National Electric Code (NEC), the Occu-
pational Safety and Health Act (OSHA), and all
state and local codes.
2. Use copper conductors only.
3. Turn off power to heater circuit at main discon-
nect panel.
4. Connect grounding lead to grounding screw
provided.
Carefully remove front cover from heater by lifting cover up from the bottom, and then outwards. Set aside. Remove wiring
compartment cover, held by one screw. (Figure 1). This thermostat kit occupies 2.4 cubic inches (39 cubic centimeters).
1. Once installation is complete and power has been restored, turn the thermostat fully on by turning the knob clockwise to
the highest position.
2. When the room reaches your comfort level, slowly turn the thermostat knob counterclockwise until the heater turns off
and a click sound is heard. The heater will automatically cycle around this preset temperature.
3. To reduce the room temperature, turn the knob counterclockwise. To increase the room temperature, turn the knob
clockwise.
After following steps above for a new or previously installed model, then:
Attach heater to the wall, making sure the power supply wires are not pinched between the wall and the heater.
240 Volt: If your SoftHEAT baseboard is 240 volts or 208 volts, connect the two red wires from the thermostat to the two
power supply wires (see Figure 2). Then connect the two black wires from the thermostat to the two black wires from the
heater.
120 Volt: If your SoftHEAT baseboard is 120 volts, connect the two black wires from the thermostat together. Then con-
nect the white wire from the baseboard to the neutral power supply wire (Figure 3). Then connect the black wire from the
baseboard to one of the red wires of the thermostat. Finally connect the remaining red thermostat wire to the remaining
power supply wire.
Inspect all wire connections to be sure they are fastened securely. Push wiring back into the wiring compartment and
attach the wiring compartment cover.
Attach the heater front cover. Restore power at the electrical panel board (circuit breaker or fuse box).
If installing on a new EBHN
heater:
1. Remove the end cap by remov-
ing the screw and clip located on
the back of the heater and sliding
the end cap away from the heater.
Keep screw and clip for future use.
2. Attach the new EBKN ther-
mostat kit by sliding it onto the
heater, making sure no wires are
caught between the thermostat
and heater. Secure in place using
the screw and clip previously
removed.
3. Make wire connections below,
then refer to the EBHN owner’s
guide for instructions on how to
nish installing your heater.
If installing on an older model EBHA heater or a previously installed heater:
A new wiring compartment cover is required for the thermostat to t properly on
an EBHA model heater. Use the wiring compartment cover provided and discard
your old cover.
1. Disconnect the power supply wires and remove the strain relief connector from
the heater. Unscrew grounding lead from ground screw.
2. Remove the heater from the wall. It is easier to replace the thermostat while
the heater is not mounted.
3. Remove the existing end cap or thermostat kit by removing the screw and clip
located on the back of the heater and sliding the end cap away from the heater.
Keep screw and clip for future use.
4. Attach the new EBKN thermostat kit by sliding it onto the heater, making sure
no wires are caught between the thermostat and heater. Secure in place using
the screw and clip previously removed.
5. Route power supply wires through the wiring knockout hole and secure to
heater using the strain relief connector. Reconnect grounding lead to green
ground screw.
For more effective and safer operation and to prolong the life of the
heater, read the Owner’s Guide and follow the maintenance instructions.
Failure to properly maintain the heater will void any warranty and may
cause the heater to function improperly. Warranties are non transferable
and apply to original consumer only. Warranty terms are set out below.
LIMITED ONE-YEAR WARRANTY: Cadet will repair or replace any
SoftHEAT (EBKN) thermostat found to be defective within one year after
the date of purchase.
These warranties do not apply:
1. Damage occurs to the product through improper installation or incor-
rect supply voltage;
2. Damage occurs to the product through improper maintenance, misuse,
abuse, accident, or alteration;
3. The product is serviced by anyone other than Cadet;
4. If the date of manufacture of the product cannot be determined;
5. If the product is damaged during shipping through no fault of Cadet.
6. CADET’S WARRANTY IS LIMITED TO REPAIR OR REPLACEMENT
AS SET OUT HEREIN. CADET SHALL NOT BE LIABLE FOR DAMAGES
SUCH AS PROPERTY DAMAGE OR FOR CONSEQUENTIAL DAMAG-
ES AND/OR INCIDENTAL EXPENSES RESULTING FROM BREACH
OF THESE WRITTEN WARRANTIES OR ANY EXPRESS OR IMPLIED
WARRANTY.
7. IN THE EVENT CADET ELECTS TO REPLACE ANY PART OF YOUR
CADET PRODUCT, THE REPLACEMENT PARTS ARE SUBJECT TO
THE SAME WARRANTIES AS THE PRODUCT. THE INSTALLATION
OF REPLACEMENT PARTS DOES NOT MODIFY OR EXTEND THE
UNDERLYING WARRANTIES. REPLACEMENT OR REPAIR OF ANY
CADET PRODUCT OR PART DOES NOT CREATE ANY NEW WAR-
RANTIES.
8. These warranties give you specic legal rights, and you may also
have other rights which vary from state to state. Cadet neither assumes,
nor authorizes anyone to assume for it, any other obligation or liability in
connection with its products other than as set out herein.
If you believe your Cadet product is defective, please contact Cadet
Manufacturing Co. at 360-693-2505, during the warranty period, for
instructions on how to have the repair or replacement processed. War-
ranty claims made after the warranty period has expired will be denied.
Products returned without authorization will be refused.
Parts and Service
Visit cadetheat.com/parts-service for information on where to obtain parts
and service.
Reduce-Reuse-Recycle
This product is made primarily of recyclable materials. You
can reduce your carbon footprint by recycling this product at
the end of its useful life. Contact your local recycling support
center for further recycling instructions.
Page 2
©2014 Cadet Printed in USA Rev 09/14 #706982
/