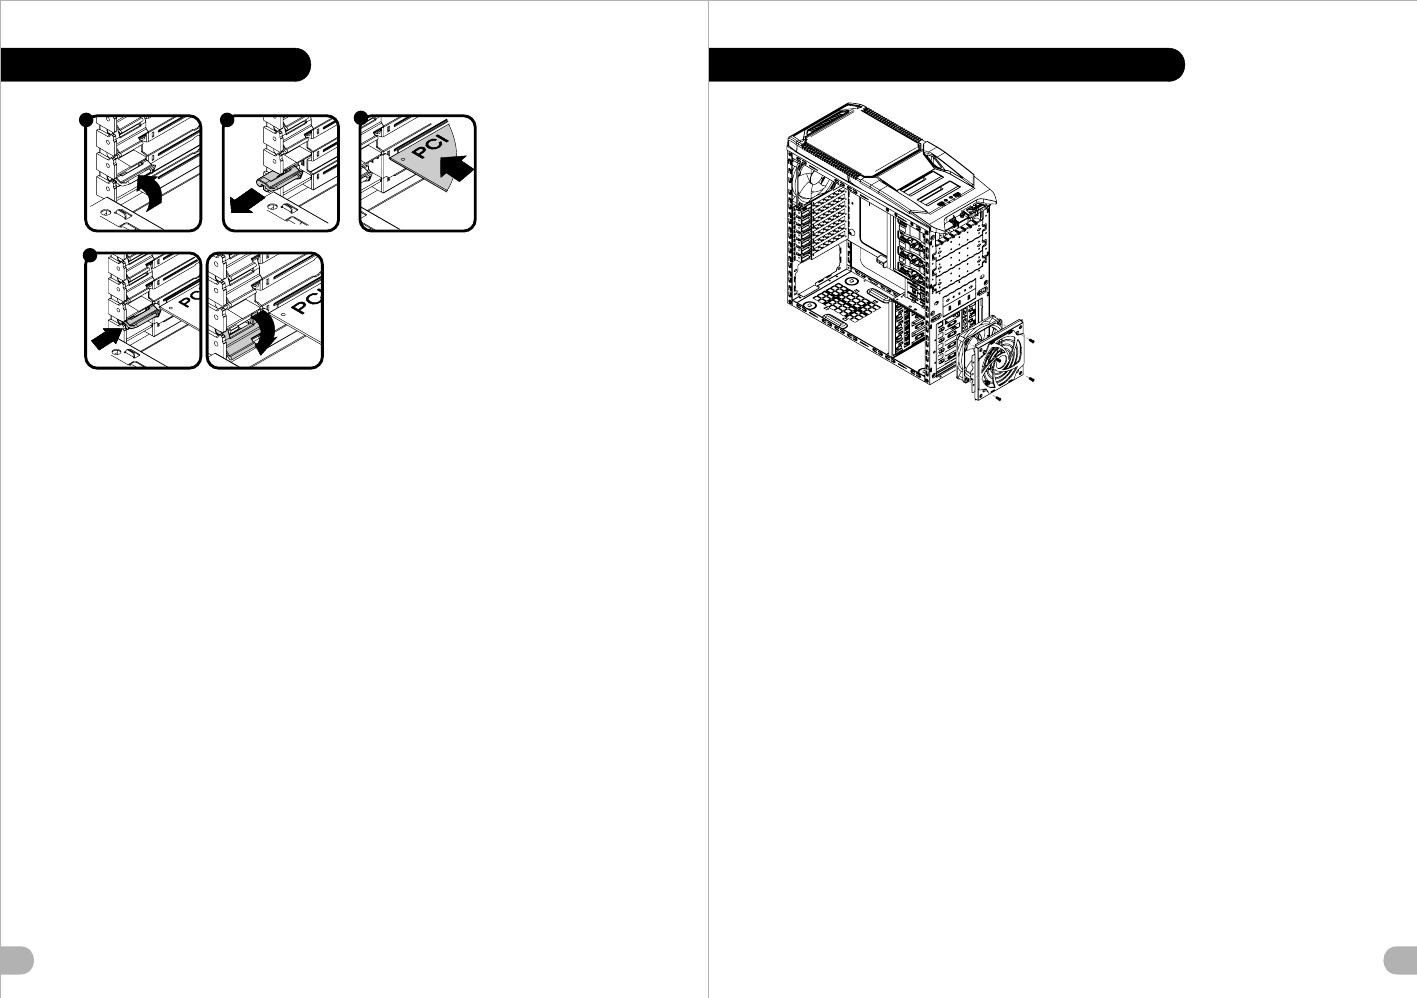
PCI Card Installation
21
3
4
2019
English /
1. Pull open the holder.
2. Remove the PCI bracket.
3. Insert the PCI card into the PCI slot.
4. Push to fasten the holder.
Deutsch /
1. Ziehen Sie den Halter auf.
2. Entfernen Sie die PCI-Klammer.
3. Stecken Sie die PCI Karte in den PCI Steckplatz.
4. Drücken Sie den Halter ein, um ihn zu sichern.
Français /
1. Tirez pour ouvrir le support.
2. Enlevez le slot PCI.
3. Insérez la carte PCI dans le slot PCI.
4. Poussez pour fixer le support.
Español /
1. Tire para abrir el sostenedor.
2. Extraiga el soporte del PCI.
3. Inserte la tarjeta del PCI en la ranura para el PCI.
4. Empuje para sujetar el sostenedor.
Italiano /
1. Tirare per aprire l'alloggiamento.
2. Rimuovere il supporto PCI.
3. Inserire la scheda PCI nello slot PCI.
4. Premere per fissare l'alloggiamento.
Português/
1. Puxe para abrir o suporte.
2. Remova a placa de suporte PCI.
3. Insira a placa PCI na ranhura PCI.
4. Empurre para apertar o suporte.
Ελληνικά/
1. Τραβήξτε για να ανοίξετε τη θήκη.
2. Αφαιρέστε το στήριγμα PCI.
3. Εισάγετε την κάρτα PCI μέσα στη σχισμή PCI.
4. Σπρώξτε για να ασφαλίσετε τη θήκη.
繁體中文 /
1. 移動PCI無螺絲機構以鬆開固定扣具
2. 移除PCI檔片
3. 插入PCI裝置於PCI插槽中
4. 向下壓入PCI扣具並固定PCI裝置
简体中文 /
1. 移动PCI无螺丝机构以松开固定扣具
2. 移除PCI檔片
3. 插入PCI装置于PCI插槽中
4. 向下压入PCI扣具并固定PCI装置
日本語 /
1. ホルダーを引っ張って開けます。
2. PCIブラケットを取り外します。
3. PCIカードをPCIスロットに挿入します
4. ホルダーを押して締め付けます。
Русский /
1. Потяните держатель до открытого состояния.
2. Снимите кронштейн PCI.
3. Вставьте плату PCI в разъем PCI.
4. Надавите, чтобы закрепить держатель.
Türkçe /
1. Tutucuyu çekerek açın.
2. PCI plakasını çıkarın.
3. PCI kartını PCI yuvasına yerleştirin.
4. Tutucuyu iterek sabitleyin.
ภาษาไทย /
1. ดึงเพื่อเปิดที่ยึด
2. ถอดแบร็กเก็ต PCI ออก
3. ใส่การ์ด PCI ลงในสล็อต PCI
4. ดันเข้าเพื่อตรึงที่ยึดให้เข้าที่
English /
1. Unscrew and detach the fan filter from
the case.
2. Install the fan in proper location.
3. Attach the fan filter back to the case and
secure it with screws.
Deutsch /
1. Lösen Sie die Schrauben und entfernen
Sie den Ventilatorfilter vom Gehäuse.
2. Installieren Sie den Ventilator in seiner
vorgesehenen Position.
3. Bringen Sie den Ventilatorfilter wieder am
Gehäuse an und sichern Sie ihn mit Schrauben.
Français /
1. Dévissez et démontez le filtre de ventilateur
du boîtier.
2. Installez le ventilateur dans l'emplacement
adéquat.
3. Remontez le filtre de ventilateur au boîtier
et sécurisez le avec des vis.
Español /
1. Desatornille y separe el filtro del ventilador
de la caja.
2. Instale el ventilador en la ubicación correcta.
3. Acople el filtro del ventilador de nuevo a la
caja y asegúrelo con tornillos.
Italiano /
1. Svitare e sganciare il filtro della ventola
dal case.
2. Installare la ventola nella posizione
appropriate.
3. Posizionare il filtro della ventola
posteriormente al case e fissarlo con viti.
简体中文 /
1. 拧下机箱的风扇网罩的螺丝并将其卸下。
2. 在适当位置安装风扇。
3. 将风扇网罩装回机箱并拧紧螺丝将其固定。
日本語 /日本語 /
1. ケースからファンフィルタのねじをゆるめ
取り外します。
2. ファンを適切なロケーションに取り付けます。
3. ファンフィルタをケースの背面に取り付け、
ねじで固定します。
Русский /Русский /
1. Отвинтите фильтр вентилятора и
отсоедините его от корпуса.
2. Установите вентилятор в надлежащее место.
3. Верните фильтр вентилятора на место и
закрепите его с помощью винтов.
繁體中文 /
1. 鬆開風扇濾罩的螺絲,將其從機箱拆下。
2. 將風扇安裝在合適的位置。
3. 將風扇濾罩裝回機箱,並用螺絲固定。
Türkçe /
1. Fan filtresinin vidalarını sökün ve filtreyi
kasadan çıkarın.
2. Fanı, uygun konuma takın.
3. Fan filtresini yeniden kasaya takın ve
vidalarla sabitleyin.
Front Fan Installation (optional)
Português/
1.Desaperte para remover o filtro da
ventoinha da caixa.
2.Instale a ventoinha na sua devida posição.
3.Fixe novamente o filtro da ventoinha na caixa
e aparafuse.
Ελληνικά/
1. Ξεβιδώστε και αποσυνδέστε το
φίλτρο του ανεμιστήρα από τη θήκη.
2. Εγκαταστήστε τον ανεμιστήρα στην
κατάλληλη θέση.
3. Συνδέστε το φίλτρο του ανεμιστήρα
πάλι στη θήκη και ασφαλίστε το με βίδες.
ภาษาไทย /
1. ขันสกรูออกแล้วแกะฟิลเตอร์กรองฝุ่นพัดลมออกจากเคส
2. ติดตั้งพัดลมในตำแหน่งที่เหมาะสม
3. ติดฟิลเตอร์กรองฝุ่นพัดลมกลับเข้าที่เคส
แล้วขันสกรูยึดให้แน่น


