Beyerdynamic Synexis Set C20 HP User manual
- Category
- Microphones
- Type
- User manual
This manual is also suitable for

Synexis
Wireless Tour Guide System
OPERATING INSTRUCTIONS

Synexis – Contents
2
1. Important safety instructions . . . . . . . . . . . . . . . . . . . . . . . . . . . . . . . . . . . . . . . . . . . . . . . . . . . . . . . . . . . . . Page 3
1.1 Synexis C8, C10, C30 chargers. . . . . . . . . . . . . . . . . . . . . . . . . . . . . . . . . . . . . . . . . . . . . . . . . . . . . Page 3
1.2 Synexis TS8 stationary transmitter, Synexis C8, C10, C20, C30, CHP chargers. . . . . . . . . . . . . . . . . . Page 4
1.3 Synexis TH8 handheld transmitter, Synexis TP8 beltpack transmitter, Synexis RP8 beltpack receiver. . . Page 5
1.4 NiMH rechargeable batteries, batteries. . . . . . . . . . . . . . . . . . . . . . . . . . . . . . . . . . . . . . . . . . . . . . . Page 5
2. Synexis RP8 beltpack receiver. . . . . . . . . . . . . . . . . . . . . . . . . . . . . . . . . . . . . . . . . . . . . . . . . . . . . . . . . . . . . Page 6
2.1 Controls and indicators . . . . . . . . . . . . . . . . . . . . . . . . . . . . . . . . . . . . . . . . . . . . . . . . . . . . . . . . . . Page 6
2.2 How to insert/replace the batteries. . . . . . . . . . . . . . . . . . . . . . . . . . . . . . . . . . . . . . . . . . . . . . . . . . Page 6
2.3 Battery status display . . . . . . . . . . . . . . . . . . . . . . . . . . . . . . . . . . . . . . . . . . . . . . . . . . . . . . . . . . . . Page 7
2.4 Headphone connection . . . . . . . . . . . . . . . . . . . . . . . . . . . . . . . . . . . . . . . . . . . . . . . . . . . . . . . . . . Page 7
2.5 How to turn the receiver on/off and control the volume . . . . . . . . . . . . . . . . . . . . . . . . . . . . . . . . . . Page 7
2.6 How to select and lock a channel . . . . . . . . . . . . . . . . . . . . . . . . . . . . . . . . . . . . . . . . . . . . . . . . . . Page 7
2.7 How to display the frequency. . . . . . . . . . . . . . . . . . . . . . . . . . . . . . . . . . . . . . . . . . . . . . . . . . . . . . Page 7
3. Synexis TH8 handheld transmitter . . . . . . . . . . . . . . . . . . . . . . . . . . . . . . . . . . . . . . . . . . . . . . . . . . . . . . . . . Page 8
3.1 Controls and indicators . . . . . . . . . . . . . . . . . . . . . . . . . . . . . . . . . . . . . . . . . . . . . . . . . . . . . . . . . . Page 8
3.2 How to insert/replace the batteries. . . . . . . . . . . . . . . . . . . . . . . . . . . . . . . . . . . . . . . . . . . . . . . . . . Page 9
3.3 Battery status display . . . . . . . . . . . . . . . . . . . . . . . . . . . . . . . . . . . . . . . . . . . . . . . . . . . . . . . . . . . . Page 9
3.4 How to set the gain . . . . . . . . . . . . . . . . . . . . . . . . . . . . . . . . . . . . . . . . . . . . . . . . . . . . . . . . . . . . . Page 9
3.5 How to turn the transmitter on/off. . . . . . . . . . . . . . . . . . . . . . . . . . . . . . . . . . . . . . . . . . . . . . . . . . Page 9
3.6 How to select a channel . . . . . . . . . . . . . . . . . . . . . . . . . . . . . . . . . . . . . . . . . . . . . . . . . . . . . . . . . . Page 10
3.7 How to display the frequency. . . . . . . . . . . . . . . . . . . . . . . . . . . . . . . . . . . . . . . . . . . . . . . . . . . . . . Page 10
3.8 How to select the mute function . . . . . . . . . . . . . . . . . . . . . . . . . . . . . . . . . . . . . . . . . . . . . . . . . . . Page 10
3.9 Maintenance . . . . . . . . . . . . . . . . . . . . . . . . . . . . . . . . . . . . . . . . . . . . . . . . . . . . . . . . . . . . . . . . . . Page 10
4. Synexis TP8 beltpack transmitter . . . . . . . . . . . . . . . . . . . . . . . . . . . . . . . . . . . . . . . . . . . . . . . . . . . . . . . . . . Page 11
4.1 Controls and indicators . . . . . . . . . . . . . . . . . . . . . . . . . . . . . . . . . . . . . . . . . . . . . . . . . . . . . . . . . . Page 11
4.2 How to insert/replace the batteries. . . . . . . . . . . . . . . . . . . . . . . . . . . . . . . . . . . . . . . . . . . . . . . . . . Page 11
4.3 Battery status display . . . . . . . . . . . . . . . . . . . . . . . . . . . . . . . . . . . . . . . . . . . . . . . . . . . . . . . . . . . . Page 12
4.4 How to set the gain . . . . . . . . . . . . . . . . . . . . . . . . . . . . . . . . . . . . . . . . . . . . . . . . . . . . . . . . . . . . . Page 12
4.5 Microphone connection . . . . . . . . . . . . . . . . . . . . . . . . . . . . . . . . . . . . . . . . . . . . . . . . . . . . . . . . . . Page 12
4.6 How to turn the transmitter on/off. . . . . . . . . . . . . . . . . . . . . . . . . . . . . . . . . . . . . . . . . . . . . . . . . . Page 12
4.7 How to select and lock a channel . . . . . . . . . . . . . . . . . . . . . . . . . . . . . . . . . . . . . . . . . . . . . . . . . . . Page 12
4.8 How to display the frequency. . . . . . . . . . . . . . . . . . . . . . . . . . . . . . . . . . . . . . . . . . . . . . . . . . . . . . Page 13
4.9 How to mute the microphone . . . . . . . . . . . . . . . . . . . . . . . . . . . . . . . . . . . . . . . . . . . . . . . . . . . . . Page 13
4.10 How to connect an audio source . . . . . . . . . . . . . . . . . . . . . . . . . . . . . . . . . . . . . . . . . . . . . . . . . . . Page 13
5. Synexis TS8 stationary transmitter . . . . . . . . . . . . . . . . . . . . . . . . . . . . . . . . . . . . . . . . . . . . . . . . . . . . . . . . . Page 14
5.1
Controls and indicators . . . . . . . . . . . . . . . . . . . . . . . . . . . . . . . . . . . . . . . . . . . . . . . . . . . . . . . . . . Page 14
5.2 Setting up . . . . . . . . . . . . . . . . . . . . . . . . . . . . . . . . . . . . . . . . . . . . . . . . . . . . . . . . . . . . . . . . . . . . Page 14
5.3 How to select and lock a channel . . . . . . . . . . . . . . . . . . . . . . . . . . . . . . . . . . . . . . . . . . . . . . . . . . . Page 15
5.4 How to display the frequency. . . . . . . . . . . . . . . . . . . . . . . . . . . . . . . . . . . . . . . . . . . . . . . . . . . . . . Page 15
5.5 Mounting the antenna on the front / 19" rack mounting . . . . . . . . . . . . . . . . . . . . . . . . . . . . . . . . . Page 15
6. Synexis C8 / C10 / C20 / C30 / CHP chargers . . . . . . . . . . . . . . . . . . . . . . . . . . . . . . . . . . . . . . . . . . . . . . . . . Page 16
6.1 Controls and indicators . . . . . . . . . . . . . . . . . . . . . . . . . . . . . . . . . . . . . . . . . . . . . . . . . . . . . . . . . . Page 16
6.2 How to use the charger . . . . . . . . . . . . . . . . . . . . . . . . . . . . . . . . . . . . . . . . . . . . . . . . . . . . . . . . . . Page 20
6.3 Power supply . . . . . . . . . . . . . . . . . . . . . . . . . . . . . . . . . . . . . . . . . . . . . . . . . . . . . . . . . . . . . . . . . . Page 20
6.4 Charging . . . . . . . . . . . . . . . . . . . . . . . . . . . . . . . . . . . . . . . . . . . . . . . . . . . . . . . . . . . . . . . . . . . . . Page 22
6.5 Maintenance . . . . . . . . . . . . . . . . . . . . . . . . . . . . . . . . . . . . . . . . . . . . . . . . . . . . . . . . . . . . . . . . . . Page 22
6.6 Charging capacity and memory effect . . . . . . . . . . . . . . . . . . . . . . . . . . . . . . . . . . . . . . . . . . . . . . . Page 22
7. General instructions for a trouble-free operation . . . . . . . . . . . . . . . . . . . . . . . . . . . . . . . . . . . . . . . . . . . . . . Page 23
8. Trouble shooting . . . . . . . . . . . . . . . . . . . . . . . . . . . . . . . . . . . . . . . . . . . . . . . . . . . . . . . . . . . . . . . . . . . . . . Page 23
9. Components . . . . . . . . . . . . . . . . . . . . . . . . . . . . . . . . . . . . . . . . . . . . . . . . . . . . . . . . . . . . . . . . . . . . . . . . . Page 24
10. Supplied accessories. . . . . . . . . . . . . . . . . . . . . . . . . . . . . . . . . . . . . . . . . . . . . . . . . . . . . . . . . . . . . . . . . . . . Page 24
11. Optional accessories. . . . . . . . . . . . . . . . . . . . . . . . . . . . . . . . . . . . . . . . . . . . . . . . . . . . . . . . . . . . . . . . . . . . Page 24
12. Frequencies . . . . . . . . . . . . . . . . . . . . . . . . . . . . . . . . . . . . . . . . . . . . . . . . . . . . . . . . . . . . . . . . . . . . . . . . . . Page 25
13. Technical specifications . . . . . . . . . . . . . . . . . . . . . . . . . . . . . . . . . . . . . . . . . . . . . . . . . . . . . . . . . . . . . . . . . Page 26

Synexis – Important Safety Instructions
3
Thank you for selecting the Synexis wireless tour guide system from beyerdynamic. Please take some time to read carefully through this manual
before using the system.
The Synexis tour guide system provides an optimum digital audio transmission for guided tours e.g. in factories or museums or in multilingual
conferences e.g. in conjunction with an interpretation system.
Synexis consists of the following components:
• Synexis RP8 beltpack receiver
• Synexis TH8 handheld transmitter
• Synexis TP8 beltpack transmitter
• Synexis TS8 stationary transmitter
• Synexis C8 charger
• Synexis C10 charger
• Synexis C20 charger
• Synexis C30 charger
• Synexis CHP charger
1. Important safety instructions
General
• READ the operating instructions.
• KEEP the operating instructions.
• HEED all warnings.
• FOLLOW all instructions.
Exemption from liability
• beyerdynamic GmbH & Co. KG will not be liable if any damage, injury or accident occurs due to negligent, incorrect or inappropriate
operation of the product.
1.1 Synexis C8, C10, C30 chargers
Warning
To reduce the risk of fire or electric shock, do not expose this apparatus to rain or moisture.
1. Read these instructions.
2. Keep these instructions.
3. Heed all warnings.
4. Follow all instructions.
5. Do not use this apparatus near water.
6. WARNING: To reduce the risk of fire or electric shock, do not expose this apparatus to rains or moisture.
7. Clean only with dry cloth.
8. Do not block any ventilation openings. Install in accordance with the manufacturer’s instructions.
9. Do not install near any heat sources such as radiators, heat registers, stoves, or other apparatus (including amplifiers) that produce heat.
10. Do not defeat the safety purpose of the polarized or grounding-type plug. A polarized plug has two blades with one wider than the other.
A grounding type plug has two blades and a third grounding prong. The wide blade or the third prong are provided for your safety. If the
provided plug does not fit into your outlet, consult an electrician for replacement of the obsolete outlet.
11. Protect the power cord from being walked on or pinched particularly at plugs, convenience receptacles, and the point where they exit from
the apparatus.
12. Only use attachments/accessories specified by the manufacturer.
13. Use only with the cart, stand, tripod, bracket, or table specified by the manufacturer, or sold with the apparatus. When a cart is used, use
caution when moving the cart/apparatus combination to avoid injury from tip-over.
14. Unplug this apparatus during lightning storms or when unused for long periods of time.
15. Refer all servicing to qualified service personnel. Servicing is required when the apparatus has been damaged in any way, such as power
supply cord or plug is damaged, liquid has been spilled or objects have fallen into the apparatus, the apparatus has been exposed to rain
or moisture, does not operate normally, or has been dropped.
The lightning flash within an equilateral triangle is intended to alert the user to the presence of uninsulated dangerous voltage within
the device that may be sufficient enough to constitute a risk of electric shock to users.
The exclamation mark within an equilateral triangle is intended to alert the user to the presence of important operating and maintenance
instructions in the literature accompanying the product.

Synexis – Important Safety Instructions
4
1.2 Synexis TS8 stationary transmitter, Synexis C8, C10, C20, C30, CHP chargers
Location
• The equipment must be set up so that the mains switch, mains plug and all connections on the rear of the device are easily accessible.
• If you transport the equipment to another location take care to ensure that it is adequately secured and can never be damaged by being
dropped or by impacts on the equipment.
Fire hazard
• Never place naked flames (e.g. candles) near the equipment.
Humidity / heat sources
• Never expose the equipment to rain or a high level of humidity. For this reason do not install it in the immediate vicinity of swimming pools,
showers, damp basement rooms or other areas with unusually high atmospheric humidity.
• Never place objects containing liquid (e.g. vases or drinking glasses) on the equipment. Liquids in the equipment could cause a short circuit.
• Do not install near any heat sources such as radiators, heat registers, stoves or other apparatus (including amplifiers) that produce heat.
Connection – Synexis TS8 stationary transmitter, Synexis CHP, C20 charger
• The device can only be powered with the supplied external power adapter connected to a power outlet.
Connection - Synexis C8, C10, C30 chargers
• The equipment must be connected to a mains socket that has an earth contact.
• Protect the power cord from being walked on or pinched particularly at plugs, convenience receptacles, and the point where they exit from
the apparatus.
• Lay all connection cables so that they do not present a trip hazard.
• Whenever working on the equipment switch off all inputs and outputs to the power supply.
• Check whether the connection figures comply with the existing mains supply. Serious damage could occur due to connecting the system to
the wrong power supply. An incorrect mains voltage could damage the equipment or cause an electric shock.
• Please note that different operating voltages require the use of different types of power cable and plugs.
Please refer to the following table:
• If the equipment causes a blown fuse or a short circuit, disconnect it from the mains and have it checked and repaired.
• Do not hold the mains cable with wet hands. There must be no water or dust on the contact pins. In both cases you could receive an
electric shock.
• The mains cable must be firmly connected. If it is loose there is a fire hazard.
• Always pull out the mains cable from the mains and/or from the equipment by the plug – never by the cable. The cable could be damaged and
cause an electric shock or fire.
• Do not use the equipment if the mains plug is damaged.
• If you connect defective or unsuitable accessories, the equipment could be damaged. Only use connection cables available from or
recommended by beyerdynamic.
• Do not connect more than six Synexis C8 or C10 chargers in one daisy chain.
Switching off - Synexis C8, C10, C30 chargers
• In order to switch off the device disconnect the power plug from the power socket.
Disconnect - Synexis C8, C10, C30 chargers
• For pluggable equipment, the socket-outlet shall be installed near the equipment and shall be easily accessible.
Ventilation - Synexis C8, C10, C20, C30 chargers
• Do not insert objects into the ventilation grilles or other openings. You could damage the equipment and/or injure yourself.
Maintenance
• Only clean the equipment with a slightly damp or dry cloth. Never use solvents as these damage the surface.
Trouble shooting and servicing
• Do not open the equipment without authorisation. You could receive an electric shock. There are no user-serviceable parts inside.
• Leave all service work to authorised expert personnel.
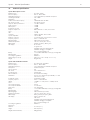
Voltage Power plug according to standard
110 - 125 V UL817 and CSA C 22.2 no 42.
220 - 230 V CEE 7 page VII, SR section 107-2-D1/IEC 83 page C4.
240 V BS 1363 (1984): “Specification for 13A fused plugs and
switched and un-switched socket outlets.”

Synexis – Important Safety Instructions
5
1.3 Synexis TH8 handheld transmitter, Synexis TP8 beltpack transmitter, Synexis RP8 beltpack receiver
• Protect the transmitter/receiver from moisture and sudden impacts. You could either injure yourself or others or damage the transmitter.
• Always switch off the transmitter/receiver before charging or changing the batteries.
Synexis TH8 handheld transmitter
• Do not blow into the microphone. In a condenser microphone this could damage the transformer. It is preferable to carry out a speech trial.
Synexis TP8 beltpack transmitter
• Clip-on microphones are often very compact. If they are accidentally swallowed there is a risk of choking. Always keep this type of micro-
phone away from small children.
Synexis RP8 beltpack receiver
• The Synexis RP8 receiver can produce sound pressures of more than 85 dB(A). 85 dB(A) is the sound pressure corresponding to the
maximum permissible volume which is by law (in some countries) allowed to affect your hearing for the duration of a working day. It is used
as a basis according to the specifications of industrial medicine. Higher volumes or longer durations can damage your hearing. At higher
volumes, the duration must be shortened in order to prevent hearing damage. The following are symptoms that you have been exposed to
excessive noise for too long a time:
– You can hear ringing or whistling sounds in your ears.
– You have the impression (even for a short time only) that you can no longer hear high notes.
1.4 NiMH rechargeable batteries, batteries
• The TH8, TP8 transmitters and the RP8 receiver can only be operated with AA (LR6) Mignon alkaline batteries or equivalent NiMH rechargeable
batteries (1600 mAh to 2100 mAh).
• The normal commercial alkaline batteries can have a length tolerance of 2 - 3 mm. When changing the batteries always ensure good contact.
• If the transmitter is not being used for weeks or months, please remove the batteries. Batteries can leak when not being used for a long time
and corrode the conductor strips and components. Repair is not then possible. In this case all warranty claims are null and void. The
description “leak proof” on batteries is no guarantee that they will not run out.
• Never take batteries apart yourself. The battery acid contained will damage skin and clothing.
• If abused or misused, rechargeable batteries may leak. In extreme cases, they may even present an explosion, heat, fire, smoke or gas
hazard.
• CAUTION: Danger of explosion if battery is incorrectly replaced.
Disposal
• If you throw away the device, please remove the batteries.
• Old batteries may contain substances that are harmful to your health and environment.
• Dispose used batteries always according to the applicable disposal regulations. Please do not throw used battery packs into the fire (danger of
explosion) or your household rubbish, take them to your local collection points. The return is free and required by law. Please dispose
discharged batteries only.
• For removing the batteries, please refer to chapter “How to insert/replace the batteries”.
• All batteries are recycled to reclaim valuable material such as iron, zinc or nickel.

Synexis – Synexis RP8 Beltpack Receiver
6
2. Synexis RP8 beltpack receiver
2.1 Controls and indicators
Headphone socket, mini jack (3.5 mm)
LED to display operation or charging status
(refer also to the chapter “Synexis chargers”)
On/off and volume control
Set button
Charging contacts
Lid of the battery compartment
Belt clip
Channel selector buttons
OLED display to indicate the channel, battery status, frequency and
channel lock function (on delivery with protective foil)
Mounting for strap
Battery compartment
2.2 How to insert/replace the batteries
• Remove the belt clip by levering out the clip with pressure to the rear from the
lock-in position (see arrow in chapter “Controls and indicators”). Slide down the
lid to open the battery compartment .
• Insert the supplied NiMH rechargeable batteries according to the polarity marks.
Before using the receiver for the first time, the rechargeable batteries inside
must be charged e.g. with the Synexis C8 or C10 charger. As an alternative you
can use two 1.5 V AA alkaline batteries.
• If you wish to wear the receiver with a strap around your neck, you can mount
a strap to the right and left hand side.
• Close the battery compartment by sliding the lid to the top.

Synexis – Synexis RP8 Beltpack Receiver
7
2.3 Battery status display
• The battery status is displayed in 4 stages.
• If only one bar is displayed, you should recharge the receiver as soon as possible.
• If the battery frame is flashing, the batteries are empty and have to be replaced or
recharged.
• If the receiver is equipped with rechargeable NiMH batteries, put it into the
appropriate charger (e.g. Synexis C8 or C10). Despite the Auto-Off function we
recommend turning off the receiver before charging.
The LED indicates the charging status:
LED is flashing blue . . . . . . . . . . The batteries are being charged
LED illuminates blue. . . . . . . . . . The batteries are fully charged
LED is flashing red . . . . . . . . . . . Error
2.4 Headphone connection
• Connect a beyerdynamic headphone with mono or stereo mini jack plug to the
headphone socket .
2.5 How to turn the receiver on/off and control the volume
• Switch on the beltpack receiver by turning the control clockwise to the right.
• The LED will illuminate:
blue, when a transmitter is turned on and reception available.
red, when there is no transmitter turned on or no reception available.
• Use the control to set the requested volume by turning it more clockwise.
• The selected channel and the battery status are displayed .
• After use, switch off the receiver by turning the control anti-clockwise.
• The LED will go out.
CAUTION
• Do not set the volume too high, because listening at high levels can damage
your hearing.
2.6 How to select and lock a channel
• Use one of the two channel selector buttons to select the requested channel.
• If you release the channel selector button , the channel will automatically be
stored after approx. 3 seconds.
• If you would like to lock the selected channel to avoid accidental shifting, hold
down the Set button for about 3 seconds. A key symbol will be displayed .
The channel is locked.
If you would like to unlock a locked channel, hold down the Set button for
about 3 seconds. The key symbol in the display will disappear.
2.7 How to display the frequency
• Press the Set button briefly.
• The frequency will be displayed for a few seconds.

Synexis – Synexis TH8 Handheld Transmitter
8
3. Synexis TH8 handheld transmitter
3.1 Controls and indicators
Electret condenser microphone head, cardioid polar pattern
LED to display mute or charging status (refer also to the chapter “Synexis chargers”)
Button with mute function
Arrow-shaped buttons for channel selection and frequency display
OLED display to indicate battery status, channel, frequency and mute function (on delivery with protective foil)
On/off and Set button
Battery compartment
Gain switch Hi/Low
Lid of the battery compartment
Charging contacts on the right and left hand side

Synexis – Synexis TH8 Handheld Transmitter
9
3.2 How to insert/replace the batteries
• Slide down the lid to open the battery compartment .
• Insert the supplied NiMH rechargeable batteries according to the polarity marks.
Before using the transmitter for the first time, the rechargeable batteries inside
must be charged e.g. with the Synexis C8 charger. As an alternative you can use
two 1.5 V AA alkaline batteries.
• Close the battery compartment by sliding the lid to the top.
H
L
3.5 How to turn the transmitter on/off
• Turn on the handheld transmitter by pressing the on/off button for approx.
3 seconds.
• The battery status, selected channel and mute function are displayed .
• After use turn off the handheld transmitter by pressing the on/off button for
approx. 3 seconds.
3.4 How to set the gain
• Inside the battery compartment you will find the gain switch to set the
gain for close or distant miking. Remove the batteries first and then set the gain.
Position “High” = set switch to “H”
Position “Low” = set switch to “L”
3.3 Battery status display
• The battery status is displayed in 4 stages.
• If only one bar is displayed, you should recharge the receiver as soon as possible.
• If the battery frame is flashing, the batteries are empty and have to be replaced or
recharged.
• If the transmitter is equipped with rechargeable NiMH batteries, put it into the
appropriate charger (e.g. Synexis C8). Despite the Auto-Off function we
recommend turning off the transmitter before charging.
Depending on the charger, the LED of the charger or the LED indicates the
charging status:
LED is flashing blue . . . . . . . . . . The batteries are being charged
LED illuminates blue. . . . . . . . . . The batteries are fully charged
LED is flashing red . . . . . . . . . . . Error

Synexis – Synexis TH8 Handheld Transmitter
10
1.
2.
3.
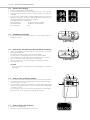
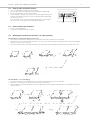
3.9 Maintenance
• Protect the handheld transmitter from moisture and sudden impacts.
• For cleaning metal surfaces, use a soft cloth moistened with methylated spirits or
alcohol.
• Clean the foam pop shield under clear running water:
1. Unscrew the microphone basket counter clockwise.
2. Remove the foam pop shield (if necessary use tweezers).
3. Wash the pop shield under clear running water and dry it afterwards with a
hairdryer or allow it to dry overnight.
• Place the dry pop shield inside the microphone basket and screw the microphone
basket clockwise.
Important
• Place the microphone basket and the pop shield on the transmitter again only
when completely dry.
3.8 How to select the mute function
• Press the on/off button and the mute button simultaneously for approx.
2 seconds until the channel and mute display will start to flash.
• Use the mute button to select the requested mute function.
• After approx. 2 seconds the selected mute function will automatically be stored
or immediately if you press briefly the on/off button .
• If the LED will illuminate blue, the microphone is activated. If the LED will
flash red, the microphone is muted.
• There are three different mute functions available:
Push-To-Mute (PTM): Hold down the mute button to mute the microphone.
Push-To-Talk (PTT): Hold down the mute button to activate the microphone.
Mute Toggle (MTG): Press the button briefly to switch between muted and
activated microphone.
3.7 How to display the frequency
• Press both arrow-shaped buttons simultaneously.
• The frequency will be displayed for approx. 2 seconds.
3.6 How to select a channel
• Press the on/off button and one of the two arrow-shaped buttons
simultaneously for approx. 2 seconds until the channel display will flash.
• Use the upper or lower arrow-shaped button to select the requested channel.
• The channel will automatically be stored after approx. 2 seconds. If you press
briefly the on/off button , the channel will immediately be stored.

Synexis – Synexis TP8 Beltpack Transmitter
11
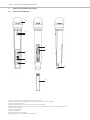
4. Synexis TP8 beltpack transmitter
4.1 Controls and indicators
On/off switch
LED to display operating or charging status
(refer also to the chapter “Synexis chargers”)
Push-button to mute the microphone
Microphone connection, 4-pin mini XLR
Set button
Line-In input to connect an audio source such as MP3 player,
mini stereo jack (3.5 mm)
Belt clip
Lid of the battery compartment
Charging contacts on the right and left hand side
Channel selector buttons
OLED display to indicate the channel, battery status, frequency and
channel lock function (on delivery with protective foil)
Mounting for strap
Gain switch, 3 stages Hi/Mid/Low
Battery compartment
Antenna
4.2 How to insert/replace the batteries
• Remove the belt clip by levering out the clip with pressure to the rear from the
lock-in position (see arrow in chapter “Controls and indicators”). Slide down the
lid to open the battery compartment .
• Insert the supplied NiMH rechargeable batteries according to the polarity marks.
Before using the transmitter for the first time, the rechargeable batteries inside
must be charged e.g. with the Synexis C8 or C10 charger. As an alternative you
can use two 1.5 V AA alkaline batteries.
• If you wish to wear the transmitter with a strap around your neck, you can mount
a strap to the right and left hand side.
• Close the battery compartment by sliding the lid to the top.

Synexis – Synexis TP8 Beltpack Transmitter
12
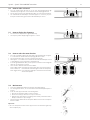
4.3 Battery status display
• The battery status is displayed in 4 stages.
• If only one bar is displayed, you should recharge the receiver as soon as possible.
• If the battery frame is flashing, the batteries are empty and have to be replaced or
recharged.
• If the transmitter is equipped with rechargeable NiMH batteries, put it into the
appropriate charger (e.g. Synexis C8 or C10). Despite the Auto-Off function we
recommend turning off the transmitter before charging.
The LED indicates the charging status:
LED is flashing blue . . . . . . . . . . The batteries are being charged
LED illuminates blue. . . . . . . . . . The batteries are fully charged
LED is flashing red . . . . . . . . . . . Error
4.5 Microphone connection
• Connect a microphone to the 4-pin mini XLR socket . Make sure the connector
will correctly lock in place.
Note
• In order to avoid popping noise in the Synexis RP8 receiver, you should connect
the microphone when Synexis TP8 receiver is turned off.
4.6 How to turn the transmitter on/off
• Turn on the beltpack transmitter with the on/off switch .
• The LED will illuminate blue.
• The selected channel and the battery status are displayed .
• After use turn off the beltpack transmitter with the on/off switch .
• The LED will go out.
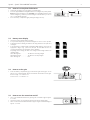
4.4 How to set the gain
• With the 3-stage (Hi/Mid/Low) gain switch you can set the gain for close or
distant miking. Remove the lid of the battery compartment to access the
switch.
Position “Low” = set switch to “L”
Position “Mid” = set switch to “M”
Position “High” = set switch to “H”
L M H

Synexis – Synexis TP8 Beltpack Transmitter
13
4.10. How to connect an audio source
• You can connect an audio source (e.g. MP3 player) to the Line In input , if you
want to play recordings during guided tours.
4.8 How to display the frequency
• Press the Set button briefly.
• The frequency will be displayed for a few seconds.
4.9 How to mute the microphone
• If you would like to mute the connected microphone, press the mute button .
The LED will flash red. “Mute” is displayed . In order to turn off the mute
function, press the mute button once again.
4.7 How to select and lock a channel
• Use one of the two channel selector buttons to select the requested channel.
• If you release the channel selector button , the channel will automatically be
stored after approx. 3 seconds.
• If you would like to lock the selected channel to avoid accidental shifting, hold
down the Set button for about 3 seconds. A key symbol will be displayed .
The channel is locked.
If you would like to unlock a locked channel, hold down the Set button for
about 3 seconds. The key symbol in the display will disappear.

Synexis – Synexis TS8 Stationary Transmitter
14
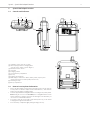
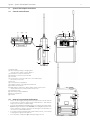
5. Synexis TS8 stationary transmitter
5.1 Controls and indicators
On/off switch
Level control microphone input
Level control AUX input
OLED display to indicate channel, AF level, frequency and channel lock function
(on delivery with protective foil)
Channel selector buttons
Set button
Level control headphone
Headphone connection, 1/4" stereo jack (6.35 mm) (Mix from Aux and Input.
On request, Aux only for single interpretation applications.)
Antenna output, 50 ohms, TNC
AUX output, phono RCA, stereo
AUX input, phono RCA, stereo, for MP3 or CD
Input for line or dynamic microphone, balanced, 3-pin XLR
Sensitivity switch for Line level or microphone
Microphone input, unbalanced, 1/4" stereo jack (6.35 mm)
Cable grip
DC connection for power adapter
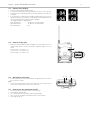
5.2 Setting up
1. Connect the supplied antenna to the antenna output .
2. Connect the XLR input or the jack input to the output of a mixing console,
interpretation system or a dynamic microphone.
3. Set the sensitivity according to the input level.
Recommendation:
Mic when using dynamic microphones
Line when using interpretation systems, mixing console outputs etc.
4. Depending on the application you can connect an MP3 or CD player to the AUX
input .
5. Make sure the mains voltage shown on the power adapter corresponds to the
local mains voltage.
6. Connect the power adapter to the receiver and to AC power.
7. Switch on the Synexis TS8 .
8. Channel and AF level are displayed .
9. If the transmitter is not operated for a while, the display turns into a “screensaver”
mode (dimmed, continuous display). The AF level is not displayed in the
“screensaver” mode. In order to activate it, press briefly the Set button .
10. To avoid accidental pulling off the power adapter cable, thread the power cable
through the cable grip as shown on the illustrations on the right hand side.
cable grip

Synexis – Synexis TS8 Stationary Transmitter
15
5.3 How to select and lock a channel
• Select a channel with the channel selector buttons .
• Press the up or down button until the requested channel is displayed .
• Release the button to store the selected channel.
• If you would like to lock the selected channel to avoid accidental shifting, hold
down the Set button for about 3 seconds. A key symbol will be displayed .
The channel is locked.
If you would like to unlock a locked channel, hold down the Set button for
about 3 seconds. The key symbol in the display will disappear.
5.4 How to display the frequency
• Press the Set button briefly.
• The frequency is displayed next to the channel.
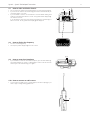
Two transmitters - 19" rack mounting
• Pull out the retention pin in the middle of the feet and remove them from the bottom of the transmitter.
• Mount the connection plates on the top and bottom of the two transmitters.
• After joining the two transmitters together, mount the supplied brackets on the right and left hand side of the transmitters and mount
them in a 19" rack.
5.5 Mounting the antenna on the front / 19" rack mounting
One transmitter - mounting the antenna on the front
• Pull out the retention pin in the middle of the feet and remove them from the bottom of the transmitter.
• Attach the shorter one of the two supplied brackets to one side of the transmitter and the longer bracket with a hole for mounting the
antenna on the front on the other side.
• Connect the antenna cable to the antenna input on the rear, pull the cable through the hole and mount the antenna on the front.

Synexis – Synexis C8 / C10 / C20 / C30 / CHP Chargers
16
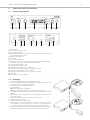
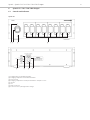
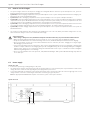
Charging status of handheld transmitter
Charging compartment for handheld transmitter
Power on LED
Charging compartments for beltpack transmitters / beltpack receivers
Ground
Fuse
Mains connection
Connection to loop through another charger
6. Synexis C8 / C10 / C 20 / CHP chargers
6.1 Controls and indicators
Synexis C8

Synexis – Synexis C8 / C10 / C20 / C30 / CHP Chargers
17
Synexis C10
Power on LED
Charging compartments for beltpack transmitters / beltpack receivers
Ground
Fuse
Mains connection
Connection to loop through another charger

Synexis – Synexis C8 / C10 / C20 / C30 / CHP Chargers
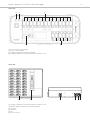
18
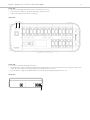
Synexis C20
DC connection for power adapter
Power on switch with LED
Charging compartment for handheld transmitter
Charging compartments for beltpack transmitters / beltpack receivers
Synexis C30
Charging compartments for beltpack transmitters / beltpack receivers
Optional charging compartment for handheld transmitter
Ventilation
Ventilation
Fuse
Mains connection

Synexis – Synexis C8 / C10 / C20 / C30 / CHP Chargers
19
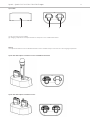
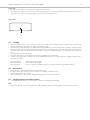
Synexis CHP
DC connection for power adapter
Charging compartments for beltpack transmitters / beltpack receivers / handheld transmitters
Caution
The beltpack transmitter/receiver and handheld transmitter cannot simultaneously be inserted into the same charging compartment!
Synexis CHP with beltpack transmitter/receiver and handheld transmitter
Synexis CHP with beltpack transmitter/receiver

Synexis – Synexis C8 / C10 / C20 / C30 / CHP Chargers
20
Safety instructions:
• Never charge a beltpack receiver, handheld or beltpack transmitter when they are powered with normal batteries!
• Make sure that the ambient temperature does not exceed 45 °C (113 °F); if necessary ensure an additional ventilation.
• Despite the Auto-Off function we recommend turning off the receivers, handheld and beltpack transmitters before charging!
• After a power failure or after the receiver and/or transmitter has been reinserted, the entire charging process begins again.
Overcharging is prevented however.
• If you use the transmitter and receiver from time to time only, the rechargeable batteries can be over-discharged (= discharge until
the almost complete exhaustion of the charging capacity of the rechargeable battery) due to self-discharge making the rechargeable
batteries useless. Therefore, we recommend to recharge the transmitter and receiver every 2 or 3 months to avoid the rechargeable
batteries being damaged due to over-discharge.
• Do not cover the ventilation slots of the Synexis C8, C10, C20 and C30 chargers. With Synexis C20 and C30 charge only when the
case is wide open.
6.2 How to use the chargers
• The Synexis chargers have been developed for charging the rechargeable batteries inside the Synexis RP beltpack receiver, Synexis TP
beltpack transmitter and Synexis TH handheld transmitter.
• Synexis C8 provides 8 charging compartments for the Synexis RP beltpack receiver or Synexis TP beltpack transmitter and one charging com-
partment for the Synexis TH handheld transmitter.
• Synexis C10 provides 10 charging compartments for the Synexis RP beltpack receiver or Synexis TP beltpack transmitter .
• Synexis C20 provides 20 charging compartments for the Synexis RP beltpack receiver or Synexis TP beltpack transmitter and one charging
compartment for the Synexis TH handheld transmitter. The charger is built into a practical trolley. The accessory compartment in the cover
of the case provides room for headphones and microphones of the beltpack receivers/transmitters.
• Synexis C30 provides 30 charging compartments for the Synexis RP beltpack receiver or Synexis TP beltpack transmitter and a connection
for an optional charging compartment for the Synexis TH handheld transmitter. The charger is built into a practical case.
• Synexis CHP provides 2 charging compartments for the Synexis RP beltpack receiver or Synexis TP beltpack transmitter or the Synexis TH
handheld transmitter.
• The Synexis C8 or C10 charger has been designed for the installation into a 19" rack (3 U). When you install the charger into a 19" rack,
make sure that the charger is connected to a switchable mains supply.
6.3 Power supply
Synexis C8 / C10
• Connect the Synexis C8 or C10 charger to AC power.
• The charger has no separate on/off switch and is ready for operation when it is connected to AC power. If you would like to switch off the
charger, disconnect it from the mains by pulling the power plug from the power socket.
• You can link a maximum of 6 chargers by connecting the first charger via the connection or to the connection or of the second
charger and then connect the second charger via the mains connection or to AC power.
Note: For appropriate IEC-60320 C13/C14 power cord extensions, please contact your local dealer.
Synexis C8 / C10
/ /
Page is loading ...
Page is loading ...
Page is loading ...
Page is loading ...
Page is loading ...
Page is loading ...
Page is loading ...
Page is loading ...
Page is loading ...
-
 1
1
-
 2
2
-
 3
3
-
 4
4
-
 5
5
-
 6
6
-
 7
7
-
 8
8
-
 9
9
-
 10
10
-
 11
11
-
 12
12
-
 13
13
-
 14
14
-
 15
15
-
 16
16
-
 17
17
-
 18
18
-
 19
19
-
 20
20
-
 21
21
-
 22
22
-
 23
23
-
 24
24
-
 25
25
-
 26
26
-
 27
27
-
 28
28
-
 29
29


Beyerdynamic Synexis Set C20 HP User manual
- Category
- Microphones
- Type
- User manual
- This manual is also suitable for
Ask a question and I''ll find the answer in the document
Finding information in a document is now easier with AI
Related papers
-
Beyerdynamic Synexis TP8 User manual
-
-
-
-
-
-
-
-
-
Other documents
-
Rockville RWF20 Owner's manual
-
Magnadyne HP-400 User manual
-
 Assistive Sound AS201T User manual
-
Pyle PDMW400HD User manual
-
 Assistive Sound AS201R Quick start guide
-
Pulse PA-40 User Instructions
-
 La Crosse Technology RS1000 Owner's manual
-
TOA WM-2110 01ER User manual
-
 La Crosse Technology RS-900 Owner's manual
-
Techno line BC700 Owner's manual


