Page is loading ...

Hi-hat control
pedal
1.
Rotate the kick pad and pedal plate holders
as shown in the illustration.
1
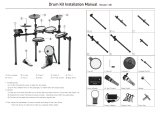
StandDrum sound module and pads
Check the included items
8
Hi-hat control pedal
(FD-9)
8
Kick pad
8
Cymbal pad for crash/ride/
hi-hat (CY-5) x 3
8
Pad for tom × 3
(PDX-6)
8
Drum sound
module (TD-1)
8
Connection cable
8
Stand
8
Drum key
8
Pedal plate
8
Cable clip B × 4
8
Cable clip A
8
Kick pad attachment
bolt
8
AC adaptor
Manual set
8
Setup Guide (this document)
8
Owner’s Manual
As soon as you open the package, check to see that all items are included. If anything is missing, please contact your dealer.
* Use a commercially available kick pedal.
6
Attach the snare and toms
1.
Attach the rods to the pad mounts (four
locations).
Use a drum
key to loosen/
tighten
7 8
Attach the hi-hat Attach the cymbals
1.
Remove the nut and attach the hi-hat pad as shown in the
illustration.
Pay attention to the direction of the rubber part attached to the tip of the
hi-hat arm.
2.
Tighten the nut to obtain the desired amount of sway.
9
Attach the kick pad
1.
Place the cymbals onto the tip of the cymbal rods (two
locations).
Align the cymbal with the narrow part of the cymbal rod, and insert the
r o d r m l y .
MEMO
Place the cymbals onto the tip of the cymbal rods, and rmly press
them to secure the position, as shown in the illustration.
3.
Loosen the bolt and attach the pedal plate as
shown in the illustration (do not tighten the bolt
yet).
2.
Attach the kick pad as shown in the illustration,
and rmly tighten the kick pad attachment bolt.
4
Extending the cymbal rods
1.
Use the drum key to loosen the bolt of the movable section.
2.
Tilt up the tips of the cymbal rods (two locations).
3.
Release the lever at the top of the pipe, and pull out the cymbal
rod.
4.
Tighten the lever to secure the rod.
Align with narrow part
of cymbal rod, and insert
rmly.
Verify that the plate and pedal rmly contact the
oor without any gap
Pedal plate
2
Open the stand
1.
Loosen the hand knob and open the stand.
Loosen
Tighten
Do not open wider than 90
degrees
2.
Tighten the hand knob to secure the stand.
4.
Kick pedal positioning.
Mount the kick pedal to the pedal plate and so that the beater strikes the center of the
kick pad.
In order to this, you may have to loosen the knob on the kick pad to adjust the height
and angle.
Once the pedal is in the desired playing position, tighten the 2 knobs and bolt.
3.
Place the hi-hat control pedal
below the hi-hat.
Completed setup
Crash
Ride
Hi hat
Tom 1
Tom 2
Tom 3
Kick pad
Snare
Drum sound module
Hi hat control pedal
Kick pad attachment bolt
(included with the stand)
With the OUTPUT jack facing
out, use the drum key to
securely tighten the bolt.
* Take care not to pinch your ngers.
* If you’re not using a commercially available kick pedal, make the pedal plate firmly
contact the oor without any gap.
NOTE
* As shown in the illustration,
do not open the stand wider
than 90 degrees. If the stand is
opened too wide, it will be less
stable, and may fall over.
NOTE
5
Arm and Mount positioning
1.
Loosen the hand knobs and spread open the hit hat arm and
sound module mount as shown in the illustration.
2.
Position the snare arm as shown in
the illustration.
3.
Loosen the knob and position
the tom arm as shown in the
illustration.
* Use a commercially available kick pedal.
Loosen the bolt, then
insert the pedal plate
(don’t tighten the bolt).
Nut
Note direction
* Toms 1–3 do not support
rim shots.
Caution during assembly
* Do not open the stand frame wider than 90 degrees in order to maintain stability.
* Position all pipes as instructed in this Setup Guide in order maintain the proper balance of the entire kit.
* When folding or assembling the stand, please be careful not to get your ngers pinched between the movable part
and the unit. In places where small children are present, make sure that an adult provides supervision and guidance.
* Do not pull hard on any connection cables.
* Follow all procedures in this Setup Guide regarding set up or folding the stand. Pipes folded incorrectly may
damage or stretch the cables.
* Handle the cymbals with care when adjusting the cymbal arms. A falling cymbal could injure you.
* Repeatedly folding and setting up the stand may cause the various bolts to loosen. Before you perform, verify that
the bolts and hand knobs are not loose.
* Take care when transporting the system in the folded state. Use caution for protruding parts such as the pedal plate
and hand knobs.
* The pipes and the cymbal rods will come out if they are extended too far.
NOTE
NOTE
* Take care that the stand does not fall over during assembly.
* Take care not to pinch your ngers while setting up or storing the stand.
8
Pad mount × 4
Tips for assembly
When assembling the stand, it's best to assemble the stand in its approximate position; then
after you've assembled the entire stand, adjust the positions and angles of the pads.
8
Pad for snare
(PDX-8)
3
Extend the pipes
1.
Loosen the hand knobs at the locations shown, and
extend the pipes.
2.
After you’ve extended the pipes, tighten the hand
knobs to secure the pipes position.
Left and right pipes facing
each other
* The pipes will come out if they are
extended too far.
NOTE
2.
Attach the pad mounts as shown in the illustration below (four locations).
MEMO
Attach the pad mount so that the rod is on the back.
3.
Attach the snare (PDX-8) and toms 1–3 (PDX-6).
4.
Firmly tighten the snare and tom knobs.
Loosen
Tighten
Rod
Beater
Adjust the position of the beater so
that it strikes the center of the kick pad
striking surface, and rmly fasten the
kick pedal and kick pad.
Kick pad
Install the kick pedal
securely.
Tom
arm
Sound module
mount
Snare arm
Hit hat arm
PDX-8
PDX-6PDX-6
PDX-6
A
Extend this to
approximately twice
the length of
A
.
8
Drum sound
module holder
* 5 1 0 0 0 5 3 8 3 6 - 0 1 *
Watch the Quick Start Video
This video explains how to use the TD-1KPX.
http://roland.cm/td-1kpx
Setup Guide
Assembling
Before using this product, please carefully read “USING THE UNIT SAFELY” and
“IMPORTANT NOTES” (the lea et “USING THE UNIT SAFELY” and the “Owner’s
Manual”), as well as the notes in the Setup Guide in order to ensure that you use the
product correctly. After reading, keep the document(s) where it will be available for
immediate reference.
© 2016 ROLAND CORPORATION
Tilt up the cymbal rod.
Use the drum key
to loosen.
Release the lever and pull out the
cymbal rod.
Use a
drum key
to loosen/
tighten
Pedal plate
Verify that the pedal
plate rmly contact the
oor without any gap
8
Adjust the head tension
8
Adjust the hi-hat control pedal
Using the anchor bolts
If you’re using this unit on a drum mat (TDM series) or on carpet,
extending the anchor bolts will secure the unit in place, making it
easier for you to perform.
When using on the
drum mat or carpet
When using on
the oor
* When used on ooring, the anchor bolts may damage the oor.
* The tips of the anchor bolts are sharp. Handle with care.
By adjusting the spring
You can lighten the feeling by removing either
the left or the right spring.
* Take care not to pinch your nger when
removing or installing a spring.
Detach upper hook.
To reinstall the spring, attach the
upper hook rst.
2
Detach lower hook.
1
Adjusting the feeling will change the amount of
noise/vibration
Be aware that removing a spring will increase the noise/vibration
when performing.
Springs Two One
Noise/vibration Less More
Feeling Heavy Light
11
Connecting the cables
10
Attach the drum sound module (TD-1)
1.
Attach the drum sound module holder to the drum sound
module.
Use the bolt of the drum sound module
holder to attach it as shown in the
illustration.
2.
Attach the drum sound module to the pipe at the position
shown in the illustration.
Use the bolt the bottom of the
drum sound module holder
to attach it as shown in the
illustration.
MEMO
You can also position the drum sound module one hole further
back.
3.
Adjust the height of the drum sound module.
Set the height of the drum sound
module so that you can see the
screen.
When you’ve nished making
adjustments, tighten the hand knob
r m l y .
1.
Connect the cable to the drum sound module as
show in the illustration.
Each cable has a label indicating the pad to which it should
be connected.
* Firmly insert the plugs all the way into the jacks.
* Pass the cables through the cable holders so that they will not interfere with your
playing. Pass the cables through the cable holders one at a time.
NOTE
2.
Connecting cables to the pads.
1. As shown in the illustration, pass the hi-hat (
HH
), tom 1 (
T1
), and crash (
CR1
) cables through the cable holder
1
,
and connect the cables to the pads.
2. Pass the rest of the cables through the cable holder
2
.
3. Locate the hi-hat controller cable (
HHC
)
3
and connect to the hi-hat control pedal.
4. Insert the remaining cables, into two of the provided cable clips B and attach the cable clips B to locations
4
(two
locations) on the frame as shown in the illustration.
5. Fix the snare cable (
SNR
) in place using the supplied cable clip A
5
and connect it to the snare pad.
6. Insert the cables, into the remaining two cable clips B and attach the cable clips B to locations
6
(two locations)
on the frame as shown in the illustration.
7. Locate the cable for the kick pad (
KIK
)
7
and connect it to the kick pad.
8. Pass the rest of the cables through the cable holders at location
8
.
9. Locate and connect the cables for tom 2 (
T2
), tom 3 (
T3
) and the ride cymbal (
RD
).
10. Locate the cymbal clamps for the ride and crash cymbals and attach the cable to them as shown in the
illustration.
1
2
3
5
7
8
CR1
HH
SNR
KIK
HHC
T1T2
T3
RD
Pass the cable
through the cable
clip B before
attaching it to the
stand.
Seen from behind
Provide slack
Fasten cable with
clamp
Fasten the hi-hat cable to
the clamp.
Connect the snare cable to the snare from
the front of the stand.
Cable clip A
* If you pass the cable behind the snare,
it will be pinched when you store the
system, causing the cable to break.
NOTE
12
Connect the AC adaptor and speakers
* To prevent malfunction and equipment failure, always turn down the volume, and turn o all the units before
making any connections.
* Pass the cord from the AC adaptor through the cable holder, so it is held in place against the stand. This way,
even if someone accidentally tugs on the cord, you won’t have to worry about the plug getting pulled out,
which would cause a sudden loss of power. And, you can also prevent the application of an undue amount of
force to the AC adaptor’s connector.
DC IN jack
Connect the included AC adaptor to the DC IN
jack.
Place the AC adaptor so the side with the indicator
(see the illustration) faces upwards and the side
with textual information faces downwards. The
indicator will light when you plug the AC adaptor
into an AC outlet.
OUTPUT/PHONES jack
Connect your ampli ed speaker or headphones to
the OUTPUT/PHONES jack.
Indicator
13
* To prevent damage to your oor or carpet, and to ensure a stable setup, we recommend that you use a separately sold drum mat (TDM
series).
Final set-up adjustments
Adjust each tuning bolt little by little in the illustrated order so that the head is
tensioned evenly.
* Adjusting the head tension a ects only the head response, and does not change
the pitch of the sound as it would on an acoustic drum.
2 1
5 3
4
6
PDX-8
4 1
2 3
5
PDX-6
Cable clip B
* When attaching cable clips B, take care not
to insert your nger into the hole on the
bottom of the stand. The edge might cut
your nger, causing injury.
NOTE
4
6
You can attach your
drum key to the cable
holder.
Cable holder
Tilt it forward slightly.
Position so there is 12–15 cm
(4-3/4”–6”) of space between
the snare and tom.
The hi-hat should be placed
about 20 cm (7-7/8”) higher
than the snare.
Place directly
below the hi-hat.
The snare and
tom 3 should
be at the same
height.
Allow for 3–6 cm
(1-3/16”–2-3/8”) of
space between tom
1 and tom 2.
Place at a slightly
lower position than
the crash cymbal.
Adjust the angles so that you
can perform comfortably.
The tom 1 and tom 2
should be at the same
height.
* When you operate the kick pedal or the hi-hat control pedal, please be careful not to get your ngers pinched between the movable
part and the unit. In places where small children are present, make sure that an adult provides supervision and guidance.
NOTE

1.
Fold the snare.
Loosen the hand knob and raise it to the highest position; then
use a drum key to loosen the bolt and put the snare in a vertical
position.
When the position is correct, tighten the hand knob rmly.
2.
Fold the drum sound module.
Use a drum key to loosen the
bolts of the drum sound module
and sound module mount, and
fold the drum sound module to a
vertical position.
When the position is correct,
tighten the bolt rmly.
Loosen the hand knob and
rotate the sound module mount
from inside, lowering it to the
lowest position as shown in the
illustration.
* Leave the hand knob loose.
3.
Fold the hi-hat.
Use the included drum key to loosen the hi-
hat arm bolt, and rotate it so that the hi-hat
is vertical.
When the position is correct, tighten the
b o l t r m l y .
Loosen the hand knob, and rotate the pipe
from the outside to fold it.
Position the hi-hat so that it faces the
center of the snare pipe.
* Leave the hand knob loose.
1
2
3
4.
Fold tom 1.
Use the drum key to loosen the tom bolt, and position it vertically.
When the position is correct, tighten the bolt rmly.
5.
Lower the pipe while aligning the arm to the position of
the stand’s angular pipe.
* Take care not to pinch the cable when lowering the pipe.
NOTE
Loosen the hand knob, and lower
it all the way down.
When it is fully lowered, rmly
tighten the hand knob and
the hi-hat hand knob that you
loosened.
Angular pipe
6.
Fold the cymbal rod and lower it.
Use a drum key to loosen the cymbal rod bolt, and fold the
cymbal.
After folding it, securely tighten the bolt.
Open the pipe lever, and rotate the cymbal rod to slowly lower it
so that you can see the back of the cymbal.
After lowering the rod, securely tighten the lever.
Release the lever and lower
the cymbal rod.
Fold up the cymbal rods.
Rotate the cymbal rod to lower it so that
you can see the back of the cymbal.
By rotating the cymbal rod you can
fold the stand more compactly.
7.
Fold the snare.
Loosen the hand knob to align the snare with the orientation of
the tom, and then lower the snare until the pad mount touches.
* Lower the snare so that the hi-hat is between the snare arm
and the snare.
When the position is correct, securely tighten the hand knob.
3
1
4
2
1.
Turn o the power.
2.
Disconnect all cables from the drum sound module.
Disconnect the connection cable, AC adaptor, and cables
connected to the OUTPUT/PHONES jacks.
Loosen the knobs that
fasten the connection
cable, and pull the
connector straight
out.
3.
Disconnect the hi-hat control pedal cable.
You can fasten the
disconnected cable
to the cable holder.
4.
Remove the kick pedal.
1.
Loosen the hand knob, and rotate the kick pedal
attachment plate toward the inside with the kick pad
outside.
When the position is correct, securely tighten the hand knob.
2.
Rotate tom 3 and fold it.
Loosen the tom knob, and rotate it from the outside.
Use a drum key to loosen the tom bolt, position the tom vertically,
and move it to the end of the tom arm.
1
2
3
Loosen the hand knob and rotate
the tom arm from the outside to
lower it all the way down.
* Leave the hand knob loose.
3.
Fold tom 2.
Use a drum key to loosen the tom bolt, and position the tom
vertically.
4.
Lower the pipe while aligning the arm to the position of
the stand’s angular pipe.
Loosen the hand knob, and lower it all the way down.
By loosening the tom’s knob and
angling it, you can lower the pipe all
the way down.
Angular pipe
After lowering it all the way down, securely tighten the pipe’s
hand knob and the hand knob of tom 3 that you left loosened.
* Take care not to pinch the cable when lowering the pipe.
NOTE
5.
Fold the cymbal rod and lower it.
Use a drum key to loosen the cymbal rod bolt, and fold the
cymbal.
After folding it, securely tighten the bolt.
Open the pipe lever, and rotate the cymbal rod to slowly lower it
so that you can see the back of the cymbal.
After lowering the rod, securely tighten the lever.
Rotate the cymbal rod to lower it so that
you can see the back of the cymbal.
By rotating the cymbal rod you can
fold the stand more compactly.
Release the lever and lower
the cymbal rod.
Fold up the cymbal rods.
1.
Fold the sound module mount.
Loosen the hand knob, and fold the sound module mount inward.
When the position is correct, securely tighten the hand knob.
2.
Loosen the hand knob and fold the stand inwards.
Not less than 13 cm
* When storing the system in a
folded state, leave the stand’s
pipes opened so that they are at
least 13 cm apart. If this distance is
less than 13 cm, the stand will be
unstable and may fall over.
NOTE
Disconnect the cables and pedals Fold the left side
Folding the right side
Folding the stand.
MEMO
For easy transportation, you can place the
system in a carrying case (CB-TDP; sold
separately) designed speci cally for the
Roland V-Drums Portable.
NOTE
* Take care not to allow the system to tip over when folding it up.
* When setting up or storing the stand, please be careful not to get your ngers pinched
between the movable part and the unit. In places where small children are present, make
sure that an adult provides supervision and guidance.
Setup Guide
Folding for Storage /
Extending for Use
Before using this product, please carefully read “USING THE UNIT SAFELY” and
“IMPORTANT NOTES” (the lea et “USING THE UNIT SAFELY” and the “Owner’s
Manual”), as well as the notes in the Setup Guide in order to ensure that you use the
product correctly. After reading, keep the document(s) where it will be available for
immediate reference.
© 2016 ROLAND CORPORATION
Watch the Quick Start Video
This video explains how to use the TD-1KPX.
http://roland.cm/td-1kpx
Folding for Storage
1 2
3
1.
Extend the stand.
Loosen the hand knob, and open to 90 degrees.
After you’ve opened the stand,
tighten the hand knob.
Do not open wider than 90 degrees
2.
Open the sound module mount.
Loosen the hand knob, and
open the sound module
mount.
* Leave the hand knob loose.
3.
Raise the snare, and position it at the front.
Loosen the hand knob, then raise the snare all the way and
position it at the front.
When the position is correct, securely tighten the hand knob.
4.
Raise and set up the cymbal rods.
Release the lever and pull
out the cymbal rod.
Tilt up the cymbal rod.
5.
Raise tom 2.
Use a drum key to loosen
the tom’s bolt, and raise
tom 2.
6.
Extend the pipe, and position tom 2 at the front.
Loosen the hand knob of tom 3 before you
extend the pipe.
Loosen the hand knob of the pipe, and
extend it.
When the position is correct, securely tighten
the hand knob of the pipe to fasten it.
For the height of tom 2, refer to “
3
Extending the pipe” in the section on
assembly.
* Leave the hand knob of tom 3 loose.
* Take care that the cables are not excessively stretched.
NOTE
7.
Raise tom 3.
1
Rotate the tom arm from the
outside.
Adjust the height of the tom.
Tighten the hand knob to secure
the tom arm.
2
Use a drum key to
loosen the tom’s bolt,
then raise the tom and
adjust its position.
Loosen the tom’s knob
and rotate it from the
outside.
3
8.
Rotate the kick pad and the pedal plate.
Loosen the hand knobs, and adjust
the position of the kick pad and
the pedal plate.
Tighten the hand knobs to secure
the kick pad and the pedal plate
position.
1.
Raise and set up the cymbal rods.
Release the lever and pull
out the cymbal rod.
Tilt up the cymbal rod.
2.
Extend the pipe so that tom 1 is in the front.
Loosen the hand knob of the hi-hat,
and then loosen the hand knob of
the pipe and extend it.
When the position is correct, tighten
the hand knob of the pipe to secure
it.
* Leave the hand knob of the hi-
hat loose.
* Take care that the cables are not
excessively stretched.
NOTE
3.
Raise tom 1.
Use a drum key to loosen the bolt of the tom, and then raise it.
When the tom is positioned correctly, tighten the bolt to secure
the tom.
4.
Raise the hi-hat.
Rotate the hi-hat arm.
Adjust the height of the hi-hat.
When the position is correct, tighten
the hand knob to secure it.
Use a drum key to loosen the bolt of the
hi-hat arm, and raise the hi-hat.
When the position is correct, tighten the
bolt to secure it.
1
2
3
5.
Raise the drum sound module.
Use a drum key to loosen the
bolts of the drum sound module
and the sound module mount,
and raise the drum sound
module.
When the position is correct,
tighten the bolts securely.
Rotate the sound module mount
from the inside, placing it in the
position shown in the illustration.
When the position is correct,
securely tighten the hand knob.
6.
Connect the cable to the drum sound module.
Connect the connection cable to the drum sound module as
shown in the illustration. Insert the connector all the way, and turn
the knobs to secure the connector.
1.
Raise the snare and adjust its height.
Use a drum key to loosen the bolt, raise the snare, and loosen the
hand knob to adjust the height.
When the position is correct, tighten the bolt and the hand knob
securely.
2.
Kick pedal positioning.
Mount the kick pedal to the pedal plate and so that the beater
strikes the center of the kick pad.
Beater
Install the kick pedal
securely.
For details, refer to “
9
Attaching the kick” in the section on
assembly.
3.
Position the hi-hat control pedal directly below the hi-
hat.
4.
Connect the cable (HHC) to the hi-hat control pedal.
HHC
5.
Check the cable connections.
For details, refer to “
11
Connecting the cables” in the section on
assembly.
6.
Connect the AC adaptor and speakers.
For details, refer to “
12
Connect the AC adaptor and speakers”
in the section on assembly.
Opening the right side Opening the left side
Position the snare and pedals
4
Adjust the position and angle of the pads
1.
Adjust the position and angle of each pad as shown in the illustration.
* Take care not to allow the system to tip over when setting it up.
* When setting up or storing the stand, please be careful not to get your ngers
pinched between the movable part and the unit. In places where small children are
present, make sure that an adult provides supervision and guidance.
NOTE
NOTE
* Before every performance, check to make sure that none of the bolts or hand knobs are loose. Otherwise, if left untightened, it can be quite
dangerous, since the stand could fall over during a performance, or a pad could come o .
Extending for Use
* To prevent damage to your oor or carpet, and to ensure a stable setup, we recommend that you use a separately sold drum mat (TDM
series).
You can attach your
drum key to the cable
holder.
Cable holder
Tilt it forward slightly.
Position so there is 12–15 cm
(4-3/4”–6”) of space between
the snare and tom.
The hi-hat should be placed
about 20 cm (7-7/8”) higher
than the snare.
Place directly
below the hi-hat.
The snare and
tom 3 should
be at the same
height.
Allow for 3–6 cm
(1-3/16”–2-3/8”) of
space between tom
1 and tom 2.
Place at a slightly
lower position than
the crash cymbal.
Adjust the angles so that you
can perform comfortably.
The tom 1 and tom 2
should be at the same
height.
/