Xerox 4110 User guide

Category
Software
Type
User guide
SERVER & CONTROLLER SOLUTIONS
Fiery
®
EXP4110
Utilities
© 2005 Electronics for Imaging, Inc. The information in this publication is covered
under
Legal Notices
for this product.
45051575
22 September 2005
CONTENTS
3
C
ONTENTS
I
NTRODUCTION
7
Terminology and conventions
8
About this document
9
About Help 9
Preparing for installation on Windows computers
10
Preparing for installation on Mac OS computers
11
Fonts 11
C
OMMAND
W
ORK
S
TATION
, W
INDOWS
E
DITION
12
Installing Command WorkStation, Windows Edition
13
Configuring the connection to the Fiery EXP4110
14
Using Command WorkStation, Windows Edition
17
Additional features
18
Align Trays 18
Mixed Media 20
Insert Tabs 24
Troubleshooting
27
Command WorkStation cannot connect to the Fiery EXP4110 27
Command WorkStation does not respond 28
I
MPOSE
29
Installing and enabling Impose
30
Installing Impose 30
Installing Adobe Acrobat and Enfocus PitStop 31
Using Impose
33
C
ONTENTS
CONTENTS
4
P
RODUCTION
P
RINTING
P
ACKAGE
34
Installing Production Printing Package
35
Using Production Printing Package
36
Compose 36
Paper Catalog 37
Preflight 39
Reorder Jobs 41
Suspend on Mismatch 42
Rush Printing 43
Schedule Printing 44
Print Next 45
Process Next 45
Insert Tabs 45
Quick Doc Merge 46
C
OMMAND
W
ORK
S
TATION
, M
ACINTOSH
E
DITION
48
Installing Command WorkStation, Macintosh Edition
49
Configuring the connection to the Fiery EXP4110
50
Using Command WorkStation, Macintosh Edition
53
Schedule Printing 53
Troubleshooting
55
Command WorkStation cannot connect to the Fiery EXP4110 55
Command WorkStation does not respond 56
D
OWNLOADER
57
Installing Downloader
58
Configuring the connection to the Fiery EXP4110
59
Using Downloader
61
Viewing print status 61
Downloading files and printer fonts 62
Managing printer fonts 65
CONTENTS
5
H
OT
F
OLDERS
67
Installing Hot Folders
67
Using Hot Folders
68
VDP R
ESOURCE
M
ANAGER
69
Installing VDP Resource Manager
70
Configuring the connection to the Fiery EXP4110
71
Using VDP Resource Manager
74
W
EB
T
OOLS
75
Setting up WebTools
76
Accessing the WebTools home page
77
Using WebTools
78
Home 78
Configure 78
Print 78
Downloads 78
I
NDEX
79
INTRODUCTION
7
I
NTRODUCTION
The Fiery EXP4110 media pack includes a set of software utilities that allow you to manage
the Fiery EXP4110, as well as the print workflow and content of jobs on the Fiery EXP4110.
This document provides an overview of how to install, configure, and use the following
Fiery EXP4110 utilities:
Command WorkStation, Windows Edition
•Impose
Command WorkStation, Macintosh Edition
Downloader
•Production Printing Package
•Hot Folders
VDP Resource Manager
•WebTools
INTRODUCTION
8
Terminology and conventions
This document uses the following terminology and conventions.
Term or convention Refers to
Aero Fiery EXP4110 (in illustrations and examples)
Fiery EXP4110 Fiery EXP4110
Mac OS Apple Mac OS X
Printer Xerox 4110
Titles in
italics
Other documents in this set
Windows Microsoft Windows 2000, Windows XP,
Windows Server 2003
Topics for which additional information
is available by starting Help in the software
Tips and information
Important information
Important information about issues that can result
in physical harm to you or others
INTRODUCTION
9
About this document
This document covers the following topics:
Command WorkStation, Windows Edition:
Monitoring and managing the print workflow of
jobs on the Fiery EXP4110 (Windows only).
Impose:
Applying imposition layouts to jobs for custom printing, binding, and cutting
purposes (available as an option, Windows only).
Command WorkStation, Macintosh Edition:
Monitoring and managing the print workflow
of jobs on the Fiery EXP4110 (Mac OS X only).
Downloader:
Transferring job files and fonts from your computer to the Fiery EXP4110.
Production Printing Package:
Additional job management features accessed through
Command WorkStation, Windows Edition (available as an option, Windows only).
Includes the Compose and Paper Catalog applications.
Hot Folders:
Storing and reusing frequently used print options when printing PostScript
and PDF files on the Fiery EXP4110.
VDP Resource Manager:
Finding and deleting global objects used in variable data printing.
WebTools:
Managing your Fiery EXP4110 remotely from the Internet or your companys
intranet.
About Help
Detailed instructions about using most Fiery EXP4110 utilities are provided in Help.
Wherever appropriate, this document refers you to Help for additional information and
explains how to access Help for each utility.
INTRODUCTION
10
Preparing for installation on Windows computers
Before installing Fiery EXP4110 software on a Windows computer, be sure to complete
the following:
•To use Command WorkStation or WebTools on a Windows computer, you must install
the Sun Java file, Java Runtime Environment (JRE), provided in the Common Utilities
folder on the User Software (Utilities) CD. If the Sun Java file is not installed, you are
prompted to install it before you proceed to installing the Fiery EXP4110 software.
For more information about installing the file, see “To install Sun Java JRE on your
computer” on page 10.
N
OTE
:
JRE, SE v1.4.1_02 (the recommended version) is provided on the User Software
(Utilities) CD.
•To install the Fiery EXP4110 software, you must install Service Pack 4 on a Windows
2000 computer and Service Pack 2 on a Windows XP computer. If not, a warning message
alerts you to install the Service Pack.
T
O
INSTALL
S
UN
J
AVA
JRE
ON
YOUR
COMPUTER
1 Open the Common Utilities folder on the User Software (Utilities) CD and click the
sj141_02.exe installer icon.
If you start to install Fiery EXP4110 software without installing Sun Java first, a
dialog box prompts you to install Sun Java JRE. Click OK to proceed with the installation.
2 Click Yes in the License Agreement dialog box.
3 Select Typical for Setup Type and click Next.
4 When installation of the JRE file is complete, click Finish and follow the on-screen
instructions for installing the Fiery EXP4110 software.
After you install Sun Java JRE, a Java Web Start shortcut is created on your computer desktop.
This is not intended for use with Fiery EXP4110 software. You may delete the shortcut.
Different versions of Sun Java JRE can be installed on your computer. The Fiery EXP4110
software automatically finds the correct version. You do not need to uninstall other versions of
Sun Java JRE required for third-party applications.
INTRODUCTION
11
Preparing for installation on Mac OS computers
Before installing Fiery EXP4110 software on a Mac OS X computer, you must install screen
and printer fonts.
Fonts
The Fonts on the User Software (Drivers) CD include screen and printer fonts that
correspond to the 136 built-in PostScript printer fonts on the Fiery EXP4110. To be
available to applications, the screen fonts must be installed on Mac OS X.
T
O
INSTALL
SCREEN AND PRINTER FONTS ON MAC OS X V10.2
1 Insert the User Software (Drivers) CD into the CD-ROM drive of the Mac OS X computer.
2 Open the OSX : Fonts folder.
3 Copy the fonts to the following location:
•For your personal use: Users/account name/Library/Fonts
•For shared use: Library/Fonts
TO INSTALL SCREEN AND PRINTER FONTS ON MAC OS X V10.3
1 Insert the User Software (Drivers) CD into the CD-ROM drive of the Mac OS X computer.
2 Start the Font Book application in Applications/Font Book.
3 Choose Add Fonts from the File menu.
4 Choose User Software/OSX/Fonts/Albertus MT.
5 Choose Select All from the Edit menu.
6 Choose one of the following from Install fonts:
•For your personal use: for your use only
•For shared use: for all users of this computer
•For Classic: for Mac OS X Classic
7 Click Open.
8 Exit the Font Book application.
COMMAND WORKSTATION, WINDOWS EDITION
12
COMMAND WORKSTATION, WINDOWS EDITION
Command WorkStation, Windows Edition allows Fiery EXP4110 operators (or users with
Operator or Administrator privileges) to monitor and manage the print workflow of jobs
on the Fiery EXP4110. Command WorkStation, Windows Edition allows you to do
the following:
•View the print status of jobs on the Fiery EXP4110.
•Hold, process, and print jobs.
•Override user-assigned print option settings.
•Preview the page content of a job.
•Reorder pages in a job and combine pages from different jobs.
•Create and use FreeForm master files for variable data printing.
•Archive job files.
•View Job Logs of recent print activity.
COMMAND WORKSTATION, WINDOWS EDITION
13
Installing Command WorkStation, Windows Edition
Install Command WorkStation, Windows Edition on a Microsoft Windows computer that
has a network connection to the Fiery EXP4110. For a complete list of system requirements,
see Welcome.
The installer for Command WorkStation, Windows Edition is provided on the User Software
CD. In addition to the Command WorkStation software, the installer installs the Java files
required to use Fiery Setup from Command WorkStation. For information about using
Fiery Setup, see Configuration and Setup.
Before you install the utility, read the guidelines described in “Preparing for installation on
Windows computers on page 10.
TO INSTALL COMMAND WORKSTATION, WINDOWS EDITION
1 Insert the User Software (Utilities) CD into the CD-ROM drive of the Windows computer.
2 Open the EFI Command WorkStation folder.
3 Double-click the setup.exe icon.
4Follow the on-screen instructions to complete installation.
COMMAND WORKSTATION, WINDOWS EDITION
14
Configuring the connection to the Fiery EXP4110
The first time you start Command WorkStation, you are prompted to configure the
connection to the Fiery EXP4110.
You can also edit the configuration whenever there is any change to your Fiery EXP4110
server or network, such as a changed server name or IP address. If you change Fiery EXP4110
Setup information, do so before you reconfigure the connection. For information about
reconfiguring the connection, see “To modify the configuration for Command WorkStation,
Windows Edition on page 16.
BEFORE YOU BEGIN
Print the Fiery EXP4110 Configuration page.
For instructions on printing the Configuration page, see Configuration and Setup.
This page contains information you need when configuring the connection, such as the IP
address of the Fiery EXP4110. For TCP/IP installations, you can use the DNS name instead
of the IP address. Make sure the Fiery EXP4110 is already registered in a Domain Name
Server (DNS) on your network. For more information, contact your network administrator.
TO CONFIGURE THE CONNECTION FOR COMMAND WORKSTATION, WINDOWS EDITION
1 Choose Start > Programs > Fiery > Command WorkStation to start the utility.
The Available Servers dialog box appears, displaying all servers found in the local subnet.
COMMAND WORKSTATION, WINDOWS EDITION
15
2 If no Fiery EXP4110 servers were found, click the Manual tab to search by DNS name or IP
address. Type the DNS name or IP address and click Add to add the server to the Available
Servers list.
3 Click the Auto Search tab, and then click Advanced to search by a range of IP addresses or by
the IP address and subnet mask.
All available servers appear in the Available Servers list.
4 Select the Fiery EXP4110 server that you want to use and click Add.
The selected Fiery EXP4110 is added to the Login Server window.
COMMAND WORKSTATION, WINDOWS EDITION
16
5 Click the button to the left of the server name.
The Login dialog box appears.
6 Click the key to the left of Administrator, Operator, or Guest and type the appropriate
password, if required.
7 Click Log In.
For information about setting passwords and the default Administrator password for the
Fiery EXP4110, see Configuration and Setup.
Command WorkStation is now connected to the Fiery EXP4110.
TO MODIFY THE CONFIGURATION FOR COMMAND WORKSTATION, WINDOWS EDITION
1 Start Command WorkStation.
The Login Server window appears.
2 Select the Fiery EXP4110 server for which you want to modify the configuration and
click Remove.
3 Repeat “To configure the connection for Command WorkStation, Windows Edition” on
page 14.
COMMAND WORKSTATION, WINDOWS EDITION
17
Using Command WorkStation, Windows Edition
After you install and configure Command WorkStation, you can begin using it to monitor
and manage jobs on the Fiery EXP4110.
For complete instructions on using the standard Command WorkStation features, see
Command WorkStation Help. Additional features are described in the sections starting on
page 18.
TO ACCESS COMMAND WORKSTATION HELP
1 Start Command WorkStation.
Select the Fiery EXP4110 from the Server List dialog box and log on to the server.
For information about setting passwords and the default Administrator password for the
Fiery EXP4110, see Configuration and Setup.
2 Choose Help from the Help menu.
COMMAND WORKSTATION, WINDOWS EDITION
18
Additional features
The following sections describe how to use additional features of Command WorkStation that
are not discussed in Command WorkStation Help.
Align Trays
The Align Trays feature allows you to adjust the placement of text and images on the page so
they are correctly aligned on a sheet of paper. This ensures that both sides of a duplex sheet
have exactly the same alignment.
You can also perform tray alignment from the Fiery EXP4110 Control Panel by choosing
Tray Alignment from the Functions menu.
To perform tray alignment, you must do the following:
Log on to the Fiery EXP4110 with Administrator privileges and enable tray alignment in
Fiery EXP4110 setup.
•Enable Tray Alignment in the Paper Source option bar of the Fiery EXP4110
printer driver.
•Select the correct paper tray before printing.
NOTE: For tray alignment to work when printing a job, select the tray that you have aligned in
the Paper Source option bar before printing. If you later print a job using auto tray selection,
the alignment does not work.
TO ALIGN TEXT AND IMAGES FOR PRINTING
1 In the Active Jobs window, select the connected Fiery EXP4110 for which you want to perform
tray alignment.
If the Active Jobs window is hidden, choose Active Jobs from the Window menu to display it.
COMMAND WORKSTATION, WINDOWS EDITION
19
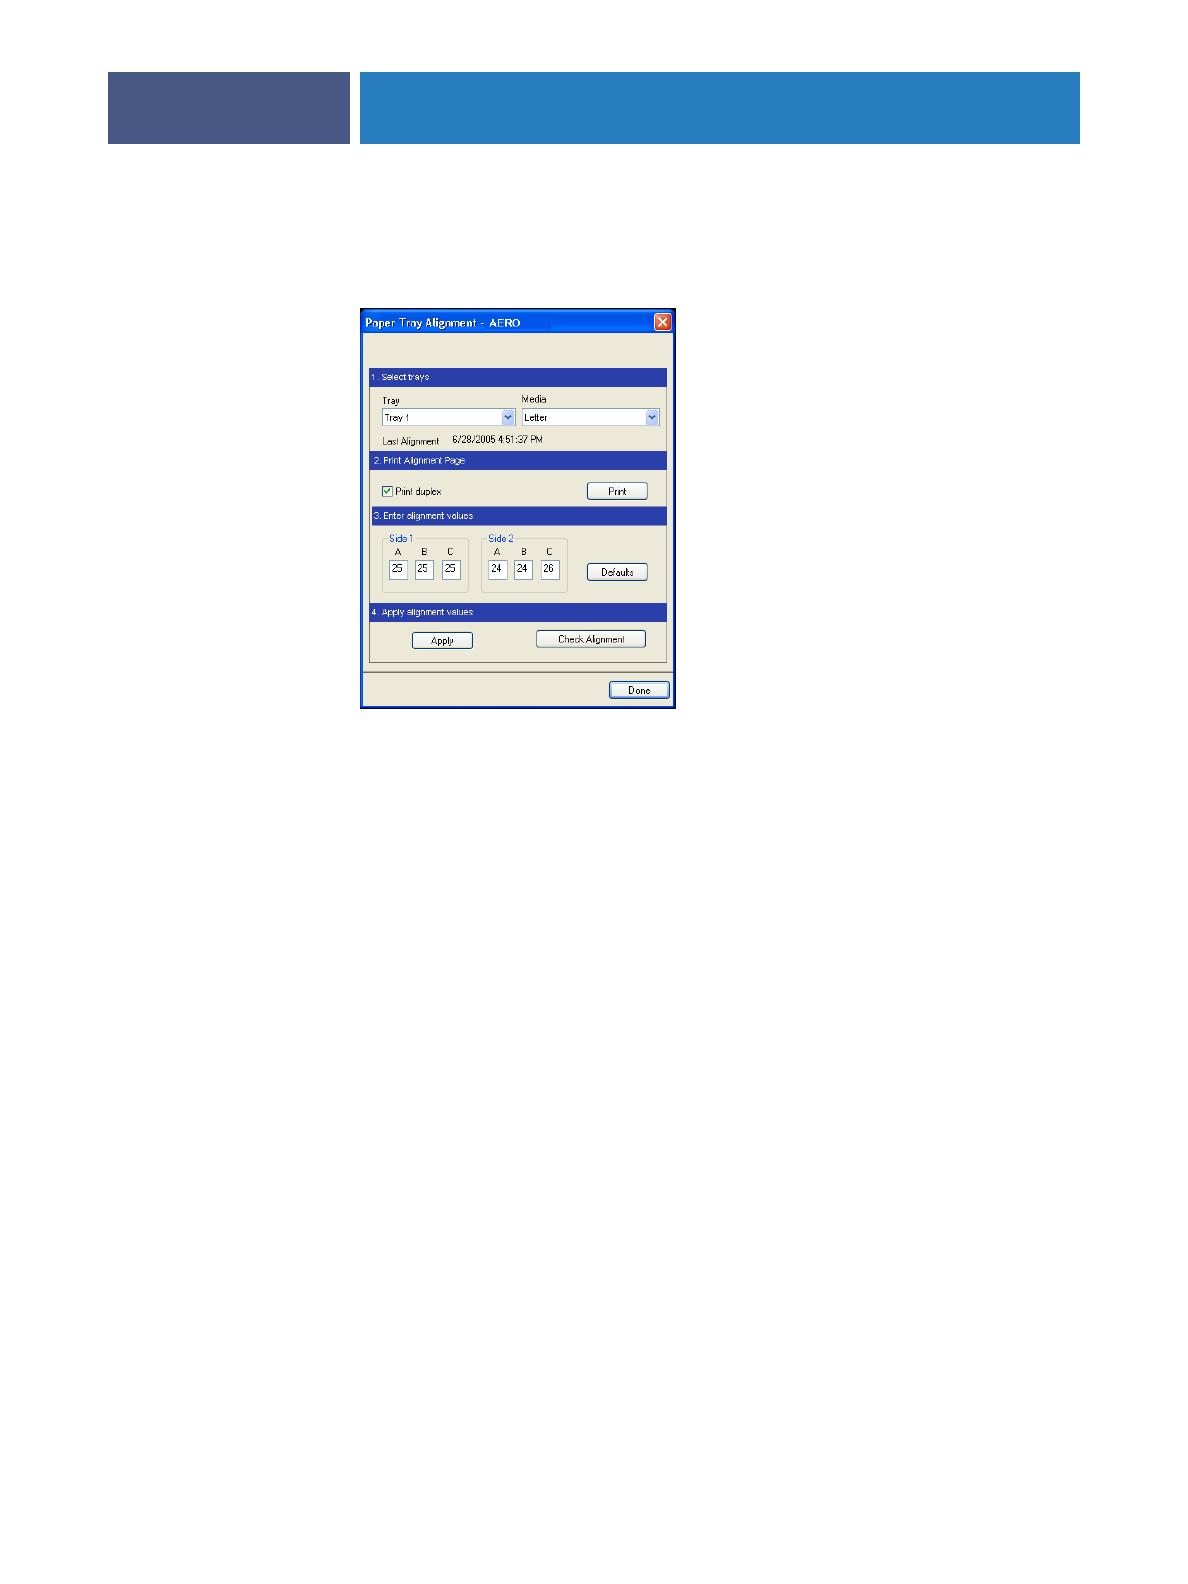
2 Choose Align Trays from the Server menu.
A dialog box appears, displaying the paper tray alignment options.
3 Choose the tray that you want to align from the Tray menu.
4 Choose the paper size loaded in the tray from the Media menu.
NOTE: The alignment is specific to the combination of tray and paper size specified. If you
align a given tray with Letter paper, and then load Legal paper in that tray, the alignment is
wrong. You must perform a new alignment for each combination of tray and paper size.
5 In the Print Alignment Page area, select the Print Duplex option to print a duplex page, or
clear the option to print a simplex page.
6 Click Print.
7 After the Alignment Page is printed, follow the instructions on the page.
Fold the page exactly in half horizontally, unfold it, and then fold it in half vertically. When
you unfold the sheet, observe that the fold lines cross three scales on three sides of the page.
Determine which number on the scale each fold line crosses.
8 In the Enter alignment values area, enter the value that appears where the fold crosses each
of the three scales, marked A, B, and C, for Side 1. If you choose to align for duplex printing,
enter the values for the three scales on Side 2 of the page, as well.
NOTE: If you enter different values in A and C, the image rotates, leading to uneven areas on
printed output. If this occurs, enter the same value in A and C.
9 After you have entered the alignment values, click Apply, and then click Check Alignment to
print the new alignment page.
10 To remove the alignments, select a tray and click Defaults in the Enter alignment values area.
11 Click Done.
COMMAND WORKSTATION, WINDOWS EDITION
20
Mixed Media
The Mixed Media feature allows you to define the chapter divisions of a job, print ranges of
pages on varying types of media, insert blank media between pages, and insert tab media
containing text labels.
The following guidelines and restrictions apply to Mixed Media settings:
The Mixed Media dialog box restricts you from specifying settings that conflict with any
media, page size, or finishing settings that have been specified for the job in the Job
Properties dialog box or printer driver.
When two or more Mixed Media settings are in conflict with each other, the Mixed Media
dialog box highlights the setting names in red, signaling you to resolve the conflict.
When you specify print options (in the Job Properties dialog box or printer driver) after
specifying Mixed Media settings, certain print options may conflict with the page-specific
Mixed Media settings. You must resolve the conflict by choosing different print options or
removing certain Mixed Media specifications.
•If counters are configured for the printer, blank media inserted between pages do not
count as printed pages.
Basic instructions for accessing and using Mixed Media are provided in Command
WorkStation Help. Descriptions of features specific to the Fiery EXP4110 follow.
TO DEFINE MIXED MEDIA SPECIFICATIONS
1 Select a spooled/held job in the Active Jobs window and choose Mixed Media Setup from the
Actions menu.
The Mixed Media dialog box lists any previously defined media settings and includes buttons
for defining, modifying, and removing settings.
NOTE: The Job Properties dialog box opens behind the Mixed Media dialog box. Do not close
the Job Properties dialog box until you finish defining Mixed Media settings.
  • Page 1 1
  • Page 2 2
  • Page 3 3
  • Page 4 4
  • Page 5 5
  • Page 6 6
  • Page 7 7
  • Page 8 8
  • Page 9 9
  • Page 10 10
  • Page 11 11
  • Page 12 12
  • Page 13 13
  • Page 14 14
  • Page 15 15
  • Page 16 16
  • Page 17 17
  • Page 18 18
  • Page 19 19
  • Page 20 20
  • Page 21 21
  • Page 22 22
  • Page 23 23
  • Page 24 24
  • Page 25 25
  • Page 26 26
  • Page 27 27
  • Page 28 28
  • Page 29 29
  • Page 30 30
  • Page 31 31
  • Page 32 32
  • Page 33 33
  • Page 34 34
  • Page 35 35
  • Page 36 36
  • Page 37 37
  • Page 38 38
  • Page 39 39
  • Page 40 40
  • Page 41 41
  • Page 42 42
  • Page 43 43
  • Page 44 44
  • Page 45 45
  • Page 46 46
  • Page 47 47
  • Page 48 48
  • Page 49 49
  • Page 50 50
  • Page 51 51
  • Page 52 52
  • Page 53 53
  • Page 54 54
  • Page 55 55
  • Page 56 56
  • Page 57 57
  • Page 58 58
  • Page 59 59
  • Page 60 60
  • Page 61 61
  • Page 62 62
  • Page 63 63
  • Page 64 64
  • Page 65 65
  • Page 66 66
  • Page 67 67
  • Page 68 68
  • Page 69 69
  • Page 70 70
  • Page 71 71
  • Page 72 72
  • Page 73 73
  • Page 74 74
  • Page 75 75
  • Page 76 76
  • Page 77 77
  • Page 78 78
  • Page 79 79
  • Page 80 80

Xerox 4110 User guide

Category
Software
Type
User guide

Ask a question and I''ll find the answer in the document

Finding information in a document is now easier with AI