Bosch KDN42AW10N/01 Installation guide

Type
Installation guide

This manual is also suitable for

The Bosch KDN42AW10N/01 is an intelligent freestanding fridge freezer that offers exceptional food preservation and convenience. Its advanced features make it an ideal choice for those seeking a reliable and efficient cooling solution.

With its spacious 366-liter capacity, the Bosch KDN42AW10N/01 provides ample storage space to meet the needs of families and individuals alike. The fridge section features adjustable glass shelves, a VitaFresh drawer for fruits and vegetables, and a dairy compartment, while the freezer section offers three transparent drawers for organized storage.

The innovative VitaFresh system in the fridge compartment maintains optimal humidity levels, helping fruits and vegetables stay fresher for longer periods. The VitaFresh drawer provides two climate zones, one for fruits and the other for vegetables, ensuring ideal storage conditions for each.

en Installation instructions
Free-standing appliance
fr Notice de montage
Appareil indépendant
a r ﺐﻴﻛﺮﺘﻟﺍ ﺕﺎﻤﻴﻠﻌﺗ
ﺩﺮﻔﻨﳌﺍ ﺐﺼﻨﻠﻟ ﺯﺎﻬﺟ
en Table of Contents
Using the installation instructions ........ 3
Installation location ................................. 3
Changing over the door hinges ........... 3
Changing the door handle .................... 4
Fitting the wall spacer ............................ 4
Aligning the appliance ........................... 4
fr Table des matières
Utiliser la notice de montage ................ 5
Lieu d’installation .................................... 5
Inversion du sens d’ouverture
de porte .................................................... 6
Changement du sens d'ouverture
de porte .................................................... 6
Monter les écarteurs muraux ................ 6
Ajuster l’appareil ..................................... 6
en
3
enTable of Contents
enInstallation instructionsFree-standing appliance
Using the installation
instructions
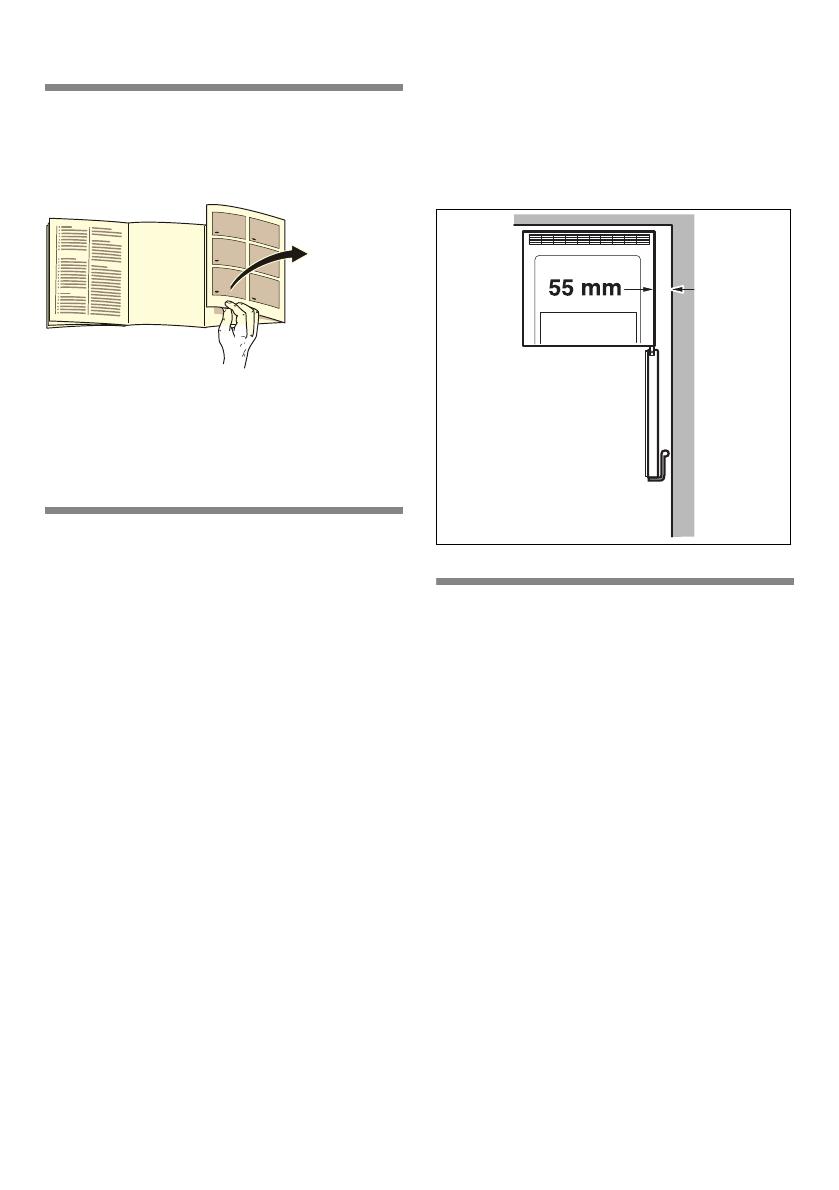
Please fold out the illustrated last page.
These installation instructions refer to
several models.
The diagrams may differ.
Installation location
A dry, well ventilated room is suitable as
an installation location. The installation
location should not be exposed to direct
sunlight and not placed near a heat
source, e.g. a cooker, radiator, etc. If
installation next to a heat source is
unavoidable, use a suitable insulating
plate or observe the following minimum
distances from the heat source:
3 cm to electric or gas cookers.
30 cm to an oil or coal-fired cooker.
The floor of the installation location must
not give way; if required, reinforce floor.
The appliance must be upright.
Distance from wall
Appliances with fitted handles must be
situated at least 55 mm from the wall on
the hinge side so that the door can
be opened by 90°.
Changing over
the door hinges
(if required)
We recommend that you have the door
hinges changed over by our customer
service. You can find out the costs for
changing over the door hinges from your
appropriate customer service.
m Warning
While changing over the door hinges,
ensure that the appliance is not
connected to the power supply. Pull out
the mains plug beforehand. To prevent
damaging the back of the appliance,
place adequate padding underneath.
Carefully place the appliance on its back.
Installation in numerical sequence.
Fig. !
* Not all models.
en
4
Changing the door
handle
(If required)
Fig. "
Installation in numerical sequence.
Fitting the wall spacer
Fit wall spacers to obtain the indicated
energy absorption of the appliance. A
reduced wall gap will not restrict the
function of the appliance. The energy
absorption may then change slightly.
Fig. #
Installation in numerical sequence.
Aligning the appliance
Place the appliance in the designated
location and align. The appliance must
be level. If the floor is uneven, use
the front height-adjustable feet. Adjust
the height-adjustable feet with a wrench.
fr
5
frTable des matières
frNotice de montageAppareil indépendant
Utiliser la notice de
montage
Veuillez déplier la dernière page,
illustrée, de la notice. Cette notice
de montage vaut pour plusieurs
modèles.
Selon le modèle, l’appareil peut différer
du contenu des illustrations.
Lieu d’installation
Un local sec et aérable convient comme
lieu d’installation. Il faudrait que le lieu
d’installation ne soit pas directement
exposé aux rayons solaires et pas
à proximité d’une source de chaleur
(cuisinière, radiateur, etc.).
Si l’installation à côté d’une source
de chaleur est inévitable, veuillez utiliser
un panneau isolant approprié ou
respecter les écarts minimums suivants
par rapport à la source de chaleur :
3 cm par rapport aux cuisinières
électriques ou à gaz.
30 cm par rapport à un appareil
de chauffage au fuel ou au charbon.
Sur l’emplacement, le sol ne doit pas
s’affaisser. Renforcez-le le cas échéant.
L’appareil doit reposer à la verticale.
Écart mural
Les appareils à poignée saillante
requièrent, sur le côté où la porte bute
contre le mur, un espace d’au moins
55 mm par rapport à ce dernier afin que
la porte puisse s’ouvrir à 90°.
fr
6
Inversion du sens
d’ouverture de porte
(si nécessaire)
Nous recommandons de confier
l’inversion du sens d’ouverture de porte
à notre service après-vente. Pour
connaître le prix d’une inversion du sens
d’ouverture de porte, consultez votre
service après-vente compétent.
m Mise en garde
Pendant le changement du sens
d’ouverture de porte, l’appareil ne doit
pas être relié au secteur. Avant
le changement, débranchez la fiche
mâle de la prise de courant. Pour ne pas
endommager le dos de l’appareil, placez
en dessous suffisamment de matériau
amortisseur. Couchez prudemment
l’appareil sur le dos.
Effectuez le montage dans l’ordre des
chiffres. Fig. !
* Selon le modèle.
Changement du sens
d'ouverture de porte
(si nécessaire)
Fig. "
Effectuez le montage dans l'ordre
des chiffres.
Monter les écarteurs
muraux
Montez les écarteurs muraux pour
parvenir à la quantité mentionnée
d’énergie absorbée par l’appareil. Un
écart moins élevé par rapport au mur ne
restreint pas le fonctionnement de
l’appareil. Dans ce cas, l’énergie
absorbée peut différer légèrement.
Fig. #
Effectuez le montage dans l’ordre des
chiffres.
Ajuster l’appareil
Amenez l’appareil sur l’emplacement
prévu puis ajustez-le pour qu’il se
retrouve bien d’aplomb. Veillez à ce que
l’appareil repose parfaitement d’aplomb
sur un sol plan. Si le sol présente des
inégalités, compensez-les à l’aide des
deux pieds à vis situés à l’avant
de l’appareil. Pour modifier le réglage
des pieds à vis, servez-vous d’une clé
à fourche.
4
ar
ﺏﺎﺒﻟﺍ ﺾﺒﻘﻣ ﺮﻴﻴﻐﺗ
(ﺎﻣﺯﻻ ﻚﻟﺫ ﻥﻮﻛ ﺪﻨﻋ)
ﺓﺭﻮﺼﻟﺍ
.ﺩﺍﺪﻋﻷﺍ ﺐﻴﺗﺮﺘﻟ ﺎﻘﻓﻭ ﻪﺋﺍﺮﺟﺇ ﻢﺘﻳ ﺐﻴﻛﺮﺘﻟﺍ
ﺔﻠﺻﺎﻔﻟﺍ ﺔﻓﺎﺴﳌﺍ ﺩﺪﺤﻣ ﺐﻴﻛﺮﺗ
ﻂﺋﺎﳊﺍ ﻦﻋ
ﻲﻜﻟ ﻚﻟﺫﻭ ﻂﺋﺎﳊﺍ ﻦﻋ ﺔﻠﺻﺎﻔﻟﺍ ﺔﻓﺎﺴﳌﺍ ﺩﺪﺤﻣ ﺐﻴﻛﺮﺗ ﻢﺘﻳ
ﻲﻓ ﺓﺩﺪﶈﺍ ﺔﻗﺎﻄﻠﻟ ﺯﺎﻬﳉﺍ ﻙﻼﻬﺘﺳﺍ ﺔﻤﻴﻗ ﻰﻟﺇ ﻝﻮﺻﻮﻟﺍ ﻢﺘﻳ
ﻂﺋﺎﳊﺍ ﻦﻋ ﺔﻠﺻﺎﻔﻟﺍ ﺔﻓﺎﺴﳌﺍ ﻥﻮﻛ ﺪﻨﻋ .ﺯﺎﻬﳉﺍ ﺕﺍﺪﻨﺘﺴﻣ
ﺀﺍﺩﻷﺍ ﻰﻠﻋ ﺎﻴﺒﻠﺳ ﺮﺛﺆﻳ ﻚﻟﺫ ﻥﺈﻓ ﺏﻮﻠﻄﳌﺍ ﺭﺪﻘﻟﺍ ﻦﻣ ﻞﻗﺃ
ﺮﻴﻐﺘﻳ ﻥﺃ ﻦﻜﳝ ﺔﻗﺎﻄﻟﺍ ﻙﻼﻬﺘﺳﺍ ﻥﺃ ﻻﺇ .ﺯﺎﻬﺠﻠﻟ ﻲﻔﻴﻇﻮﻟﺍ
.ﻂﻴﺴﺑ ﺭﺪﻘﺑ
ﺓﺭﻮﺼﻟﺍ
.ﺩﺍﺪﻋﻷﺍ ﺐﻴﺗﺮﺘﻟ ﺎﻘﻓﻭ ﻪﺋﺍﺮﺟﺇ ﻢﺘﻳ ﺐﻴﻛﺮﺘﻟﺍ
ﺯﺎﻬﳉﺍ ﻊﺿﻭ ﻂﺒﺿ
.ﻪﻌﺿﻭ ﻂﺒﺿ ﻢﺘﻳﻭ ﻪﻴﻓ ﺏﻮﻏﺮﳌﺍ ﻥﺎﻜﳌﺍ ﻲﻓ ﺯﺎﻬﳉﺍ ﺐﺼﻧ ﻢﺘﻳ
ﻊﺿﺍﻮﳌﺍ .ﻱﻮﺘﺴﻣ ﻊﺿﻭ ﻲﻓﻭ ﺕﺎﺒﺜﺑ ﺎﻔﻗﺍﻭ ﻥﻮﻜﻳ ﻥﺃ ﻡﺰﻠﻳ ﺯﺎﻬﳉﺍ
ﻝﻼﺧ ﻦﻣ ﺎﻬﺘﻟﺩﺎﻌﻣ ﻢﺘﻳ ﻥﺃ ﺐﺠﻳ ﺔﻴﺿﺭﻷﺍ ﻲﻓ ﺔﻳﻮﺘﺴﳌﺍ ﺮﻴﻏ
.ﲔﺘﻴﻣﺎﻣﻷﺍ ﲔﺘﺒﻟﻮﻠﳌﺍ ﺯﺎﻬﳉﺍ ﻲﻣﺪﻗ ﻂﺒﺿ
ﻲﻏﺍﺮﺑ ﻚﻔﻣ ﻡﺍﺪﺨﺘﺳﺍ ﻢﺘﻳ ﺔﺒﻟﻮﻠﳌﺍ ﻡﺍﺪﻗﻷﺍ ﻂﺒﺿ ﺮﻴﻴﻐﺘﻟ
.(ﺔﺒﻟﻮﻠﻣ ﺮﻴﻣﺎﺴﻣ)
3
ar
ﺐﻴﻛﺮﺘﻟﺍ ﺕﺎﻤﻴﻠﻌﺗ ﻡﺍﺪﺨﺘﺳﺍ
.ﺔﻴﺣﺎﻀﻳﻹﺍ ﻡﻮﺳﺮﻟﺍ ﻰﻠﻋ ﺔﻳﻮﺘﶈ ﺓﺮﻴﺧﻷﺍ ﺔﺤﻔﺼﻟﺍ ﺢﺘﻓ ﺀﺎﺟﺮﺑ
.ﺓﺩﺪﻌﺘﻣ ﺓﺯﺮﻃﻷ ﺔﻳﺭﺎﺳ ﻩﺬﻫ ﺐﻴﻛﺮﺘﻟ ﺕﺎﻤﻴﻠﻌﺗ ﻥﺃ ﺓﺎﻋﺍﺮﻣ ﻰﺟﺮﻳ
ﺾﻌﺑ ﺩﻮﺟﻭ ﻞﻤﺘﺤﻳ ﻪﻧﺈﻓ ﺔﻴﺣﺎﻀﻳﻹﺍ ﻡﻮﺳﺮﻟﺍ ﻖﻠﻌﺘﻳ ﺎﻤﻴﻓ
.ﺕﺎﻓﻼﺘﺧﻻﺍ
ﺯﺎﻬﳉﺍ ﺐﺼﻧ ﻥﺎﻜﻣ
.ﺔﻳﻮﻬﺘﻟﺍ ﺓﺪﻴﺟﻭ ﺔﻓﺎﺟ ﺔﻓﺮﻏ ﻮﻫ ﺯﺎﻬﳉﺍ ﺐﺼﻨﻟ ﺢﻟﺎﺼﻟﺍ ﻥﺎﻜﳌﺍ
ﺎﺿﺮﻌﻣ ﻥﻮﻜﻳ ﻻﺃ ﺐﺠﻳ ﻪﻴﻓ ﺯﺎﻬﳉﺍ ﺐﺼﻧ ﻢﺘﻳ ﻱﺬﻟﺍ ﻥﺎﻜﳌﺍ
ﺓﺭﺍﺮﺣ ﺭﺪﺼﻣ ﻦﻣ ﺎﺒﻳﺮﻗ ﻥﻮﻜﻳ ﻻﺃﻭ ﺓﺮﺷﺎﺒﻣ ﺲﻤﺷ ﺔﻌﺷﻷ
ﻦﻣ ﻝﺎﺤﻣ ﻥﺎﻛ ﺍﺫﺇ ﺎﻣ ﺔﻟﺎﺣ ﻲﻓ .ﺦﻟﺍ ﺓﺄﻓﺪﻣ ﻭﺃ ﺪﻗﻮﻣ ﻞﺜﻣ
ﻡﺍﺪﺨﺘﺳﺍ ﺐﺠﻳ ﻪﻧﺈﻓ ،ﺓﺭﺍﺮﺣ ﺭﺪﺼﻣ ﻦﻣ ﺏﺮﻘﻟﺎﺑ ﺯﺎﻬﳉﺍ ﺐﺼﻧ
ﲔﺑ ﺔﻠﺻﺎﻓ ﺕﺎﻓﺎﺴﻣ ﻰﻠﻋ ﻅﺎﻔﳊﺍ ﺐﺠﻳ ﻭﺃ ﺐﺳﺎﻨﻣ ﻝﺰﻋ ﺡﻮﻟ
:ﻞﻗﻷﺍ ﻰﻠﻋ ﺎﻫﺭﺪﻗ ﻎﻠﺒﻳ ﺓﺭﺍﺮﳊﺍ ﺭﺪﺼﻣ ﲔﺑﻭ ﺯﺎﻬﳉﺍ
.ﺮﺘﻤﻴﺘﻨﺳ 3 ﻲﺋﺎﺑﺮﻬﻛ ﺪﻗﻮﻣ ﲔﺑﻭ ﺯﺎﻬﳉﺍ ﲔﺑ
.ﺮﺘﻤﻴﺘﻨﺳ 30 ﻢﺤﻓ ﺪﻗﻮﻣ ﻭﺃ ﺖﻳﺯ ﺪﻗﻮﻣ ﲔﺑﻭ ﺯﺎﻬﳉﺍ ﲔﺑ
ﺾﻔﺨﻨﺗ ﻻﺃﻭ ﺔﺒﻠﺻ ﻥﻮﻜﺗ ﻥﺃ ﻡﺰﻠﻳ ﺯﺎﻬﳉﺍ ﺐﺼﻧ ﻥﺎﻜﻣ ﺔﻴﺿﺭﺃ
ﺓﺭﻮﺼﺑ ﺔﻴﺿﺭﻷﺍ ﺔﻳﻮﻘﺗ ﺐﺠﻳ ﻡﻭﺰﻠﻟﺍ ﺪﻨﻋﻭ ،ﺯﺎﻬﳉﺍ ﺖﲢ
.ﻱﺩﻮﻤﻋ ﻊﺿﻭ ﻲﻓ ﺎﺒﺼﺘﻨﻣ ﻥﻮﻜﻳ ﻥﺃ ﻡﺰﻠﻳ ﺯﺎﻬﳉﺍ .ﺔﺒﺳﺎﻨﻣ
ﻂﺋﺎﳊﺍ ﻦﻋ ﺔﻠﺻﺎﻔﻟﺍ ﺔﻓﺎﺴﳌﺍ
ﺔﻓﺎﺴﻣ ﻰﻟ ﺔﺟﺎﺣ ﻲﻓ ﻮﻜﺗ ﺾﺑﺎﻘﻣ ﺎﻬﻴﻓ ﺔﺒﻛﺮﳌﺍ ﺓﺰﻬﺟﻷﺍ
ﺐﻧﺎﺟ ﻰﻠﻋ ﺮﺘﻤﻴﻠﻣ 55 ﻞﻗﻷﺍ ﻰﻠﻋ ﺎﻫﺭﺪﻗ ﻎﻠﺒﻳ ﻂﺋﺎﳊﺍ ﻦﻋ ﺔﻠﺻﺎﻓ
.ﺔﺟﺭﺩ 90 ﺎﻫﺭﺪﻗ ﻳﻭﺍﺰﺑ ﺏﺎﺒﻟ ﺢﺘﻓ ﻮﻜﻳ ﻲﻜﻟ ﻚﻟﺫﻭ ،ﺢﺘﻔﻟ
.ﺮﻴﻴﻐﺘﻟﺍ ﺍﺬﻫ ﺀﺍﺮﺟﺈﺑ ﺎﻨﻟ ﻊﺑﺎﺘﻟﺍ ﺀﻼﻤﻌﻟﺍ ﺔﻣﺪﺧ ﺰﻛﺮﻣ ﻒﻴﻠﻜﺗ
ﺏﺎﺒﻟﺍ ﺢﺘﻓ ﻩﺎﲡﺍ ﺮﻴﻴﻐﺗ
(ﺎﻣﺯﻻ ﻚﻟﺫ ﻥﻮﻛ ﺪﻨﻋ)
ﻢﺘﻳ ﻥﺄﺑ ﻲﺻﻮﻧ ﺎﻨﻧﺄﻓ ﺏﺎﺒﻟﺍ ﺢﺘﻓ ﻩﺎﲡﺍ ﺮﻴﻴﻐﺗ ﻲﻓ ﺔﺒﻏﺮﻟﺍ ﺪﻨﻋ
.ﺮﻴﻴﻐﺘﻟﺍ ﺍﺬﻫ ﺀﺍﺮﺟﺈﺑ ﺎﻨﻟ ﻊﺑﺎﺘﻟﺍ ﺀﻼﻤﻌﻟﺍ ﺔﻣﺪﺧ ﺰﻛﺮﻣ ﻒﻴﻠﻜﺗ
ﻯﺪﻟ ﺏﺎﺒﻟﺍ ﺢﺘﻓ ﻩﺎﲡﺍ ﺮﻴﻴﻐﺗ ﻒﻴﻟﺎﻜﺗ ﻦﻋ ﻡﻼﻌﺘﺳﻻﺍ ﻢﻜﻨﻜﳝ
.ﻢﻜﺑ ﺺﺘﺍ ﺀﻼﻤﻌﻟﺍ ﺔﻣﺪﺧ ﺰﻛﺮﻣ
ﺮﻳﺬﲢ m
ﺓﺪﻛﺆﻣ ﺓﺭﻮﺼﺑﻭ ﺐﺠﻳ ﺯﺎﻬﳉﺍ ﻥﺈﻓ ﺏﺎﺒﻟﺍ ﺢﺘﻓ ﻩﺎﲡﺍ ﺮﻴﻴﻐﺗ ﺀﺎﻨﺛﺃ
.ﻲﺋﺎﺑﺮﻬﻜﻟﺍ ﺭﺎﻴﺘﻟﺎﺑ ﺔﻳﺬﻐﺘﻟﺍ ﺔﻜﺒﺷ ﻦﻋ ﻻﻮﺼﻔﻣ ﻥﻮﻜﻳ ﻥﺃ
ﺲﺑﺎﻗ ﺝﺍﺮﺧﺇ ﺐﺠﻳ ﺏﺎﺒﻟﺍ ﺢﺘﻓ ﻩﺎﲡﺍ ﺮﻴﻴﻐﺗ ﻲﻓ ﻉﻭﺮﺸﻟﺍ ﻞﺒﻗ
.ﻲﺋﺎﺑﺮﻬﻜﻟﺍ ﺭﺎﻴﺘﻟﺎﺑ ﺔﻳﺬﻐﺘﻟﺍ ﺲﺒﻘﻣ ﻦﻣ ﺯﺎﻬﳉﺍ
ﻊﺿﻭ ﺐﺠﻳ ﻪﻧﺈﻓ ﺯﺎﻬﳉﺍ ﺮﻬﻈﺑ ﺭﺮﺿ ﻭﺃ ﻒﻠﺗ ﻱﺃ ﺙﻭﺪﺣ ﺐﻨﺠﺘﻟ
.ﺯﺎﻬﳉﺍ ﺖﲢ ﲔﻄﺒﺘﻟﺍ ﺩﺍﻮﻣ ﻦﻣ ﺎﻴﻓﺎﻛ ﺍﺭﺪﻗ
.ﻩﺮﻬﻇ ﻰﻠﻋ ﺹﺮﺤﺑ ﺯﺎﻬﳉﺍ ﺩﺎﻗﺭﺇ ﻢﺘﻳ
.ﺩﺍﺪﻋﻷﺍ ﺐﻴﺗﺮﺘﻟ ﺎﻘﻓﻭ ﻪﺋﺍﺮﺟﺇ ﻢﺘﻳ ﺐﻴﻛﺮﺘﻟﺍ
ﺓﺭﻮﺼﻟﺍ
ﺕﺍﺯﺍﺮﻄﻟﺍ ﻊﻴﻤﺟ ﻲﻓ ﺪﺟﻮﺗ *
ﺕﺎﻳﻮﺘﶈﺍ ﺱﺮﻬﻓ ar
3 . . . . . . . . . . . . . . . . . . . . . . ﺐﻴﻛﺮﺘﻟﺍ ﺕﺎﻤﻴﻠﻌﺗ ﻡﺍﺪﺨﺘﺳﺍ
3 . . . . . . . . . . . . . . . . . . . . . . . . . . . . . . ﺯﺎﻬﳉﺍ ﺐﺼﻧ ﻥﺎﻜﻣ
3 . . . . . . . . . . . . . . . . . . . . . . . . . . . .ﺏﺎﺒﻟﺍ ﺢﺘﻓ ﻩﺎﲡﺍ ﺮﻴﻴﻐﺗ
4 . . . . . . . . . . . . . . . . . . . . . . . . . . . . . ﺏﺎﺒﻟﺍ ﺾﺒﻘﻣ ﺮﻴﻴﻐﺗ
4 . . . . . . . . . . .ﻂﺋﺎﳊﺍ ﻦﻋ ﺔﻠﺻﺎﻔﻟﺍ ﺔﻓﺎﺴﳌﺍ ﺩﺪﺤﻣ ﺐﻴﻛﺮﺗ
4 . . . . . . . . . . . . . . . . . . . . . . . . . . . . . . ﺯﺎﻬﳉﺍ ﻊﺿﻭ ﻂﺒﺿ
!
!
!
!
"
#
47
48
49
50
52
51
2
3
3
5
1
4
9000670480 (9105) ar, en, fr
*9000670480*
  • Page 1 1
  • Page 2 2
  • Page 3 3
  • Page 4 4
  • Page 5 5
  • Page 6 6
  • Page 7 7
  • Page 8 8
  • Page 9 9
  • Page 10 10
  • Page 11 11
  • Page 12 12
  • Page 13 13
  • Page 14 14

Bosch KDN42AW10N/01 Installation guide

Type
Installation guide
This manual is also suitable for

The Bosch KDN42AW10N/01 is an intelligent freestanding fridge freezer that offers exceptional food preservation and convenience. Its advanced features make it an ideal choice for those seeking a reliable and efficient cooling solution.

With its spacious 366-liter capacity, the Bosch KDN42AW10N/01 provides ample storage space to meet the needs of families and individuals alike. The fridge section features adjustable glass shelves, a VitaFresh drawer for fruits and vegetables, and a dairy compartment, while the freezer section offers three transparent drawers for organized storage.

The innovative VitaFresh system in the fridge compartment maintains optimal humidity levels, helping fruits and vegetables stay fresher for longer periods. The VitaFresh drawer provides two climate zones, one for fruits and the other for vegetables, ensuring ideal storage conditions for each.

Ask a question and I''ll find the answer in the document

Finding information in a document is now easier with AI

in other languages