
Please read this manual carefully before operation and retain it for future
reference.
webOS 3.2
www.lg.com
USER GUIDE
LG Digital
Signage
(MONITOR SIGNAGE)

ENGLISH
2
CONTENTS
SETTINGS ......................................4
- Home .......................................................................................4
[Global Buttons]
[Dashboard]
[Content Manager]
- Ez Setting .............................................................................5
[Video Wall]
[On/Off Scheduler]
[SI Server Setting]
[Server Setting]
[Fail Over]
[Status Mailing]
[Play via URL]
[Setting Data Cloning]
[Sync Mode]
[Signage 365 Care]
[Multi Screen]
- General ................................................................................11
[Language]
[System Information]
[Set ID]
[Time & Date]
[Power]
[Network]
[Safety Mode]
[Expert Controls]
- Display .................................................................................25
[Picture Mode]
[Aspect Ratio]
[Rotation]
[Expert Controls]
- Sound ...................................................................................31
[Sound Mode]
[Sound Out]
[Audio Out]
[Volume Increase Amount]
[AV Sync. Adjust]
[Digital Audio Input]
- Admin ...................................................................................34
[Lock Mode]
[Change PIN Code]
[Enterprise Settings]
[Reset to Initial Settings]
[Factory Reset]

ENGLISH
3
CONTENT MANAGER ................ 36
- Web Login ..........................................................................36
- Content Manager ..........................................................36
[Player]
[Scheduler]
[Template]
- Group Manager 2.0 ......................................................43
- ScreenShare ......................................................................46
MANAGEMENT TOOLS .............. 47
- Control Manager ............................................................47
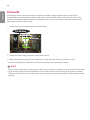
- Picture ID ............................................................................48
TOUCH ........................................ 49
- Touch Assistive Menu ..................................................49
- IDB (Interactive Digital Board)................................50
IR CODE ...................................... 51
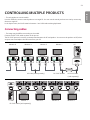
CONTROLLING MULTIPLE
PRODUCTS .................................. 53
- Connecting cables .........................................................53
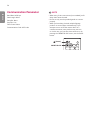
- Communication Parameter ......................................54
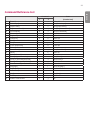
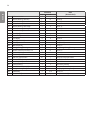
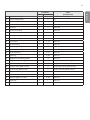
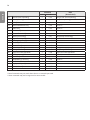
- Command Reference List ..........................................55
- Transmission/Reception Protocol .........................59
To obtain the source code under GPL, LGPL, MPL,
and other open source licenses, that is contained
in this product, please visit
http://opensource.lge.com.
In addition to the source code, all referred license
terms, warranty disclaimers and copyright notices
are available for download.
LG Electronics will also provide open source code
to you on CD-ROM for a charge covering the
cost of performing such distribution (such as the
cost of media, shipping, and handling) upon email
request to opensourc[email protected].
This offer is valid for a period of three years after
our last shipment of this product. This offer is
valid to anyone in receipt of this information.

ENGLISH
4
NOTE
• Software-related content may be changed without prior notice due to upgrades of the product functions.
• Some features described in the User Manual may not be supported in certain models and countries.
• SNMP 2.0 is supported.
SETTINGS
Home
[Global Buttons]
• [MOBILE URL]: Provides information necessary to access the monitor set through an external device's browser.
With this feature, you can view QR code and URL information. In addition, by accessing the URL, you can also run
Content Manager and Group Manager 2.0, and Control Manager. (This featured is optimized for Google Chrome.)
• [Input]: Navigate to the external input selection screen
• [Settings]: Navigate to the Settings screen
[Dashboard]
• This feature displays key information about your Signage monitor in the center of the home screen. In the Dashboard,
you can manually change settings by selecting the corresponding items.
NOTE
• If the dashboard is locked, the focus does not move.
[Content Manager]
• [Player]: Play a variety of content including images, videos, and SuperSign content.
• [Scheduler]: Manage schedules for content that will be played at different times.
• [Template]: You can create your own content using templates and media files.
• [Group Manager 2.0]: Distribute content schedules and setting data to the connected device.

ENGLISH
5
Ez Setting
[Video Wall]
[Ez Setting] [Video Wall]
Set Video Wall options to create a wide visual canvas.
• [Tile Mode]: Turn [Tile Mode] on or off.
• [Tile Mode Setting]: Display a single integrated screen on multiple Signage monitors.
• [Natural Mode]: Display the image excluding the area that overlaps with the monitor's bezel so that the image
displayed has a more natural feel to it.
• [Frame Control]: Adjust the sets that run [Scan Inversion] and frame deviation.
- When running [Scan Inversion], please run [Frame Control] for the sets that do not run [Scan Inversion].
• [Scan Inversion]: Reduce screen deviation between adjoining video walls by changing screen scanning method.
• [White Balance]: Configure white balance settings (White Pattern, R/G/B-Gain, and Luminance).
• [RESET]: Reset to initial settings.
NOTE
• When Tile Mode is enabled, automatically set [Frame Control] for odd numbered rows and [Scan Inversion] for even
numbered rows.
[On/Off Scheduler]
[Ez Setting] [On/Off Scheduler]
Set a schedule to use your signage by time and day of the week.
• [On/Off Time Setting]: Set on/off times for each day of the week.
• [Holiday Setting]: Set holidays by date and by day of the week.
[SI Server Setting]
[Ez Setting] [SI Server Setting]
Set up to connect your signage to an external SI server. Set up a server environment for SI app installation.
[Ez Setting] [SI Server Setting] [Developer Mode & Beanviser]
This feature provides great convenience to the app developers.
Set up to install and activate the Developer mode and BEANVISER app.
NOTE
• To use these features, an account (ID/Password) for webOS Signage developer website (http://webossignage.
developer.lge.com/) is required.

ENGLISH
6
[Server Setting]
[Ez Setting] [Server Setting]
Set up to connect your signage to a SuperSign server.
• CMS servers
• Control servers
[Fail Over]
[Ez Setting] [Fail Over]
This feature enables automatically switching to other input sources in order of priority if the primary signal is
interrupted. It also enables the automatic playback of the content stored on your device.
• [On/Off]: Turns [Fail Over] on or off.
• [Input Priority]: Set the priority of input sources for fail over.
• [Backup via Storage]: Automatically play the content stored on the device when there is no input signal. Set to [On]
to activate Auto, Manual, and [SuperSign Contents].
- Auto: When the automatic input switches due to taking screenshots of an image or video that is playing at regular
intervals, this feature will play back the file. (OLED model is not supported.)
>- [Capture time Interval]: The time interval can be set to 30 min, 1 hour, 2 hours and 3 hours.
- Manual: When the automatic input switches due to the image and video file being uploaded, the feature will play
back the file.
>- [Backup media select]: Using the settings button, you can upload a single file in the internal / external memory.
>- [Preview]: You can preview the uploaded file.
- [SuperSign Contents]: When the automatic input switches, this feature will play the file(s) distributed in SuperSign
CMS.
• [RESET]: Reset to initial settings.
[Status Mailing]
[Ez Setting] [Status Mailing]
This feature configures the system so that the status of the device is assessed and then notified to the administrator
by e-mail.
• [On/Off]: Turns [Status Mailing] on or off.
• [Mailing Option], [SCHEDULE]: Sets the email sending interval.
• [User E-mail Address]: Set the user email address of the sender.
• [Sending Server(SMTP)]: Set the address of the SMTP server.
• [ID]: Enter the account ID of the sender.
• [Password]: Enter the password for the sender's account.
• Recipient E-mail Address: Set the email address of the recipient.
• Message Delivery: Immediately assess the status of the device and deliver the information to the specified email
address.
• [RESET]: Reset to initial settings.

ENGLISH
7
NOTE
• If the status regarding any of the following items changes or becomes abnormal, a status message can be sent.
- 1. Temp. Sensor: If the set reaches a dangerous temperature, its current temperature is recorded, and an email
containing such information is sent.
- 2. Temp. Sensor Validation: An email is sent if there is no temperature sensor connected, if the communication
status of the temperature sensor is unknown, or if the information provided by the chip provider is abnormal.
- 3. LAN Status, Wi-Fi Status: An email is sent if there is a change in the network’s connection status. The maximum
number of network status changes that can be saved is limited to 50. The saved value is reset once the power turns
off.
- 4. Screen Fault Detection: An email is sent if an abnormal value is picked up by the RGB sensor while Screen Fault
Detection is turned on in the Settings.
- 5. No Signal Check: Checks whether there is a signal. If there are no signals for more than 10 seconds, an email is
sent.
- 6. Schedule Play Status: An email is sent if content cannot be played between the scheduled start time and end
time in either Content Management Schedule status or SuperSign Content status. However, this does not apply
when terminated using the remote control.
- 7. Fail Over Status: An email is sent if input switching occurred due to an error. (Excludes input switching initiated
by the user (RC, RS232C, SuperSign))
• Only SMTP ports 25, 465, and 587 are supported.
• The occurrence of internal input switches, excluding external input switches (RC, RS232C, SuperSign), are considered
as Fail Over Status.
• One email containing the “Failover status : Failover” message is sent when switching to Fail Over Status, and the
following status emails sent regularly or upon status changes contain the message “Failover status : None”.

ENGLISH
8
[Play via URL]
[Ez Setting] [Play via URL]
Play content you want to play automatically through the built-in web browser.
• [URL Loader]: Turns [Play via URL] on or off.
• [Set URL]: Enter the URL address to display automatically.
• [Preview]: Preview your desired website by accessing the specified URL.
• [SAVE]: Save the specified URL.
• [Reboot to Apply]: Restarts the monitor set after saving the specified URL.
• [RESET]: Reset to initial settings.
NOTE
• This feature does not apply when [Screen Rotation] is enabled, and using this feature disables [Preview].
• [Time & Date] is not set to [Set Automatically], website navigation may be difficult.
- [General] [Time & Date] Check [Set Automatically]
[Setting Data Cloning]
[Ez Setting] [Setting Data Cloning]
This feature is used to copy and import the settings of the device to other devices.
• [Export Setting Data]: Export the settings of the device to another device.
• [Import Setting Data]: Import the settings of another device into the device.
[Sync Mode]
[Ez Setting] [Sync Mode]
Sync up time and content among multiple signages.
• [RS-232C Sync]: Sync up multiple signages connected by RS-232C.
• [Network Sync]: Sync up multiple signages connected to the same network.

ENGLISH
9
[Signage 365 Care]
[Ez Setting] [Signage 365 Care]
You can install the Signage 365 Care (fault diagnosis) solution for fault diagnosis and prediction service.
• [Install]: Installs the Signage 365 Care solution.
1) [ENTER ACCOUNT NUMBER]: Enters the 6-digit account number to install the Signage 365 Care solution.
- Account Number: The number assigned when the Signage 365 Care solution is registered. When the account
number is entered, the account name corresponding to the number is obtained.
2) [CONFIRM ACCOUNT NUMBER]: Displays the account number and the account name corresponding to the
account number and validates the account number.
- If the account number is registered, the account name corresponding to the account number is displayed, and you
can continue to install the Signage 365 Care solution.
- If the account number is not registered, “Unknown” is displayed as the account name, and you cannot continue to
install the solution.
• [Enable]/[Disable]: Sets whether to Enable/Disable the Signage 365 Care solution.
• [Account]: Displays user’s currently connected account number and name.
• [Version]: Displays the version of the Signage 365 Care solution.
• [Check for Update]: Checks for available updates in the server.
• [Update]: Updates the Signage 365 Care solution to the latest version.
• [Server Status]: Displays the status of connection between the set and server.
- [Connected]: Displayed when the set and server are connected.
- [Not Connected]: Displayed when the set and server are disconnected.
- [Waiting for Approval]: Displayed when the server is waiting for approval.
- [Rejected]: Displayed when the server rejected the connection.
• [Reset]: Deletes the installed Signage 365 Care solution.

ENGLISH
10
[Multi Screen]
[Ez Setting] [Multi Screen]
This feature allows you to view multiple external inputs and videos on a single screen.
NOTE
• After entering multi-screen mode, the screen may flicker and the picture may appear abnormal on certain devices
while the optimal resolution is selected automatically. If this happens, please restart the monitor.
• In multi-screen mode, the DP daisy chain feature is not supported.
[Selecting Screen Layout]
When you enter multi-screen mode without having set any screen layout, the screen layout selection menu appears.
When the screen layout selection menu is not displayed on the screen, go to the screen layout menu bar by pressing
the up arrow key on your remote control and select your desired screen layout. If you want to close the screen layout
menu, press the back key.
[Closing Screen Layout Menu]
From the screen layout menu, press the up arrow key on the remote control to go to the screen layout menu bar and
select it or press the back key to close the screen layout menu.
[Changing Screen Input]
Press the button on the top right of each split screen to select the desired input.
NOTE
• Inputs which have already been selected for other split screens cannot be selected again. To select them, press the
RESET button to reset the inputs for all screens first.
• PIP mode works only when External Input Rotation is set to Off and Screen Rotation is set to Off.
[Playing Videos on Split Screens]
Press the button on the upper right of each split screen, select Video File, and then select a storage device to view
the list of videos in the selected device. Next, select your desired video from the list to play it.
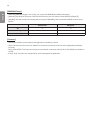
NOTE
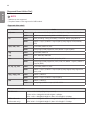
• Videos created with HEVC, MPEG-2, H.264, or VP9 codecs can be played on split screens. When using PIP mode, the
following combinations cannot be used.
Main Sub
HEVC HEVC
H.264 HEVC
MPEG-2 HEVC
VP9 VP9

ENGLISH
11
General
[Language]
[General] [Language]
You can select the menu language to be displayed on the screen.
• [Menu Language]: Sets the language of your Signage monitor.
• [Keyboard Language]: Sets the language of the keyboard displayed on the screen.
[System Information]
[General] [System Information]
This feature displays information such as the device name, software version, and storage space.
[Set ID]
[General] [Set ID]
• [Set ID] (1~1000): Assigns a unique Set ID number to each product when several products are connected via RS-
232C. Assign numbers ranging from 1 to 1000 and exit the option. You can control each product separately by using
the Set ID you assigned to each product.
• [Auto Set ID]: Automatically assigns a unique Set ID number to each product when several products are connected
for display.
• [Reset ID]: Reset the Set ID of the product to 1.
[Time & Date]
[General] [Time & Date]
This feature enables you to view and change the time and date on the device.
• [Set Automatically]: Set [Time] and [Date].
• [Daylight Saving Time]: Set the start and end times for Daylight Saving Time. The DST start/end times function only
when you set them more than one day apart from each other.
• [NTP Server Setting]: Allows you to set other NTP servers other than the basic NTP server.
• [Time Zone]: Configure the continent, country/region and city.

ENGLISH
12
[Power]
[General] [Power]
Power-related feature settings
[No Signal Power Off (15 Min)]
Set whether to use the 15 Min Auto Off feature.
• You can set this option to [On] or [Off].
• If you set this feature to [On], the product turns off when it has remained in No Signal status for 15 minutes.
• If you set this feature to [Off], the 15 Min Force Off feature is disabled.
• It is recommended that you set this feature to [Off] if you intend to use the product for long periods of time as the
feature turns the power of the product off.
[No IR Power Off (4hour)]
Set whether to use 4 Hours Off feature.
• You can set this option to [On] or [Off].
• If you set this feature to [On] the product turns off if there is no input from the remote control for 4 hours.
• If you set this feature to [Off], the 4 Hours Off feature is disabled.
• It is recommended that you set this feature to [Off] if you intend to use the product for long periods of time as the
feature turns the power of the product off.
[DPM]
Set the Display Power Management (DPM) mode.
• If this feature is not set to [Off], the monitor will enter DPM mode when there is no input signal.
• If you set this feature to [Off], [DPM] is disabled.
[DPM Wake Up Control]
Turns on the set according to the digital signal processing of the connected DVI-D/HDMI port.
• [Clock], the set only checks for digital clock signals and turns on once it finds the clock signal.
• [Clock+DATA], the set turns on if the digital clock and data signals are both input.

ENGLISH
13
[PM Mode]
• [Power Off(Default)]: Sets the normal DC off mode.
• [Sustain Aspect Ratio]: Identical to normal DC off mode except that the Switching IC remains on. On some models,
this applies only to a specific input mode (DisplayPort) and has the same effect as [Screen Off Always] in other input
modes.
• [Screen Off]: Switches to [Screen Off] status when entering DPM, Auto Power Off (15 mins, 4 hours), or Abnormal
Shut Down mode.
• [Screen Off Always]: Switches to [Screen Off] status when entering DPM, Auto Power Off (15 mins, 4 hours), Off
Time Scheduling, or Abnormal Shut Down mode, or when there is input from the remote control’s Power button or
the monitor’s Off button.
• [Screen Off & Backlight On]: Partially turns on the backlight to keep the display at a proper temperature when in
Screen Off status.
NOTE
• In order for the screen to switch from [Screen Off] to On status, there must be input from the remote control's
Power or Input button, or the monitor's On button.
[Power On Delay (0~250)]
• This feature prevents overload by implementing a power-on delay when multiple monitor sets turn on.
• You can set the delay interval in the range of 0 to 250 seconds.
[Power On Status]
• Select the operating status of the monitor when the main power has turned on.
• You can choose from among [PWR (Power On)], [STD (Standby)], and [LST (Last Status)].
• [PWR (Power On)] keep the monitor powered on when the main power has turned on.
• [STD (Standby)] switch the monitor to Standby status when the main power has turned on.
• [LST (Last Status)] switches the monitor back to its previous status.
[Wake On LAN]
• Set whether to use [Wake On LAN].
• You can set the feature to On or Off for each wired/wireless network.
• [Wired]: When set to [On], the [Wake On LAN] feature is enabled, letting you turn the product on remotely through
a wired network.
• [WiFi]: When set to [On], the [Wake On LAN] feature is enabled, letting you turn the product on remotely through a
wireless network.

ENGLISH
14
[Power Indicator]
• This function enables you to change the [Power Indicator] settings.
• Setting to [On] will turn on [Power Indicator].
• Setting to [Off] will turn off [Power Indicator].
• Regardless of [On] or [Off] settings in [Power Indicator], [Power Indicator] will be turned on for approximately 15
seconds.
[Power On/Off History]
Display the device's power on/off history.
[Network]
[General] [Network]
[Wired Connection (Ethernet)]
• [Wired Connection]: Connects the monitor to a local area network (LAN) via the LAN port and configures wired
network settings. Only wired network connections are supported. After setting up a physical connection, the display
will automatically connect without any adjustments on most networks. A small number of networks may require the
display settings to be adjusted. For detailed information, contact your Internet provider or consult your router manual.
[Wi-Fi Connection]
If you have set your monitor up for a wireless network, you can view and connect to available wireless Internet
networks.
• [Add a Hidden Wireless Network]: You can add a wireless network by manually typing in its name.
• [Connect via WPS PBC]: Press the button on the wireless router that supports PBC to easily connect to the router.
• [Connect via WPS PIN]: Enter the PIN number in the web page of the PIN-supporting wireless router to connect to
the router in a simple manner.
• [Advanced Wi-Fi Settings]: When there is no available wireless network displayed on the screen, you can connect to
the wireless network by entering the network information directly.
NOTE
• On models that support Wi-Fi dongles, the Wireless Network Connection menu is enabled only when a Wi-Fi dongle
is connected.
• When connected to a network that supports IPv6, you can select IPv4 / IPv6 in the wired / wireless network
connection. But, IPv6 connection only supports automatic connection.

ENGLISH
15
[LAN Daisy Chain]
• LAN Daisy Chain forms a daisy chain of LAN ports so that even if you connect only one monitor set to a network, the
other sets in the daisy chain are connected to the network.
• However, the first monitor set in the daisy chain must be connected to the network through a port that is not used
for the daisy chain connection.
[SoftAP]
If you set up a SoftAP, you can connect many devices via a Wi-Fi connection without a wireless router and use wireless
Internet.
• You must have an Internet connection.
• The SoftAP and ScreenShare features cannot be used at the same time.
• On models that support Wi-Fi dongles, the SoftAP menu is enabled only when a Wi-Fi dongle is connected to the
product.
• SoftAp Access Information
- SSID: A unique identifier necessary to make a wireless Internet connection
- Security key: The security key you enter to connect to the desired wireless network
- Number of connected devices: Shows the number of devices currently connected to your Signage device via a Wi-Fi
connection. Up to 10 devices are supported.
[UPnP]
Open and block UDP port 1900, which is used for UPnP.
• The default setting is [On]. Setting this feature to [Off] blocks UDP port 1900, making the UPnP function
unavailable.
• If you set this feature to [Off], Sync Mode's "Network" option will be deactivated. When the value for Sync Mode is
"Network," the value switches to [Off], deactivating the "Network" option.
• If you change the UPnP value, the change will not be applied before a reboot.
• If you set UPnP to [Off], you cannot use Group Manager 2.0 properly.
[Ping Test]
Check your network connection status via Ping Test.
[Port Control]
Unused ports can be blocked for network security.
[Connection Domain]
Change domain for checking network connection.
NOTE
• A reboot is recommended for the settings to be applied properly.

ENGLISH
16
Tips for Network Settings
• Use a standard LAN cable (Cat5 or higher with a RJ45 connector) with this display.
• Many network connection problems during set up can often be fixed by re-setting the router or modem. After
connecting the display to the home network, quickly power off and/or disconnect the power cable of the home
network router or cable modem, Then power on and/or connect the power cable again.
• Depending on the Internet service provider (ISP), the number of devices that can receive INTERNET service may be
limited by the applicable terms of service. For details, contact your ISP.
• LG is not responsible for any malfunction of the display or Internet connection failures due to communication errors/
malfunctions associated with your Internet connection or other connected equipment.
• LG is not responsible for problems within your INTERNET connection.
• You may experience undesired results if the network connection speed does not meet the requirements of the
content being accessed.
• Some INTERNET connection operations may not be possible due to certain restrictions set by the Internet service
provider (ISP) supplying your Internet connection.
• Any fees charged by an ISP including, without limitation, connection charges are your responsibility.
NOTE
• If you want to access the Internet directly on your display, the INTERNET connection should always be on.
• If you cannot access the Internet, check the network conditions from a PC on your network.
• When you use Network Setting, check the LAN cable or check if DHCP in the router is turned on.
• If you do not complete the network settings, the network may not function correctly.
CAUTION
• Do not connect a modular phone cable to the LAN port.
• Since there are various connection methods, please follow the specifications of your telecommunication carrier or
INTERNET service provider.
• Network setting menu will not be available until the display connected to physical network.

ENGLISH
17
Tips for When Configuring Wireless Network Settings
• The wireless network may be affected by interference from a device that uses 2.4 GHz frequency, such as a wireless
telephone, Bluetooth device or microwave. Interference may also be caused by a device that uses 5 GHz frequency
such as Wi-Fi devices.
• The wireless network service may run slowly depending on the surrounding wireless environment.
• Some devices may have a network traffic jam if any local home networks are turned on.
• To connect to a wireless router, a router that supports wireless connection is necessary; the wireless connection
function of the corresponding router must also be activated. Ask the router manufacturer whether the router
supports wireless connection.
• To connect to a wireless router, verify the SSID and security settings of the wireless router. Please refer to the user
guide of the corresponding router regarding SSID and security settings of the wireless router.
• The monitor may not work properly if network devices (wire/wireless router or hub, etc.) are incorrectly set up. Be
sure to install the devices correctly by referring to their user guides before configuring the network connection.
• The connection method may vary according to the manufacturer of the wireless router.

ENGLISH
18
[Safety Mode]
[General] [Safety Mode]
Set to this function for safe performance.
[ISM Method]
If a still image is displayed on the screen for an extended period of time, image sticking can occur. The ISM method is a
feature that prevents image sticking.
[Mode]
• Selects the desired [ISM Method] mode.
• [Normal]: Disables the ISM method.
• [Inversion]: Inverts screen colors to remove image sticking. (This option is disabled when the current input source is
No Signal.)
• [Orbiter]: Moves the screen display by 4 pixels in a certain order to prevent image sticking. (This option is disabled
when the input source is No Signal.) (OLED model is not supported.)
• [White Wash]: Displays a white pattern to remove image sticking.
• [Color Wash]: Alternately displays a white pattern and a color pattern to remove image sticking.
• [Washing Bar]: Displays a bar on the screen to make the image move smoothly. You can download your desired image
and display it on the bar.
• [User Image]: Displays your desired images using USB. (OLED model is not supported.)
• [User Video]: Plays your desired video.
[Repeat]
• [Off, just 1 time]: If you select the desired mode and press DONE, ISM operates immediately.
• [On]: If the screen remains still for a specified wait time, ISM operates for the specified duration time.
• [On, with moving detection]: Only applies to Orbiter mode. If the screen remains still for the specified Wait time, ISM
operates for the specified Duration time.
• [On, without moving detection]: Only applies to Orbiter mode. ISM immediately starts operating and continues to
operate as soon as the DONE button is clicked.
• [Schedule]: Enables ISM feature in accordance with the set date, start time, and end time.
[Wait]
• You can set the time between 1–24 hours.
• This option is available only when you have set [Repeat] to [On].
• The ISM feature starts when the image freezes for a specified period of time.

ENGLISH
19
[Duration]
• You can select from among 1–10 mins/20 mins/30 mins/60 mins/90 mins/120 mins/180 mins/240 mins.
• This option is available only when you have set [Repeat] to [On].
• ISM operates for the specified time.
[Select Day]
• You can set the date.
• This option is available only when [Repeat] is set to [Schedule].
[Start Time]
• Set the Start time.
• This option is available only when [Repeat] is set to [Schedule].
• You cannot set the same time for Start time and End time.
[End Time]
• Set the End time.
• This option is available only when [Repeat] is set to [Schedule].
• You cannot set the same time for Start time and End time.
[Action Cycle]
• You can select from among 1–10 mins/20 mins/30 mins/60 mins/90 mins/120 mins/180 mins/240 mins.
• This option is available only when you have selected [Inversion] or [Orbiter].
• [Orbiter]: Moves the position of the screen at specified intervals.
• [Inversion]: Inverts the screen color at specified intervals.

ENGLISH
20
[Bar Image]
• [Off]: Displays a bar with a fixed resolution of 300 x 1080, then moves the bar.
• [On]: Displays and moves an image downloaded by the user. The image is displayed with a fixed height of 1080 and
the same width as downloaded. However, if the width of the image is below 300, it will have a fixed value of 300.
• This option is available only when you have selected [Washing Bar].
• If you have downloaded only one image, the bar is moved and the image is displayed alone.
• If you have downloaded multiple images, up to four images are displayed in sequence per cycle.
[Bar Color]
• You can choose from six colors: red, green, blue, white, black, and gray.
• This feature is only applicable when [Bar Image] is set to [Off].
• This option is available only when you have selected [Washing Bar].
[Transparency]
• [Off]: Displays the bar opaquely.
• [On]: Displays the bar translucently. (Transparency: 50 %)
• This option is available only when you have selected [Washing Bar].
[Direction]
• [Left To Right]: The bar is moved from left to right.
• [Right To Left]: The bar is moved from right to left.
• This option is available only when you have selected [Washing Bar].
Page is loading ...
Page is loading ...
Page is loading ...
Page is loading ...
Page is loading ...
Page is loading ...
Page is loading ...
Page is loading ...
Page is loading ...
Page is loading ...
Page is loading ...
Page is loading ...
Page is loading ...
Page is loading ...
Page is loading ...
Page is loading ...
Page is loading ...
Page is loading ...
Page is loading ...
Page is loading ...
Page is loading ...
Page is loading ...
Page is loading ...
Page is loading ...
Page is loading ...
Page is loading ...
Page is loading ...
Page is loading ...
Page is loading ...
Page is loading ...
Page is loading ...
Page is loading ...
Page is loading ...
Page is loading ...
Page is loading ...
Page is loading ...
Page is loading ...
Page is loading ...
Page is loading ...
Page is loading ...
Page is loading ...
Page is loading ...
Page is loading ...
Page is loading ...
Page is loading ...
Page is loading ...
Page is loading ...
Page is loading ...
Page is loading ...
Page is loading ...
Page is loading ...
Page is loading ...
Page is loading ...
Page is loading ...
Page is loading ...
Page is loading ...
Page is loading ...
Page is loading ...
Page is loading ...
Page is loading ...
Page is loading ...
-
 1
1
-
 2
2
-
 3
3
-
 4
4
-
 5
5
-
 6
6
-
 7
7
-
 8
8
-
 9
9
-
 10
10
-
 11
11
-
 12
12
-
 13
13
-
 14
14
-
 15
15
-
 16
16
-
 17
17
-
 18
18
-
 19
19
-
 20
20
-
 21
21
-
 22
22
-
 23
23
-
 24
24
-
 25
25
-
 26
26
-
 27
27
-
 28
28
-
 29
29
-
 30
30
-
 31
31
-
 32
32
-
 33
33
-
 34
34
-
 35
35
-
 36
36
-
 37
37
-
 38
38
-
 39
39
-
 40
40
-
 41
41
-
 42
42
-
 43
43
-
 44
44
-
 45
45
-
 46
46
-
 47
47
-
 48
48
-
 49
49
-
 50
50
-
 51
51
-
 52
52
-
 53
53
-
 54
54
-
 55
55
-
 56
56
-
 57
57
-
 58
58
-
 59
59
-
 60
60
-
 61
61
-
 62
62
-
 63
63
-
 64
64
-
 65
65
-
 66
66
-
 67
67
-
 68
68
-
 69
69
-
 70
70
-
 71
71
-
 72
72
-
 73
73
-
 74
74
-
 75
75
-
 76
76
-
 77
77
-
 78
78
-
 79
79
-
 80
80
-
 81
81


Ask a question and I''ll find the answer in the document
Finding information in a document is now easier with AI
Related papers
Other documents
-
Barco SOperate User guide
-
LockeyUSA EC Series Operating instructions
-
Conceptronic 1300053 Datasheet
-
Sungale CPF1909 User manual
-
Tuya DC-68 Operating instructions
-
 Motoman DX100 User manual
-
Gefen EXT-HD-DSMP User manual
-
Hisense GoClick HT002 User guide
-
 Innosys IDB-02S User manual
-
QNAP IS-1620-US Datasheet

