Page is loading ...

281112rev1
Model No: 40100126
Benson Multi-Purpose Fire Pit
Instruction Manual
®
Read the instructions and precautions before use of this product
Please keep this instruction manual for future reference
For warranty information, please refer to the back page of
this instruction manual.
Due to ongoing product development
the actual product or products may vary from
the illustrations or photos shown within this manual.
NOTE: This product is intended for residential, non-commercial use.
Made in China
©2012 World Factory, Inc.
Distributed by:
World Factory, Inc.
Westlake, TX 76262
For Manuals, Replacement Parts or Customer Service visit:
www.ezreplacement.com
Limited Warranty
World Factory, Inc. Products for Home Use
World Factory, Inc. (Seller) warrants to the original Buyer only, that each Astonica Product will be free
from defects in material and workmanship for a period of one (1) year from date of purchase.
SELLER’S SOLE OBLIGATION AND BUYER’S EXCLUSIVE REMEDY UNDER THIS LIMITED
WARRANTY SHALL BE THE REPAIR OR REPLACEMENT OF PARTS, WITHOUT CHARGE, WHICH
ARE DEFECTIVE IN MATERIAL OR WORKMANSHIP. ANY PARTS AS DETERMINED BY THE SELLER
WHICH HAVE BEEN MISUSED; ABUSED OR DAMAGED EITHER DIRECTLY OR INDIRECTLY FROM
REPAIRS OR ALTERATIONS ATTEMPTED BY UNAUTHORIZED PERSONS; IMPROPER
MAINTENANCE, NEGLECT OR ACCIDENT ARE NOT COVERED BY THIS LIMITED WARRANTY. This
warranty does not apply to damage, heat-induced coloration changes, scratching or alteration due to
normal use or weathering. To make a claim under this Limited Warranty, you must return the complete
product with proof of purchase, transportation prepaid, to any World Factory, Inc. authorized service
center. Call 1-888-422-7800 or visit: ezreplacement.com for the location of the nearest authorized
service center.
Additional Limitations
THIS LIMITED WARRANTY DOES NOT APPLY TO ACCESSORY OR CONSUMABLE ITEMS RELATED
TO THIS PRODUCT. ALL IMPLIED WARRANTIES SHALL BE LIMITED IN DURATION TO ONE (1)
YEAR FROM DATE OF PURCHASE. IN NO EVENT SHALL SELLER BE LIABLE FOR ANY INCIDENTAL
OR CONSEQUENTIAL DAMAGES, INCLUDING BUT NOT LIMITED TO LIABILITY FOR LOSS OF
PROFITS, ARISING FROM THE SALE OR USE OF THIS PRODUCT.
If any provision of this Limited Warranty is for any reason held to be invalid or unenforceable, such
provision shall not affect any other provision herein, this Limited Warranty shall be construed as if
such invalid and/or unenforceable provision had never been contained herein.
This warranty gives you special legal rights, and you may also have other rights which vary from state
to state.
This Warranty contains the entire agreement between Seller and Buyer and supersedes any and all
prior agreements, arrangements, or understandings between the parties relating to product warranty.

14
NOTE: This product is intended for residential, non-commercial use.
WARNING
WARNING
Read all safety information contained in this manual before operating grill.
1. Failure to follow the Dangers, Warnings and Cautions contained in this Manual may result in
serious bodily injury or death, or in a fire or an explosion causing damage to property.
2. Do not use indoors! This grill is designed for outdoor use only. If used indoors, toxic fumes will
accumulate and cause serious bodily injury or death.
3. Only use grill outdoors in a well-ventilated area. Do not use in a garage, building, breezeway or
any other enclosed area.
4. Do not use this grill under canopies, awnings or any overhead combustible construction.
5. Do not use this grill within five feet of any combustible material. Combustible materials include,
but are not limited to wood or treated wood decks, patios and porches.
6. Improper assembly may be dangerous. Follow the assembly instructions in this manual. Do not
use grill unless all parts are in place. Make sure either the ash can is properly attached to the
legs, before lighting the grill.
7. Do not add charcoal starter fluid or charcoal impregnated with charcoal lighter fluid to hot or
warm charcoal. Cap starter fluid after use, and place a safe distance away from the grill.
8. Do not use gasoline, alcohol or other highly volatile fluids to ignite charcoal. If using charcoal
starter fluid, remove any fluid that may have drained through the bottom vents before lighting
the charcoal.
9. Do not overfill the bowl of your grill. It should only be filled to a maximum of 70% of its capacity
with charcoal or charcoal briquettes.
10. Use care when operating grill. It will be hot during cooking and should never be left unattended
during use.
11. Do not leave infants, children or pets unattended near a hot grill.
12. Do not attempt to move a hot grill. Allow the grill to cool before moving.
13. Do not remove ashes until all charcoal is completely burned out and are fully extinguished and
grill is cool.
14. Do not use grill in high winds.
15. Keep the grill on a secure, level surface at all times, clear of combustible material.
16. Never touch the cooking grate, ashes, charcoal or the grill to see if they are hot.
17. Grill mitts should always be worn while cooking, adjusting grill (grate) and adding charcoal.
18. Use proper grill tools, with long, heat-resistant handles.
19. Never dump hot coals where they might be stepped on or be a fire hazard. Never dump ashes
or coals before they are fully extinguished. Do not store grill until ashes and coals are
fully extinguished.
20. The use of alcohol, prescription or non-prescription drugs may impair the consumer’s ability to
properly assemble or safely operate the grill.
21. Not for use or installed in or on recreational vehicles and/or boats
22. Follow safe food handling practices when using chopping / preparation board and store
board inside.
23. Follow charcoal manufactures instruction for safe handling and use of product selected.
Combustion by-products produced when using this product contain chemicals known to the State
of California to cause cancer, birth defects or other reproductive harm.
GREAT CARE HAS BEEN TAKEN DURING PRODUCTION TO REMOVE SHARP EDGES BUT YOU SHOULD
HANDLE ALL COMPONENTS WITH CARE TO AVOID POSSIBLE INJURY.
DO NOT USE WATER TO COOL THE FIRE PIT AFTER USING, LET THE BOWL NATURALlY COOL TO
AVOID PAINT CRACKING AND PEELING.
CAUTION
PRE-ASSEMBLY CHECKLIST
1. To assure fast and easy assembly, follow the instructions below in their proper sequence.
2. Check all parts carefully and compare to the parts lists.
3. Report any missing parts to customer service at ezreplacement.com or call 1-888-422-7800.
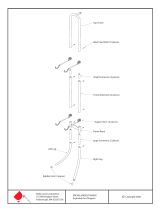
PARTS & HARDWARE LIST
PART# DESCRIPTION QUANTITY
A Leg Post 4
B Table Top Frame 4
C Fire Box 1
D Grill Grate
1
E Fire Screen Lid
1
F Connector Bracket
4
G Leg Support 4
H Log Grate 1
I Coffee Tabletop 1
J Log Rack 1
K Hex Key 1
L Bolt M6x12mm
24
M Bolt M6x15mm
8
N Flathead Bolt M6X12mm
8
O Grate Tool
1
P Fire Screen Ring 1
Carefully remove the contents from the package. If any parts are missing do not
attempt to use the product until they have been obtained and correctly installed.
D
N
E
F
K
BC
LOPM
H
A
G
IJ
Parts Detail

32
Figure 6
Figure 7
Figure 5
ASSEMBLY INSTRUCTIONS
P
D
E
C
C
H
I
J
5. (FIGURE 5) Turn the assembled fire pit frame
right side up on a flat surface. Place fire box (C)
on the base and place log grate (H) inside.
Place grill grate (D) on the fire box (C). Insert
the log rack (J) underneath the fire box on
the leg supports (G). Option 1:The fire pit can
now be used for cooking.
6. (FIGURE 6) Option 2: Remove grill grate (D).
Place the coffee tabletop (I) on top of fire
box (C). The fire pit can now be used as a
coffee table.
7. (FIGURE 7) Option 3: Remove coffee tabletop.
Place the fire screen lid (E) on top of the fire
box. Thread the fire screen ring (P) in the hole
on top of the lid. The fire pit is ready to be used
as a fire pit.
ASSEMBLY INSTRUCTIONS
Figure 1
Figure 2
Figure 3
Figure 4
K
F
F
B
B
B
A
A
A
A
N
L
L
L
M
M
G
CAUTION: Do not over tighten fasteners.
1. (FIGURE 1) Place all 4 tabletop frame pieces (B)
on a non-scratch surface upside down to
form a square. Use Bolts (L) to attach pieces.
2. (FIGURE 2) Attach connector brackets (F) to
leg posts (A) by using flathead bolts (N).
Tighten the bolts (N) with the hex key (K).
3. (FIGURE 3) Attach the leg assembly (A,F) to the
tabletop frame (B) using bolts (M). Make sure
the holes in the middle of the leg posts
face inward.
4. (FIGURE 4) Mount leg supports (G) to the
holes in the middle of the leg posts (A) using
bolts (L). Tighten all the bolts with the hex
key (K) until all pieces fit together securely.
G
/