Page is loading ...

600MM WIDE ADJUSTASTAIRS
INSTRUCTIONS – SAFETY, ASSEMBLY & OPERATION
PORTABLE STAIRS
www.safesmartaccess.com
CALL +1 (310) 410 1525
Users of Safesmart Access AdjustaStairs please read the
following instructions carefully and do not use the stair until
the instructions have been read and understood.
The AdjustaStairs is designed and manufactured to the
requirements of and AS/NZS 1576:1-2010 & 3-2015.
Any operator expected to use or install the Stair should have
received training in its safe use and have conducted a risk
assessment prior to use.
There is further general information on safe working at
heights in the following websites:
www.workcover.nsw.gov.au & www.dol.govt.nz/worksafe/
SafeSmart USA
13238 Florence Ave
Santa Fe Springs
CA 90034
PHONE +1 (310) 410 1525
www.safesmartaccess.com

INSTRUCTIONS – SAFETY, ASSEMBLY & OPERATION
PORTABLE STAIRS
600MM WIDE ADJUSTASTAIRS
MAINTENANCE
• The AdjustaStairs should be checked monthly for damage such as dents, stress cracks, weld cracking, buckling,
missing components, damaged hardware and the like. Details of checks should be recorded in the company’s
plant maintenance records.
• If any of the above defects are discovered these should be immediately reported to the workshop manager/site
supervisor for replacement or repair. Use of the Safety Stair should be discontinued until it has been cleared safe
for use.
• Check that the step pivot bolts/nuts are secure before each use. Ensure there are at least 2 turns of bolt thread
visible beyond the nylon nuts. Note; nuts must not be over-tightened as this will reduce the adjustability of the
stair.
• Ensure each step is kept clean of rubbish and grease etc. Clean it regularly with a standard cleaning agent and
water.
All replacement components used in AdjustaStairs must be supplied by Easy Access Company.
OPERATION
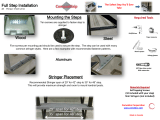
• Place the stair on the support surface with the top step facing the xing location.
• Using two people each side of the stair, raise the top step end of the stair and place it on to the xing location.
Adjust the angle of the steps to ensure they are level and the notch in the top step ts rmly onto the support
position. Note; the top step xing area must be a rigid surface e.g. steel beam, concrete or timber (minimum 100
x 50mm). It must not be an earth or gravel edge.
• Remove the wing-nut from the hand tightened bolt in the upper stringer and remove the bolt.
• Slide the bolt into the slot in the handrail post and through the hole in the upper stringer. Ensure the head of the
bolt ts into the groove in the handrail post extrusion.
• Slide the nylon washer over the bolt and reattach the wing-nut. Tighten the wing-nut at this time.
• The above steps are to be completed on each handrail post.
• The standard angle of slope range for a Safety stair is 30 - 45 degrees. The operator must face away from the
stair when descending and maintain 3 points of contact when ascending and descending.
• The Safety stair can also be used at a 65 - 75 degree range, however, the operator must descend the stair facing
it and maintain 4 points of contact during ascending and descending.
• Fix the top step onto the support rail using either timber coach screws (minimum M10 x 50mm), Bolts (minimum
M10, 8.8) or concrete sleeve anchors (minimum M10 x 50mm). Note: The Safety stair requires a minimum of four
xings to the top support surface and two at the base.
• Fix the base angle brackets into the support surface using the same fastenings as the top step. Note; compacted
gravel may be used as a base support surface. In this instance drive a minimum 300mm length of Rebar through
the hole in the base angle brackets to secure them to the support surface.
• If Strutlocks are tted to the stair; swivel these into the receiving brackets with locking nut above as shown.
Adjust the nut to suit nal stair height, locking the stair
in correct position. Note: If a Safety stair is tted with
Strutlocks it requires a minimum of two xings to the top
support surface.
Your stair is now ready for use.
A
A
STRUTLOCK (A)

INSTRUCTIONS – SAFETY, ASSEMBLY & OPERATION
PORTABLE STAIRS
SAFETY
The manufacturer’s recommended maximum safe working load limit is displayed on the AdjustaStairs and must
not be exceeded at any time.
DO NOT USE THE ADJUSTASTAIRS:
• If the total load will exceed the manufacturer’s SWL.
• If the user is affected by alcohol or drugs.
• If any conductors of an overhead electrical powerline are less than 4mtrs from the Safety Stair.
• If the Safety Stair has not be xed securely to the support surface according to manufacturer’s instructions both
at the top and base.
• If the Safety Stair handrails are not in place with bolts securely tightened.
• If the Safety Stair has not been subjected to regular maintenance checks or is known to be defective.
• When the steps are greasy or slippery and poor footing results.
• If the Safety Stair has not been installed correctly and been signed off as t for use by the site safety supervisor
or person authorized to do so.
• If the angle of slope of the Safety stair is outside the ranges mentioned in the manufacturers instructions.
STORAGE
AdjustaStairs may be stored outdoors.
600MM WIDE ADJUSTASTAIRS

INSTRUCTIONS – SAFETY, ASSEMBLY & OPERATION
PORTABLE STAIRS
ACCESSORIES
LIFTING LUGS
• Attach to any aluminum AdjustaStairs model.
• Enables the Adjustastair to be lifted by a crane
or mechanical device by attaching certied
strops/chains to Lifting lugs.
• Ensure the operator is competent in the use of
the lifting device.
• 4x Lifting lugs spaced evenly, 2x each side of
the stair enables a horizontal lift.
600MM STEP ATTACHMENT*
• Attaches to the bottom of any 600mmW
AdjustaStairs model to add an extra 600mm of
height.
• Can also be used as an independent step or
stair where space is limited.
• Ensure the brackets at the base of the
Adjustastair are rmly bolted to the top of the
Step extension using Grade 8.8 M10 bolts/
nyloc nuts.
SCAFFOLD MOUNT HOOK
• Attaches to the top xing plate of the
AdjustaStairs and clamps stairs to a scaffold
tubular ledger.
• Ensure top step is level and the clamps rmly
tightened before using the Adjustastair.
BEAM COUPLER
• Beam coupler can be used in conjunction
with Scaffold mount hooks an enables the
Adjustastair to attach to a xed member.
• Coupler a section of 50 x 3mm tube to the
mount hook so that it protrudes either side of
the top step a minimum of 100mm.
• Attach the Beam coupler to the protruding
ends of the tube and the supporting xed
member.
• Ensure the top step is level and all ttings are
rmly tightened before using the Adjustastair.
* 1200mmW Step Attachment option available
STRUTLOCKS
• Designed to hold AdjustaStairs at a set angle when the xing plate cannot be secured
(e.g. when used for access to a truck tray).
• Perfect for when AdjustaStairs are used on a batter or slope.
• Come as standard with all aluminium models.
600MM WIDE ADJUSTASTAIRS

INSTRUCTIONS – SAFETY, ASSEMBLY & OPERATION
PORTABLE STAIRS
ACCESSORIES
JOINING TRUSS
• The truss attaches under the bottom stringers
allowing two stairs to be joined together end
to end.
• Remove the base angle brackets on the upper
stair and mount them facing inwards on the inside
of the stringers.
• Attach the upper stair to the lower one by tting
M10 x 30mm bolts through the base brackets into
corresponding holes in the top step of the lower
stair. Tighten nyloc nuts rmly.
• Fit the ‘C’ shaped brackets over the bottom stair
stringers spacing it evenly across the join between
the stairs. Tighten the nyloc nuts rmly.
• Note; where the combination of two stairs
equals a total length greater than 15 steps and
the conguration is a clear span there must be
a central support post tted under the stair to
ensure the SWL is maintained.
AdjustaStairs may be joined
for use on a batter or
embankment without the
need for the use of a truss.
600MM WIDE ADJUSTASTAIRS
Mount the base angle
bracket facing inwards on
the inside of the stringers.
Attach the upper stair
by bolting the base
bracket to the top step
of the lower stair.
Fit the C shape bracket
to to the underside
of both stairs, evenly
spanning the two.

www.safesmartaccess.com
CALL +1 (310) 410 1525
INSTRUCTIONS – SAFETY, ASSEMBLY & OPERATION
PORTABLE STAIRS
The manufacturers or supplier will not accept liability for injury or damage resulting from product failure
due to misuses, abuse, faulty installation and alteration, lack of reasonable care, lack of adequate training,
use not listed under these Operational Safety Instructions or any other failure not related to defects in
materials or manufacture.
YOUR ADJUSTASTAIRS STAIR IS NOW FULLY ASSEMBLED. PLEASE ENSURE THAT ALL USERS HAVE READ
THE OPERATIONAL AND SAFETY INSTRUCTIONS LABEL ON THE ADJUSTASTAIRS PRIOR TO USING IT.
THANK YOU FOR TAKING THE TIME TO READ THESE INSTRUCTIONS, AND FOR PURCHASING THE SSA
ADJUSTASTAIRS.
Component Issue Control Jan Feb Mar Apr May June Jul Aug Sep Oct Nov Dec
Weld check
Cracking Remove and replace
weld, completed by
a competent person
Guardrails
and Stringers
In place All guardrails must
be in place and bolts
secured to prevent
movement when
stair is emplaced.
Ensure stringer
bolts are sufficiently
tightened (on 15-17
drill speed setting)
Top Step/
Support Foot
In place Ensure bolted in
position firmly to
support surfaces,
and bolts connecting
to stringers are
secure. If top step
has rubber/foam
grip, ensure this is
in good condition;
if excessively aged
or no longer firmly
secured this should
be replaced by a
competent person
Extrusion
Stringers,
Steps,
Handrails
Damage Any components
that has been
damaged must
be replaced
before reuse by a
competent person
MAINTENANCE SCHEDULE FOR ADJUSTASTAIRS STAIR SYSTEMS
• Maintenance checks must be carried out at least monthly by a competent person.
• If the Safety Stair Stringers or steps have sustained damage at any time the stair must be checked and the
damage corrected prior to further use.
• It is suggested that an independent qualied person carry out an annual check on the stair.
600MM WIDE ADJUSTASTAIRS
/