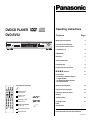
Panasonic DVDRV32EG Owner's manual
- Category
- DVD players
- Type
- Owner's manual
This manual is also suitable for

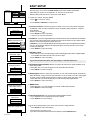
Contents Page
Warning and Precautions 2
Functions of the DVD-player 3
Function of the remote control
Connecting to TV 4
EASY SETUP 5
Basic play 6
Child lock password 7
Programme play 8
Repeat and resume functions 9
# $ % &
-functions
10
Home Theatre 11
Connecting an analogue amplifier
- a digital amplifier
- an amplifier with built-in decoder
- an active subwoofer
Menus of the DVD-player 12
Using On-screen messages 13
Information about the player 14
Glossary
Troubleshooting 15
Language codes 16
Index
Specifications
Please read these instructions thoroughly before use.
Please keep this manual for future reference.
XY
DVD/CD PLAYER
Operating Instructions
Included accessories
RQTD0003-2B
DVD-RV32
Remote Control
N2QAJB000050
AC Mains lead
RJA0043-1C
Audio/video cable
K2KA6CA00001
Remote Control Batteries
AA, UM3 or R6
Operating Instructions
Guarantee Card
A
B
C
D
TITLE
CHAP
SLEEP
DVD
BASS
Panasonic
Panasonic
DVD / CD PLAYER
DVD-RV32
192KHz / 24bit AUDIO D/A CONVERTER
/I
ONE TOUCH
CINEMA MEMORY
ADVANCED
SURROUND
BASS
PLUS
DIALOGUE
ENHANCER
CINEMA
OPEN/CLOSE
RANDOM
REPEAT
A-B
REPEAT
QUICK
REPLAY
Hi
-SPEED SCAN
x 200

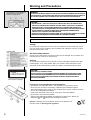
Instructions of inserting Remote Control Batteries:
The lifetime of the batteries is about 1 year, depending on the frequency of use.
Do not use one old and one new battery, or different types of batteries together
Only insert batteries which contain no toxic materials (such as lead, cadmium, mercury).
Do not use rechargeable type batteries.
If the remote control will not be used for a long time, remove the batteries.
Do not heat or short-circuit the batteries.
Remove spent batteries immediately and replace them with type AA, UM3 or R6.
Observe the and polarities when replacing the batteries.
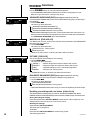
Warning and Precautions
WARNING!
TO REDUCE THE RISK OF FIRE, ELECTRIC SHOCK OR PRODUCT DAMAGE, DO NOT EXPOSE
THIS APPARATUS TO RAIN, MOISTURE, DRIPPING OR SPLASHING AND THAT NO OBJECTS
FILLED WITH LIQUIDS, SUCH AS VASES, SHALL BE PLACED ON THE APPARATUS.
CAUTION!
THIS PRODUCT UTILIZES A LASER.
USE OF CONTROLS OR ADJUSTMENTS OR PERFORMANCE OF PROCEDURES OTHER
THAN THOSE SPECIFIED HEREIN MAY RESULT IN HAZARDOUS RADIATION EXPOSURE.
DO NOT OPEN COVERS AND DO NOT REPAIR YOURSELF. REFER SERVICING TO
QUALIFIED PERSONNEL.
CAUTION!
DO NOT INSTALL, OR PLACE THIS UNIT, IN A BOOKCASE, BUILT-IN CABINET OR IN
ANOTHER CONFINED SPACE. ENSURE THE UNIT IS WELL VENTILATED. TO PREVENT
RISK OF ELECTRIC SHOCK OR FIRE HAZARD DUE TO OVERHEATING, ENSURE THAT
CURTAINS AND ANY OTHER MATERIALS DO NOT OBSTRUCT THE VENTILATION VENTS.
DO NOT OBSTRUCT THE UNIT’S VENTILATION OPENINGS WITH NEWSPAPERS,
TABLECLOTHS, CURTAINS, AND SIMILAR ITEMS.
DO NOT PLACE SOURCES OF NAKED FLAMES, SUCH AS LIGHTED CANDLES, ON THE UNIT.
DISPOSE OF BATTERIES IN AN ENVIRONMENTALLY FRIENDLY MANNER.
THIS UNIT IS INTENDED FOR USE IN MODERATE CLIMATES.
Voltage
Do not use high voltage power sources. This can overload the unit and cause a fire. Do not
use a DC power sources. Check the source carefully when setting the unit up on a ship or
other place where DC is used.
AC mains lead protection
Ensure the AC mains lead is connected correctly and not damaged. Poor connection and
lead damage can cause fire or electric shock.
Service
Do not attempt to repair this unit by yourself. If sound is interrupted, indicators fail to light,
smoke appears, or any other problem that is not covered in these instructions occurs,
disconnect the AC mains lead and contact your dealer or an authorized service center.
Batteries, packaging and old equipment should not be disposed of as
domestic waste, but following local regulations.
2
Inside of product
Back of product, see page 4
Do not place the unit on amplifiers or
equipment that may become hot.
The heat can damage the unit.
CLASS 1
LASER PRODUCT
RQTD0003-2B

Functions of the DVD-player
All basic functions can be controlled on the DVD-player and with the remote control. Only
symbols of the remote control are used in this instruction book. You can change the initial
settings with the remote control. These settings are retained in memory until they are
changed, even if the unit is turned off.
Standby indicator *
When the unit is connected to the AC mains
supply, this indicator lights up in standby mode
and goes out when the unit is turned on.
Standby/on switch
**
**
*/I
Press to switch the unit from on to standby
mode or vice versa. In standby mode, the unit
is still consuming a small amount of power.
Functions of the remote control
**
**
*
Switch the player on and off to standby mode
SLEEP Player switches off if you set a time
SETUP Call up the menus of the DVD-player
OPEN/CLOSE
FF
FF
F
Open and close the disc tray
SKIP
BB
BB
B
CC
CC
C
Skipping chapters or tracks
SLOW/SEARCH
@@
@@
@
A
Slow-motion play, search fast forward and rewind
STOP
c
Stop play
PAUSE
dd
dd
d
Pause play
PLAY
ee
ee
e
Start play
TOP MENU Call up the top menu of a DVD or MP3 menu
MENU Call up the menu of a DVD or MP3 menu
Cursor buttons
ENTER, to confirm a selection in a menu
DISPLAY Call up OSD-screens
RETURN Return from menu to play
SUBTITLE Language of subtitles
AUDIO Change audio
ANGLE Angles during play
QUICK REPLAY Replay of the last 7 sec. of a movie
PROGRAM Program play
RANDOM Random play
REPEAT Repeat play
A-B REPEAT Repeat marked sections
CANCEL Clear settings
0...9
(
Numbered buttons, to
enter a 2 digit number
(
A.SRD For a surround-like effect
BASS If you connected a subwoofer
CINEMA Enhances detail in dark scenes
D.ENH Increase the volume of the dialogue sound
ONE TOUCH MEMORY Reselect the settings in A.SRD, BASS, CINEMA,
D.ENH
ZOOM To zoom the picture
POSITION MEMORY Restart from the memorized position
f
&
f
%
f
$
f
#
(ADVANCED SURROUND)
(DIALOGUE ENHANCER)
3
RQTD0003-2B
A
B
C
D
TITLE
CHAP
SLEEP
DVD
BASS
Panasonic
Panasonic
DVD / CD PLAYER
DVD-RV32
192KHz / 24bit AUDIO D/A CONVERTER
/I
ONE TOUCH
CINEMA MEMORY
ADVANCED
SURROUND
BASS
PLUS
DIALOGUE
ENHANCER
CINEMA
OPEN/CLOSE
RANDOM
REPEAT
A-B
REPEAT
QUICK
REPLAY
Hi
-SPEED SCAN
x 200

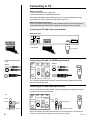
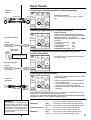
Connecting to TV
Back of the unit
21 pin scart cable
AV input on TV
Connecting to TV with a S-VIDEO input terminal
S-VIDEO input terminal
onTV
The S-VIDEO terminal achieves a more vivid picture than the VIDEO OUT terminal.
Connect stereo audio cable.
S-video cable
Connecting to TV with video input terminal
White/L
Red/R
TV
Audio/video cable
Connect the Audio/video cable (white/L, red/R, yellow/video) according to the colours/
markings of the video input terminals.
Yellow/video
White
Red
Yellow
AC IN
Yellow/
video
White/L
Red/R
White/L
Red/R
White/L
Red/R
When connecting to the video input terminal, do not change the AV output (Scart) to
S-VIDEO, as this will cause the picture to be output incorrectly.
Before connection
Disconnect the AC power supply cord.
Refer to the television’s operating instructions.
The following illustrations show the different ways to connect a DVD-player using a
scart cable or an S-video cable or an Audio/video cable to TV.
Connecting to TV with 21-pin scart terminal
Note for all shown connections
Do not connect the unit through your video cassette recorder. Connect directly to the
TV, otherwise the picture may not be displayed correctly due to the copy guard.
AC IN
4
Audio/video cable
AC mains lead
AV
CLASS 1
LASER PRODUCT
DIGITAL
AUDIO
OUT
AUDIO
OUT
VIDEO
OUT
S VIDEO
OUT
AC IN
DIGITAL
AUDIO
OUT
VIDEO
OUT
AUDIO
OU
T
S VIDEO
OUT
L
( PCM/
BITSTREAM )
OPTICAL
R
SUB-
WOOFER
Please connect
directly to TV
DIGITAL
AUDIO
OUT
VIDEO
OUT
AUDIO
OU
T
S VIDEO
OUT
L
( PCM/
BITSTREAM )
OPTICAL
R
SUB-
WOOFER
Please connect
directly to TV
RQTD0003-2B

EASY SETUP
9
Use the numbered buttons of the remote control to enter a 4-digit password.
Press ENTER to confirm the selection.
Your DVD player is now ready to use.
If you want to cancel EASY SETUP before it has finished, press the RETURN button.
8 Child lock password: You can prevent the unwanted playback of DVDs.
If you select Yes, then a 4-digit password must be entered.
Press ENTER to access the setting.
7 MPEG Audio
Select Yes when you connect the player to a unit with a built-in MPEG decoder.
Press ENTER to confirm the setting.
6 Dolby Digital: Method of coding and compression of more channel audio signals, developed by
Dolby Laboratories. A large amount of audio information can be recorded on one disc. Dolby Digital
is used in cinemas, digital television programs, DVDs and video games around the world.
Select Yes when you connect the player to a unit with a built-in Dolby Digital decoder.
Press ENTER to confirm the setting.
3 Pan&Scan: If you have a regular television (4:3 format) and wish to view 16:9 software in the Pan&Scan
style, if the disc supports this format. Expands the picture to fill the screen from top to bottom without
distortion. However, the edges of the picture are cut off.
Letterbox: If you have a regular television (4:3 format) and wish to view 16:9 software in the Letterbox
style. The whole picture is displayed, but black bands appear at the top and bottom of the screen.
Select your setting
.
Press ENTER to confirm the setting.
2 TV screen formats: There are two types of TV format, 4:3 or 16:9. The 16:9 format corresponds
to Widescreen. When you select “Widescreen (16:9)“, the following setting “Pan&Scan / Letterbox“
will be skipped.
Select your setting
.
Press ENTER to confirm the setting.
*
This may not work with some discs.
After first plug in of AC mains, the EASY SETUP-screen will be invoked automatically.
Initial settings for the unit can be adjusted in an easy way as shown below.
Make the settings with the buttons of the remote contro
l
.
1
Select the desired language
.
Press
ENTER
to confirm the setting.
Press SETUP or RETURN
to exit the screen.
5 DTS (Digital Theater Systems): Method of coding multi channel audio signals. Realistic sound
effects are possible
.
Select Yes when you connect the player to a unit with a built-in DTS decoder.
Press ENTER to confirm the setting.
Normal (4:3)
Widescreen (16:9)
- - - -
Do you have a unit connected
to the OPTICAL output?
Please select your TV type
How do you want the widescreen picture
displayed on the normal (4:3) TV?
Pan&Scan style
(cut sides and fill screen)
Letterbox style
(black bands top and bottom)
Does the unit connected have
a built-in DTS decoder?
Does the unit connected have
a built-in Dolby Digital decoder?
Does the unit connected have
a built-in MPEG decoder?
Would you like to set a child lock
password now?
Please enter a 4-digit password
Panasonic
EASY SETUP
Deutsch
Italiano
Svenska
Português
to select ENTER to access
No
Yes
No
Yes
No
Yes
No
Yes
No
Yes
English
Français
Español
Nederlands
5
4 OPTICAL output
Select Yes if you have connected the player with an Optical digital audio cable to a digital amplifier
or an amplifier with a built-in decoder to the OPTICAL output.
Press ENTER to confirm the setting.
If you have selected "No" above, the next setting is “child lock password“.
RQTD0003-2B

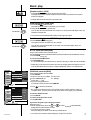
Basic play
Reading disc information - please wait
SLEEP AUTO
Label must
face upward.
CHAPTER/TRACK CHAPTER/TRACK CHAPTER/TRACK
Play position
twice once once twice
6
Preparation
Turn on the television and select the appropriate video input on the television to suit the
connections for the player.
Play
Press
*
to turn on the unit.
Press OPEN/CLOSE
FF
FF
F
to open the disc tray.
Place the disc on the disc tray.
Press PLAY
ee
ee
e
, the disc tray closes and play begins automatically.
*
The procedure of reading disc information’s can take up a longer time!
To stop play
Press STOP
c
.
To pause play
Press PAUSE
dd
dd
d
during play.
Press PLAY
ee
ee
e
for restart of playback.
Auto standby: The unit switches to standby mode after about 30 minutes in the stop mode.
Replaying a scene [DVD,VCD,CD]
Press QUICK REPLAY
during play.
The player skips back a few seconds each time to replay parts of scenes.
*
You cannot skip beyond the beginning of a track or title. This feature doesn’t work
with some discs.
SLEEP timer
Press SLEEP to select the setting.
Each time you press the button: OFF AUTO 60 min. 90 min. 120 min.
The unit turns off 5 minutes after play finishes. The indicator lights up when the sleep
timer is on.
To cancel the SLEEP timer
Press SLEEP to select “OFF“.
To confirm the remaining time
Press SLEEP.
*
AUTO does not work if you press the buttons STOP, MENU or TOP MENU.It is activated
again when you restart play. AUTO does not work correctly with some discs.
Auto standby: The unit switches to standby mode after about 30 minutes in the stop mode,
irrespective of the SLEEP setting.
POSITION MEMORY function [DVD,VCD,CD]
This function allows you to memorise a position to start from even after switching the unit to
standby or changing discs. You can memorise positions for up to five different discs at time.
Press POSITION MEMORY during play.
Press
*
to switch the unit to standby or press
FF
FF
F
to remove the disc.
Press PLAY
ee
ee
e
when you are ready to play the disc again.
To clear the position before play
Press STOP
c
.
Start play after switching to standby
Press PLAY
ee
ee
e
.
Play starts from the memorised position and the position is cleared.
Skipping chapters or tracks [DVD,VCD,CD]
Press SKIP
B C
during play or while paused.
Each press increases the number chapters or tracks skipped.
BASS
TITLE CHAP
DVD
VIDEO
DVD
VIDEO
TITLE CHAP BASS
RQTD0003-2B

Basic play
Screen display
Screen display
Shuttle dial
Shuttle dial
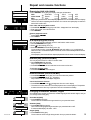
Child lock password [DVD]
Only for DVD-VIDEO discs available.
Press SETUP.
Select the SETUP menu “DISC“ -
Menu list.
Select “Child lock“
-
Settings.
Select “On - - - -“
.
Input your 4-digit password.
If you enter a wrong number press CANCEL.
Press
ENTER
to store the password.
*
By choosing the rating level you can prohibit viewing certain scenes of a disc or
complete discs. This may not work with some discs. Don’t forget your password.
To exit the SETUP screen
Press SETUP.
To return to the previous screen
Press RETURN.
If you have forgotten your ratings password
(Main unit only.)
While stopped press and hold and and also , until [Initialized]
disappears from the television screen.
Turn the unit off then on again.
All of the settings will return to the factory default values.
*
You will have to reset the initial settings by using EASY SETUP.
7
Panasonic
SETUP
DISC
VIDEO
AUDIO
DISPLAY
DEMO
EASYSET
to input your personal 4-digit password
CANCEL to delete
Soundtrack language English
Subtitle language Automatic
DVD Menu language English
Child lock On - - - -
Level All
Panasonic
SETUP
DISC
VIDEO
AUDIO
DISPLAY
DEMO
EASYSET
Soundtrack language English
Subtitle language Automatic
DVD Menu language English
Child lock On
Level All
to select to modify
to return to SETUP Menu
Chapter review [DVD]
Press PLAY
ee
ee
e
for 5 sec. during play of a DVD.
The beginning of each chapter starts for some seconds. Play starts from the point
where you stopped.
*
Chapter Review feature works only within a title.
Slow-motion play [DVD,VCD]
Press SLOW
@@
@@
@A
while paused.
The speed of slow-motion increases by up to 5 steps.
Press PLAY
ee
ee
e
to restart play.
You can also turn the shuttle dial on the main unit. The pictures stills again when you
release the shuttle dial.
*
You cannot move backwards with VIDEO CD during slow-motion.
Fast forward and rewind-SEARCH [DVD,VCD,CD]
Press SEARCH
@@
@@
@A
during play.
The speed of search increases by up to 5 steps.
You can also turn the shuttle dial on the main unit. Play starts again when you
release the shuttle dial.
4:3 TV Zoom function [DVD]
Only for DVD-VIDEO in the Letterbox style.
Use the ZOOM function to expand widescreen pictures to fill more of the television screen.
Press ZOOM
during play
.
To cancel the ZOOM function
Press ZOOM again.
4:3 TV ZOOM is also canceled when you open the disc tray or switch the unit to standby.
*
Depending on the video format of the disc and current play status, this feature may not
work as described. Menus may act or appear differently while 4:3 TV ZOOM is on.
RQTD0003-2B

Panasonic
PROGRAM
No. Track Time
1
Total Time
PLAYLIST
CLEAR LIST
RANDOM
to select
PLAYLIST
CLEAR LIST
RANDOM
No. Folder Title Time
Total Time
Panasonic
PROGRAM
to select CANCEL to delete
Panasonic
MP3 Menu
/F0LDER/
TITLE 01
TITLE 02
TITLE 03
TITLE 04
TITLE 05
TITLE 06
TITLE 07
ENTER to select
PROGRAM to add to PLAYLIST
1 1 2
2
Programme play
Programme play [DVD,VCD,CD,MP3]
You can select up to 32 tracks to play in the order you choose.
Press PROGRAM while stopped, until the screen “PROGRAM“ appears.
Select the numbers of the tracks with the numeric buttons.
Press PLAY
ee
ee
e
.
Play now begins in the programmed sequence.
Select an item using cursor buttons
Press
ENTER
.
Select an item using the cursor buttons
.
Press
ENTER
again to register the item number.
Press PLAY
ee
ee
e
.
Play now begins in the programmed sequence.
Adding or changing items Moving between pages
Press
to select an available item.
Press SKIP
BB
BB
B
CC
CC
C
.
Enter the number of the desired item.
Clearing individual items Clearing the whole programme
Select the number
.
Move to “CLEAR LIST“
.
Press CANCEL.
Press
ENTER
to
confirm.
Exiting programme mode
Press PROGRAM while stopped, until the programme play screen disappears. The
programme is retained in memory.
*
The programme is cleared when the unit is turned off, or the disc tray is opened.
Call up a MP3 Menu
Press MENU or TOP MENU.
Press
to select the FOLDER.
Press
to select the TITLE.
Press
ENTER
to
confirm.
Play starts and continues to the last title in the last folder.
To show other pages
Press SKIP
BB
BB
B
CC
CC
C
for page before or page after.
To close the MP3 Menu
Press MENU or TOP MENU .
DVD menus
DVD’s can have several menus. The menu displayed when you press the button
“TOP MENU“ may be different from the menu displayed when you press “MENU“.
*
The function of these buttons is different for every disc. Read the disc’s instructions for
further details about operation.
Starting play from a selected title or track [DVD,VCD,CD]
While stopped, enter a track number using the remote control.
To select a 2-digit number
Example: To select track 23, press
(+
))
))
)+
..
..
.
. Play starts from the selected item.
*
This may not work with some discs.
Frame by frame viewing [DVD,VCD]
While paused, press
or
on the remote control. The frame changes each time you
press the buttons. The frames change in succession if you press and hold the button.
Pressing
dd
dd
d
also activates forward frame-by-frame.
*
You cannot move backwards frame by frame with VIDEO CD.
8
TITLE
MENU
MENU
MENU
MENU
Disc
TOPMENU
TITLETITLE
TOP MENU
CD
AUDIO
TRACK
RQTD0003-2B

REPEAT CHAPTER
REPEAT TITLE
REPEAT OFF
SET POSITION A
ANGLE 1 (2)
SUBTITLE OFF
2 English 3
Repeat and resume functions
SET POSITION B
1 English 10
Changing Soundtracks, Subtitles, Angles
Some DVDs have multiple soundtracks, subtitle languages and camera angles, and you
can change these during play.
Soundtracks [DVD]
Press AUDIO during play.
The numbers of soundtrack changes each time you press the button.
Subtitles [DVD]
Press SUBTITLE during play.
The numbers of language changes each time you press the button or .
To switch subtitle display off, select “OFF“.
Angles [DVD]
Press ANGLE during play.
The numbers of camera angle changes each time you press the button.
9
Repeat play [DVD,VCD,CD,MP3]
Press REPEAT during play, the display changes as illustrated.
DVD CHAPTER TITLE OFF
Video CD/CD TRACK
DISC OFF
MP3 TITLE
FOLDER OFF
*
Repeat play does not work if the elapsed playback time is not shown on the unit’s display.
There is no mode for repeating the whole DVD.
You cannot use repeat play to restart an
entire DVD or MP3 disc.
If the video CD has playback control
Press STOP
c
during play until “PBC “ disappears from the display.
Enter the number of the desired track.
Press REPEAT.
Restore playback control
Press STOP
c
.
Press MENU.
A-B repeat play [DVD,VCD,CD]
You can repeat a section between points A and B within a title or track.
Press A-B REPEAT during play.
Press
ENTER
at the starting point, (A).
Press A-B REPEAT
at the finishing point, (B).
To cancel this function, press A- B REPEAT and wait until the is switched off.
When the end of a title/track/chapter is reached, the unit automatically determines the
end as point B.
*
A-B repeat play does not work if the elapsed playback time is not shown on the unit’s display.
Random play [DVD,VCD,CD,MP3]
The unit plays the tracks on a disc in random order.
Press RANDOM while stopped.
Play now begins in random order.
Press STOP
c
the unit switches back to resume function.
To exit the random mode
Press STOP
c
while stopped.
Resume function [DVD,VCD,CD,MP3]
Press STOP
c
during play, the unit remembers the position.
Press PLAY
ee
ee
e
while “ “ is flashing.
Play restarts from the position you stopped it.
Cancel the Resume function
Press STOP
c
until “ “ disappears from the unit’s display.
*
The resume function does not work if the playback time is not displayed. The position
is cleared when the disc tray is opened or the unit is switched to standby.
VIDEO
CD
DVD
VIDEO
BASS
TITLE CHAP
DVD
VIDEO
RQTD0003-2B

# $ % &
-functions
10
Use the
# $ % &
buttons to control the following features.
*
Turn ADVANCED SURROUND and BASS PLUS off when using Dolby Pro Logic.
Dolby Pro Logic will not work correctly if they are on.
ADVANCED SURROUND [DVD] Dolby Digital, 2-channel or over only
Use ADVANCED SURROUND to have a surround-like effect during play, if you are using 2
front speakers.
Press A.SRD
f
.
Each time you press the button:
ADVANCED SURROUND NORMAL (1)
ADVANCED SURROUND EMPHASIZED (2)
ADVANCED SURROUND OFF: Factory preset
*
ADVANCED SURROUND will not work, or will have less effect with some discs. Turn
off the surround sound effect of the equipment you have connected when use this effect.
Turn ADVANCED SURROUND off if it causes distortion.
BASS PLUS [DVD,VCD,CD]
Turn Bass PLUS on when you have connected an active subwoofer to the SUBWOOFER
terminal on the rear of the unit.
Press BASS f.
Each time you press the button:
BASS PLUS ON : Factory preset
BASS PLUS OFF
*
BASS PLUS will not work, or will have less effect with some discs.
PICTURE [DVD,VCD]
You can change the picture quality for movie viewing.
Press CINEMA .
Each time you press the button:
CINEMA 1 : Mellows images and enhances detail in dark scenes.
CINEMA 2 : Sharpens images and enhances detail in dark scenes.
USER : Separate settings for colour, contrast and brightness.
NORMAL : Normal mode : Factory preset
*
CINEMA will not work, or will have less effect with some discs.
DIALOGUE ENHANCER [DVD] Dolby Digital, 3-channel or over only
Increase the volume and clarity of speech or dialogue during playback.
Press D.ENH
f.
Each time you press the button:
DIALOGUE ENHANCER ON
DIALOGUE ENHANCER OFF: Factory preset
*
DIALOGUE ENHANCER will not work, when you connect an amplifier to OPTICAL output.
Recalling your settings with one button [DVD,VCD,CD]
This feature allows the settings that you made for ADVANCED SURROUND, BASS,
CINEMA and DIALOGUE ENHANCER to be stored and recalled with just one button press.
Storing the settings in memory
Press and hold the button ONE TOUCH MEMORY until the button of the unit lights up. The
settings remain in the memory even if you turn the unit off.
Recalling the settings
Press the button ONE TOUCH MEMORY .
The button of the unit lights up.
To cancel
Press the button ONE TOUCH MEMORY to set the factory preset.
The button light turns off.
$
#
f
%
&
unit display
PICTURE : CINEMA 1
BASS PLUS ON
ADVANCED SURROUND NORMAL (1)
DIALOGUE ENHANCER ON
TITLE
DVD
VIDEO
CINEMA
TITLE
DVD
VIDEO
D.ENH
TITLE
DVD
VIDEO
BASS
TITLE
DVD
VIDEO
A.SRD
RQTD0003-2B

Connecting an active subwoofer
Place the subwoofer as close as possible to
the front of the center.
Turn the BASS-function to “BASS PLUS ON“
to boost the output from the subwoofer.
Adjust the volume on the subwoofer to suit your
preference.
Audio cable
terminal on
Subwoofer
SUB-
WOOFER
If you connect an amplifier with Dolby Pro Logic-decoder you will also need to connect
center and surround speakers to enjoy surround sound.
The Dolby Pro Logic-decoder will not function correctly if A.SRD (ADVANCED SURROUND)
and BASS PLUS is on. Turn A.SRD and BASS PLUS off.
Connecting an analogue amplifier or system component
Analogue recording
You can record to a Mini Disc (MD) or cassette
tape.
Audio cable
White
Red
terminal on
amplifier
OPTICAL
terminal on amplifier
Connecting a digital amplifier or system component
Digital recording
You can record the digital signal directly onto
an MD. The recording equipment should handle a
sampling frequency of 48 kHz/16 bit .
Change the settings in the SETUP menu “AUDIO“
as follows.
PCM Down conversion : Yes
Dolby Digital : PCM
DTS Digital Surround : Off
MPEG Audio : PCM
ADVANCED SURROUND : Off
Optical digital
audio cable
Insert fully,
with this side facing up
Connecting an amplifier with a built-in decoder or a decoder-
amplifier combination
OPTICAL
terminal on amplifier
You cannot use DTS Digital Surround decoders
not suited to DVD.
L
R
Home Theatre
11
PCM Down conversion Yes: connected to an amplifier with an optical digital audio cable.
No: connected an amplifier with audio (phono) cables.
Dolby Digital PCM: connected a unit without a built-in Dolby Digital decoder.
Bitstream: connected to a unit with a built-in Dolby Digital decoder.
DTS Digital Surround Off: connected a unit without a built-in DTS decoder.
Bitstream: connected to a unit with a built-in DTS decoder.
MPEG Audio PCM: connected a unit without a built-in MPEG decoder.
Bitstream: connected a unit with a built-in MPEG decoder.
IMPORTANT
If the equipment you connected cannot
decode the signal, the setting must be
changed to Yes, Off and PCM . If not, signals
the equipment cannot process will be
output by this unit, causing highlevels of
noise which can damage your hearing
and the speakers.
You can enjoy more powerful bass by connecting
an active subwoofer.
DIGITAL
AUDIO
OUT
VIDEO
OUT
AUDIO
OU
T
S VIDEO
OUT
L
( PCM/
BITSTREAM )
OPTICAL
R
SUB-
WOOFER
Please connect
directly to TV
DIGITAL
AUDIO
OUT
VIDEO
OUT
AUDIO
OU
T
S VIDEO
OUT
L
( PCM/
BITSTREAM )
OPTICAL
R
SUB-
WOOFER
Please connect
directly to TV
DIGITAL
AUDIO
OUT
VIDEO
OUT
AUDIO
OU
T
S VIDEO
OUT
L
( PCM/
BITSTREAM )
OPTICAL
R
SUB-
WOOFER
Please connect
directly to TV
DIGITAL
AUDIO
OUT
VIDEO
OUT
AUDIO
OU
T
S VIDEO
OUT
L
( PCM/
BITSTREAM )
OPTICAL
R
SUB-
WOOFER
Please connect
directly to TV
RQTD0003-2B

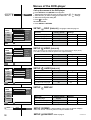
SETUP DISC [DVD,VCD] Language codes see page 16.
SETUP VIDEO [DVD,VCD]
SETUP DISPLAY
SETUP
AUDIO [DVD,VCD]
DISC
VIDEO
AUDIO
DISPLAY
DEMO
EASYSET
Panasonic
SETUP
to select to access Menu
DISC
VIDEO
AUDIO
DISPLAY
DEMO
EASYSET
Panasonic
SETUP
PCM Down conversion Yes
Dolby Digital PCM
DTS Digital Surround Off
MPEG Audio PCM
Dynamic range compr. Off
to select to access Menu
DISC
VIDEO
AUDIO
DISPLAY
DEMO
EASYSET
Panasonic
SETUP
Menu language English
On-screen messages On
Player front display Bright
to select to access Menu
SETUP DEMO A demonstration of the unit’s On-Screen displays,
select “Off“ or “On“. Press any button to stop the DEMO mode.
SETUP EASYSET Refer to page 5.
DISC
VIDEO
AUDIO
DISPLAY
DEMO
EASYSET
Panasonic
SETUP
TV Aspect 4:3 Pan&Scan
AV Output (Scart) Video
Still mode Automatic
NTSC Disc output PAL 60
to select to access Menu
DEMO DEMO Off
When connecting to the video input terminal, do not change the AV output (Scart)
to S-VIDEO, as this will cause the picture to be output incorrectly.
Soundtrack language English
Subtitle language Automatic
DVD Menu language English
Child lock Off
Level All
Menus of the DVD-player
Call up the menus of the DVD-player
Press SETUP and the SETUP screen appears.T
Select the item in the SETUP menu you want to change
-
Menu list.
Select the item you want to change in the Menu list
-
Settings.
Select and change the setting
.
Press
ENTER
to confirm.T
To exit the screen
Press SETUP or RETURN.T
SETUP Menu Menu list Settings
12
Menu list Factory preset Settings
Soundtrack language English 6978 Original
Subtitle language Automatic Off - - - -
DVD Menu language English 6978
Child lock Off On - - - -
Level All 1 - 8
Menu list Factory preset Settings
TV Aspect 4:3 Pan&Scan 4:3 Letterbox 16:9
AV Output (Scart) Video S-Video RGB
Still mode Automatic Field Frame
NTSC Disc output PAL60 NTSC
Menu list Factory preset Settings
Menu language English
On-screen messages On Off
Player front display Bright Dimmed Auto
Menu list Factory preset Settings
PCM Down conversion Yes No
Dolby Digital PCM Bitstream
DTS Digital Surround Off Bitstream
MPEG Audio PCM Bitstream
Dynamic range compr.
only in the format Dolby Digital
Off On
RQTD0003-2B

Using On-screen messages
TITLE / TRACK
CHAPTER
TIME - - :- - : - -
AUDIO
SUBTITLE OFF
ANGLE 1/2
REPEAT OFF
* * * * *
ADVANCED SURROUND
NORMAL (1)
BASS PLUS ON
DIALOGUE ENHANCER OFF
PICTURE : NORMAL
COLOUR 0
BRIGHTNESS 0
Enter time for DVD to start from this position.
For VCD,CD switch REMAIN/ELAPSED TIME.
If the DVD offers alternatives you can select from the
other soundtracks on the disc.
Scenes which were filmed several times from different
camera angles. You can select this different angles.
Repeat of titles/tracks,chapters/folders or marked
sections of A-B REPEAT.
You can mark up to 5 scenes which you can select
directly during playback.
When you have connected an active subwoofer.
Makes the dialogue in movies easier to hear.
Adjust the contrast to suit your preference.
Makes possible to have a surround-like effect if you
are using only 2 front speakers. Turn Advanced
Surround off if it causes distortion.
If there are several titles/tracks on a DVD,VCD or
CD, use this menu item to select them.
If there are several chapters on a DVD, use this
menu item to select them.
When subtitles are available in several languages,
you can select the language of choice.
Adjust the colour level to suit your preference.
Adjust the brightness to suit your preference.
TITLE 1/2
TRACK 1/2
TRACK 1/2
X
MP3
FOLDER (1/18)
X
DVD-VIDEO
VCD
CD-DA
CONTRAST 0
CHAPTER - / - TIME - -:- -:- -
to select ENTER to access
to select ENTER to access
to select ENTER to access
to select ENTER to access
OSD-screens are menus that contain information about the disc or unit. These menus
allow you to perform operations by changing this information.
*
For some DVD-VIDEO discs certain settings are not allowed by disc. Please use
the DVD menu.
Press DISPLAY during play.
The Progress Indicator appears. Indicates how far you have played through an item.
Press DISPLAY once more and the OSD menu appears.
TITLE 1/17
DVD-VIDEO 00:00:45 00:04:00
Dolby Digital 2/0 48 kHz CHAPTER 2/5
Adjust the position of OSD-bar
on the screen.
To change the position icons
Press
to select the rightmost icons.
Press
to move the icons.
There are 10 positions.
To exit the screen
Press DISPLAY or RETURN.
13
“CINEMA 1“, “CINEMA 2“, “NORMAL“, “USER“.
ADJUST POSITION
RQTD0003-2B

Bitstream: This is the digital form of multiple channel audio data before it is decoded into its
various channels.
Dolby Digital: A technology developed by Dolby Laboratories that allows audio (mono up
through 5.1 channels) to be conveniently transmitted, stored and reproduced in high fidelity.
Dolby Digital is used in many movie theatres, digital television programs, DVDs and video
games around the world.
DTS Digital Surround: This surround system is used in many movie theatres around
the world. There is good separation between the channels, so realistic sound effects are
possible.
Dynamic range: Dynamic range is the difference between the lowest level of sound that can
be heard above the noise of equipment and the highest level of sound before distortion occurs.
Field: One frame is made up of 2 fields.
A regular television shows these fields one after the other to create frames.
Field still: A field still is not blurred, but it has only half the information of a frame still so
picture quality is lower.
Frame: Frames are the still pictures that go together to make a moving picture. There are
about 25/30 frames shown each second.
Frame still: A still is shown when you pause a moving picture. A frame still is made up of
2 alternating fields, so the picture may appear blurred, but overall quality is high.
Letterbox: When a rectangular picture is displayed on a normal TV, with black bands top
and bottom.
Optical digital audio cable: Electronic signals are converted to optical signals for output
to an amplifier. This reduces noise caused by electronic interference.
Pan&Scan: Expands a 16:9 widescreen picture to fill a 4:3 normal TV screen. The edges of
the picture are cut off, but there are no black bands or distortion to the picture.
PCM (pulse code modulation): PCM is the digital method used when recording music CDs.
DVDs have a greater volume so they use linear PCM, which has a higher sampling rate.
Playback control: If a Video CD has “playback control“ written on it or its jacket, it means that
particular scenes or information can be selected for viewing interactively on the television,
using the menu screen. This unit can play Video CDs with playback control.
Title/Chapter: DVD’s are divided up into large sections, titles and smaller sections, chapters.
The numbers allocated to these sections are called title numbers and chapter numbers.
Track: Video CDs and CDs are divided up into sections called tracks, and the numbers
allocated to these sections are called track numbers.
TV-screen formats: TVs have 2 different formats 4:3 (normal) or 16:9 (widescreen).
Glossary
Region codes
Region numbers are allocated to DVD players and software according to where they are sold.
You can play DVD’s if their region number is the same or includes the same number, or is
marked “All“.
United Kingdom and Continental Europe: “2“/ Russia, Ukraine: “5“
Disc-formats
DVD-Video, DVD-R (R4.7), CD-Audio (CD-DA), Video-CD, CD-R/CD-RW (CD-DA, Video-CD
formatted discs)
*
It may not be able to play some CD-R/RW due to the condition of the recording.
DVD-formats
This unit includes a 2-channel Dolby Digital decoder. Connect the analog outputs (Left and
Right) to an external Dolby Surround Pro Logic decoder to enjoy 4 channel surround sound
(Left, Center, Right and Surround) or connect the digital audio output of this unit to an external
multichannel Dolby Digital decoder to enjoy programs in up to 5.1 channel surround sound.
(Left, Center, Right, Left Surround, Right Surround, Subwoofer).
Manufactured under license from Dolby Laboratories.
“Dolby“, “Pro Logic“ and the double-D symbols are trademarks of Dolby Laboratories.
This unit does not have a DTS-decoder. Connect this unit to equipment that has a DTS-decoder
to enjoy DVD’s with this mark
\
.
“DTS“ and “DTS Digital Surround“ are trademarks of Digital Theater Systems, Inc.
Clean the unit with a soft, dry cloth. Never use alcohol, paint thinner or other solvents.
Information about the player
This product incorporates copyright protection technology that is protected by the method claims
of certain U.S. patents and other intellectual property rights owned by Macrovision Corporation and
other rights owners. Use of this copyright protection technology must be authorized by Macrovision
Corporation, and is intended for home and other limited viewing uses only unless otherwise
authorized by Macrovision Corporation. Reverse engineering or disassembly is prohibited.
Do not use irregulary shaped discs,
such as heart-shaped.
These can damage the unit.
X
YX
R
R 4.7
14
Region code 5
Russia, Ukraine
RQTD0003-2B

Troubleshooting
COMMON
No response when buttons are pressed:
Some operations may be prohibited by the disc.
The unit may not be operating properly due to lightning or static electricity.
Press
[
**
**
*
/I] to switch the unit to standby mode, disconnect the AC mains lead, then
reconnect it.
No operation can be performed with the remote control:
Check the batteries are installed with the correct polarities (+and -), and are not worn out.
Point the remote control in direction to the unit.
Play does not start even when PLAY is pressed:
Condensation has formed. Wait 1 to 2 hours for it to evaporate.
You can only play DVD discs if the region number is the same as, or includes the same
region number as the unit, or if the DVD is marked “All“.
The disc may be dirty.
Ensure that the disc is inserted with the label on the side to be played facing upwards.
Alternative languages cannot be selected:
An alternative language cannot be selected if the disc does not contain more than one
language.
With some discs, the alternative language must be selected in a disc menu.
No subtitles:
Subtitles only appear if they are recorded on the disc.
Subtitles are switched off. Display the subtitles.
Soundtrack or subtitle language is not the one selected in the setup menu:
The language is not recorded on the disc.
Angle cannot be changed:
Only one angle is recorded on the disc.
This product may receive radio interference caused by mobile telephones during use. If such
interference is apparent, please increase separation between the product and the mobile telephone.
SOUND
No sound, distorted sound:
Check the connections. Check the volume on the equipment you have connected.
If the DVD is recorded in DTS, no sound will be output. Try selecting another soundtrack.
Turn ADVANCED SURROUND off, if it causes distortion.
Piercing noise comes from the speakers:
Ensure you have selected the correct setting for “Dolby Digital“, “DTS Digital Surround“
and
“MPEG Audio“ in the SETUP screen’s AUDIO menu.
PICTURE
Picture distorted during search:
The picture will be somewhat distorted at times. This is normal.
No picture:
Ensure that the equipment is connected properly. Ensure that the equipment is turned on.
Ensure the television’s video input setting is correct.
The picture shown on the television is not normal:
Go to the VIDEO menu in the SETUP screen and change “TV Aspect“ to suit your TV.
Ensure that the unit is connected directly to the television and is not connected through a
video cassette recorder. Ensure the "AV Output (Scart)" selection is correct for the TV input.
If you have connected to your television through the video output terminal, go to the
VIDEO menu in the SETUP screen and change “AV Output (Scart)“ to “Video“ or “RGB“.
DISPLAYS
“NO PLAY“ appears on the unit’s display:
A disc was inserted that the unit cannot play: insert one that it can.
No on-screen menu:
Go to the DISPLAY menu in the SETUP screen and select “On-screen messages - On“.
OSD- screens not displayed or only partially on the television:
Move the OSD downwards using the bar position selection.
“H “ appears on the unit’s display:
Trouble is likely to have occurred. The number following “H“ depends on the status of
the unit.
Press [
**
**
*
/I] to switch the unit to standby mode and then back to ON, disconnect the
AC mains lead, and then reconnect it.
If the service numbers fail to clear, note the service number and contact
your local dealer.
The model number and serialnumber of this product
can be found on either the back of the unit.
Please note them and keep for future reference.
Model NO.
Serial NO.
15
RQTD0003-2B

Matsushita Electric Industrial Co., Ltd.
http://www.panasonic.co.jp/global/
Specifications
Power supply: AC 220-240 V, 50 Hz
Power consumption: 11 Watts
Power consumption
in standby mode: approx. 4 W
Dimensions: 430(w) X 256(D) X 74,5(H) mm
Weight: 2.4 kg
Operating temperature range: +5° to +35°C
Operating humidity range: 5 to 90 % RH (no condensation)
Discs played: DVD-Video, DVD-R (R4.7),
CD-Audio (CD-DA), Video-CD,
CD-R/CD-RW(CD-DA, Video-CD
formatted discs)
Signal system: PAL 625/50, PAL 525/60, NTSC
Video output:
Output level: 1 Vp-p (75 Ohm)
Output connector: Pin jack/AV
S video output:
Y output level: 1 Vp-p (75 Ohm)
C output level: NTSC; 0.286 Vp-p (75 Ohm)
Pal; 0.300 Vp-p (75 Ohm)
Output connector: S terminal/AV
RGB video output:
R output level: 0.7 Vp-p (75 Ohm)
G output level: 0.7 Vp-p (75 Ohm)
B output level: 0.7 Vp-p (75 Ohm)
Output connector: AV 1
Audio output:
Output level: 2Vrms. (1 kHz, 0 dB)
Output connector: Pin jack/AV 2 ch (L/R)
Subwoofer output
[
ENG
]
RQTD0003-2B
Index
Page
A-B repeat play 9,13
ADVANCED SURROUND 10,13,15
Analogue recording 11
Angles 9,13,15
AV Output (Scart) 12,15
BASS PLUS 10,13
Batteries 2
Bitstream 11,12,14
CHAPTER 9,13,14
Chapter review 7
Child lock 5,7,12
CINEMA 10,13
DIALOGE ENHANCER 10,13
Digital recording 11
DIGITAL AUDIO OUT 4,11
Disc-formats 14
Dolby Digital 5,11,12,14
DTS Digital Surround 5,11,12,14
DVD Menu language 12
DVD-formats 14
DVD-Menu 8
Dynamic range compression 12,14
EASY SETUP 5
Fast forward, fast rewind 7
Field 12,14
Page
R
andom play 9
Region codes 14
Remote 3
Repeat play 9,13
Replaying a scene 6
Resume funktion 9
RGB 12
SET UP DEMO, DISPLAY 12
SET UP DISC, VIDEO, AUDIO 12
Shuttle dial 7
SLEEP timer 6
Slow-motion 7
Soundtrack language 9,12,13,15
Still mode 12
Subtitle language 9,12,13,15
SUBWOOFER 11,13
S-Video 12
TITLE 9,13,14
TOP MENU 8
TRACK 9,13,14
TV Aspect 5,12,14,15
Video 12
Warning 2
ZOOM 7
Page
Frame 12,14
Frame by frame viewing 8
Laser 2
Letterbox 5,12,14
Level 12
Macrovision 14
Menu language 12
MP3 menu 8
MPEG Audio 5,11,12
NTSC Disc output 12
ONE TOUCH MEMORY 10
On-screen messages 12,13
OPTICAL 4,5,11
Optical digital audio cable 5,11,14
Pal 60 12
Pan&Scan 5,12,14
PCM Down conversion 11,12,14
Play 6
Playback control 9,14
Player front display 12
POSITION MEMORY 6
Precautions 2
Progress Indicator 13
Abkhazian 6566
Afar 6565
Afrikaans 6570
Albanian 8381
Ameharic 6577
Arabic 6582
Armenian 7289
Assamese 6583
Aymara 6588
Azerbaijani 6590
Bashkir 6665
Basque 6985
Bengali 6678
Bhutani 6890
Bihari 6672
Breton 6682
Bulgarian 6671
Burmese 7789
Byelorussian 6669
Cambodian 7577
Catalan 6765
Chinese 9072
Corsican 6779
Croatian 7282
Czech 6783
Danish 6865
Dutch 7876
English 6978
Esperanto 6979
Estonia 6984
Faroese 7079
Fiji 7074
Finnish 7073
French 7082
Frisian 7089
Galician 7176
Georgian 7565
German 6869
Greek 6976
Greenlandic 7576
Guarani 7178
Gujarati 7185
Hausa 7265
Hebrew 7387
Hindi 7273
Hungarian 7285
Icelandic 7383
Indonesian 7378
Interlingua 7365
Irish 7165
Italian 7384
Japanese 7465
Javanese 7487
Kannada 7578
Kashmiri 7583
Kazakh 7575
Kirghiz 7589
Korean 7579
Kurdish 7585
Laotian 7679
Latin 7665
Latvian 7686
Lingala 7678
Lithunian 7684
Macedonian 7775
Malagasy 7771
Malay 7783
Malayalam 7776
Maltese 7784
Maori 7773
Marathi 7782
Moldavian 7779
Mongolian 7778
Nauru 7865
Nepali 7869
Norwegian 7879
Oriya 7982
Pashto 8083
Persian 7065
Polish 8076
Portuguese 8084
Punjabi 8065
Quechua 8185
Rhaeto-Rom. 8277
Romanian 8279
Russian 8285
Samoan 8377
Sanskrit 8365
Scots Gaelic 7168
Serbian 8382
Serbo-Croat. 8372
Shona 8378
Sindhi 8368
Singhalese 8373
Slovac 8375
Slovenian 8376
Somali 8379
Spanish 6983
Sundanese 8385
Swahili 8387
Swedish 8386
Tagalog 8476
Tajik 8471
Tamil 8465
Tatar 8484
Telugo 8469
Thai 8472
Tibetan 6679
Tigrinya 8473
Tonga 8479
Turkish 8482
Turkmen 8475
Twi 8487
Ukrainian 8575
Urdu 8582
Uzbek 8590
Vietnamese 8673
Volapük 8679
Welsh 6789
Wolof 8779
Xhosa 8872
Yiddish 7473
Yoruba 8979
Zulu 9085
Language codes
T
This equipment complies with European conformity requirements, in accordance
with the conditions of electromagnetic compatibility and product safety.
U
This equipment complies with the requirements of protection class 2.
This equipment complies with the safety requirements of SEMKO.
Audio signal output characteristics:
Frequency response:
DVD (linear audio): 4 Hz-22 kHz
(48 kHz sampling)
4 Hz-44 kHz
(96 kHz sampling)
CD audio: 4 Hz-20 kHz
S/N ratio:
CD audio: 115 dB
Dynamic range:
DVD (linear audio): 97 dB
CD audio: 97 dB
Total harmonic distortion:
CD audio: 0.0025 %
Digital audio output:
Optical digital output: Optical terminal
Pickup:
Wave length: 658 nm/790 nm
Laser power: Class 2/Class 1
Specifications are subject to change without notice.
Weight and dimensions are approximate.
F13H02-0
-
 1
1
-
 2
2
-
 3
3
-
 4
4
-
 5
5
-
 6
6
-
 7
7
-
 8
8
-
 9
9
-
 10
10
-
 11
11
-
 12
12
-
 13
13
-
 14
14
-
 15
15
-
 16
16


Panasonic DVDRV32EG Owner's manual
- Category
- DVD players
- Type
- Owner's manual
- This manual is also suitable for
Ask a question and I''ll find the answer in the document
Finding information in a document is now easier with AI
Related papers
-
Panasonic DVDS35 Owner's manual
-
-
-
-
-
-
-
-
-