Velleman Mobile Phone Surveillance Installation guide

Type
Installation guide

Velleman Mobile Phone Surveillance lets you remotely view and control your security cameras using your mobile phone or PDA. This pocket-sized device supports various DVR and IP camera models. Access your cameras from anywhere with an internet connection and monitor your property in real-time. Switch between single-channel and multi-channel views, zoom in for a closer look, and even control PTZ cameras. With this device, you can keep an eye on your home or business from the palm of your hand, ensuring your peace of mind wherever you are.

Velleman Mobile Phone Surveillance lets you remotely view and control your security cameras using your mobile phone or PDA. This pocket-sized device supports various DVR and IP camera models. Access your cameras from anywhere with an internet connection and monitor your property in real-time. Switch between single-channel and multi-channel views, zoom in for a closer look, and even control PTZ cameras. With this device, you can keep an eye on your home or business from the palm of your hand, ensuring your peace of mind wherever you are.

Software Installation & Setup
for Remote Surveillance via GPRS / 3G Mobile Phones or PDA
Table of Contents
CHECKLIST BEFORE USING ......................................................................................................................... 3
INSTALLATION & SETUP ............................................................................................................................. 4
Software Download ...................................................................................................................... 4
GPRS / 3G MOBILE PHONE ............................................................................................................ 6
WINDOWS MOBILE PHONE .......................................................................................................... 8
AVAILABLE FUNCTIONS ............................................................................................................................ 11
GPRS / 3G MOBILE PHONE .......................................................................................................... 11
WINDOWS MOBILE PHONE ........................................................................................................ 12
CHECKLIST BEFORE USING
Make sure your PDA or mobile phones conform to the following requirements:
Device Make sure …
WINDOWS MOBILE PHONE The operating system is Windows Mobile 5.0 Packet PC /
6.0 Professional*. Windows Mobile 5.0 Smartphone / 6.0
Standard is NOT supported.
J2ME MIDP2.0 is supported.
Internet services via WiFi or GPRS / 3G networks are
subscribed and available to use. For details, please check with
your local network operator or service provider.
GPRS / 3G Mobile Phones J2ME is supported.
Internet services via GPRS / 3G networks are subscribed and
available to use. For details, please check with your local
network operator or service provider.
The port number of the connected device (such as DVR or
network camera) is NOT 80. The suggested port number is 88.
iPhone Go to the application store and search eagleeyes.
Download the iPhone compatible software
* We do not guarantee the compatibility of the mobile surveillance software in every touch panel PDA brand with the operating system of
Windows Mobile 5 Packet PC / 6.0 Professional.
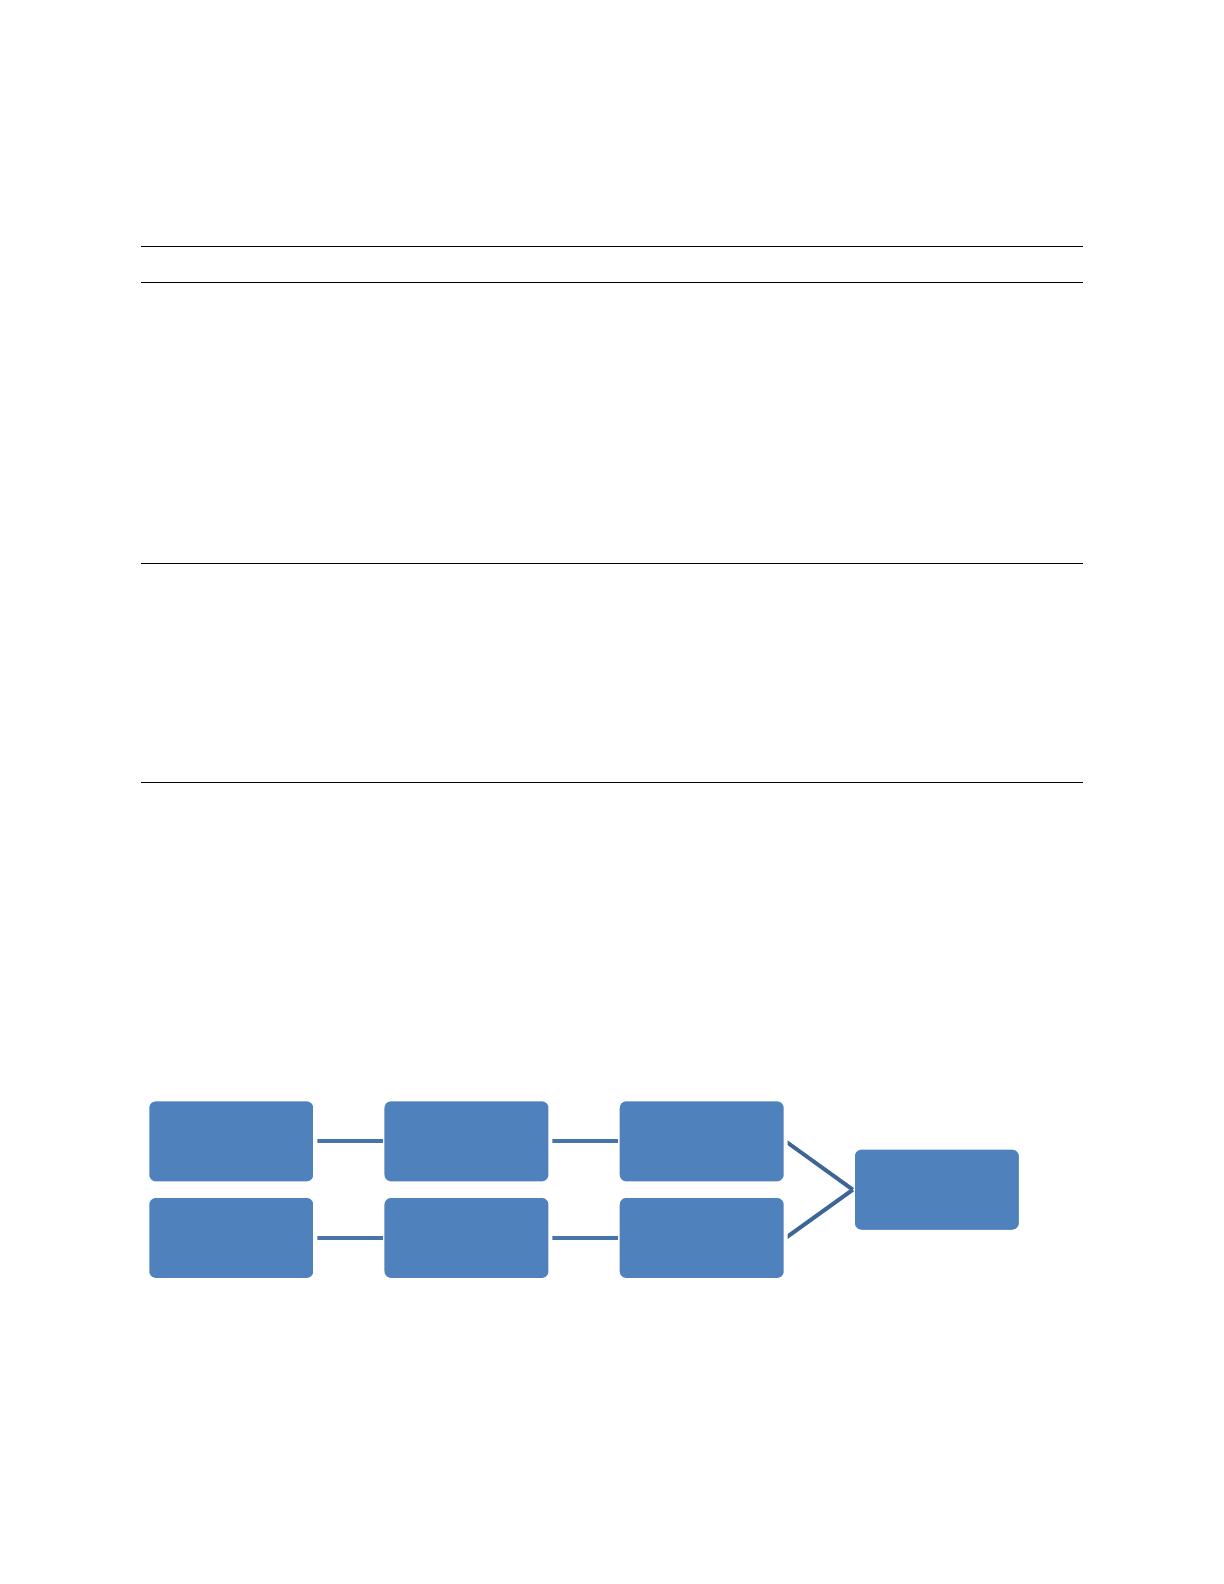
NOTE: First of all you have to set up the network configuration for the DVR and router. Check if you can
log into the DVR via a PC connected to another modem (see diagram)
Internet
Modem 1Router 1PC
Modem 2Router 2DVR
INSTALLATION & SETUP
Software Download
STEP1: To download the software for mobile surveillance, please visit the following website address
from your PDA or mobile phones: http://211.75.84.102/fae/MobileAP/index.html or
http://www.eagleeyescctv.com/
NOTE: The Internet access setting via WiFi or GPRS / 3G networks varies
depending on different PDA or mobile phone brand. For details, please refer to its individual
user manual, or check with your local network operator or service provider.
NOTE: You might be charged for Internet access via WiFi or GPRS / 3G
networks. For the Internet access rate details, please check with your local network operator or
service provider.
You will see the following five applications to download:
o BackBerry Software
o GPRS / 3G Software
o EagleEyes (J2ME New version)
o EagleEyes (For WinCE)
o EagleEyes (For WinCE New Version)
STEP2: Select the application you need and start downloading. To know which program you should
download, please refer to the following table:
Device DVR model download software
Symbian
mobile
DVR4MQAEE, DVR8N and DVR8N2
GPRS/3G Software
Symbian
mobile
DVR4H,
DVR4L3
,
DVR4L4
, DVR4L5 and
DVR16H1
EagleEyes(J2ME NewVersion)
DVR4MQAEE, DVR8N and DVR8N2
EagleEyes(For WinCE)
DVR4H,
DVR4L3, DVR4L4,
DVR4L5,
DVR8L1, DVR16L1 and DVR16H1
EagleEyes(For WinCE New Version)
BlackBerry
DVR4L3,
DVR4L4, DVR4L5, DVR4H
,
DVR8L1, DVR16L1 and DVR16H1
BlackBerry_Software
iPhone
DVR4L3, DVR4L4, DVR4L5, DVR4H,
DVR8L1, DVR16L1 and DVR16H1
iTunes application store
STEP3: Follow the on-screen instructions after downloading.
For mobile phones, the application will save to the location you specified.
For PDA, the application will save to “Programs”.
GPRS / 3G MOBILE PHONE
The setting interface of each mobile phone may vary depending on its individual brand. Therefore, the
interface shown below only illustrates the main functions of the application, and is for reference only.
For the actual display, please refer to your own mobile phone.
With GPRS / 3G software installed
STEP1: Go to the location where you save the application, and you will see the item “Supervisor”.
STEP2: Select “Supervisor” to key in the information necessary for DVR or network camera remote
access.
1. IP
Enter the IP address or hostname (ex. dyndns) of the device
you want to connect.
2. PORT
Enter the port number used by the device you want to
connect. You can use the port number from 0 ~ 65536
except 80. It’s recommended to use 88.
3. UserName
Enter the user name used to access the DVRe you want to
connect.
4. PassWord
Enter the password used to access the device you want to
connect.
STEP3: Make sure the information above is correct, and confirm the connection
set to start accessing the device remotely.
With EagleEyes (J2ME New version) installed
STEP1: Go to the location where you save the application, and you will see the
item “EagleEyes”.
STEP2: Select “Connect & View” to go to the setting page, similar as follows. Key
in the information necessary for DVR or network camera remote access.
Select “Connect & View” Create New Connection Set
1. Host Name
Give a name for this connection set.
2. User Name
Enter the user name used to access the DVR you want to connect.
3. Password
Enter the password used to access the DVR you want to connect.
4. IP
Enter the IP address or hostname (ex. dyndns) of the device you want to connect.
5. Port
Enter the port number used by the device you want to connect.
You can use the port number from 0 ~ 65536 except 80. It’s
recommended to use 88.
STEP3: Make sure the information above is correct, and confirm the connection
set to save the setting, and at the same time, you will return to the
previous layer.
STEP4: Select “Connect & View” again, and select the connection set you just
created to start connecting to the device you want.
PDA
The setting interface of each PDA may vary depending on its individual brand.
Therefore, the interface shown below only illustrates the main functions of the
application. For the actual display, please refer to your own PDA.
With EagleEyes (For WinCE) installed
STEP1: Go to “Programs” “EagleEyes” to go to the setting page.
STEP2: Click “Device” to add a connection set, and key in the information
necessary for DVR or network camera remote access.
Create New Connection Set Edit Connection Set Connection Set Created
1. Label
Give a name for this connection set.
2. (User Name)
Enter the user name used to access the DVR you want to connect.
3. (Password)
Enter the password used to access the DVR you want to connect.
4. IP
Enter the IP address or hostname (ex. dyndns) of the device you want to connect.
5. Port
Enter the port number used by the device you want to connect.
STEP3: Make sure the information above is correct, and confirm the connection
set to save the setting, and at the same time, you will return to the previous layer.
STEP4: Select the connection set you just created to start connecting to the
device you want.
With EagleEyes (For WinCE New version) installed
STEP1: Go to “Programs” -> “EagleEyes” to go to the setting page.
STEP2: Click “NEW DEVICE” to add a connection set, and key in the information necessary for DVR or
network camera remote access.
Create New Connection Set Edit Connection Set Connection Set Created
1. Name
Give a name for this connection set.
2. Transfer Method
Select TCP or UDP.
3. IP Address
Enter the IP address or hostname (ex. dyndns) of the device you want to connect.
4. Port
Enter the port number used by the device you want to connect.
5. User Name
Enter the user name used to access the DVR you want to connect.
6. Password
Enter the password used to access the DVR you want to connect.
7. Stream Format
Select MPEG4, JPEG or H.264 (if available).
8. AV Option
Select VIDEO, or VIDEO / AUDIO.
STEP3: Make sure the information above is correct, and confirm the connection set to save the setting,
and at the same time, you will return to the previous layer.
STEP4: Select the connection set you just created to start connecting to the device you want.
AVAILABLE FUNCTIONS
When the installation is completed, you can start the remote surveillance via your device now. The
functions available are depending on the remote device you have, and the software you installed.
For details, please refer to the following sections.
GPRS / 3G MOBILE PHONE
With GPRS / 3G software installed
a) DVR Mode
- Single channel switch
- 4-cut / 9-cut / 16-cut display mode switch
b) PTZ Mode
- Hot point
- Auto pan
- Zoom in / out
- Focus in / out
DVR Mode PTZ Mode
With EagleEyes (J2ME New version) installed
DVR Mode
- Single channel switch
- 4-cut / 9-cut / 16-cut display mode switch
- Quality change
DVR Mode - Main Panel DVR Mode - Quality Select DVR Mode - Quality Options
WINDOWS Mobile
With EagleEyes (For WinCE) installed
a) DVR Mode
- Single channel switch
- 4-cut / 9-cut / 16-cut display mode switch
- Snapshot
b) PTZ Mode (from left to right)
- Preset point 1~16 selection (switch to DVR and click “CH”)
- Focus near / far
- Zoom in / out
- Max Zoom in / out
- Auto pan
- Pan / tilt / zoom control
DVR Mode
PTZ Mode
With EagleEyes (For WinCE New version) installed
a) DVR Mode
- Record / playback at the remote site
- Playback
- Channel switch
- Remote independent operation
- 4-cut / 9-cut / 16-cut display mode switch
- Quality change
b) PTZ Mode
- Record at the remote site
- Pan / tilt / zoom control
- Auto pan
- Auto Tracking
- Focus near / far
- Preset point 1~16 selection
DVR Mode PTZ Mode
  • Page 1 1
  • Page 2 2
  • Page 3 3
  • Page 4 4
  • Page 5 5
  • Page 6 6
  • Page 7 7
  • Page 8 8
  • Page 9 9
  • Page 10 10
  • Page 11 11
  • Page 12 12
  • Page 13 13
  • Page 14 14

Velleman Mobile Phone Surveillance Installation guide

Type
Installation guide

Velleman Mobile Phone Surveillance lets you remotely view and control your security cameras using your mobile phone or PDA. This pocket-sized device supports various DVR and IP camera models. Access your cameras from anywhere with an internet connection and monitor your property in real-time. Switch between single-channel and multi-channel views, zoom in for a closer look, and even control PTZ cameras. With this device, you can keep an eye on your home or business from the palm of your hand, ensuring your peace of mind wherever you are.

Ask a question and I''ll find the answer in the document

Finding information in a document is now easier with AI